jkelly
-
Posts
147 -
Joined
-
Last visited
-
Days Won
1
1 Follower

Recent Profile Visitors
8429 profile views


jkelly's Achievements
")


-
 I'd buy another hoodie too. I got fat. Also, I'd buy a cap.
 -
I did! It was just a matter of getting the correct settings. It was tricky because even with the correct settings it idled poorly due to other tuning issues which made me think it was wrong. Ill post my settings tomorrow for posterity.
-
What does plumbers compound on the bleeder threads do? Yeah, I've been using the tapping method with the back end of a screw driver. I'm hoping to get back at it this weekend and get this rest of the air out, although, the pedal did seem a little stiffer yesterday than the day before. Interesting regarding the Wilwood quality. That's disappointing to hear. It seems like half the tools and parts I come across are poor quality. For example, I had an OTC double flare die split in half when making my final double flare just the other day. I'm going to give the Mastercool hydraulic tool a shot.
-
I unbolted each caliper and bleed them with the bleeder facing up at the highest point. Some air came out and the brakes are a lot better now and the car can actually stop. They're still quite squishy so I'm missing something.

-
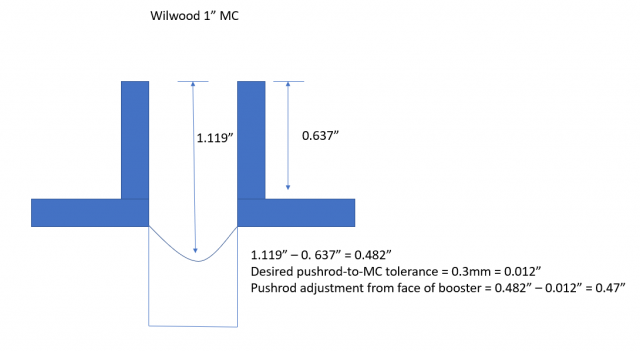
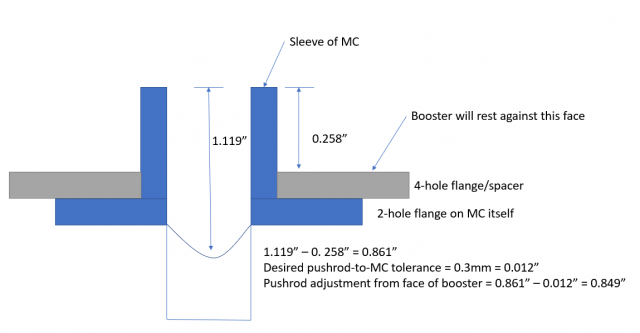
I was actually referring to a cylindrical spacer I made to lengthen the push rod. I removed that and didn't put it back. Your advice reminds me, though, that I didn't take my measurements with the flange/spacer installed between the booster and the MC, so everything is off by about 0.5" (thickness of the flange). Here are the measurements and adjustment I made to the push-rod last night., but again I forgot to take into account the aluminum 4-hole flange/spacer between the booster and MC. This would add approximately +0.5" to the push-rod adjustment. I took a measurement of the 4-hole flange/spacer and it should change my adjustment by: Can you confirm my approach? I'm not sure how you went from 0.39" measurement to a 0.53" adjustment. Also, thank you for the caliper bleeding tips. My bleed screws are not at the top of the caliper at all, so I will try the bench bleed technique you recommended after correctly adjusting the push-rod. EDIT: @Miles Disregard my comment on how you got from 0.39" to 0.53". I didn't catch that it was illustrating the adjustment to a 240z stock push-rod position to accommodate a 280zx MC. Thanks.
-
This may end up being a long post because I want to highlight all of the things I've tried to get the brake pedal to not depress all the way to the floor. 1. I believe the brake booster is a 280zx booster. I had to widen the holes in the fire wall to get it to fit. I purchased the booster from O'Reilys. 2. I did the maxima caliper swap on the rear. 3. All brake lines to calipers are steel braided. 4. I removed the stock proportioning valve insides and converted it to a pass through splitter. 5. I first tried a 7/8" master cylinder and bleed the brake using several methods includ8.ing a pressure bleeder, traditional bleeding, and even an electric pump. 6. I thought that maybe the booster push rod wasn't quite long enough so I put a spacer in the end of the master cylinder. The brakes then worked well enough to stop the car, but only at the last 0.5" of travel. 7. I then removed the spacer and adjusted the push rod to almost touch the master cylinder plunger. The brake pedal still went to the floor with no stopping power. 8. I then removed the booster and checked that the reaction disc was still on the push rod. It was. I epoxied it to the push rod just in case. I reassembled the booster. I set the push rod clearance to 0.3mm. 9. I bench bled a 1" Wilwood master cylinder until there were no bubbles. I removed the check valve from the rear brake outlet. 9. I installed the 1" Wilwood master cylinder. 10. I installed a Willwood proportioning valve/switch in place of the stock brake switch/valve. 11. I bleed the brakes using the pressure/pump bleeder. It's basically a round-up sprayer with a cap you place on each reservoir and pump it up to 15 psi or so. I started at the furthest away wheel, then the rear left, the front right, the front left, and finally the MC itself. No bubbles come out of the calipers unless I loosen the bleeder a lot, at which point I think it's sucking in air from around the bleeder screw so several small bubbles show up at that point. After bleeding the pedal still depressed to the floor. 12. I then got a helper to pump the brakes and I bled each caliper the traditional way. The pedal STILL went to the floor. I'm out of ideas and at a loss. Especially after dripping brake fluid on the fresh paint and melting it. Does anyone have any ideas that might help out? Could the calipers themselves be screwed up? Is there a second bleeder on the calipers that I need to bleed?
-
Great. I didn't know that. I had heard that the 71C is a little stronger than the T5 BW so I've been looking for the 71C. Do you know if the SR20 5 speed has the same gear box as the KA24 5 speed?
-
Looking for an '89 - 98' 240sx KA24DE (FS5W71C) 5 speed transmission.
-
Dyno and u-joint replacement advice
jkelly replied to jkelly's topic in S30 Series - 240z, 260z, 280z
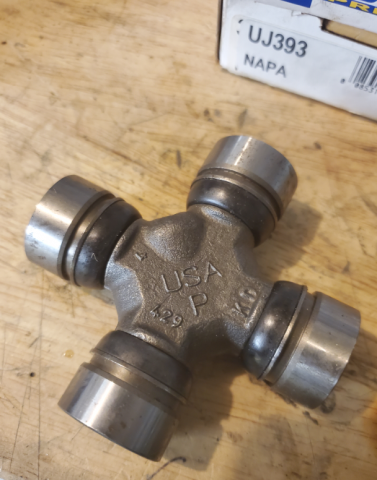
I added fresh Redline MT90 and diff oil to the transmission and diff, but the ujoints oddly do not have a place to add grease or take out a plug. The part number on them is Koyo KC1819D. Is that the stock part? Here is a video of one of them: 20200708_173153.mp4 -
Dyno and u-joint replacement advice
jkelly replied to jkelly's topic in S30 Series - 240z, 260z, 280z
I took a look and didn't see the plugs in the current u-joints. Not sure if they had different ones that did have the plug. These are labeled Koyo. -
Dyno and u-joint replacement advice
jkelly replied to jkelly's topic in S30 Series - 240z, 260z, 280z
That all makes sense to me. It's primarily a street car and weekend cruiser, so I don't plan to make huge HP and torque. The tires are close to stock as well. Thanks! Maybe I'll report back with some dyno numbers in a week or two. -
Dyno and u-joint replacement advice
jkelly replied to jkelly's topic in S30 Series - 240z, 260z, 280z
Great. Thanks for the feedback -- I appreciate it. Do you have any data points on at what torque the outer stub axles and/or diff carrier gears start to fail? There are of course a lot of other variables like the condition of the splines and gears, but I'm just curious so I can have a "do not exceed" number for the dyno tuner. -
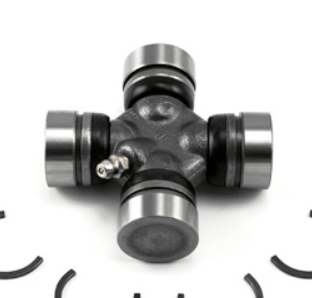
Hey guys, So I'm getting ready for a trip to the dyno after my fresh rebuild and Megasquirt MS3X install. The engine is all fresh and I've barely driven it. One thing I didn't do is replace the original halfshaft and driveshaft u-joints. I have some new NAPA UJ393s for the halfshafts and NAPA P391s for the driveshaft that I plan to put in before the dyno run. My question is, would it be better to order the heavy duty u-joints from MSA or will the NAPA u-joints be fine? Differential is the original R180. Planning to make around 300HP this first round. Link to heavy duty joints. It looks like they have more meet around the trunion compared to the NAPA ones. https://www.thezstore.com/page/TZS/PROD/22-3004 Heavy duty: NAPA:
-
My '72 240z project -- Rotisserie Restomod
jkelly replied to jkelly's topic in S30 Series - 240z, 260z, 280z
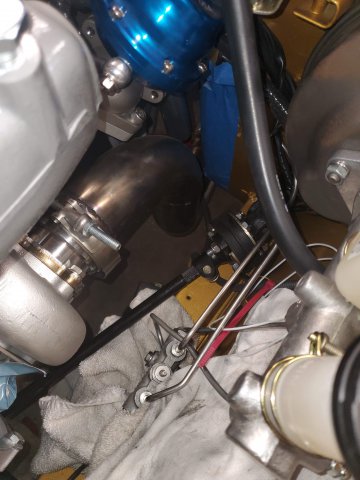
Installed the steering column and steering coupler. The steering coupler shaft interferes with my turbo oil drain, so I ordered 90" 3/4" barb for the drain that should solve the problem. Hoping for a maiden voyage this weekend!
- 76 replies
-
- 1
-

-
- restoration
- metal fabrication
- (and 19 more)
-
Digging the village ski hill! Nice composite work, too. What are you repairing on the bottom of those three scoops? Looks like some Everglass in there. It kind of looks like the composite cracked off further in and that's what you're replacing?