Search the Community
Showing results for tags 'upgrade'.
Found 7 results
-
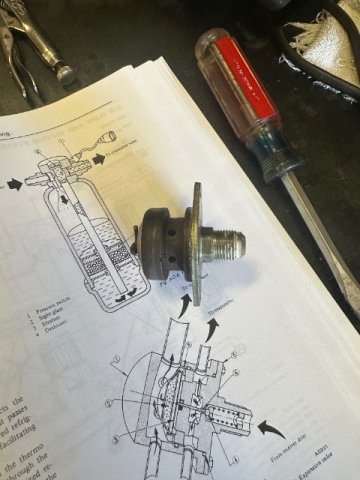
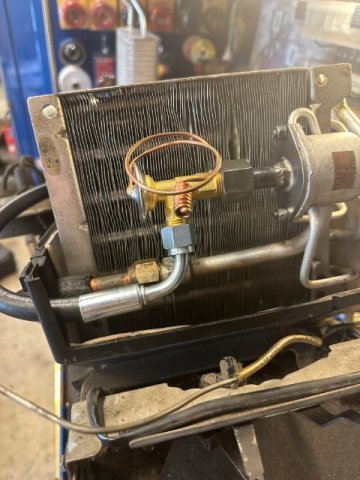
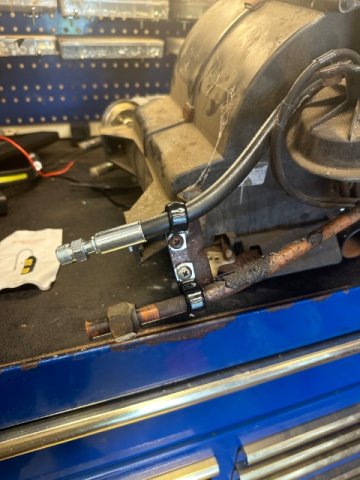
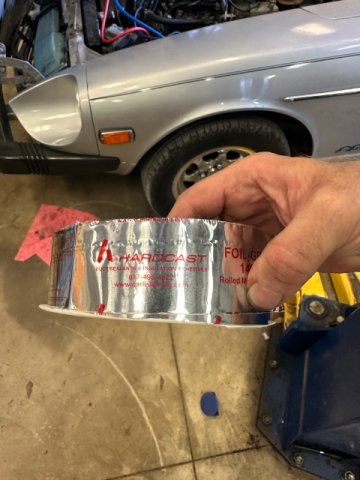
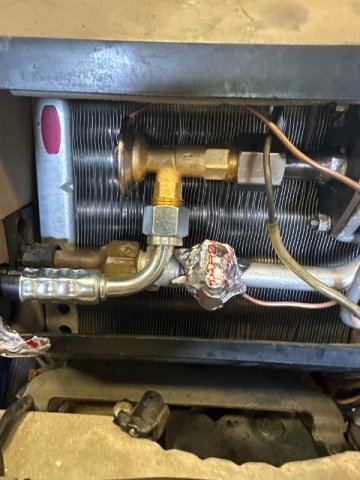
Edit: 75-78 280Z. I am editing this post to add my expansion valve modification. It will take a while to finish this post be patient. Yes I will add part numbers. End edit. If anyone is looking for the stock expansion valve o-rings which are NLA, for the outside sealing ring use a 1-1/2”id x 1-11/16”od x 3/32”cs also known as AS568-128 HNBR. The inside ring is 1-1/2”id x 1-5/8”od x 1/16”cs also known as AS568-029 HNBR. I purchased mine at www.Theoringstore.com . It took a few tries. Hope this helps somebody. Edit: EXPANSION VALVE MOD. First off, I don’t believe this mod is for everyone. If you have the $, my recommendation is to purchase Auto AC Solution’s new evaporator core. 1. They have the expansion valve in the proper orientation for longevity. 2. They put in the work to design this thing and deserve a return on their investment. 3. Your evaporator is barking 50 years old. https://autoacsolutions.com/products/1972-1973-1974-1975-1976-1977-1978-datsun-nissan-240z-260z-280z-a-c-evaporator-core-with-expansion-valve-factory-direct-drop-in-replacement/ One caveat though, the FSM shows replacing the evaporator with the dash installed. I believe this near impossible. To do this mod you will need: 1. AC hose crimper set. 2. Four Seasons #38616 expansion valve. 3. 2 feet of #6 reduced barrier ac hose. 4. Straight Reduced Barrier male #6 o-ring fitting. Four Seasons #18086. 5. 90 degree Reduced Barrier female #6 fitting Four Seasons #18086. 6. Straight female flare OR female o-ring STEEL fitting. 7. If you select #8 female flare, you will need a #8 o-ring to flare adapter. Four Seasons #16748. 8. Tig welding capability. 9. Drill bits as close as possible to the outside diameter of your #8 steel fitting tube. 10. Dremmel tool with burrs and cut wheels. First mount the valve in your vice using soft jaws or wood blocks. DO NOT MAR THE O-RING BEARING SURFACE! Next working up to a 1/4” bit, drill to remove the orifice tube (6.) Once the orifice tube is removed, continue drilling all the way through the bulb (1.) Use a dremmel tool with a burr to remove the bulb and the material inside. DO NOT KNICK THE O-Ring BEARING SURFACE! (Warning: I do not know if the material in the bulb is hazardous. The material is black graphite looking flakes. Recommend a dust mask at minimum.) You will end up with this. Later, you will weld a bolt in this hole. Now look at the first pic. Cut off the “nipple” of the valve just even with the nut boss. (That sound bad doesn’t it?) Do not cut the boss off. You need the material for welding. Now measure the outside diameter of your selected #8 female STEEL fitting. You need a drill bit as close as possible to that size. (Note: I elected for the flare fitting. I used an original one from the hoses I changed going to the condenser. The Datsun fittings have a very hefty wall thickness and I wanted the thickness for weld “meat”. I can’t tell you the thickness, as I had mine machined to almost an interference fit.) You will drill out the boss only to the top of the expansion chamber. DO NOT DRILL PAST THE EXPANSION CHAMBER. The expansion chamber is the hollow just beneath the ball seat (4. In first pic.) You now need to cut the barb off your #8 straight female STEEL fitting. I did this in multiple steps and did not take a final measurement. This is what you need to consider: 1. The depth of insertion is flush with the top of the expansion chamber ceiling. Do not block the expansion chamber outlets with the fitting. 2. You want as small of an assembly as possible. Too long and you could run into clearance issues inside the evaporator suitcase once you mount your new expansion valve. 3. The fitting needs to be long enough to allow full pull back of the b-nut so you don’t risk cross-threading the b-nut on your new expansion valve. See next pic. Remember that 1/4” hole on the other side? Select a bolt which fits the hole. Cut the shank down to where it does not enter the expansion chamber. (If you are wondering why you removed the bulb now, there are two equalizing orifices (#8 in first pic) which lead to the expansion chamber. Their purpose is to allow pressure equalization so the diaphragm may operate independently of pressure. Failing to defeat this would allow refrigerant to bypass the evaporator.) Weld everything in place. I took mine and had it tig welded as I did not trust my own skills. The above jumps the gun a little bit, but I didn’t take pics of the final product. Notice how little room there is from the edge of the hose fitting to the wall of the evaporator housing. The suction hose needs about that much clearance so it may bend without kinking. Dremmel a 1/2” hole in the evaporator case centered in the space available next to the #8 suction hard line. Sorry no pic again, but you can see where the hose passes through the wall. Now fabricate your hose. (My hose was cut to 22-7/8”. Your hose length will vary due to your insertion depth of your expansion valve modification and fitting lengths are different between manufacturers.) Step 10 will cover hose fab taking into account these differences.) That will be long enough to take into account small variations in fitting sizes. One end will be a #6 male o-ring straight and the other a #6 female o-ring 90 degree. With one being a straight fitting, you may ignore fitting clock orientation. No pics for a while now. Time for the actual install. 1. Evacuate system. (Environmentally conscious of course.) 2. Disconnect #6 high pressure fitting at bulkhead and remove bulkhead grommet cover and grommet. 3. Use dremmel cutting wheel, cut #6 copper line at each hold down bracket on the side of the case and before the b-nut on the existing expansion valve. 4. Remove all #6 copper lines. Leave the brackets in place to hold the #8 line. (The bracket hold own screws are impossible to access.) 5. Dremmel a 1/2” hole in the case in the space next to the #8 copper line. Be patient. Don’t nick the copper line! 6. Vacuum up all of your debris. 7. Remove expansion valve and modify it. 8. Install modified expansion valve. (Note: I had wire wheeled the o-ring bearing surface on my valve multiple times. Resultantly, my new green o-ring for the inside housing no longer fit. I ended up using an old black one I had saved. 9. Install new expansion valve. If you used a #8 female flare, you will need the flare to o-ring adapter. Use nylog to lubricate the o-ring and the sealing faces of the flares. The expansion valve comes with a #6 flare to o-ring adapter. Keep it, you will need it later. Don’t worry with the capillary tube yet. 10. Crimp the straight male hose end on your hose and insert through the 3/4” hole in the case and route the hose as in the pics above. Temp install the straight connector onto your copper flare connector. Do not torque. Note the hose is between the vacuum actuator and the case. I did NOT clamp this hose in place. My pictures are from my mock-up. The screws for the brackets are impossible to remove without removing the entire evap case housing. 11. Temp Install the female 90 degree hose end to the expansion valve. Make a mark on your hose and cut long. Cut your hose shorter if necessary to have proper insertion length in the ferrule. Unscrew the straight fitting and 90 degree fittings. Pull the hose out far enough to crimp the 90 degree fitting to the hose. Reinstall the hose assembly by temp installing the 90 degree fitting first. (This is important to avoid orientation issues.) Don’t forget to nylog the o-ring. 12. Install the male hose fitting on the female copper fitting inside the bay utilizing the #6 flare adapter that came with your new expansion valve. (I attempted to reuse the original screen filter but it did not fit inside the male o-ring fitting.) Don’t forget to nylog the flare faces and the o-ring. Note: the flare adapter fell out for me and I did not notice. This resulted in a MASSIVE leak which caused me to run down a rabbit hole researching new engine bay part. -then I found the adapter underneath my car. 13. Carefully unwind the capillary tube and use a hose clamp to hold it snugly against the evap outlet tube. Position it as close to the B-nut as possible. This is to allow the evap to get as cold as possible. SNUG! Don’t crush the capillary tube. The goal is to insure contact. Ensure the capillary tube does not chafe against anything. I used this stuff to insulate the capillary tube and patch up the resulting holes in the evaporator case. It’s pricey, but it was left over from me cleaning my home’s evap coils. You can buy it at your local HVAC supply. And that’s it. Put your panels back on and service per FSM procedures using pressure charts for your desired refrigerant. I use Duracool. 43% humidity, 93F. Fan clutch engaged. 1500 RPM. Windows up. Car in shade.

-
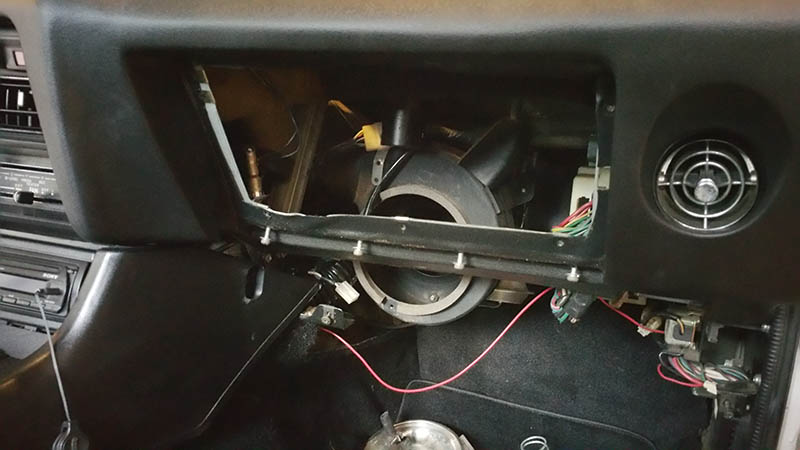
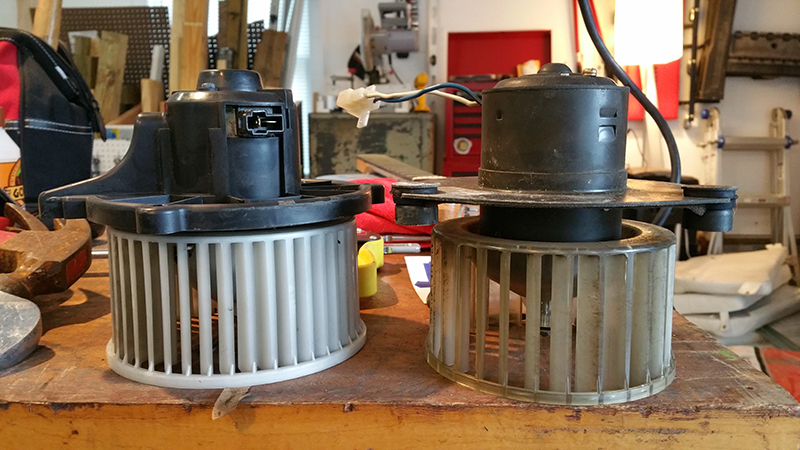
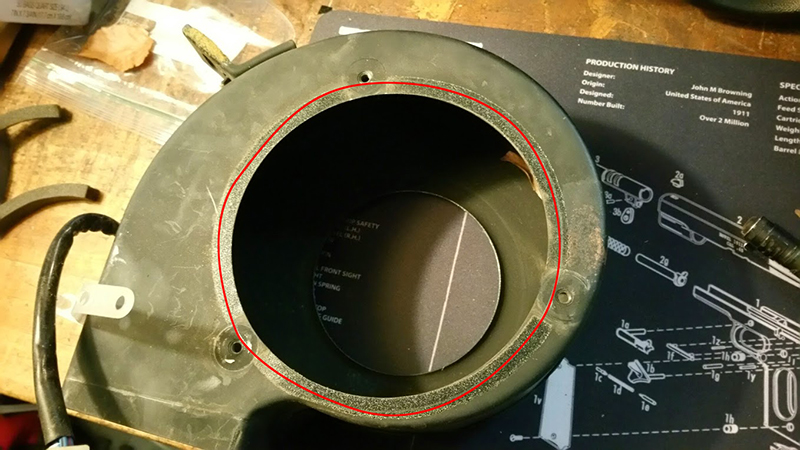
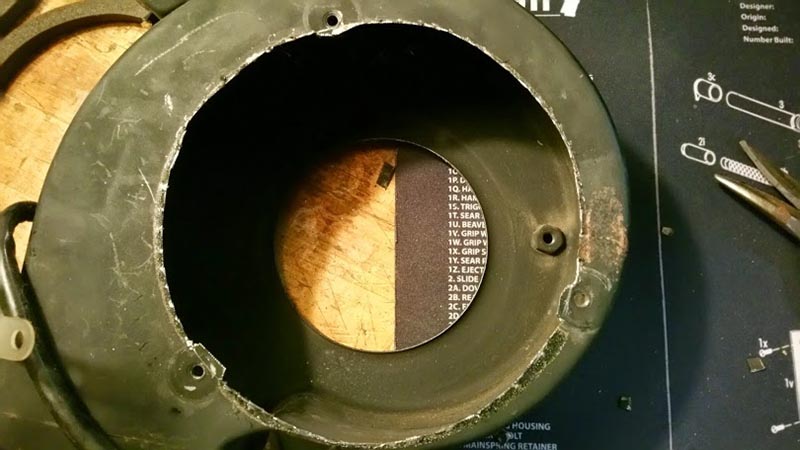
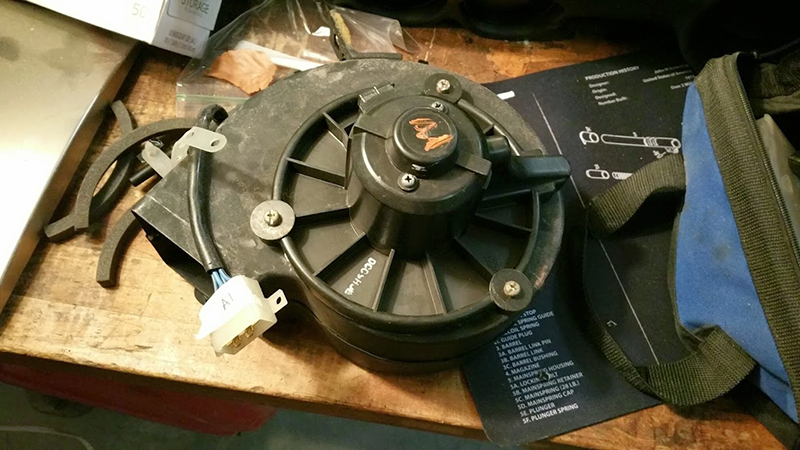
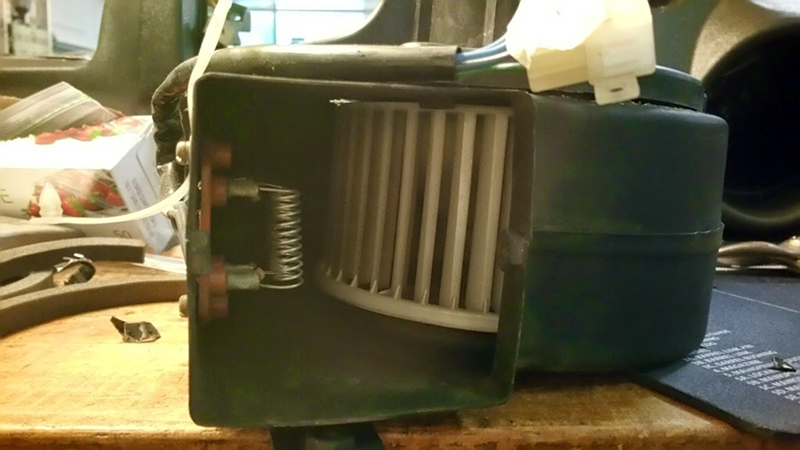
I spent several days researching ways to improve the air output on my 76 280z and wasn't able to find a really nice walk through, so I thought I'd share what I did. It looks like most of the people who put 1988-1991 Honda Civic blowers in their Z weren't able to feel a big difference. I noticed some people also suggesting using 1993-2004 Kia Sportage blowers. So, off to my junk yard I went. I found both a Civic and Sportage blower. After comparing the two, the Kia blower seemed better built and had a larger cage so I bought it for $30 and proceeded to my Z. The nice thing about this upgrade is that the Kia blower is roughly the same size, it rotates the correct way, it uses the same wire harness, and it uses the same mounting holes. It just so happens that I have taken my dash out to install a dash cap and add LED instrument lights. I don't know if you could do this upgrade with the dash in place because the entire blower housing has to be removed. This is the guide I followed for removing my dash (PITA!) http://www.classiczcars.com/topic/5934-removing-dash-and-interior-for-paint/ Here is the blower housing location The original blower and cage are on the left. The Kia unit is on the right I removed the foam padding from the fan housing since the kia unit doesn't need the extra spacing. Next, I placed the Kia blower cage over the hole, lining up the bolt holes, and marked the area to widen. I highlighted this in red. Using some aviation snips, I cut out the excess metal. I cleaned up the hole with my Dremel later. I then placed the new Kia unit in the blower housing and secured it using the original bolts and washers. The unit spins free and has just enough clearance The original Z wire harness fits right into the new motor. I plugged it in to make sure it works and it really seems to put out some air. I'll post another update once I get the dash back in.
-
 Hello Guys, first post and straight a brake thread - I`m sorry, but I read hours on hours in the FAQ section and in a lot of other brake related threads but couldn't find anybody who has done this. So on the weekend I bought a 78 280Z and I´d like to go down the performance road while still keep it kinda periodic correct so I don`t get problems with TÜV in germany and a historic licence plate. So the car will get fully striped down, an exterior backdate to 240z, suspension upgrades, fender flares, exhaust, maybe tripple weber (have to inform myself a bit more on that vs EFI) etc. etc. A lot of people go straight to a rear disk brake conversion and complain about the brake bias and sometimes even damaged axels due to a different load on them compared to drums. Basically thats not what I wanna do plus the TÜV thing mentioned above. But what about keeping the drums in the rear, change the front to S12W and go with a 15/16 master. If I`ve seen that correctly thats what they did back in the day with the original FIA brake upgrade out of the competition catalog. They just went with 13/16 wheel cylinders inside the drums. (not sure about the mastercylinder with FIA brakes...) I just can`t find the size of the original cylinders inside the drums... Somebody did that conversion here in the forums? Is it working well with the original proportion valve or is a manual one capable of dialing in a proper brake bias? Probably have to run a couple calculations to find out (which seems not that easy with drums). But as of the drums are able to create a higher brake force with less hydraulic input they should work better as a rear disc conversion. What do you think? Any help or experience is welcome
 -
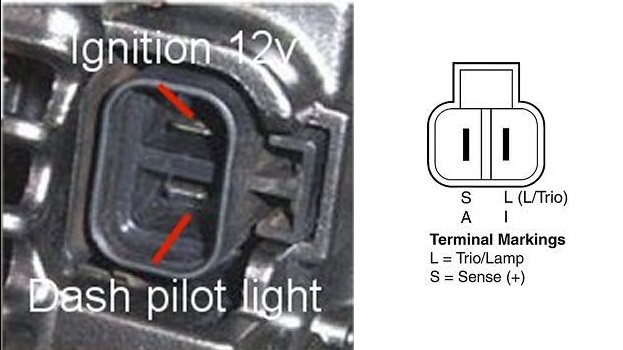
Sooo, I thought of doing a small write up after I did this today, so this will not be my best write up... Pictures will suffer, but I tried to pull all the information together. I have added some generic pictures, and how to re-wire your car to use an internally regulated alternator. (not my instruction on how to rewire) First things first... WHY do I need to upgrade?! Well, if you're like me, I now two fuel pumps, two electric cooling fans, blah blah blah... When my car was at idle, I could hear the pumps complaining, and if my fans came on, forget about it. Was it a grounding issue? No, my car has a full painless rewire, and I have more grounds then girls you stalk on instagram. My initial upgrade was to an 84 maxima alternator. While this put out 60 amps, it definitely did not put out enough amps at idle. I am not sure if this lead to the death of 3 Odyessy batteries, but I will soon find out. On to what you came here for. My first want here was bolt in, as in no cutting, making a brackets. (I have power steering and didn't want to undo a bunch of stuff) This ruled out the GM alternators, as you have to cut up the stock bracket. I spent a few hours on rock auto searching for all the combinations, amp, ear locations and have come up with the below. 1994 SOHC Nissan Maxima GXE Alternator (i believe this starts in 1991 up to 1995) 1990-1995 Nissan Pathfinder Pulley OR 1990-1995 Nissan D21 Pick up Pulley (I ordered a 1992 pathfinder pulley and i know this works) The Maxima Alternator puts out 90 amps, but at idle put out 58 amps! I looked at the Nissan Quest, and while it puts out 110 amps, it only put out 41 amps. So the clear winner for me here was the Maxima. Plus, it would take no fabrication to "bolt in". (the idle amps may vary, but this is what i found after buying a whole heap of alternators at once) The Pulley: almost all the higher amp alternators use a ribbed belt, vs a V-belt. After much searching, the best combination was to find, purchase, junk yard the v-belt pulley from a Pathfinder and put that on the 90 amp Maxima alternator.I used an impact to swap the pulleys with a little red loc-tite. The Wiring: I didn't need to do this due to my Painless harness install, but if you are still stock read the following site! Or search how to swap to a later Datsun alternator for more details on going from an external regulated alternator. (if this applies to you) Alternator rewire - click me There is now a plug for the Light/Sensing wire. Below is the diagram of the pins for that plug. You can either buy this connector/plug online for a few bucks or use spade connectors. I had bought the plug, and misplaced it, so I used blue female spade connectors. The adjustment bracket: I had already bought one of these adjustable guys yearrsss ago, so it worked well with this. You may be able to use the stock one with slight bending or buy/make one of these adjustable guys. I believe the guys over on Ratsun have a how-to on how to make these, or I could just be mixing that up with another site. Otherwise, just buy one them... As always with electrical work, ensure you unplug your battery, etc. I take no liability for you setting everything around you on fire, etc. When upgrading anything electrical, be sure all wire upstream are in good shape. I cannot stress this enough; higher amps is not going to fix an electrical system with hacked up wiring, bad grounds, etc. Be sure everything electrical is in good shape before doing this!
-
 I have read every post I can find on brake upgrades and have run into an issue I hope someone can help with. I have a 4/73 240 with a brand new 8.5" booster that I really dont want to replace, but will if I have to. I also have the non vented Toyota 4x4 calipers on the front with stock drums in the rear. The master is a stock 7/8" unit and the fluid volume is not sufficient to operate the new calipers to full brake pressure, which is exactly what numerous posts have mentioned. I have read and heard countless stories about premature failures in the 15/16" rebuilt masters ('79 to '81 ZX?), so I have been looking at the 1" Tilton, which looks like a good unit. However, I have read in my many searches that using the Tilton with the 8.5" booster gives a very stiff pedal and high braking effort. I dont really want that feel when I'm just cruising most of the time. I did auto cross my last Z at times, and may do the same with this one, but it will mostly be used for fun runs and the like. So, my question is, what to do?? Is there a good vendor with reliable 15/16" masters? Am I wrong about the 1" Tilton/8.5" booster combination? I tried another larger booster, from an unknown year Z, but it didnt fit. The diameter measured out around 10.5" but that could be off a little. The bolt pattern was correct to the firewall, but it hit the throttle bracket going in. It also looks like it will interfere with the clutch master, but it is out of the car so not sure. Maybe this one is just too large and their is another year that will fit?? Thanks in advance Bill
 -
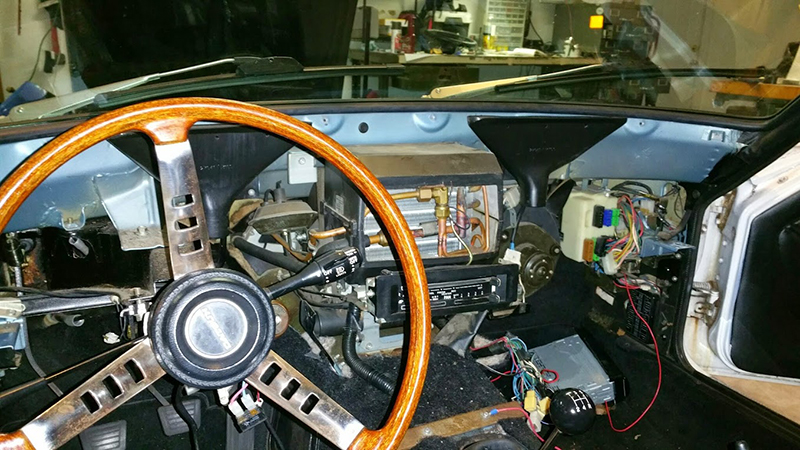
Stock 280z setups use a vacuum system powered by manifold vacuum to operate various the water cocks and FICD. On a turbo system, without the vacuum accessories like the tank and VCM, using the heater is theoretically difficult, plus the control panel looks out of place in the surprisingly modern interior of the s30. So why not swap out all the vacuum actuation, and the mechanical linkage, and install the modern HVAC controls from a newer vehicle? Has anyone done this? My overall dream is to make my s30 a formidable GT even by modern standards, and it's coming along well. If nobody has tried this, I may need a few pointers as to vehicles with relatively standalone HVAC controllers. A 2000s Mustang comes to mind. The more I can shrink the size the better the end result.
-
Someone pointed out to me recently that one of my fuse blocks had been cut out, and the remaining wires wire-nutted together. And the other fuse block had wires connecting the terminals, as opposed to fusible links. So, I wired in the distribution block. On my car, it's (the installation guide online, I think it's on atlanticz) showing 3 of the wires get a 50a fuse, and one gets an 80a (for a 77 model year, which mine is). So, it didn't matter which wire went where in the block as long as the wire needing the 80a had an 80a fuse. Checked out a wiring diagram online. It appears that three of the wires go to the same plug, while one of them goes to the alternator. Makes sense this would be my 80a (I tried searching this but was surprised not to find anything that explained differentiating these 4 wires. I know I saw it somewhere...). So, I checked for continuity between the alt plug and each of my 4 wires at the fuse block. Found one wire with continuity, so I stuck the 80a there, and the remaining 3 slots got the 50a's. I also put in a key switch (from Black Dragon) between the starter and the pos terminal on the battery. After I get the car back together (painting and pretty thorough budget frame-off), I'm gonna wire the stereo and fans straight to the battery with an inline fuse (and toggle switches for the eng fan and ac fan). I figure that way I won't lose my stations if I take the battery key out. And later, I'd like to get the megasquirt to control the engine fan, but I'm putting it off at the moment bc of time constraints (moving in...2 weeks?). And the fans will all get their own relay. My question is....Does all that sound right? I've been looking at this car for 6 months and I feel like Jack Torrance in The Shining. So, does all that sound logical and won't immediately burst my car into flames?