-
Member Statistics
32618
Total Members2093
Most Online
All Activity
- Yesterday
-
I might, haven't decided yet, but it does seem like the best solution at this point for my goals.
- Last week
-
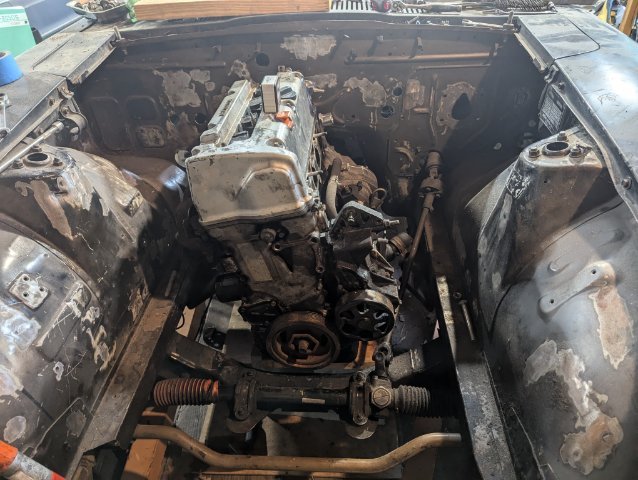
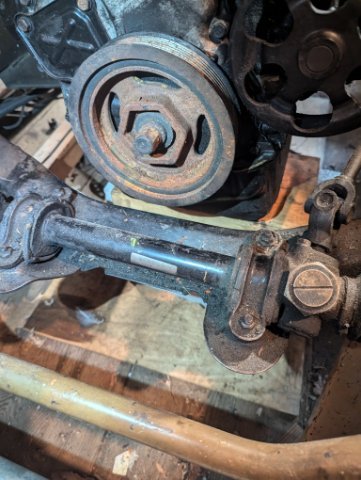
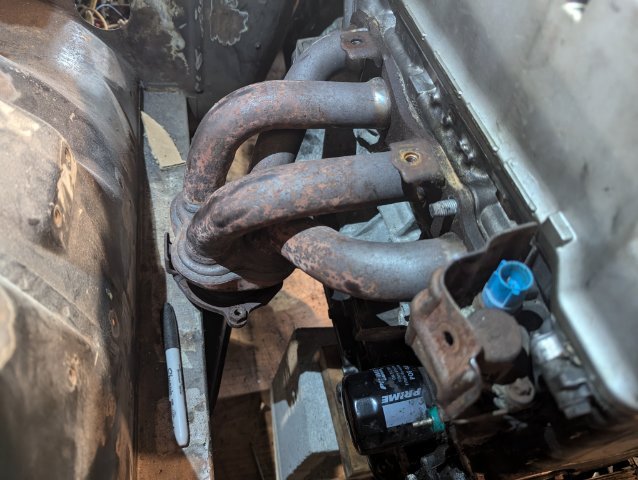
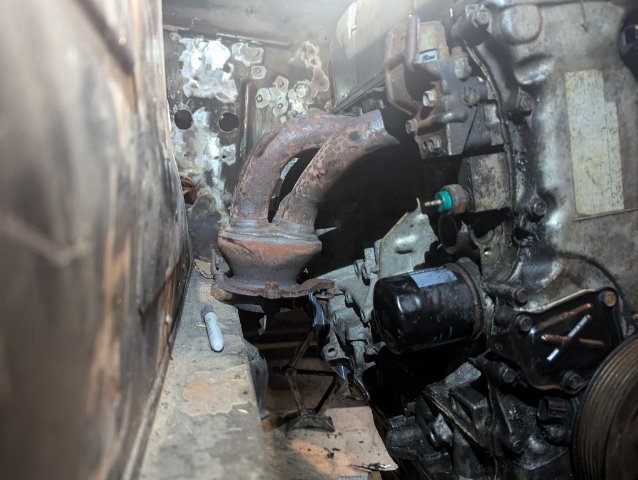
Well it's far from exactly where it needs to be, but getting a picture for how it will fit and come together. SEMA ready! But in all seriousness, plenty of room for the rear sensors and water neck + cap Hood should clear by a mile in this position (since the center sits fairly proud of the inner fender seam). I think this would leave enough space for pulling the pan without pulling the engine as well as plenty of space for getting belts on. I thought for sure this would sit further forward leaving so much room behind the engine at the firewall. So, that leads us to the real challenge, making the OEM exhaust manifold fit: Now, I already planned on putting a v-band on that so the OEM bracket can come off anyway. So I'll need to take some measurements of the ID/OD at various points, and see if I'd have to put on a 4" v-band then maybe transition to a neck down to a 3" to get it cut far enough up to work. Alternatively I could cut the runners up by the head and add some angle up there (could just cut them 90% through, close the gap and weld them easily enough). This would definitely tuck the manifold in closer to the block, though either way there's still the planned cutting at the other end for a v-band. Just might give me more room and options. And in all that, I need to also figure out fitting the mounts around the manifolds. The intake side should be "easy" because the manifold doesn't want to occupy the same space as the mount, but the steering shaft does. So there's that. I might mock up the intake manifold this weekend simply for some aesthetic motivation. Edit: Oh, and the oil pan is sitting about 3/4" below the cross member. Still well above where the floors sit, but I have the space. Might be worth it raising the whole thing up that much since I have that clearance (and more) above the transmission currently. Won't entirely solve the exhaust manifold fitment, but might make it a touch better.

-

Twin cam head for the L6 from Derek at Datsunworks
Derek replied to Derek's topic in Nissan L6 Forum
I've sold 22 heads. -
Are you ordering this kit and the matching front kit? Seems like it solves your issue perfectly
-
10 years seems impossible. How many have you sold now?
-

Apex Engineered suspension and brakes
manimal replied to Apex's topic in S30 Series - 240z, 260z, 280z
Z32 front rotors are 5 lug 280mm OD, 240sx rear are 258mm OD. The Z32 calipers are dual 40mm pistons and the 240sx rear caliper is 38mm with a built in parking brake mechanism. The balance would be pretty close to stock 300zx with a bit more front bias since the Z32 has a 297mm rear rotor with the same 38mm caliper piston. I doubt anyone makes a brake kit utilizing these parts, but adapters could be made if you have the skills/tools available. Sorry I can't be of more help. -
Twin cam head for the L6 from Derek at Datsunworks
Derek replied to Derek's topic in Nissan L6 Forum
Today this post is officially 10 years old. I was trying to think of something witty to say but I'm drawing a blank. Being 65 will do that to you sometimes. Anyway here's wonderwall. -
Yeah I did see that. I'm hoping to find a cheaper OEM solution like the common Z32 brake swap. I did find this adapter for using Z32 brakes on a 370Z: https://bleedingtarmac.com/products/broken-motorsports-nissan-370z-z34-z33-g35-g37-rear-gravel-dual-brake-bracket-kit Also, from some more research on the Apex brake kit it looks like its hard to fit even 16s on depending on the wheels.
-
I considered installing a late model Camaro Differential assembly into my 240Z. Mounting the Camaro would not be the biggest problem to overcome. Creating the Rear axle Bearing Housing connecting the Lower Rear Control Arm and the Strut Cartridge would be the Biggest Problem. It will needed to made of 3/8" Flat Mild Steel or Greater. A Machinist Lathe also be necessary to create the Bearing Housing. The Dimensions would have figured out by mostly trial and error. One, that Housing was made then you have get New CV Axles for both sides custom made. The Differential Mount would have to fit below the rear Frame Crossmember. The Differential Front Mount must allow for Driveshaft Angle. There are many factors that must considered before trying to installing any nonstock differential especially with Independent Rear Suspension Vehicle. My advice would be studied different Rear Differentials conversions on the market already and learn from them.
-
Thanks jhm, I appreciate it
-
-
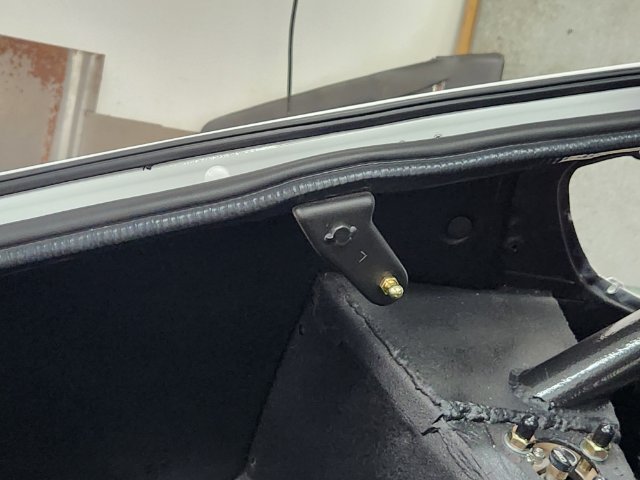
Hey @fusion, I had similar issue last time I replaced my hatch weatherstripping. I did not do anything special in that area, and it hasn't been an issue since. The seal just conformed to fit over time...the seal 'bulb' looks like it's squashed a little thinner in that area. The hatch closes fine, and I haven't had any leaks (it's been several years). At the time, I think I used generic weatherstripping from Pep Boys; so maybe it's a different overall thickness than the Kia weatherstripping? Mine appears very similar to your pics, but I don't remember it causing any difficulty in closing the hatch. Sorry -- probably not much help to you.
-
Engine + Transmission Also added from the previous minimum weight of the engine is an aftermarket aluminum rear coolant housing. Edit: Also includes adding the starter back in since it helps hold the adapter plate on. Not including: - Flywheel - Clutch - Intake Manifold - Exhaust Manifold - Alternator - PS/AC
-
So is the nature of project cars. They're never done.
-

Anyone ever used Gyraline DIY alignment tool?
Sam Henao replied to kaibiagi's topic in Brakes, Wheels, Suspension and Chassis
@kaibiagi Saw that! Thank you for your order! If you have any questions dont hesitate to reach out to us! -
Anyone ever used Gyraline DIY alignment tool?
Sam Henao replied to kaibiagi's topic in Brakes, Wheels, Suspension and Chassis
@manimal We will absolutely be supporting this for the next five years. I personally developed it because I was tired of the alignment shop. and more alignemnt products are to come from the technology we developed to make it work. @fusion We had to take a pause on the Android development to focus on the iOS one. The main concern is many Android phones have substandard sensors that we cannot effectively filter to the resolution required for an alignment (at least 0.05 deg or 1/40 inch). We are working on updating the UI and imrpoving accuracy at the moment though, and expect something to be ready by late October. -
It was done.....then the stuff that was never touched decided it wanted to be "touched". Sure is nice and strong in the midrange with the diesel crank
-
I am running into a slight problem with my Kia weatherstripping in the hatch. The spot where the weatherstripping runs over the hatch lift mounts is too tight and forces the weatherstrip to sit higher in that area. This is making my hatch not close correctly. I could either: 1) grind down the removable part of the mount. This might not even totally fix the problem as the non removable part may also be interfering 2) cut away the lower portion of the weatherstrip. This should alleviate the fitment issue but that small (~2") length would not be attached to the body. Has anyone else had this issue?
-

Anyone ever used Gyraline DIY alignment tool?
fusion replied to kaibiagi's topic in Brakes, Wheels, Suspension and Chassis
@Sam Henao, what's the status with Android phones? Will this be fully supported on any Android phones in the future? -
rsr_engineering joined the community
-
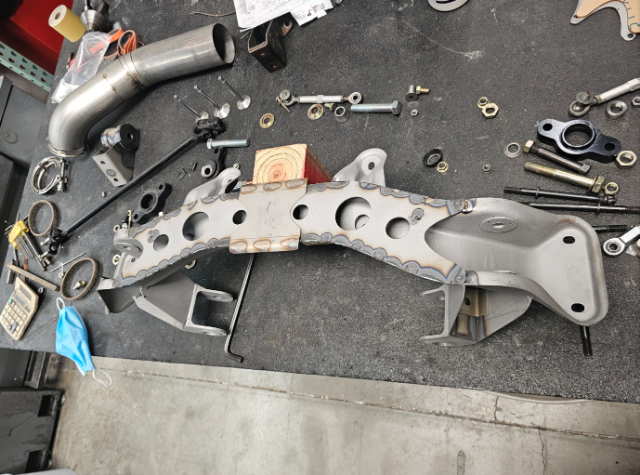
More pis of it finished up The bottom plate was beat up a bit and bent from floor jacks. So I took off the old one by drilling out the spot welds. I then drew up the shape and had a new one laser cut. The center plate that is welded to this plate, I re-made it as well, but out of 304 stainless steel. This way I can leave it a brushed stainless finish after powder coating and it is a good place to use a floor jack. I then spot welded on the larger plate in the original locations I then tigged the seam between the spot welds Then tigged on the center stainless plate Then blasted the entire cross member and powder coated it in a super black semi gloss powder coat. Powder coated the motor mounts as well I always first do a primer powder coat that is sandable I sand most off this off to fill the small blemeshes Then final coat Finally the brushed stainless plate for the floor jack Next up is getting a new transmission, then finishing the exhaust
-
Great info, thank you
-

Anyone ever used Gyraline DIY alignment tool?
kaibiagi replied to kaibiagi's topic in Brakes, Wheels, Suspension and Chassis
I just bought one and it should be here in about a week. I'll let you guys know how it ends up working for me. -

240z SCCA vintage race car, restoration
AydinZ71 replied to AydinZ71's topic in S30 Series - 240z, 260z, 280z
Tomorrow is the big day. Finally breaking in the race engine. 3.1L, 495 gram Kameari rods. 4mm taller rod ratio. Forged pistons with valve recesses. .540 of valve lift. 10.5:1 CR. Haltech running sequential injection, wasted spark ignition. Finally going back to the track this fall. IMG_3175.mov - Earlier
-
Anyone ever used Gyraline DIY alignment tool?
manimal replied to kaibiagi's topic in Brakes, Wheels, Suspension and Chassis
Have you reached out to any of the automotive YT creators? Having a review from someone impartial like superfastmatt would help convince people of it's utility. He seems like one of the few who would give an honest review. This seems like a really great tool and I might be interested in a lifetime membership if there was some way to guarantee you'll be supporting it for at least 5 years. -
Anyone ever used Gyraline DIY alignment tool?
Sam Henao replied to kaibiagi's topic in Brakes, Wheels, Suspension and Chassis
@kaibiagi Our sensor fusion algorithm is continuously improving as we get more data to make it better. We won't be changing the price of the tokens; if anything we're talking about adding more ways to access: discounted bulk token purchases, a weekend pass for SCCA (this one's been asked for alot), a lifetime membership included with the tool at a higher price ($149?), and/or calibration modes to get to 0.01 deg for $49-99/mo for professional mobile mechanics, shops, and racing teams. Basically we want to lower the bar to enter as low as possible to serve the community while still being able to sustain our own operations and make this thing even better! Any suggestions?


.JPG.5aacad0dc7dc46ac827f45420982a975.JPG)
.JPG.ad0eebc877e1c5b1f639163f7631a615.JPG)


-
Who's Online 1 Member, 0 Anonymous, 246 Guests (See full list)