

zgeezer
-
Posts
772 -
Joined
-
Last visited
-
Days Won
3
Content Type
Profiles
Forums
Blogs
Events
Gallery
Downloads
Store
Everything posted by zgeezer
-
I've heard that 75-80% rule before: the reason (I thought "excuse") that my brother spend so much time and money on slicing up the exhaust side of '70 Ford Cleveland 4 barrel heads and then bolting an aluminum plate on the raise the roof and straighten the flow of the exhaust ports. Only clean up work on the intake ports. It worked, but those heads are infamous for huge intakes and a sharp turn down in the exhaust ports. g g
-
I've heard that 75-80% rule before: the reason (I thought "excuse") that my brother spend so much time and money on slicing up the exhaust side of '70 Ford Cleveland 4 barrel heads and then bolting an aluminum plate on to raise the exhaust port roof and straighten the flow of the exhaust ports. Only clean up work on the intake ports. It worked, but those heads are infamous for huge direct short intake ports and a sharp turn down in the exhaust ports. For a while it seemed that every third Cleveland had an exhaust plate to balance the flow between intake/exhaust. The percentage to shoot for seemed to be an exhaust that flowed 75% of the intake port. g g g
-
Hmmmm, two of the three... O.K. But what about the "Series I" to describe the first 240Zs. You know the really light ones without vents in the pillars. It's redundant only if you think it is short hand for "240Z". "Jumbo shrimp" or if you are of a certain political persuasion "military intelligence". Ohhhhhhhhhhhhhhh, I can feel the heat already. There is a name, a long one too, for descriptions such as above where the adjective negates the noun. Some people spend their lifetime looking for sentences that read, and make sense in both directions. The only one that comes to my mind now is "A TOYOTA" . g
-
Final 5.3 update with pictures
zgeezer replied to milesz's topic in Gen III & IV Chevy V8Z Tech Board
Great work Miles. Is your shifter cable or rod operated? It looks as if it is a Maxima? Do you have any photos of your shifter/transmission hookup that you can share? Great car. g -
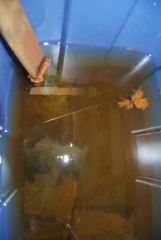
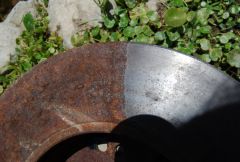
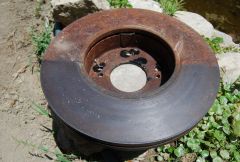
I use three different methods of dealing with rust in general. 1. I like sand/media blasting. This I used on my Z tub. Very aggressive and will cut down all metal plating...like galvanized or other OEM surface treatments. 2. If I have a number of small parts, I'll pop them into a brass cleaner filled with a very fine sand. Silica cuts right now. A brass cleaner for those who are not into firearms is often a plastic bowl filled with an abrasive media and sitting on a vibrating table. Drop in the small parts, secure the top, turn on the machine and come back after the movie. Rust will be gone, along with chrome and all. This leaves a clean, but not slick, surface. Great for painting: good "tooth". 3. If I have small parts very heavily rusted, like this 300ZT brake rotor that was left out in the junk pit for three years, I'll set up an electrolysis bath. Here's how it works. First, here's the setup: a plastic bin, a battery charger, some baling wire, an anode, which in this case is a flat bar of steel, and a cathode, which are two very rusty cow bells. I used about 1/2 cup of automatic dishwasher detergent in this case. I hooked up the battery charger and let it rip. In about 30 seconds you begin to see bubbles coming off the the cathode and a green/black/red jelly forming on the anode. In this photo the anode is in the upper left corner and the white material in the center are thousands of bubbles moving rapidly off the cathode. It sets up a current and you can actually see the circular low from the bottom of the tank to the top. . The following photos show the difference. This rotor was submerged 1/2 into the electrolyte. The outside of the rotor was substantially more than surface rust. The inside of the rotor is heavy crusted rust. These photos were taken after 3 hours in the tub. Note that rust will cause pits and that the side with the lighter rust shows the marking from the pads. This has not re-rusted in four days. Cast iron must be treated within the hour of being dried because it will re-rust. The surface is great for paint or POR-15, which is what I generally use immediately after drying out the part. What to do with the electrolyte? Depends upon what you used as an electrolyte and how socially conscience you may be. If you used baking soda and NOT salt... sodium or potassium, then you could dump it on your wife's Azaleas. The solution is, no surprise here, very iron rich. Some electrolytes are HAZMAT: don't use them. g
-
-
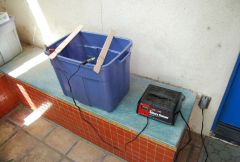 This set up is a plastic tote, baling wire and battery charger.
 -
-
 Here is the back side of the brake rotor. Heavily rusted. Some rust pits.
 -
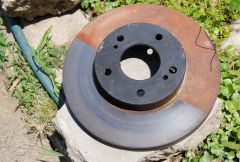 This 300ZT brake disk was heavily rusted after 3 years outside in weather.
 -
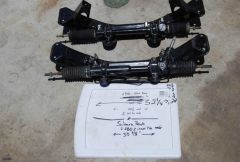
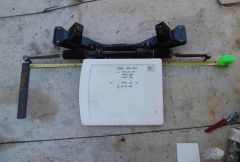
I don't know what differences there might be between the Impreza, WRX, and Loyale racks, but, if your Loyale has the long inner tie rods, why not just cut and thread the inner tie rod to accept the stock outer Subaru tie rod. The Subaru tie rod fits well into the Datsun steering knuckle. In this picture, the upper piece is the Impreza outer tie rod. Ignore that expensive little thingie in second place and look at the bottom piece. The bottom piece is the Impreza inner tie rod with an early Datsun outer end. The theads are the same for the Subaru and Datsun. There is a post and photograph somewhere on this forum from an Aussie who used the stock Subaru inners with a an outer tie rod from a 69 or so Sunny Datsun. This would appear to be a more elegant solution, if a straight line from rack end to steering knuckle doesn't create suspension bind or some great gobs of bump steer or such. g
-
Final 5.3 update with pictures
zgeezer replied to milesz's topic in Gen III & IV Chevy V8Z Tech Board
Miles, that is one fine looking Z. You're just a couple of hours drive on I-10 from me. Drive on over to Indio on November 1, 2008 and show your Z along side mine at the Indio Festival of Wheels. See indiofestivalofwheel.com. Mine will probably be shown in a number of baskets and as a tub on a trailer. I have a commitment from a family member to drive down one of his 10 second drivers to show with other modified Austin Healeys. It is also a small open header cruise, if you like to make noise. g -
This Car Hobby Sucks Big Brassy Balloons...here is why
zgeezer replied to slownrusty's topic in Non Tech Board
I've been working, changing, selling, buying, bull shitting, drinking beer, laughing, and finding new friends all around my Z for the last 11 years. This might be a record for time down without the wheels turning. My brother has build, ran, and sold three sub 10 second Falcons in the same time. However, this is my high school shop class that I couldn't take.... way too much effort to stay on the college bound track. There is not a single part on my Z that I haven't duplicated twice: and they are all stored in my garage, their garage, under my wife's bed, under my bed, in the kids' room and in various dresser drawers. My jewelry drawer has, and this is for real, two sets of cheap cuff links, two american flag lapel pins, one service club pin, two really cheap watches and.......... 12 different Z insignia I've found in different JYs. 240, 280, 260, hood emblems and one complete set of emblems for a '70 240. It is the journey, the friends you meet, and the lies you can tell. By the way, I have many reasonably good 240Z grills and would be willing to talk trade for one eight spoke 14 inch mini-mag wheel [sorta like PanaSports, but were one of the more popular dealer dress up options in 1970's.] g -
The practical answer is to pay the towing charges, get your Z out of the wrecking lot and get on with life. By the way, be sure to take photos of the Z in the lot..... sometimes parts off interesting cars can disappear. I wouldn't recommend litigation in this matter because I don't see any solid basis to sustain it. You parked your Z in either a public or private location: if it is private, then that owner can have you pulled with no notice other than posting the lot as a "tow away" zone and the address of the towing company. If you began to make roadside repairs to a non op car and then left it, you accepted the risk that it would be towed or stripped. Consider yourself lucky: in my neck of the woods your entire Z would have been treated as a "pick a part" and "salvaged" out in about 4 hours. The lack of a hood, like rolled down windows and unlocked doors would be seen by our roadside foragers, or for that matter, by the police as proof of abandonment. Did you leave a note in the car with your name, address, and telephone number? But, I do know how you feel: I just paid a bit over $300 to recover my new operating Mx5 from storage after exceeding my private parking lot's allocated time by 30 minutes. Paid for 3 hours; car was towed 15 minutes after time had run out. Some cities, need the money and use tow companies to collect, what amounts to a heavy tax. Is Vallejo still in bankruptcy? g
-
This particular Subaro power steering came out of a middle '90's sedan: not an wrx, but the same body style. Not a forester. It has also been fitted with the inner tie rods from a 280zx datsun. The stock 280Z measures 32 1/4 inches end to end. The Subaru is 33 7/8 inches. g
-
-
-
-
The top one is out of a '71 Z and the bottom is an early 280Z. If the picture is dark, download it into photoshop or other software and lighten it. The detail is there. Look at my album, I have a number of photos relating to gas tanks. g
-
280z 240z DIMENSIONS FRONT SWAY BAR
zgeezer posted a topic in Brakes, Wheels, Suspension and Chassis
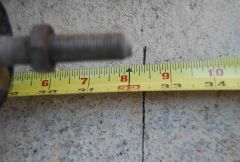
What is the standard diameter of a 280Z front sway bar? I've pulled a front suspension from a late 280 and the front sway bar looks enormous compared to my 71 Z bar. The rubber bushing will fit around a 1" inch bar and that appears to be the diameter of the sway bar. I want to know if I have the stock bar or an aftermarket piece. Lots of information of sways bars, but nothing relating to the stock diameters. I note that some bars are 23 and 24 mm in diameter. g -
Nope, just the bracket. g
-
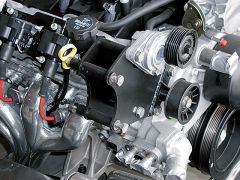
There are a number of ways to mount your a/c compressor on you GEN III engine swap. Here is one from newman car creations that while, pricey ($550) is elegant and could by replicated. This one mounts a Sanden compressor. There are other choices, Vintage Air's new catalogue lists the a simple ls1 bracket conversion kit that mounts a Sanden 508 compressor and reduces the distance from crank centerline to edge of compressor to 13.5 inches if you cut off on mounding ear of the compressor. This is their bracket kit 141803-MCA There is a member on this forum that cut back the stock a/c bracket to locate the stock compressor closer to the engine center line and then offset his engine centerline to the driver's side. I think his handle is BRIGUY g
-
-
-
ls1 ls6 ls7 exhaust manifolds F body Corvette
zgeezer replied to zgeezer's topic in Gen III & IV Chevy V8Z Tech Board
I looked at your websites and all I see is the Daytona with the JCI kit and Sanderson headers. By the way, thanks for the tip about the mounting boss, I've trial fitted the Sandersons and didn't pick up on the block interference. I presume the C5 headers are also for the "D" exhaust port. If you have a path to good photos of the header, I'll include them in the post. g