5thgenluder
-
Posts
298 -
Joined
-
Last visited
Content Type
Profiles
Forums
Blogs
Events
Gallery
Downloads
Store
Everything posted by 5thgenluder
-
Anyone following this thread can find an update and write up in my build thread. http://forums.hybridz.org/index.php/topic/93859-1971-240z-rb25det-build-thread/page__st__280
-
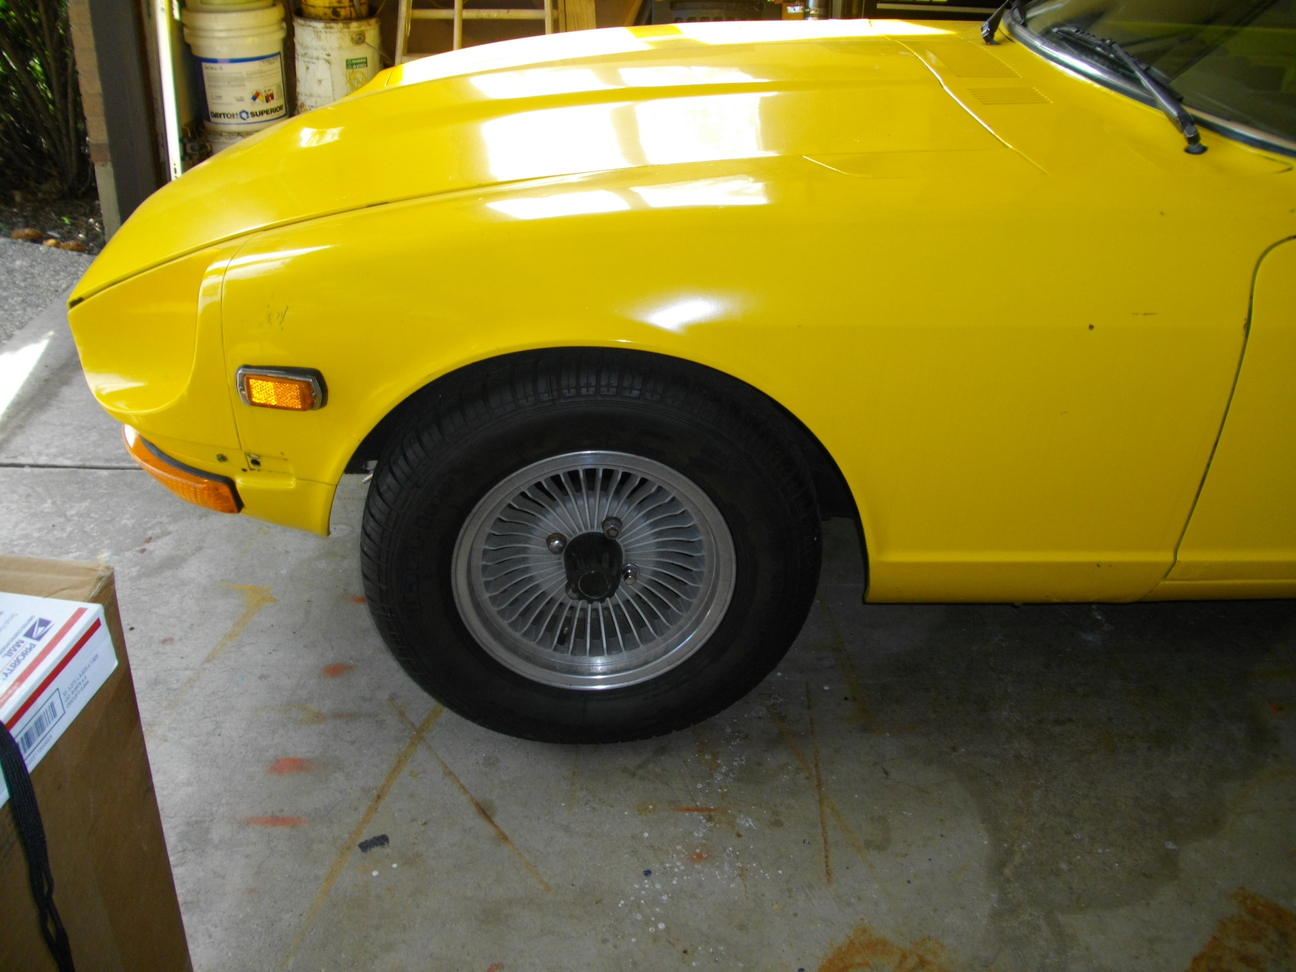
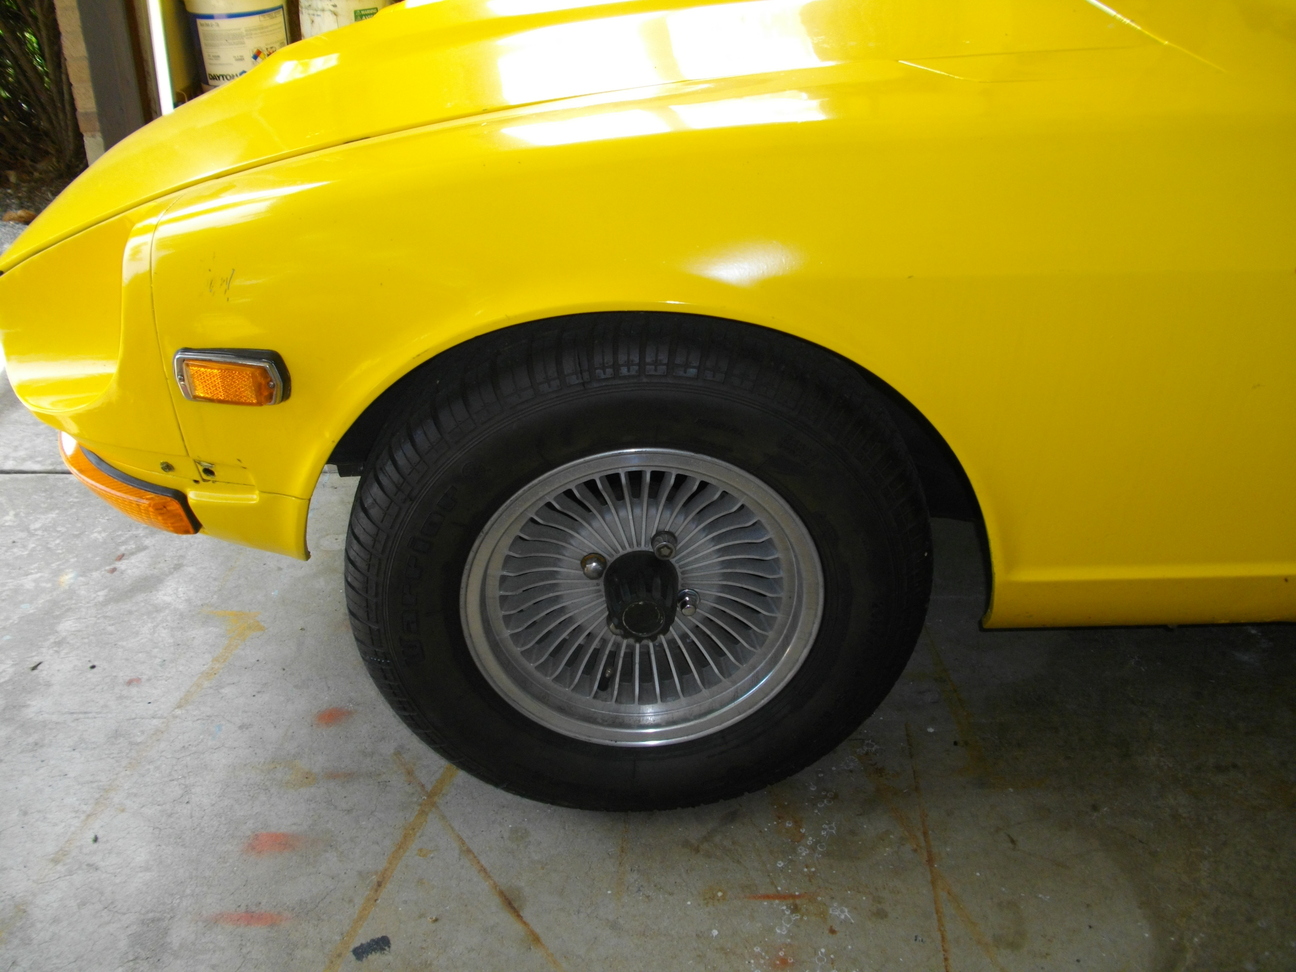
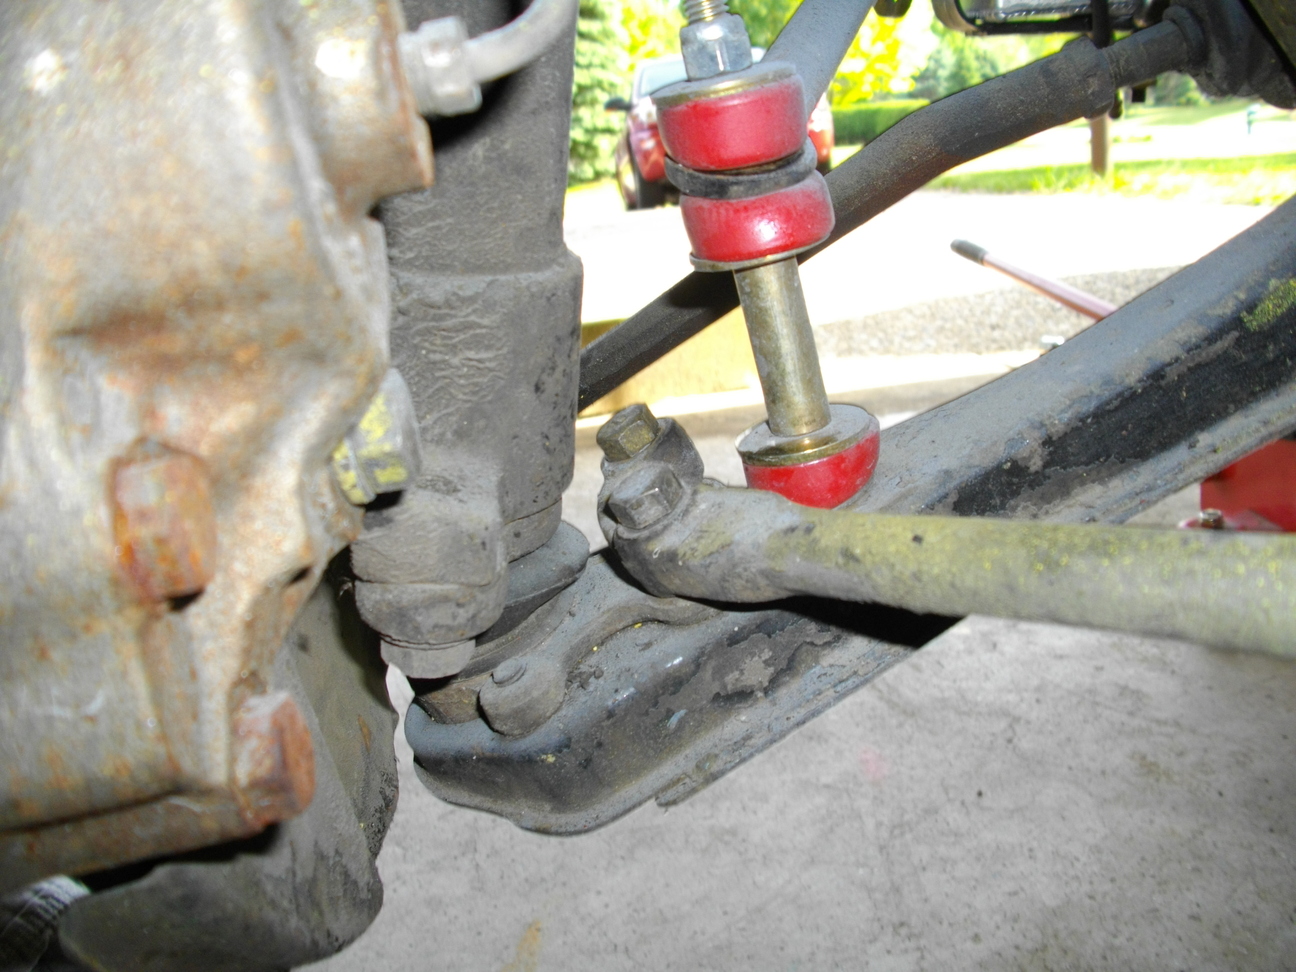
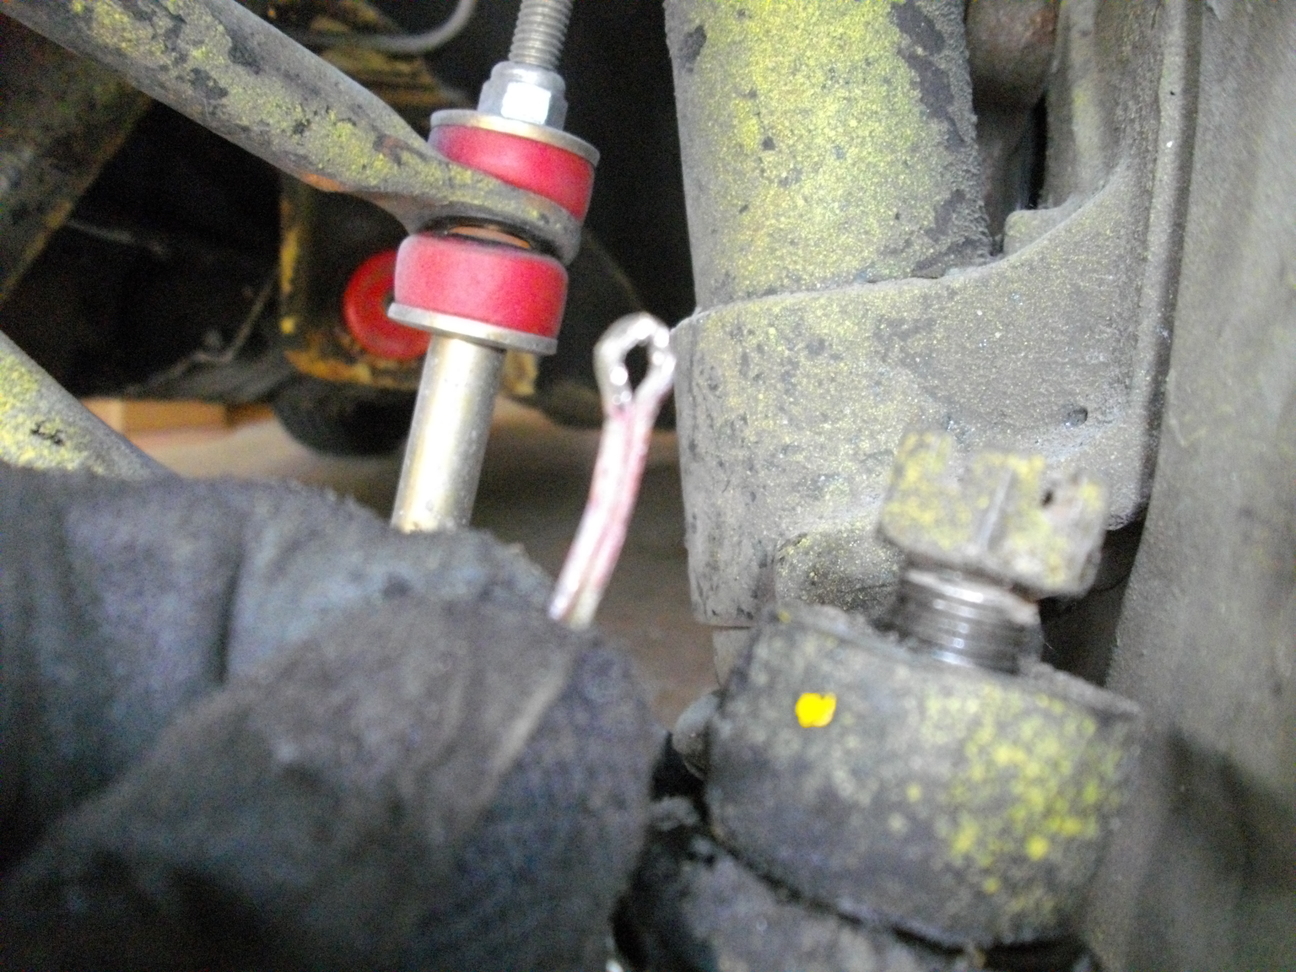
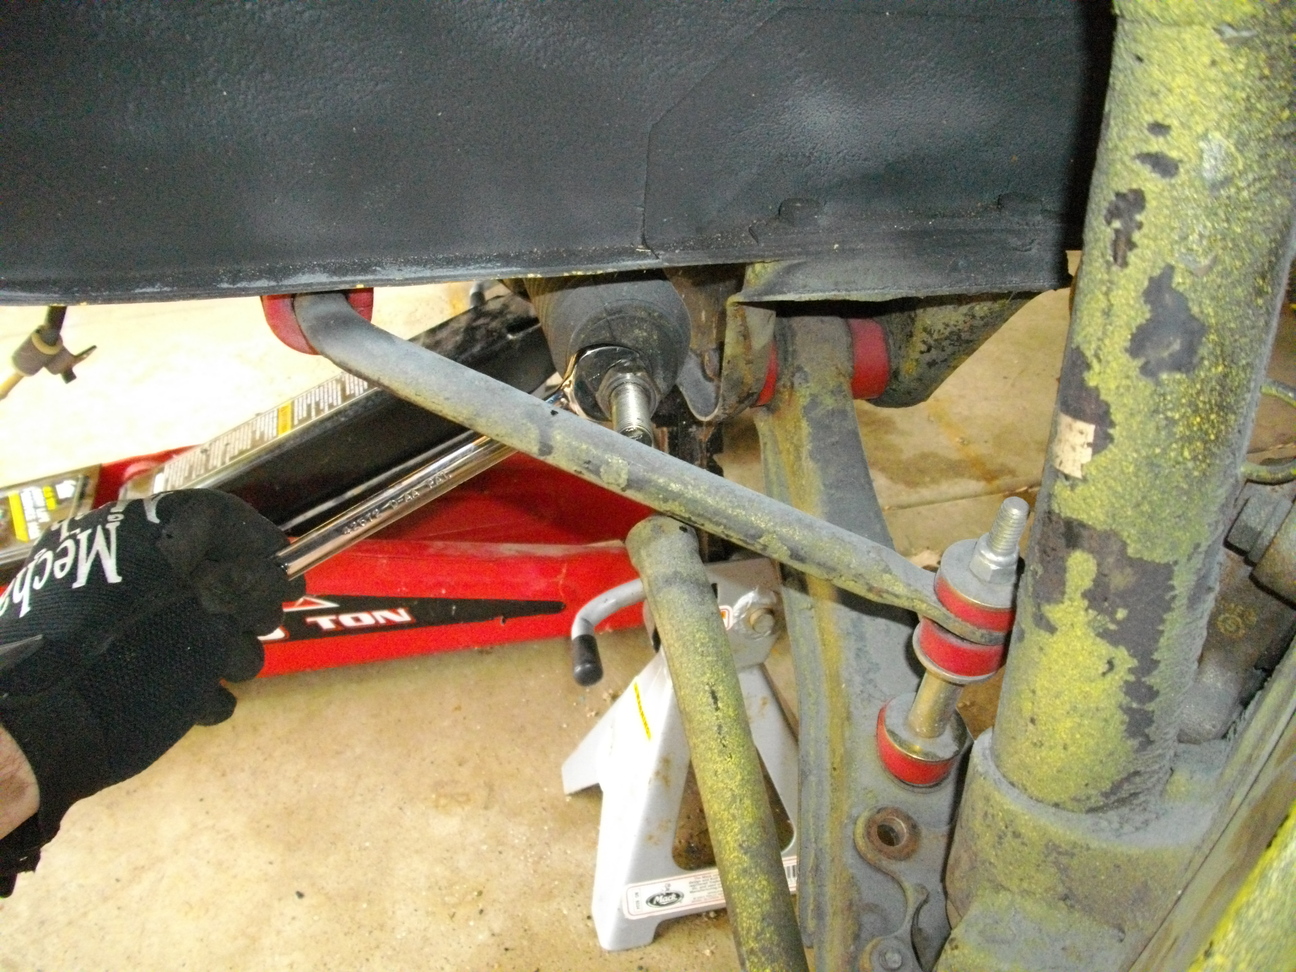
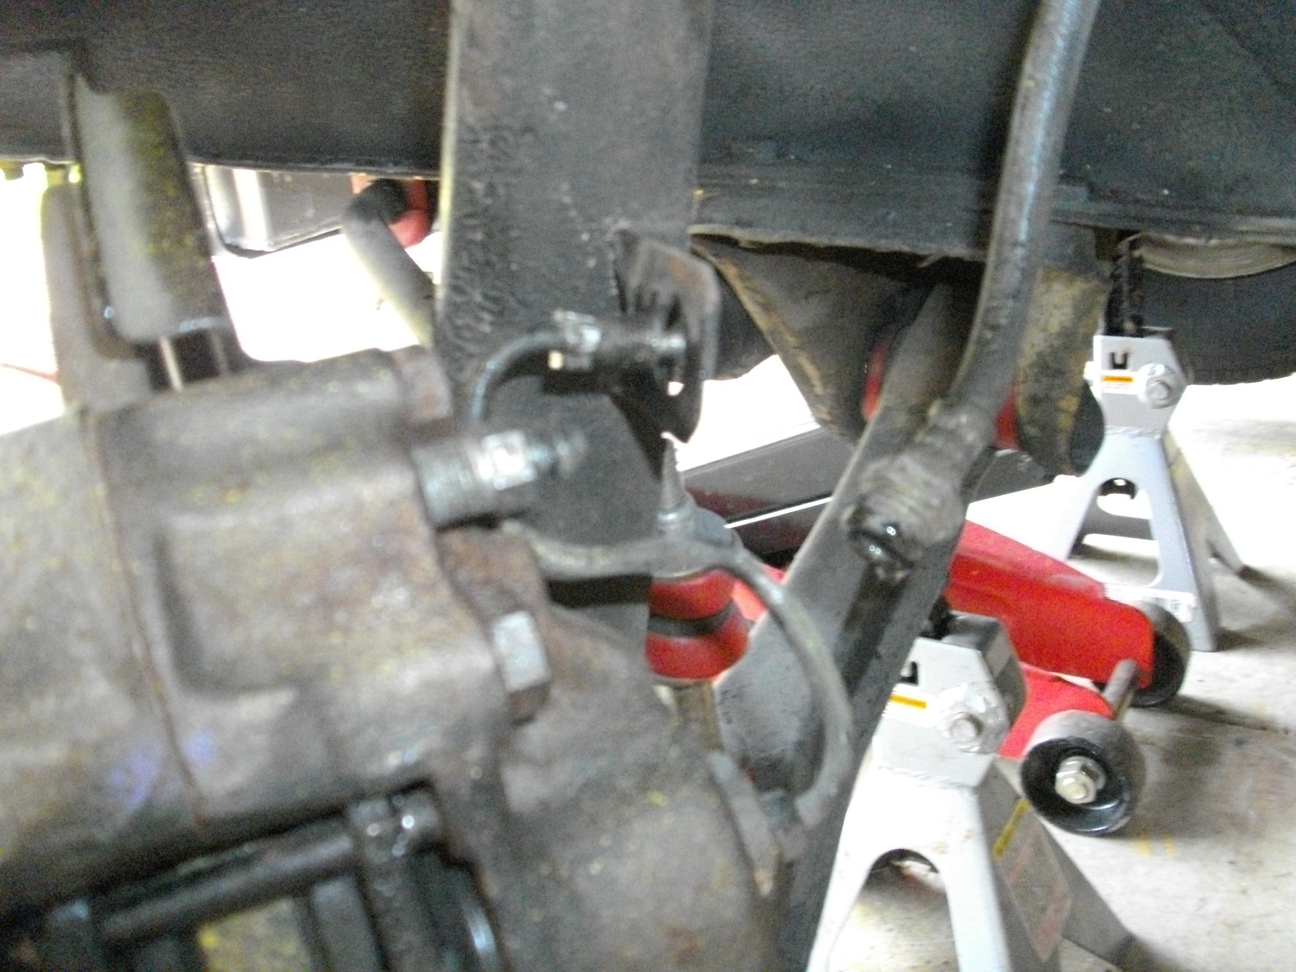
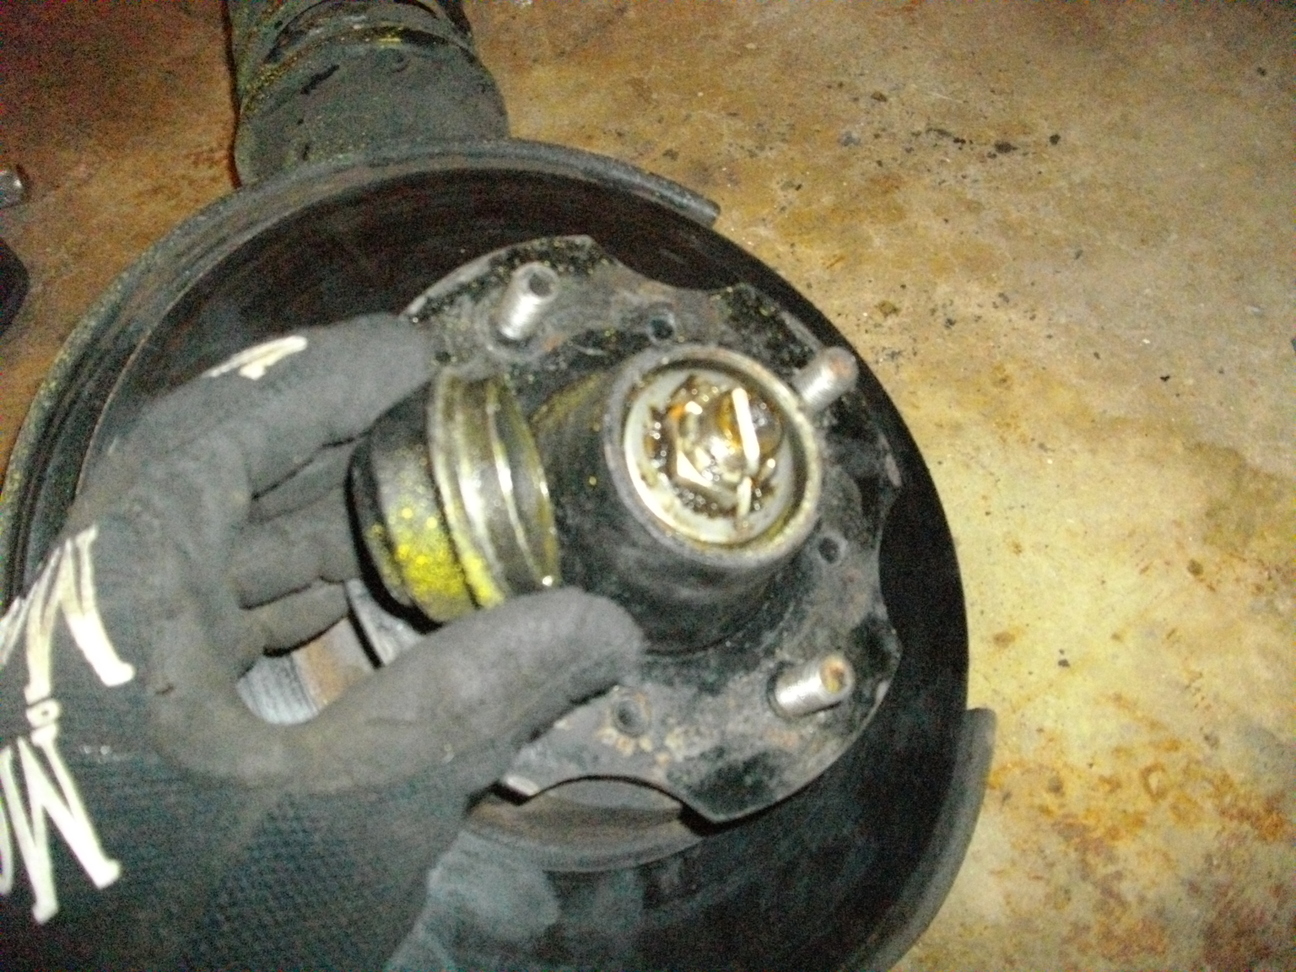
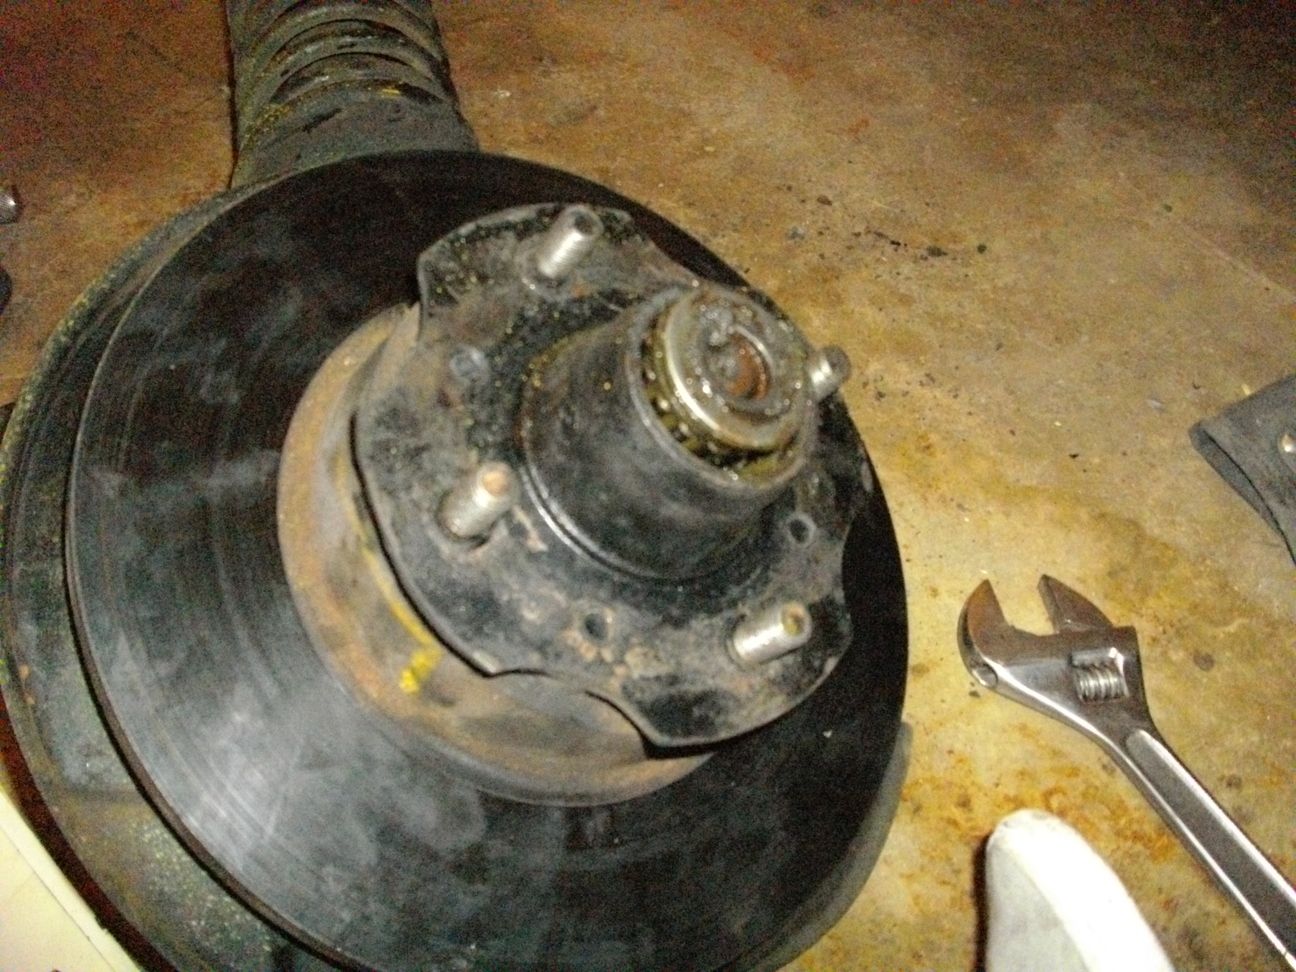
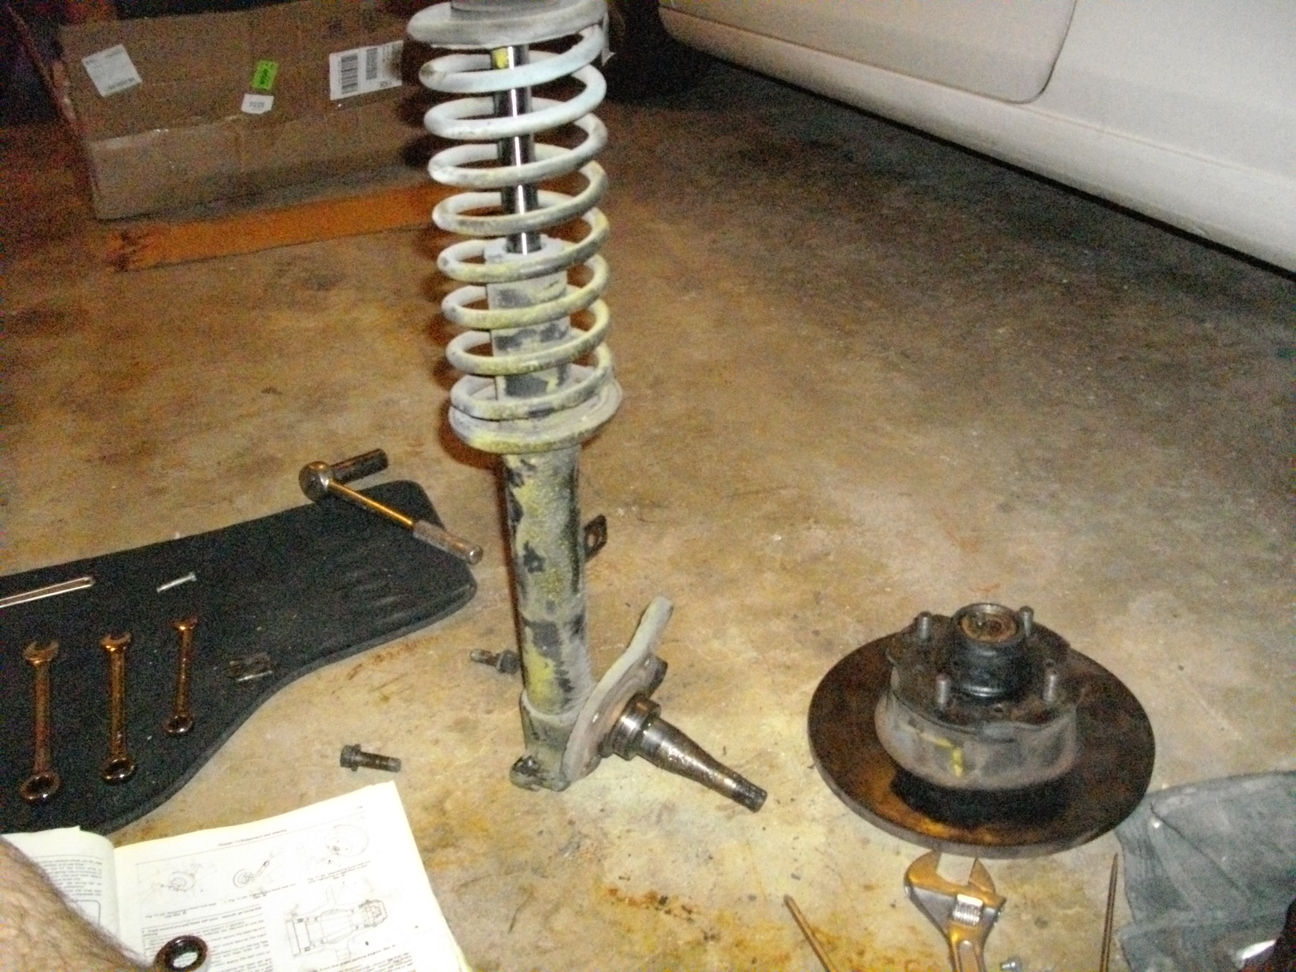
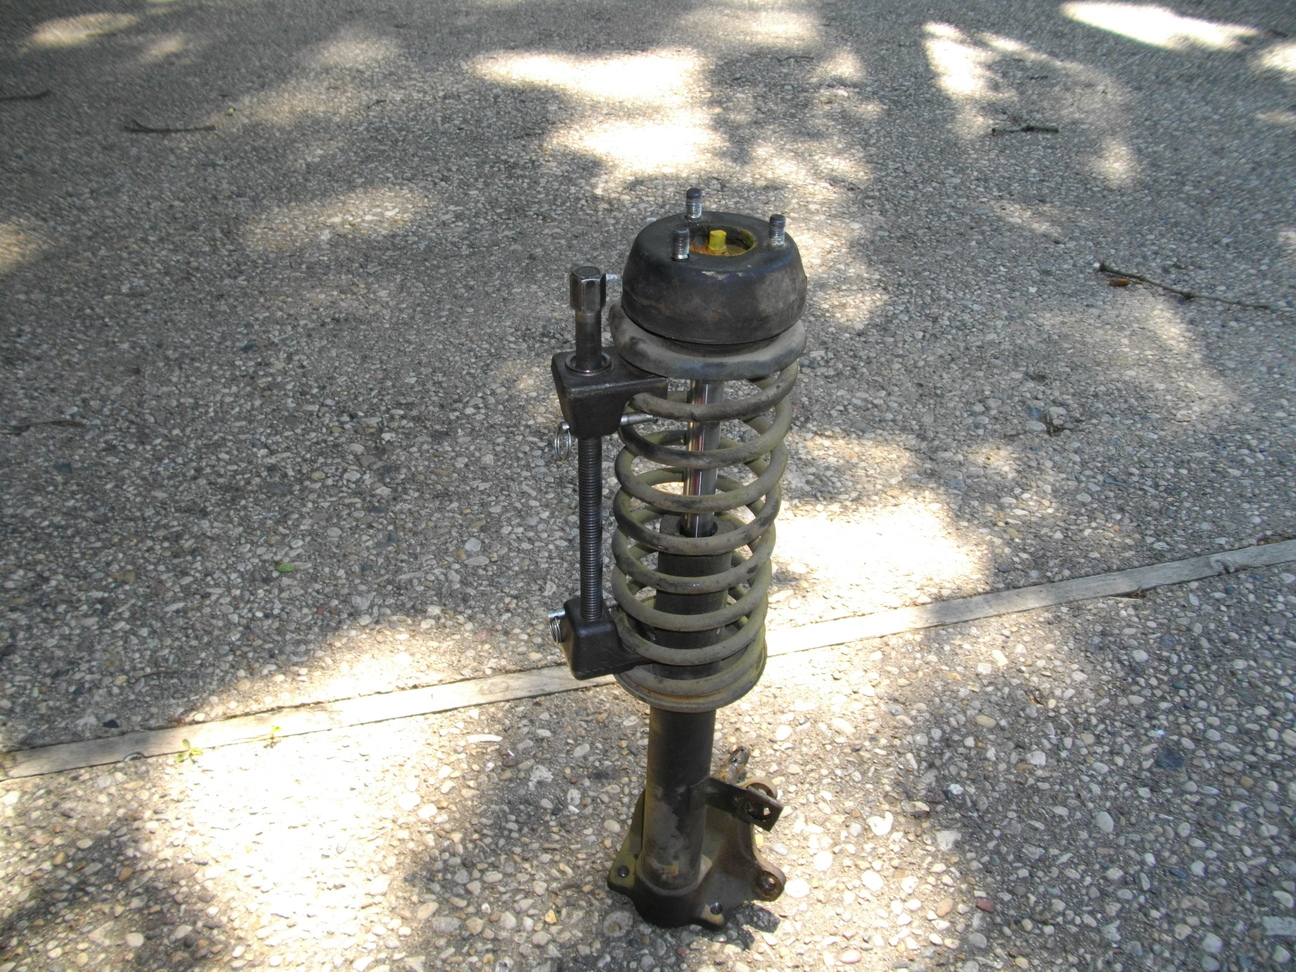
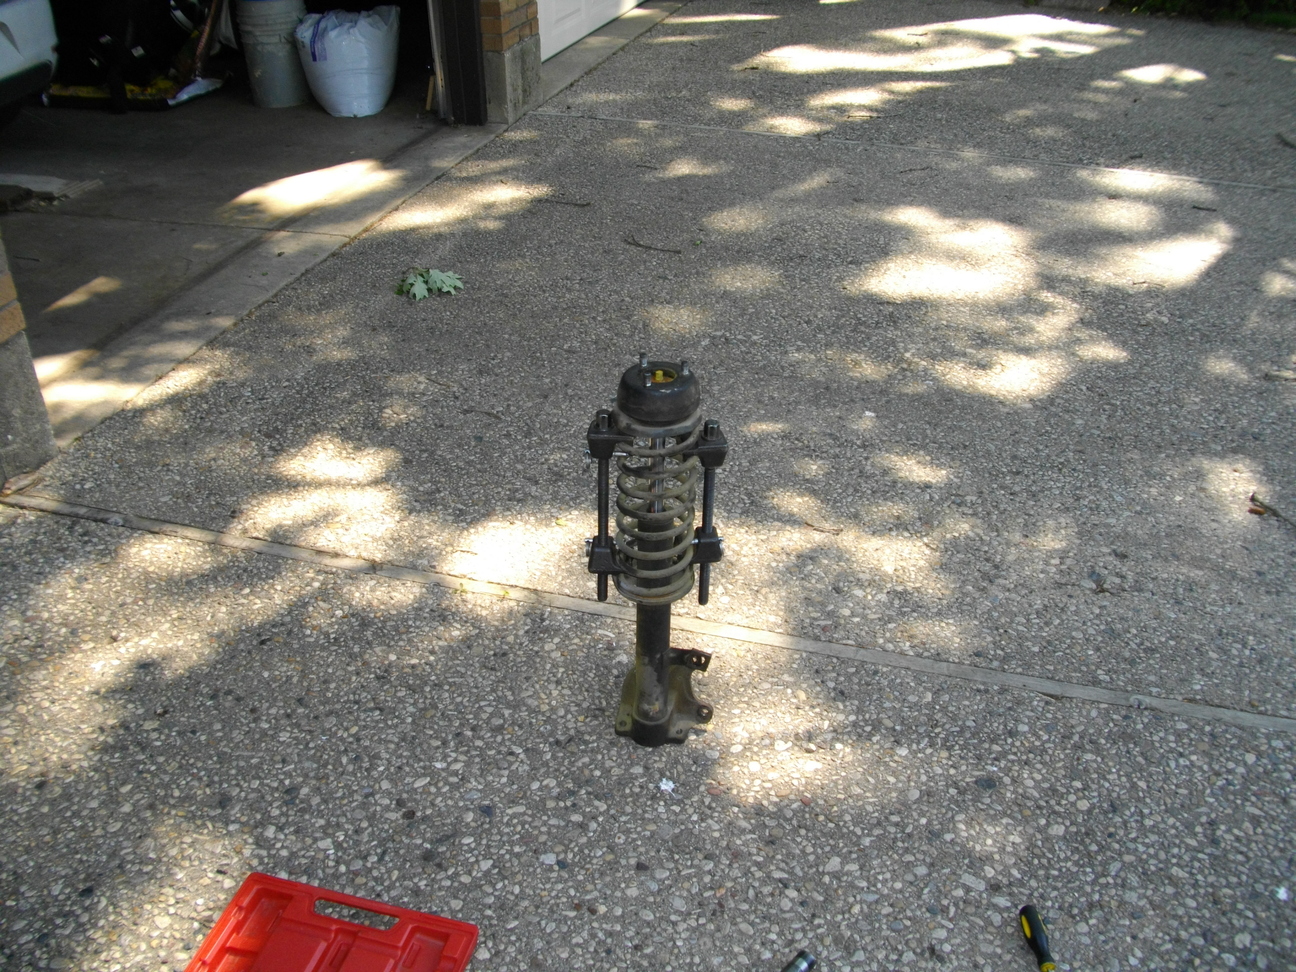
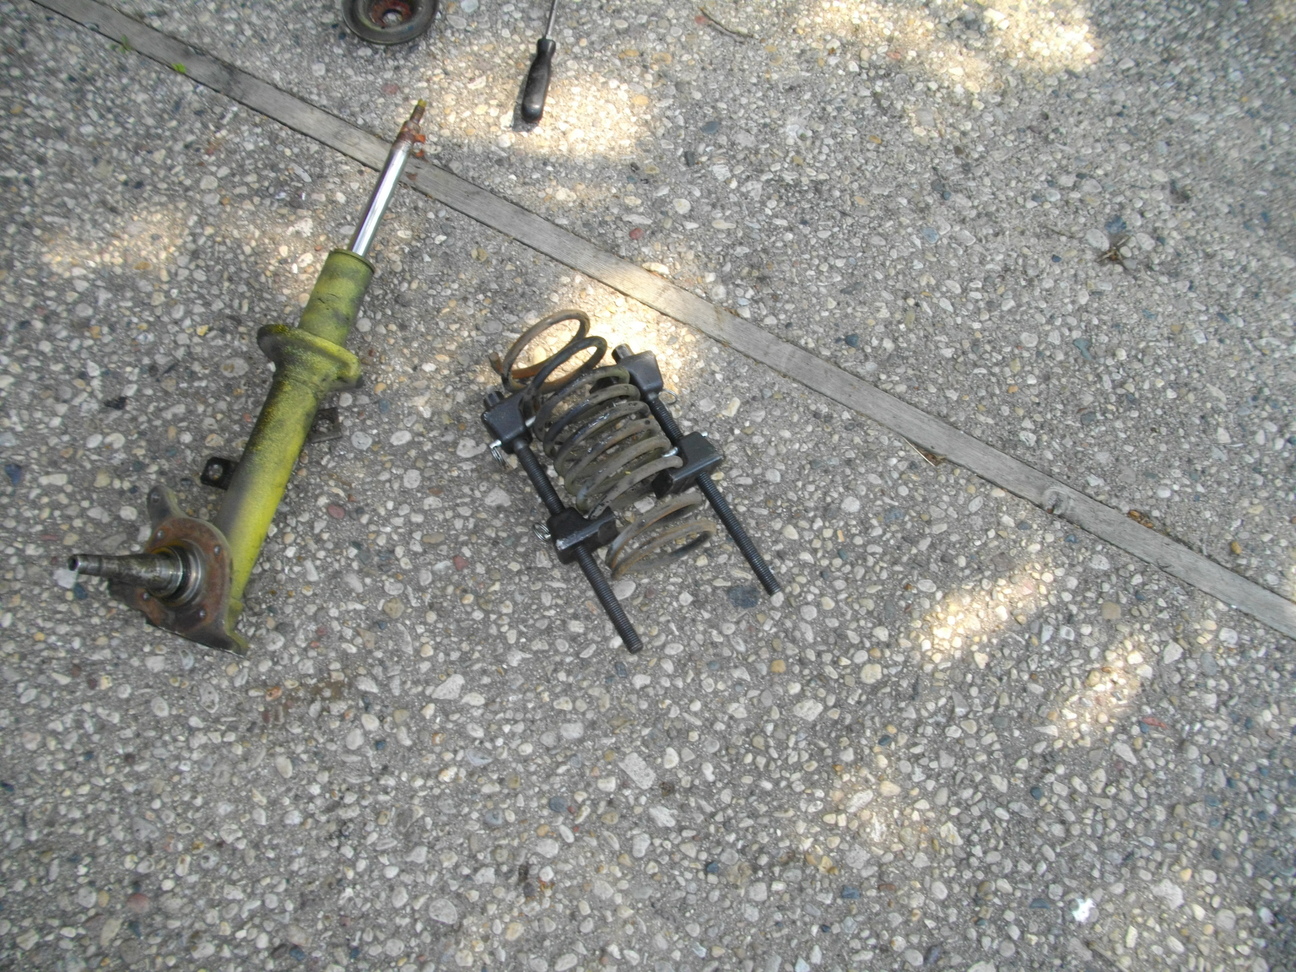
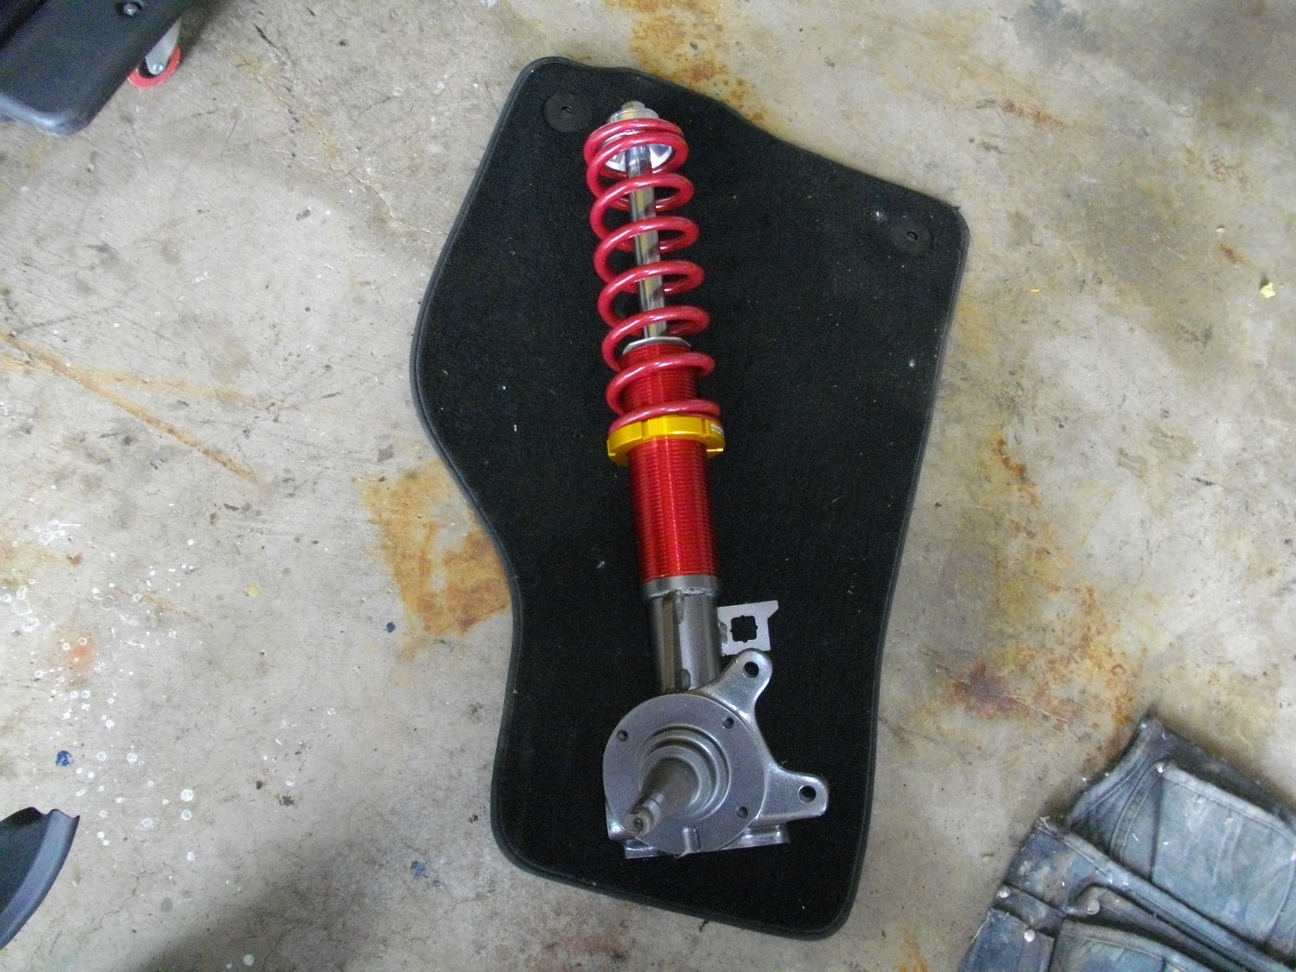
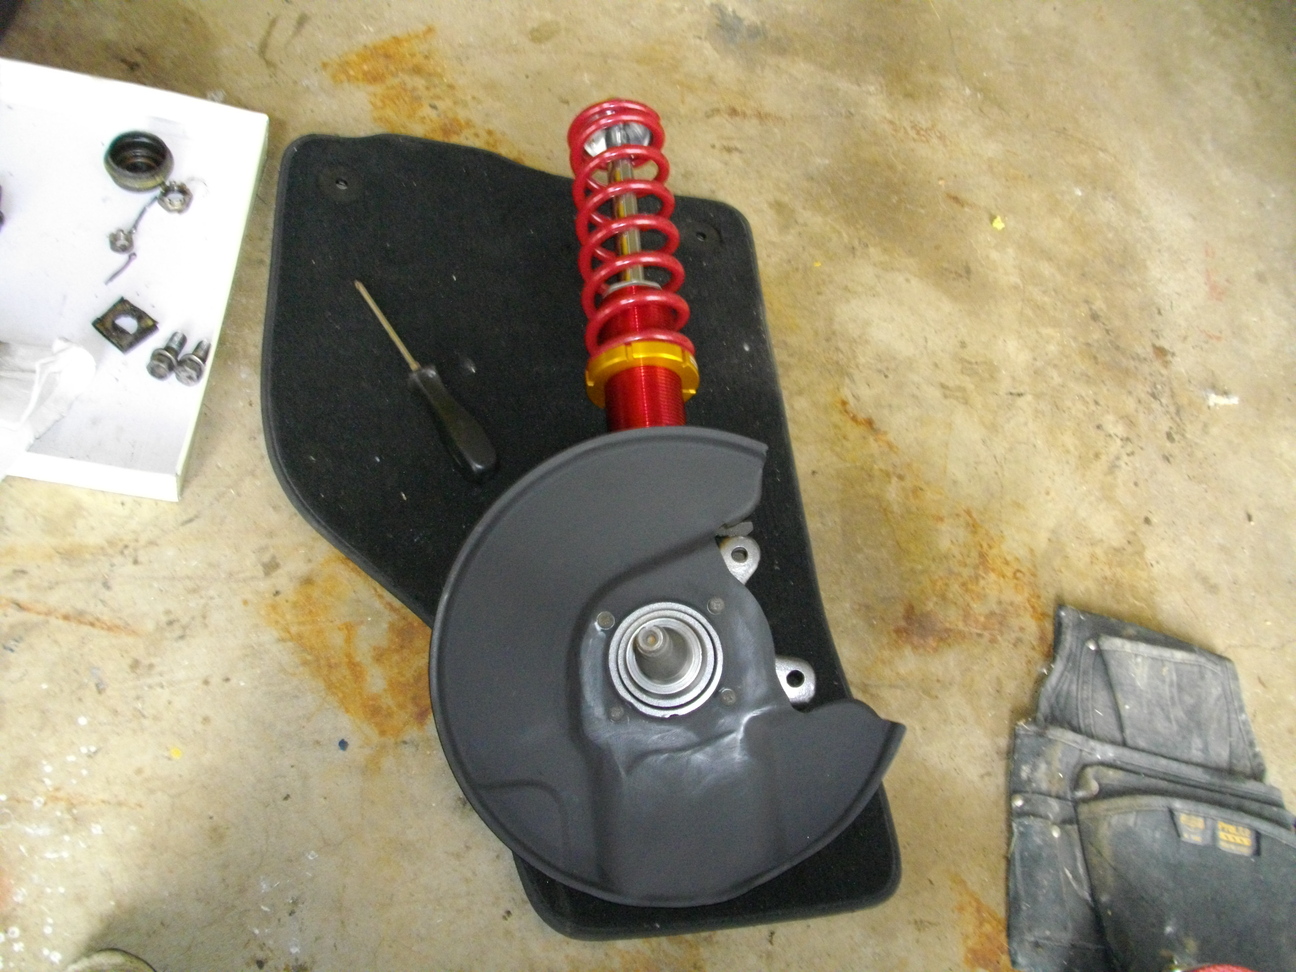
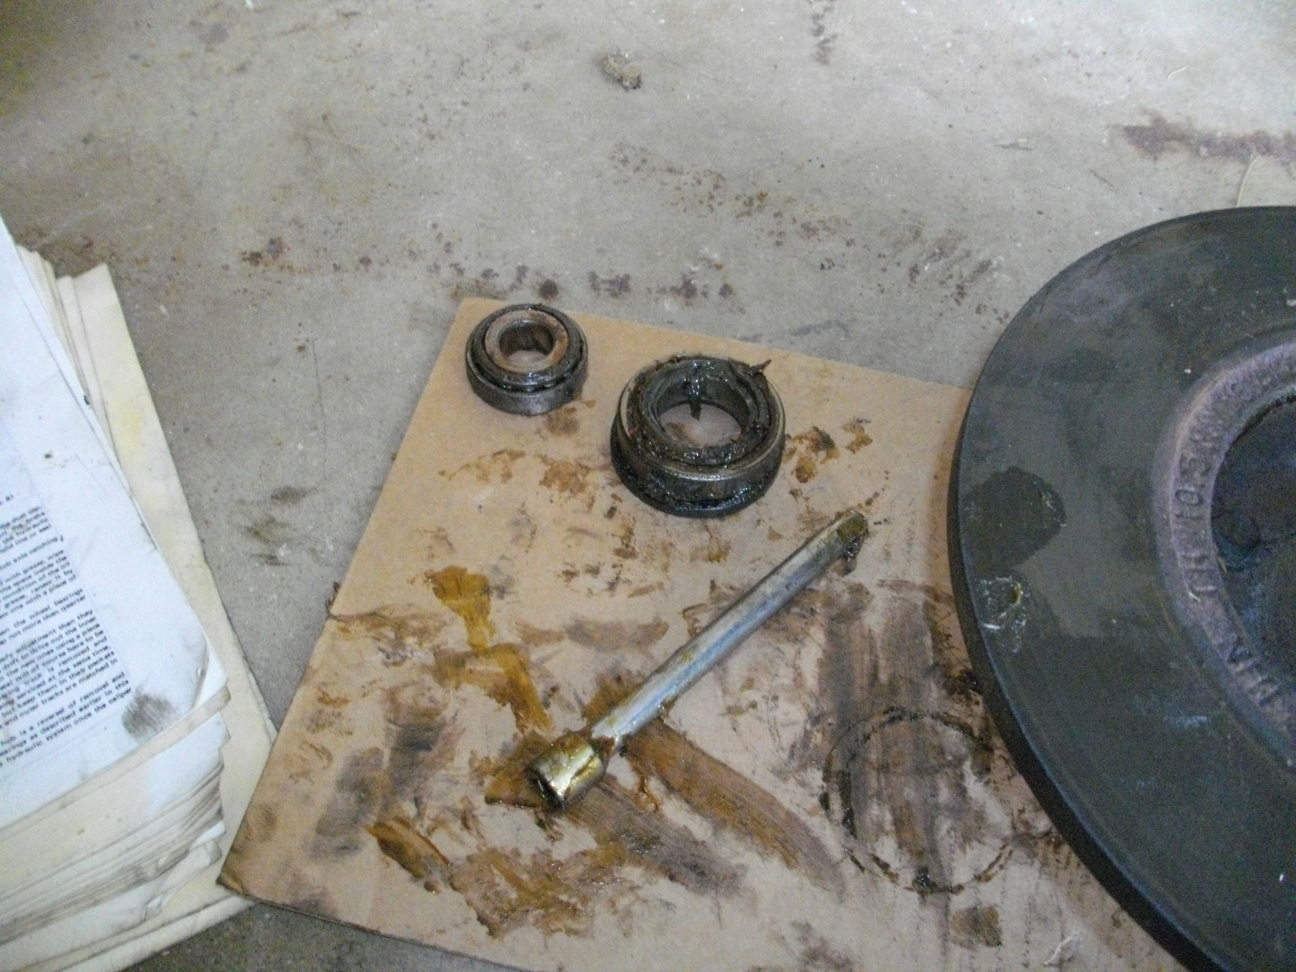
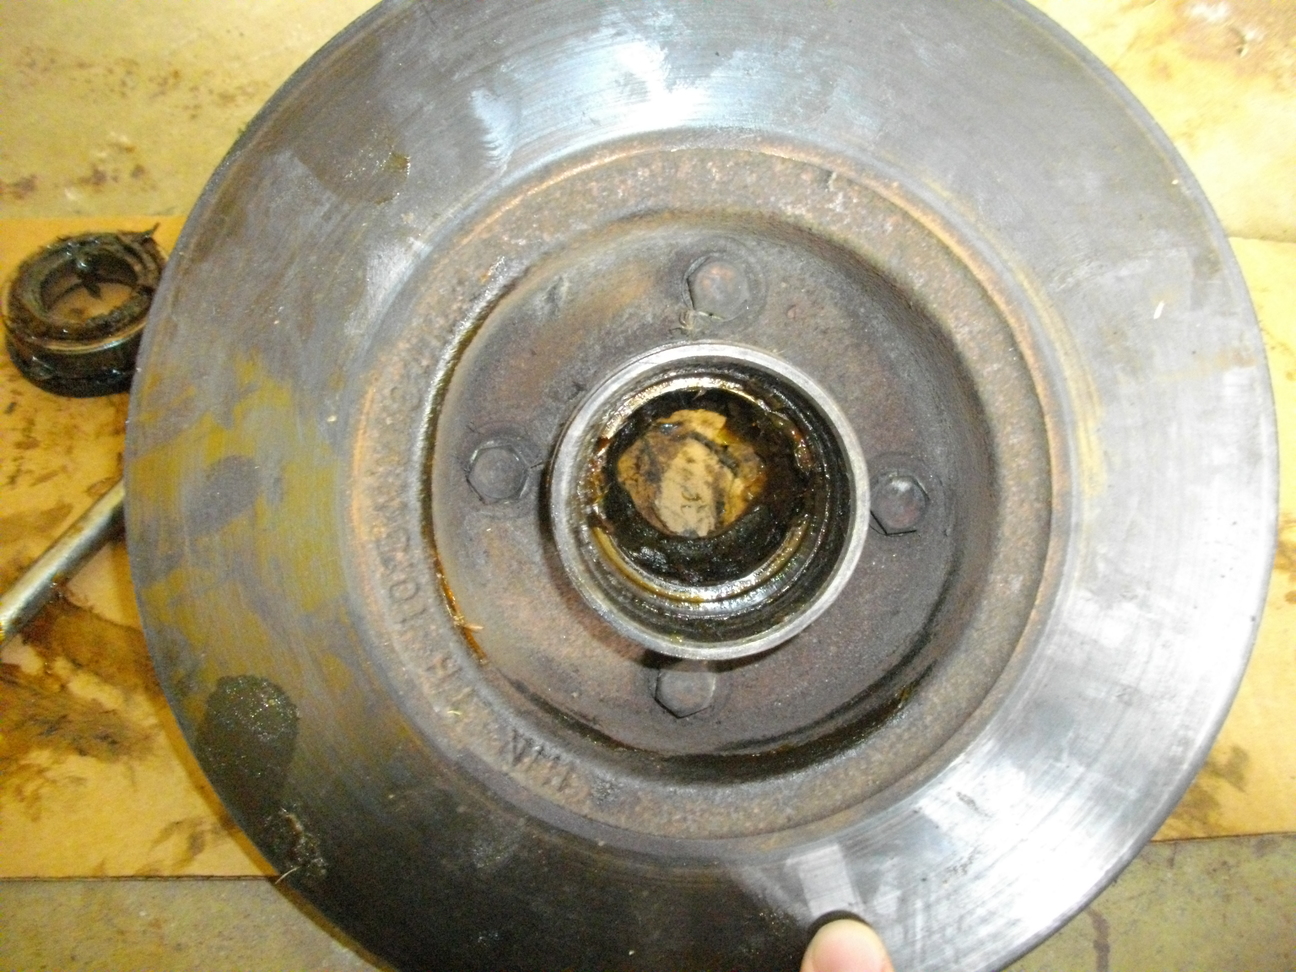
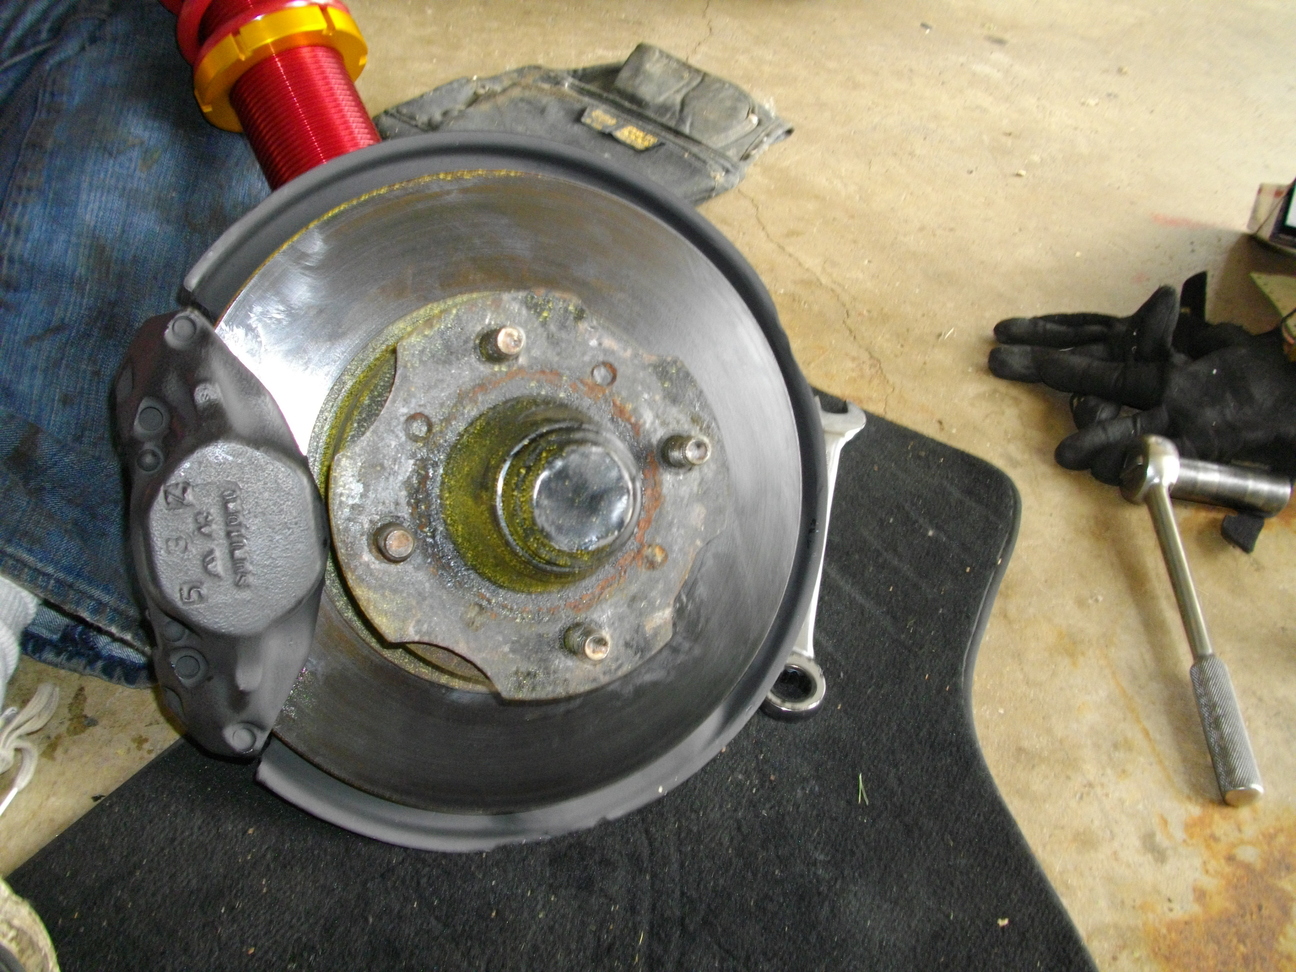
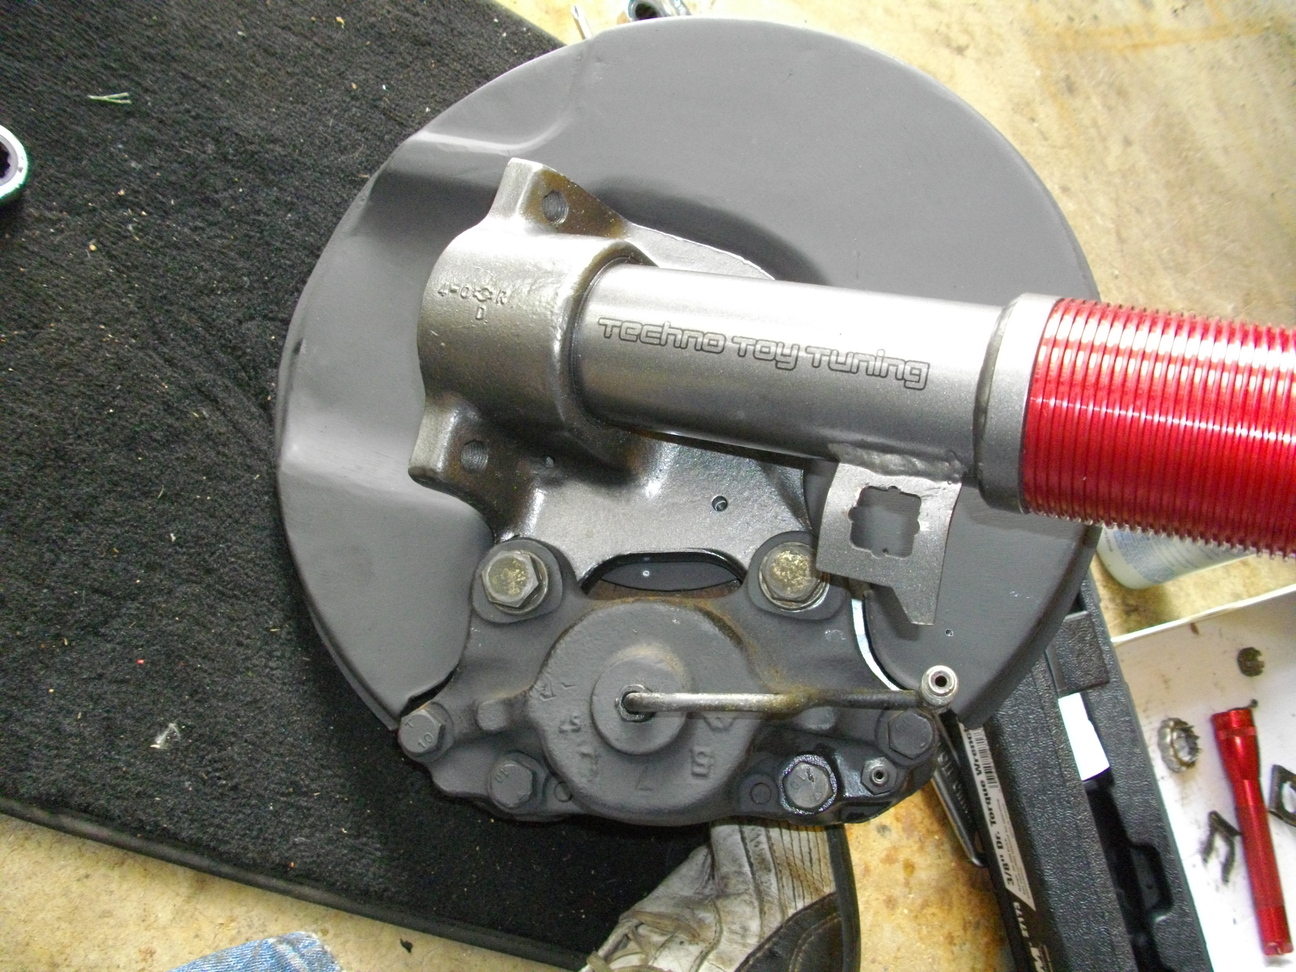
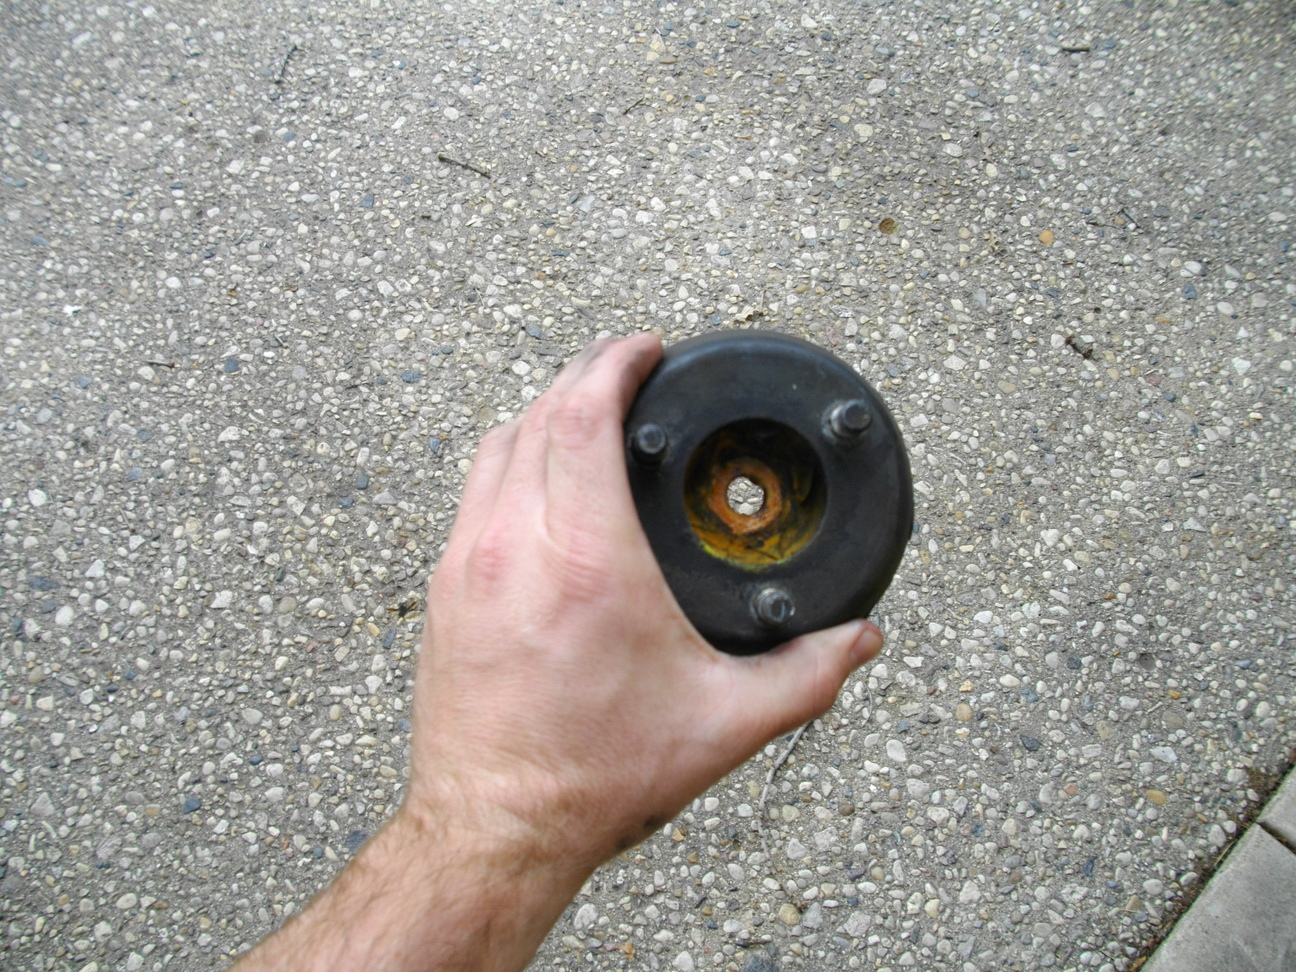
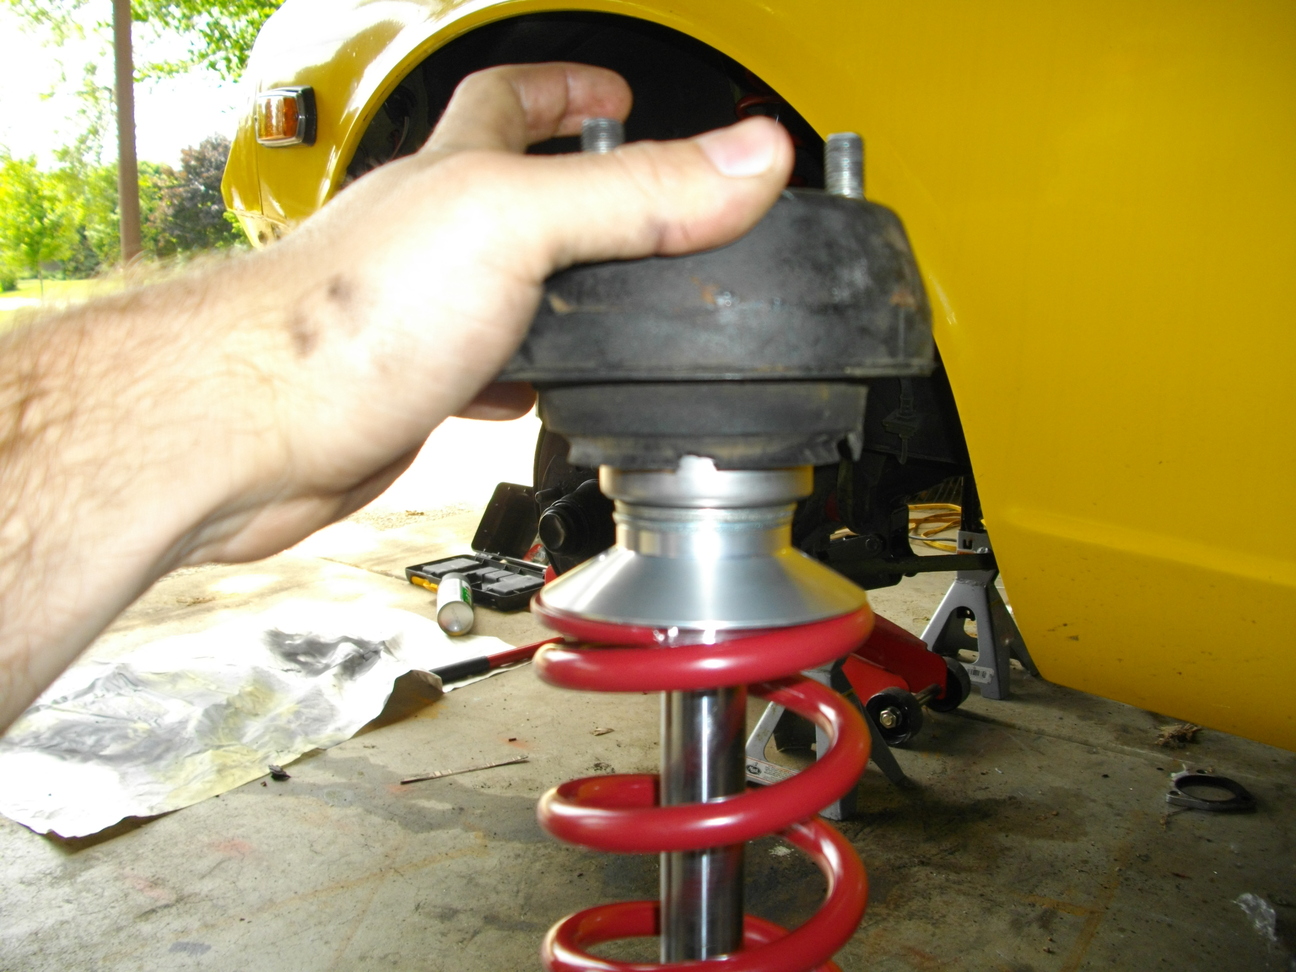
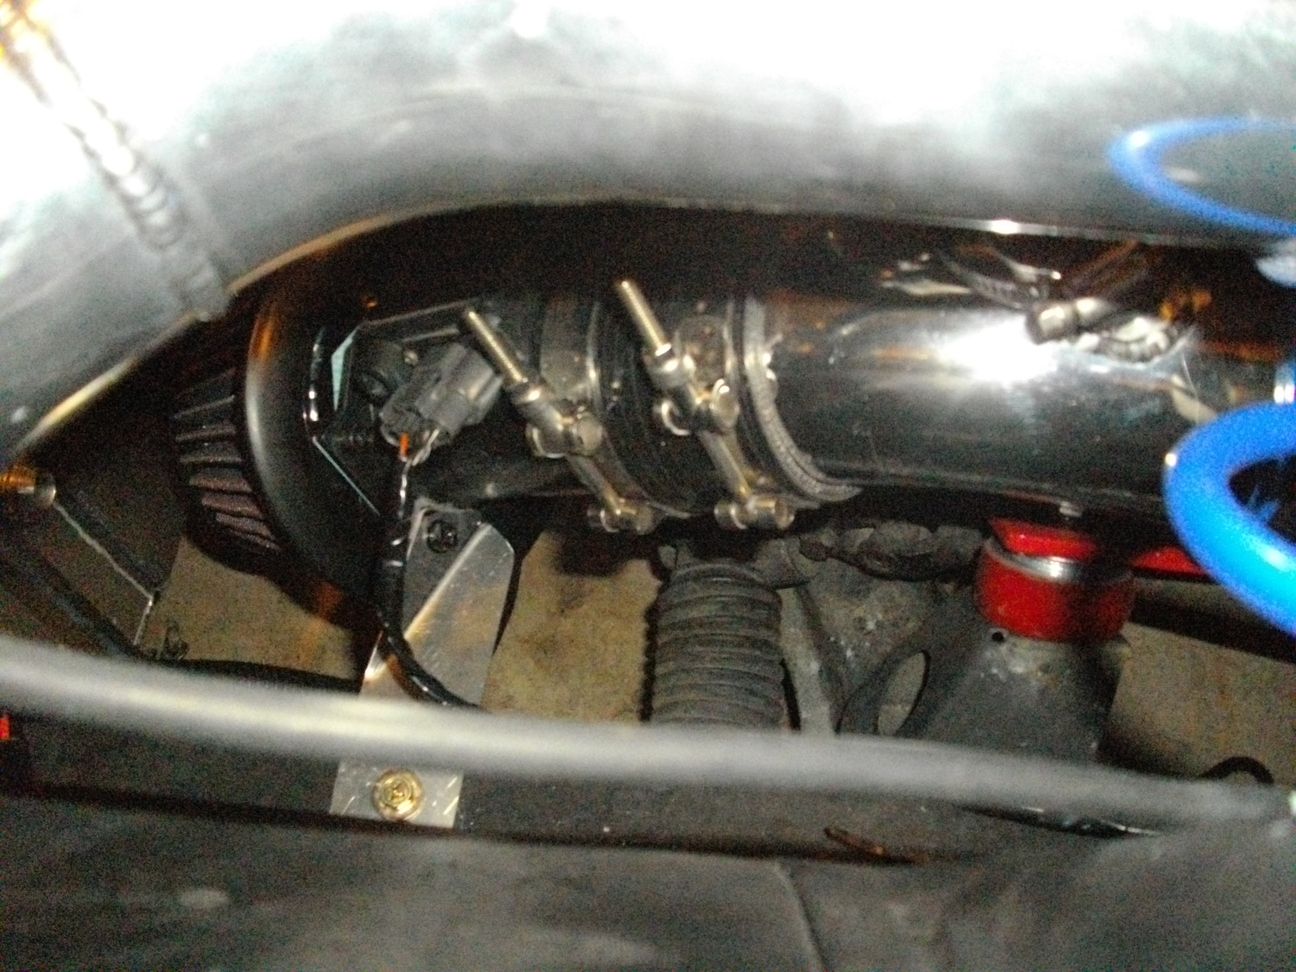
Update. Front coilover install. So I ordered a set of coilovers from ttt and have so far only received the front ones so far. Things started to move a bit quick at the end but I will try to give the best info I can. Here is what I started with. Remove the wheel and here is my stock strut. Remove the tension bar. It has bolts here. and here. Remove the cotter pin and bolt that holds on the tie end rod. Unscrew the other end of the tie rod. Disconnect the brake line. Unbolt the shock from the bottom two bolts. and the top three bolts. Remove the brake caliper by unbolting these 2 bolts. Remove the hub cap. then pull the cotter pin and unscrew the nut. Pull of the brake assembly and you are left with this. Unscrew the 4 screws that hold the brake backing plate on and you have this. Use your pickle fork to remove the tie rod. Rented mine from autozone. I also rented a spring compressor from autozone. Compress the spring and relive the pressure. Use a big screw driver to hold 2 of the bolts on the top of the rubber strut isolator. Undo the bolt on the top of the strut. You are left with this. Here is the new assembly. Reassembly is pretty straight forward. Pretty much the reverse of what we did. Start with the brake plate. I replaced all the wheel bearings. They were nasty and I wanted to freshen everything up. Here is the removal process. . Here us the new stuff going in. I greased and repacked the new bearings. This was a first for me. It consisted of taking a glob of grease putting it on my hand and then taking the bearing and repeatedly tapping it into the glob of grease until the grease came thru the bearing on the other side. Remove the old and repack the center of the hub also. Put the spindle pin washer, bolt, and cotter pin in. Tighten to 22 ft lbs of torque and then turn back 60 degrees then put the pin in. Fill the hub cap 1/4 full then put back on. Reattatch the brakes. So with this kit the rubber upper mount hole needs to be drilled out to 15mm. This hole. Took a pretty big drill and drill bit to do this. So the assembly goes on like this. Spring perch, 2 washers, strut bearing, rubber isolator, then you will need to put a few washers so that the bolt can tighten down. Here is the top that shows the washers. The rest is history. Just put it all back in the way you took it all out.

-
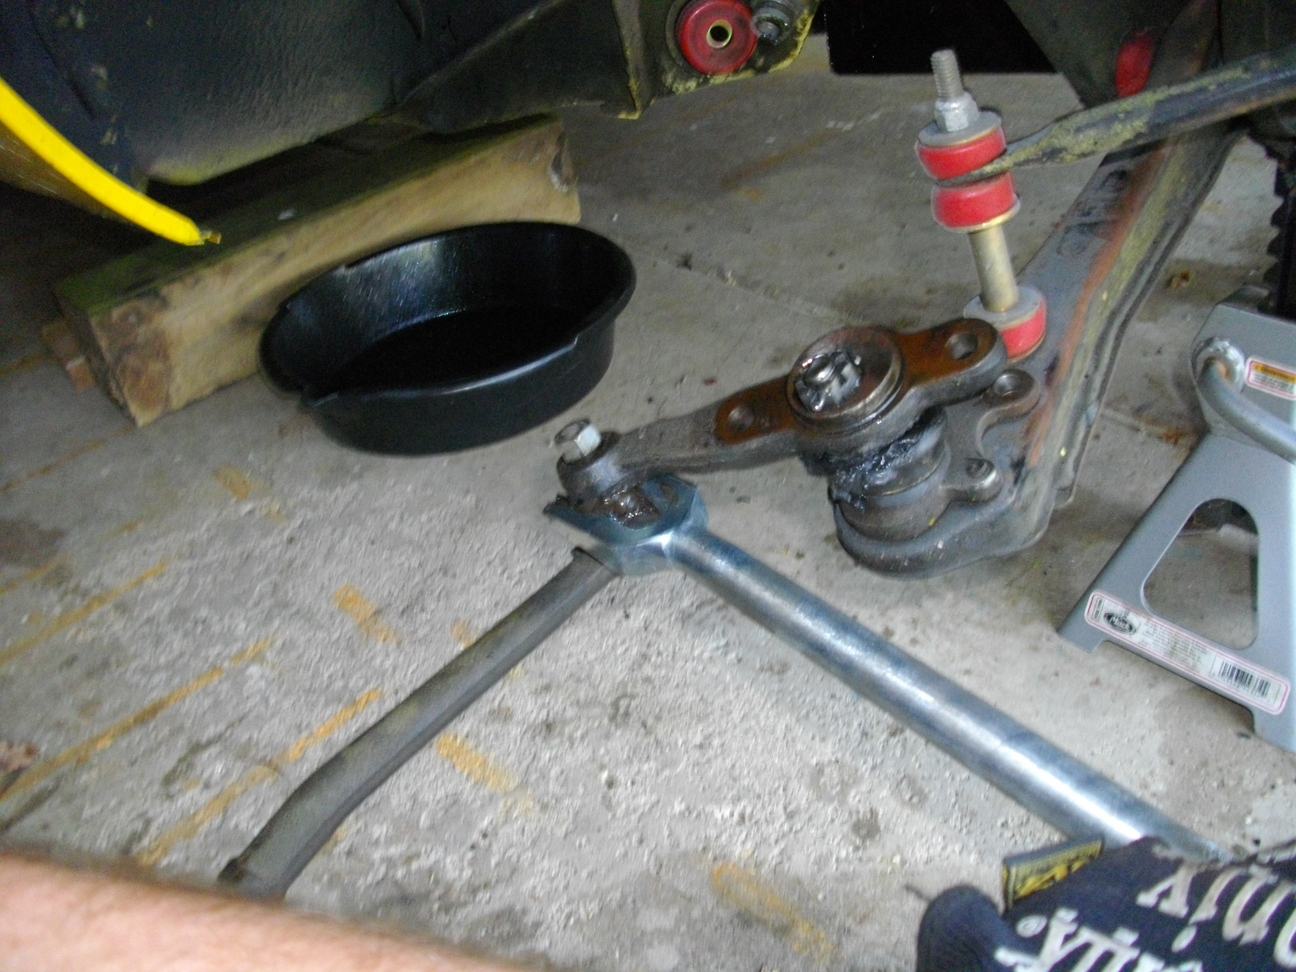
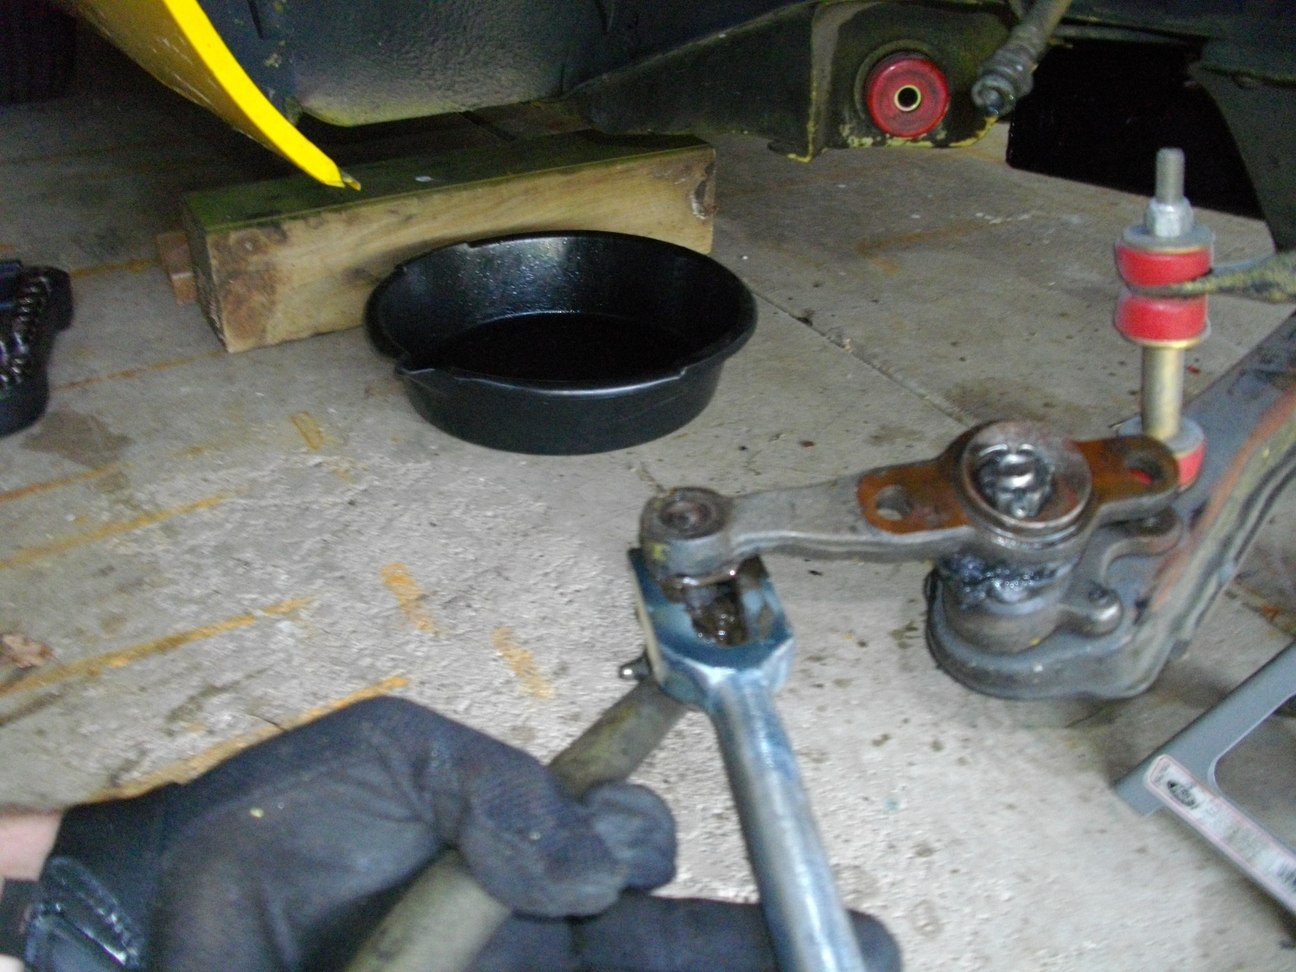
Got the front coilovers from ttt. Been working on installing them in my free time. Found some scary stuff. Bolts that hold the strut to the steering arm on the passenger side were barely hand tight. Also the strut bearing on that side was missing. No wonder it was so hard to turn that wheel. New one on the way then an official write up.
-
I am incredibly jealous right now. Love that seat. Can't wait to see it installed.
-
Unfortunatly TTT had some issues getting the struts. But they have em now and should be to me on weds. I will keep you updated with my progress.
-
This is kind of a wish list. My budget for this build is really about $25k. Obviously that is being spread out but that's a number I can swallow. I'm planning on about $5k for paint and bodywork so that leaves me about $5k for the rest. Let me know what you think of the following. Working on a deal for open r200 $150.00I'm gonna need driveshaft modified mustache bar misc parts and pieces for install $500.00Rear axles $600.00LSD $1000.00Rb-rs $800Tires $600Rear brakes $400.00 (maxima kit)Front brakes $400.00 (silvermine)Misc suspension parts ( front lcas, tension rods, bump steer spacers) $550.00 Total $5000.00 these are obviously mostly estimates. But let me know what you think. Am I missing anything?
-
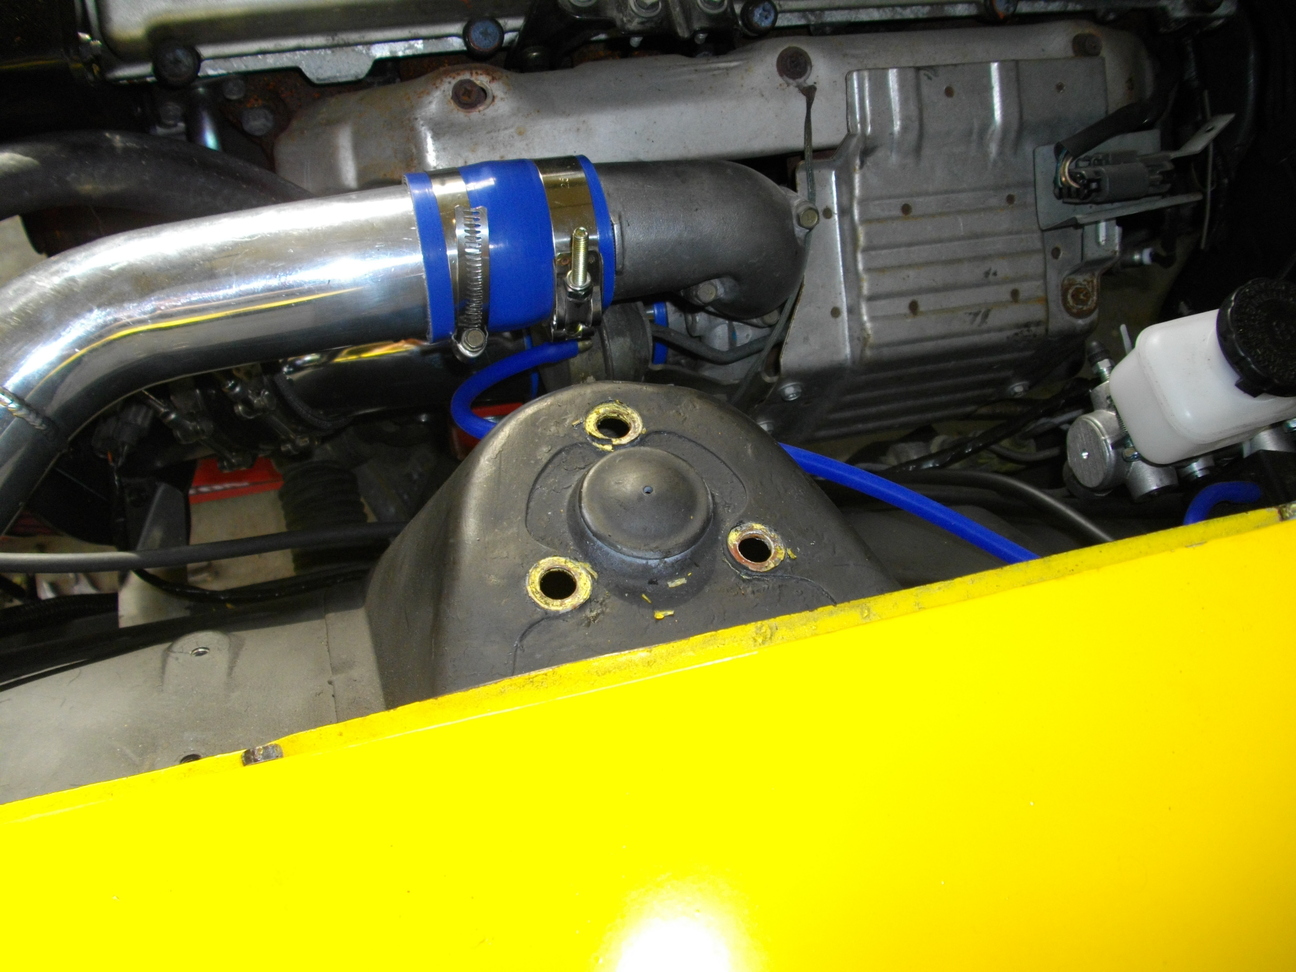
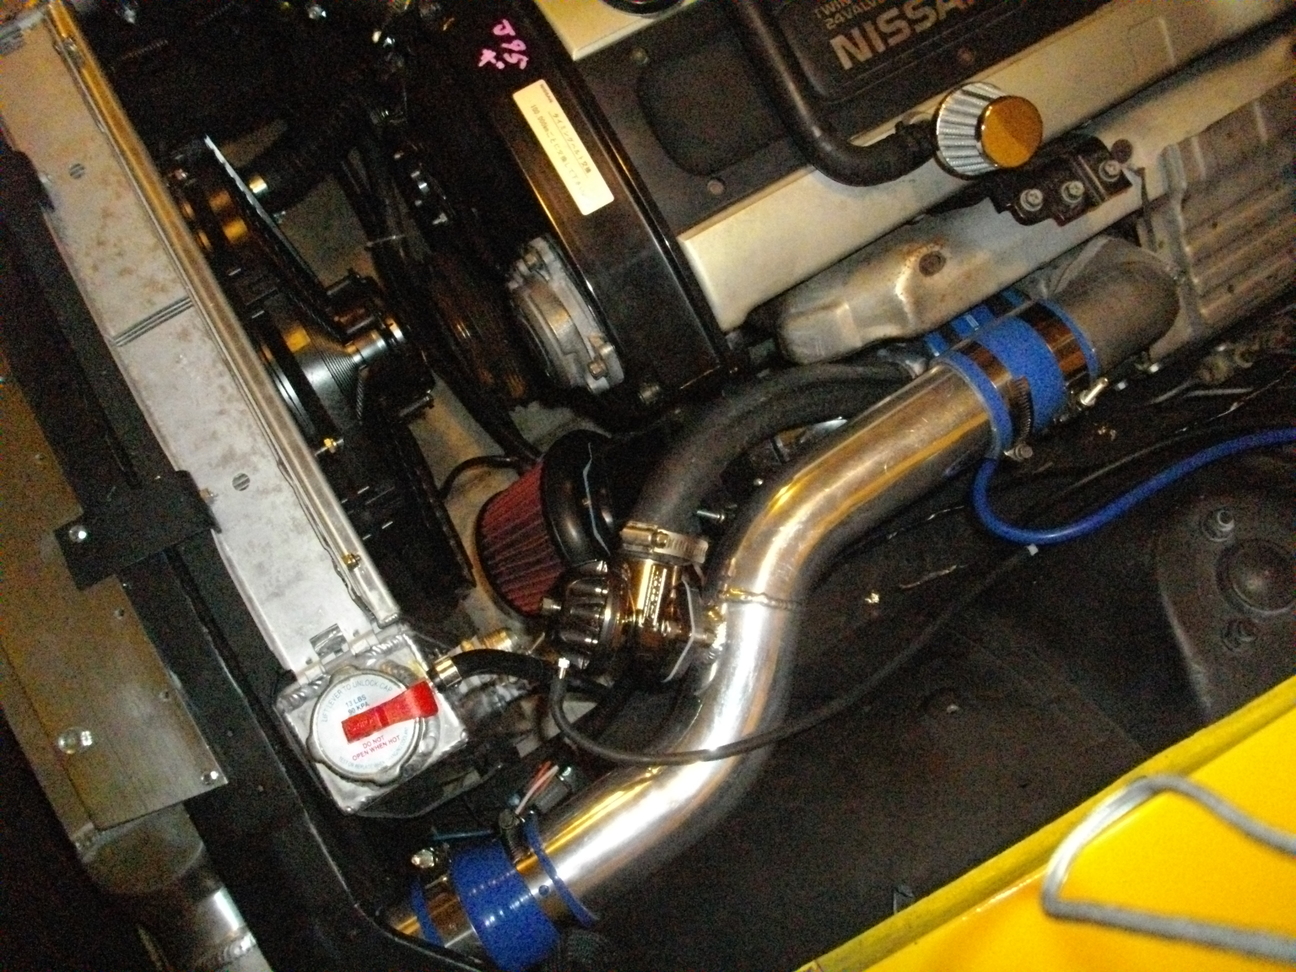
So I wanted to compile and update a better list of expenses. So some of this stuff is from memory but it should be accurate. Obviously not all this is necessary but it's the direction I want to take my car. Still waiting to get the coilovers in the mail so I can do that write up. Car. $3500.00Chemical stripper from home depot. 1 can about $8.00 rustoleum primer from home depot. 4ish cans $20.00 High heat grilll paint from home depot. 4ish cans $20.00 Rust encapsulator 1 gallon $130.00 Pre 1 gallon $50.00 3/8 tubing kit with cutter, bender, and flare. $87.00 cushion clamps. 2 packs $18.00 -6 tube nuts. 2 packs $6.00 -6 tube sleeves. 2 packs $4.00 -6 adapter fittings. qty 4 $12.00 Tap and die kit. $15.00 cutting oil $5.00 -6 to 3/8npt 90degree $10.0010' stainless braided hose. $40.00 qty 7 an straight hose ends $35.00 qty 4 an 90degree hose ends. $42.00 JEGS 40 micron inline filter $30.00 Carter fuel pump. $70.00 Bosch 044 fuel pump. $180.00 Bosch inlet adapter. $4.00 Bosch outlet adapter. $5.00 PRC radiator - $265.00 spal fan - $150.00 Custom shroud. - $100.00 bracket materials - already had them. Ace hardware weather stripping - $5.00 Ezwiring 21 circuit harness - $185.00 Solder heat shrink and loom - $30.00 welding shut plugs $? friend did it ( thanks Doug.) Eastwood kit $50.00 Acetone $15.00 muratic acid $15.00 Surge tank. $100.00 Dynamat. $200.00 Optional and plenty left for the lid. Alluminum for brackets. $20.00 The following are from Mckinney Motorsports. http://mckinneymotor...+260+280Z+parts Rb25 motor mounts $475.00 intercooler kit. $850.00 Driveshaft. $425.00 exhaust. $550.00 Throttle cable and bracket. $129.00 downpipe. $290.00 Knockoff greddy intake manifold modified for 240z. $300.00 Total for Mckinney parts. $3019.00 Greddy Type Rz BOV http://www.nopi.com/...bpc=345&vv=2246 Type RZ bov $247.00 Rb25 timing kit. http://www.z1motorsp...roducts_id=3813 Greddy Kevlar timing belt Rb tensioner pulley Rb idler pulley Rb timing belt tensioner spring N1 water pump Sold as a kit $356.00 Speedhut gauges. http://www.speedhut...._number-851.htmSold as a package $836.00 Rb25det engine and trans. $1900.00Safc free350z seats, free, brackets $120.00Apexi air filter $70.00Intake pipe $100.00Maf $150.00Fan controller $50.00Master cylinder $140.00sbc I color with a/f box and temperature sender $700.00Greddy oil cooler sandwich adapter. (not installed yet) $170.00Ttt front and rear coilovers $1600.00 next write up Total so far. $14874.00
-
Awesome. I love what you guys do. I would love to work for you. If you are ever hiring please let me know. I would even sweep the floors.
-
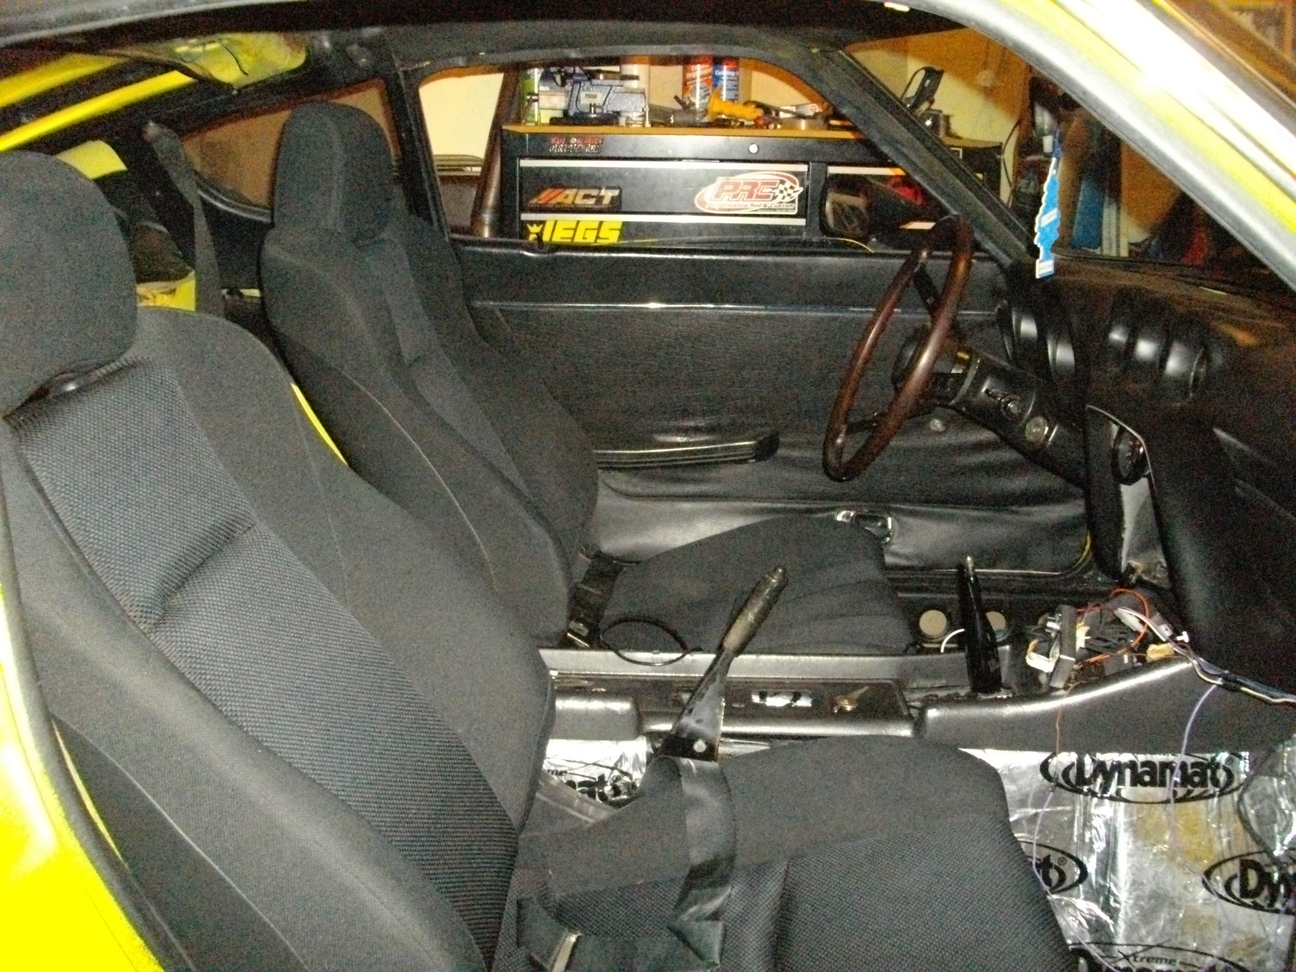
Just a few pics of what I have been up too. Got my 350z seats installed. Cant weld so had to outsource this one. Paid $120.00 to have the brackets made. Had an intake pipe made while they were at it. Not much here 12" long angled pipe with bung welded on to recirculate the bov. Also farmed this out $100.00 Got a new toy. Have to install this officially. Got it working just have to clean up the wiring.
-
I have an original safc and a series 1 rb25det. So not sure if they are the same and also not responsible for any of this info. But here are the notes from my install. 1. Safc in (white) closer to engine side of harness out ( yellow) closer to ecu Pin 27 on ecu (black) sometimes orange and blue. Should be main air flow (afm) if you have the pinout 2. Tacho (green) pin 7 (yellow/red) 3. Throttle signal (grey) pin 38 (white) 4. ign power (red) pin 59 (black/white) 5. ground (brown) (black) 1" closer to engine than the brown wire pin 60 (black/white dashes)
-
You assume correct. I have the prewelded ready to go kit.
-
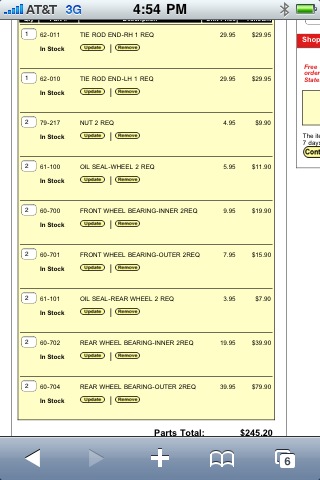
Ok I decided to not take any shortcuts on the wheel bearings. I plan to do the front lcas in a few months so I am not going to do the ball joints. I also plan on doing the ttt tension control rods when I do the lcas. So for now those are staying stock. I made a list of parts I am ordering. If you guys could look it over and make sure I dont have the wrong stuff and am not missing anything.
-
Sunny I would love to hear your input on installing these.
-
Thanks. That looks easy enough.
-
Thanks guys for the responces. I know that front lcas still use ball joints. My point was that the ttt ones replace the ball joint so I don't want to buy them twice. Front bearings are cheap so I'll probably buy those. I'll order the outer tie rods new seals for all the bearings. New cotter pins. I have never repacked bearings before. Are there any special tools involved or is it just taking my hand and packing grease into a bearing?
-
Ok guys I ordered the technotoytuning coilovers. I have been reading the FAQ section and trying to do a stage 3 suspension upgrade. I am doing this In steps for financial reasons. I plan to do lcas and new brakes next year. What on this list should I not purchase in an effort to not end up buying parts twice. For example I know that front lcas would take the place of ball joints. 1. New outer tie rods2. Ball joints as stated should be taken care of with the Front lower control arms 3. Front wheel bearings. should I just purchase new? If so do I need 2 inner, 2 outter, 2 Front wheel bearing seals and 2 Front wheel bearing lock nut?4. Rear wheel bearings. These are significantly more expensive. What's needed here same as above but with rears? Should these be done with the brakes instead? What else do I NEED to get this going. I am broke right now but need to get this project on the road. I also plan on doing bump steer spacers and Tension control rods. Are these a must right away? Thanks guys. I did search I just found so much info and it was tough to narrow it all down.
-
I think I figured out my issue with this boost controller. Broken English instructions not so good. I need to pick up some pieces at the local auto parts store. No rush right now. Downpipe went back to McKinney to get refitted. Also waiting on the correct muffler. It looks like its gonna be a few weeks before this thing is back on the street.
-
I am using an blitz sbc I color
-
I got a electronic boost controller that is also a boost gauge. It has a solenoid with an in and an out. I have the in going from the intake manifold and the out going to the actuator. Does this sound correct? I am not getting a boost reading but It could need to be setup. I know Jakeoster mentioned he had a nipple on his Ic piping. Is this my problem? If it is does it need to be right before the throttle body?
-
I used some carb cleaner to search for a vac leak. Couldn't find anything. Checked tps voltage today and adjusted the idle set screw. I've got it idling fine. A little high 900-1000rpm but it no longer stalls. No spark plugs to be found ordered Ngk copper ones should be here Friday. Set the timing. Pulled 1 plug and the gap is way off. So hopefully the new plugs will help even more. Only problem I still have is the drop in rpm on rapid decel. Goes down to about 450rpm.
-
Had a little time today. Removed and cleaned the iacv it helped a little. I am getting a much better idle. But the motor still drops to like 400rpm on rapid decel. But at least it's drivable. Talked to Mack at McKinney he is gonna help me with some exhaust issues. Plus I have some surprises in the next few weeks. I am getting some backfires at wot. Plan is to check timing. Never set it . Also replace and gap the plugs. What do you guys recommend for a stock rb25det?
-
Did a little work today. Trying to solve the idle issue. Tightened the intake manifold and iacv. No luck. Then I read how to use read the ecu codes. 1st time I got a code 12 which is maf. Reset the ecu. Went out for a drive. Got the car up to running temperature. Check engine light came on and bad idle returned. Then the next part is weird I tried to check the code and it was 55 all good. Why would the light be on and the ecu have no code stored?
-
Zt-r. I was planning on doing a 3.9 but would prefer a 4.11. I wish there was a better diff solution for our cars. It's very expensive when you start adding it all up. Update. Picked the car up today. So far I like the way the seats turned out and the new intake pipe and recirc valve looks good. Bad news is McKinney sent me the wrong exhaust so they couldn't fix that. Also the idle is still terrible. I have to have a vacuum leak somewhere. Or the iacv is bad. Also on the way home the ride was terrible again. Something about it just seems sketchy at anything over 50 mph and it was so bumpy and bouncy it made me sick at one point. I am also unhappy with how low the exhaust hangs. I need to get that worked out. To do list. (in order of priority) 1. Find vacuum leak and or figure out idle issue. 2. Get correct muffler. 3. Get exhaust tucked under the car better. 4. Suspension. Gonna go with t3 coilovers and do camber plates down the road. 5. Differential. 6. Desert z rear brake conversion kit 7. Silvermine front brake kit. That's the plan so far. I know their is a heck of a lot more to do. Pics of the seats coming after I clean them and have some sunlight.
-
I am leaning towards the long nose r200. Plan to do an obx LSD down the road. I'm not 100% sure. I'm bummed that I have to pay to have my McKinney driveshaft modified with a new diff. Thats why I wanted the sti r180 but I've been told it doesn't hold much over 350hp.
-
Well the shop got backed up on another project. No eta as of now. Miss my baby. Also asked them to weld a bung on my exhaust for the zeitronix wideband I plan to purchase this summer. Can't wait to get her back. I think I've decided to get the ttt coilovers as soon as I get the bill from my shop. Here's hoping its a small enough number that I can buy them right away. Then I'll move on to collecting diff parts.