-
Posts
1201 -
Joined
-
Last visited
-
Days Won
7
Content Type
Profiles
Forums
Blogs
Events
Gallery
Downloads
Store
Everything posted by duragg
-
What pissing me about this is I bought the BMW switch: BMW 80 / 88* C (176/190*F) dual temp switch Part # 61318361787 Being suspicious I put it in a water bath and behold, the first switch hits at 195, the second at 210f. Correct part number, even has the degrees marked on the housing. It us a URO switch from AutoHAUZ, so at the very least I've been punked by AutoCrapHauz Again... I will return it and order from a better supplier, Again. But gee I hope a proper RockAuto vendor tests correctly.
-
Splendid. I must have a different style housing: Guess the ideal is the lower hole, out of the engine, prior to the T-stat.
-
Need a 2nd water temp sensor / sender for my eFans. I have the stock temp pickup in the front of the T-stat housing. Where ideally would one mount the 2nd pickup? There are 2 other unused bungs I see in the T-stat housing, both face drivers side if I recall. One on top, one on bottom. Anything else to consider in this area? Tj
-
Hey 280Zcar... how is all of this holding up for you? I am doing the same mod right now. Tj
-

Weber jets??All who live for their triples please read this
duragg replied to datfreak's topic in Nissan L6 Forum
The Z engine calculator will get you close: http://www.atlanticz.ca/zclub/techtips/calcs/engine%20builder/ If you have 89mm bores and standard rods you are somewhere around 2950cc? Use the snail gauge only as a reference for comparing and setting all the bores to the same flow. Those values go out the exhaust as soon as the butterflies move. -

Weber jets??All who live for their triples please read this
duragg replied to datfreak's topic in Nissan L6 Forum
I do think starting with a small and managable choke and working up from there is helpful. But as we discussed by email, a change in choke changes everything else so you are switching Main, Air and possible idle and other jets. -

Taco'ed my car, haven't been around a while
duragg replied to clutchdust's topic in S30 Series - 240z, 260z, 280z
Sorry brother. Hope you find damage limited to easily fixed parts. I know you are feeling this... But remember, 9 out of 10 ferral dogs prefer warm to cold food from a can.... I hope this helps you feel better? Point is to make the best of it... TJ -

Autocross and oil pressure... impending doom??
duragg replied to shuttlefever's topic in S130 Series - 280ZX
I like some things about Dave's cast pan: http://www.arizonazcar.com/pan.html I can drive over to his house and pick it up in 15 minutes being #1. I presume it is better than a stock pan. If I call it "Contact Lenses" in my 1040 it would reduce my taxable income for a brief period. -

Autocross and oil pressure... impending doom??
duragg replied to shuttlefever's topic in S130 Series - 280ZX
Mobil VR1 50wt holds up much better for me on full flog mode. But a real oil pan in my future. Oil level, block, pan and dipstick model is a whole nother search thread for the cornering issue. Good job on the PRV fix. -
Years ago I took a giant socket, cut it and welded a pipe in the middle. This made me a DEEEEEEP Socket to torque the Main Shaft nut. I either gave that away or "klog" took it which is another story. I need to do make another super-socket like that. There is a picture of its impressive length and girth somewhere here on Hybridz. In the meantime I used a big wrench borrowed from a friend (1.5"?)
-
AFR on gauges aside, you should still reference the lean best find method and have an idea that all screws take about the same turnage to peak RPM in each cylinder. Takes a while but keep working till all are adjusted by reference to sound or a digital tach for max RPM .from there u may go 1/4 to 1/2 turn out (richer) to get behavior where u want it . A nice collection of jets can be toggled also Drivability trumps AFR reading on a gauge which is a good relative reference tool
-

LD28 water pump install - Question for those who have done this modification
duragg replied to ktm's topic in Nissan L6 Forum
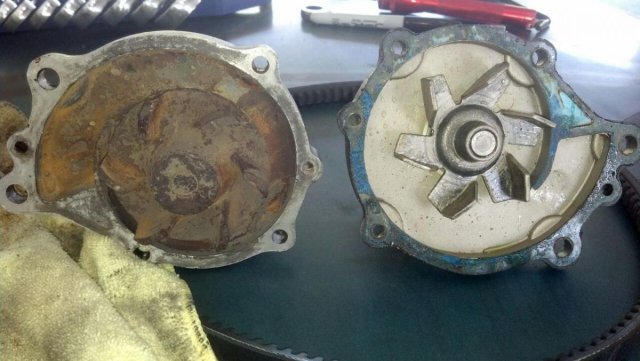
Well... one is old cast "Japan" pump Other is the cheap one I installed at build The "Japan" cast impeller was a bonus in the LD28 engine (complete) for $450 -

LD28 water pump install - Question for those who have done this modification
duragg replied to ktm's topic in Nissan L6 Forum
Found some other pics of LD28 pumps with different little tip things. Maybe it is a cast gas. Wonder if its any better than the stock one I pulled out. -

LD28 water pump install - Question for those who have done this modification
duragg replied to ktm's topic in Nissan L6 Forum
Pic below. I pulled it myself off the LD28 I bought last week. My "LD28" pump and the pump I installed when I built the engine. It installs with no interference from anything so I will just proceed and run it. -

LD28 water pump install - Question for those who have done this modification
duragg replied to ktm's topic in Nissan L6 Forum
Help... I am installing my LD28 pump, but it is fitting perfectly with no modification? I haven't trimmed anything and it sits in position and spins just fine. Lucky or screwed?? TJ -
We should probably be clear on one thing... I screw-up half of everything I touch. Everything I did could have been totally 100% raw luck due to some other screw-up which un-did the primary screwup. I hope that is not the case, based on research and studying just about everything I could find online. I tried to test / apply / analyze along the way as best I could, but there are clear gaps in the scientific process. It seems to me that tranny people as a whole are generally relutcant to give up their "secret sauce". This thread is OPEN to any and all who want to add, subtract, multiply or divide the efforts herein presented.
-
We are adjusting slot depth so the teeth are closer to each other (forward and backward, if you will) The slot width would change how the relative alignment of the teeth is (Left/Right if you will) which was perfect on all the ones I looked at. Making the slot deeper brings the teeth closer to each other so they can touch prior to the keys being pushed out of their engage ring groove. With this set, the impact will be corrrect for both upshift and downshift and I have hammered all gears up to 7300rpm power falloff and shifted great. You bring up a point of making the keys shorter, and I think I considered that, but there may have been some issue with that. For one, brass is easier to work than the hardened keys. At the April race I will know more with the higher heat and stress of combat.
-
NewZed: I love the double on-tonn-derr of your post. AZGhost is my next victim, we bought him all the new parts and going to use all the previously gained knowledge to make him a new tranny with perfect performance from day one (we hope). I've beat on the car a bunch now and all the squawks have been resolved. 1,2,3,4 and 5 all shift perfectly well with no grinding. 3&4 shifts a little faster than 1&2. I tend to attribute this to some cleanup I did of the gear cone prior to reassembly. I broke the gloss of the cone surface, not unlike turning rotors or resurfacing a flywheel. Of course, i am having radiator issues now with harder track use and summer coming, but that is another story altogether. Tj
-
Bought: LD28 eng and tranny with starter. Sitting on Craigslist a mile from my house in some dudes backyard. $foh-fitty. Trying to figure out what to salvage from this $450 booty. Starter - Yes LD water pump- ya Crank, sure. Main cap screws- yep Block - sold to another guy What else? Scrap it all?
-
I ran the car hard tonight with race gas and I slammed 3rd gear "Like a boss" and it slipped in perfectly / no crunch. I win. I am eternally gratefull to "jacks" and I will send them an email so they know how much we appreciate their sharing information.. Slot: There are 3 slots in the brass ring synhro and those are what I shaved from .0163" to about .0148" based on some measuring. You can see it by preloading the gear and pushing the engage ring and watchin how much the synchro keys recede on the backside. I swear its really hard to explain, but relatively easy to visualize once you have a test setup and spend 3 months farking with it 3 hours and 3 beers a day.
-
I didn't touch the keys. I shimmed .060" under each key spring, but the keys are stock. I think there has to be a slight increase in shift effort as evidenced by the higher key breakaway force due to the stiffer springs under the keys. But this is negligible and I cannot detect it at all by stirring the lever. My 1&2 gear have old keys, 3&4 are new. and no difference can be detected at the shift lever.
-
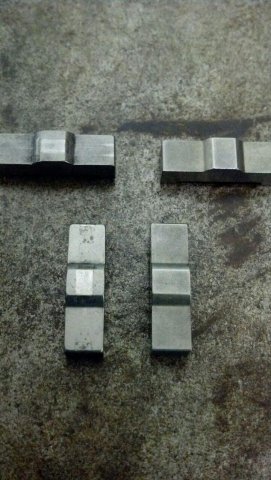
I bought new keys from Nissan ($1.70 each). They are now NLA, sorry. Those were the last 4... I took pictures of the new and old side / side and there was very little difference. I tested the new and old keys in my little fixture on the scale and could tell no difference in the keys. I think with the shimming under the keys you have plenty of control over the breakaway force. Of the various factors I have run into through this process: Major Factors: 1) Brass Synchro in spec (so the have ability to provide sync braking effect). 2) Dog Teeth engage distance (so the force is properly applied during the sync braking). 3) Good condition shift forks to make sure engage slider moves as far as it needs. (so the slider is in position and cannot pop out) Minor factors 1) slightly worn brass rings (will still work fine as long as they aren't bottomed out on the gear face) 2) condition of the engage teeth (sharp & new vs old and slightly rounded not a huge factor). 3) breaking the polished glaze of the gear cone (Allows better braking action) 4) type of oil (A great condition tranny would work with any appropriate lubrication). As Jacks website noted, I think I could take an old and crunchy tranny, rebuild with used (but within limits) parts and do some of the tweaks mentioned above and have a perfectly good transmission again.
-
I am sorry for not taking pictures last night, but we were on a full court press to get the work done. I split the tranny case and pulled the input and C/S bearing and gear which gave me access to the 3/4 gear cluster. Swapped in my new keys, and new engage ring then measured the gap between the brass teeth and engage teeth it was still too far, allowing the keys to give up tension too early releasing the engage ring to grind onto the gear. I machined off about .015" from the slot on the brass rings and this allowed the correct timing of the engage ring hitting the brass teeth just as the keys are just before their maximium tension so the blocking remains until the speed is synced and the shift proceeds properly.
-
That's a BIG smile from duragg... I believe success has been achieved. Beer and a shower time. Huge thanks to 510 kid "Vanmansam" for helping with todays 5 hour push to remove, fix, replace and test.
-

WTB F54 short block or compete 280zx turbo long block (Southern CA)
duragg replied to kcwyeung's topic in Parts Wanted
Theres a bunch on Phoenix Craigslist.. it seems.


