EastTnZ
-
Posts
317 -
Joined
-
Last visited
Content Type
Profiles
Forums
Blogs
Events
Gallery
Downloads
Store
Everything posted by EastTnZ
-
LS2 HybridZ 240 Sets 3 ECTA Records
EastTnZ replied to RebekahsZ's topic in Gen III & IV Chevy V8Z Tech Board
Show us pictures when they're done!!! I hope one day to have a lift! I'm dreading this downpipe welding under the car on jack stands haha -
Project Rex Killer, 240z LS3
EastTnZ replied to nathaninwa's topic in Gen III & IV Chevy V8Z Tech Board
Those headers look AWESOME so far!!! Love it! And yeah I bet those couple of plugs will be a pain to swap! Keep up the great work! -
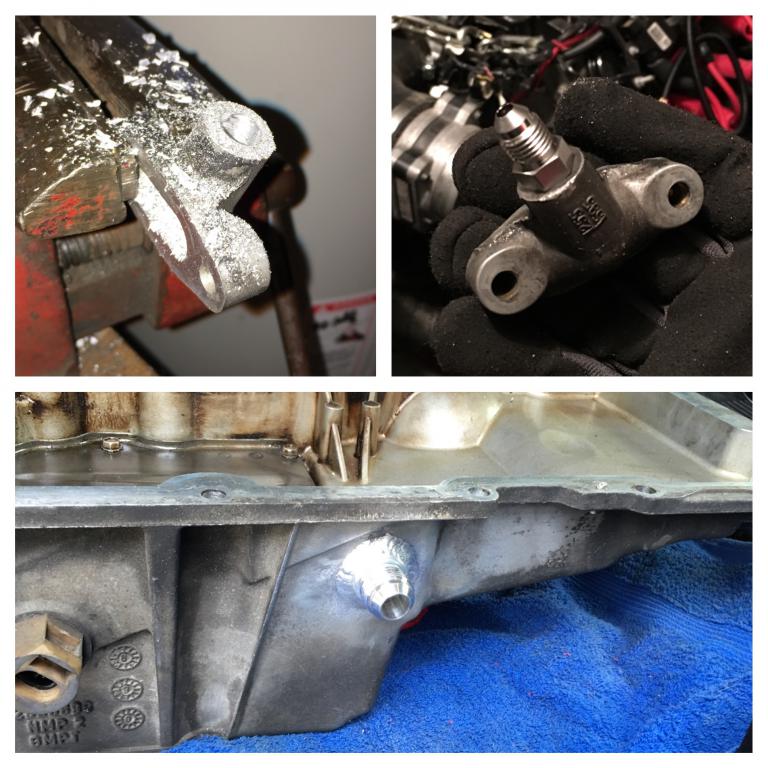
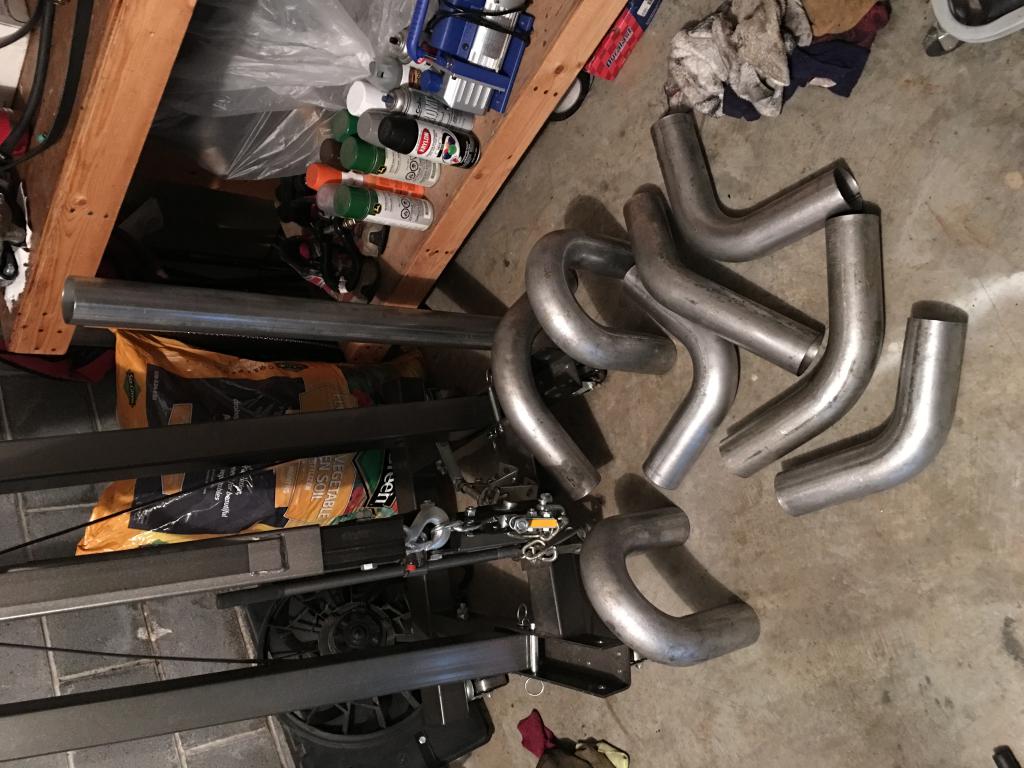
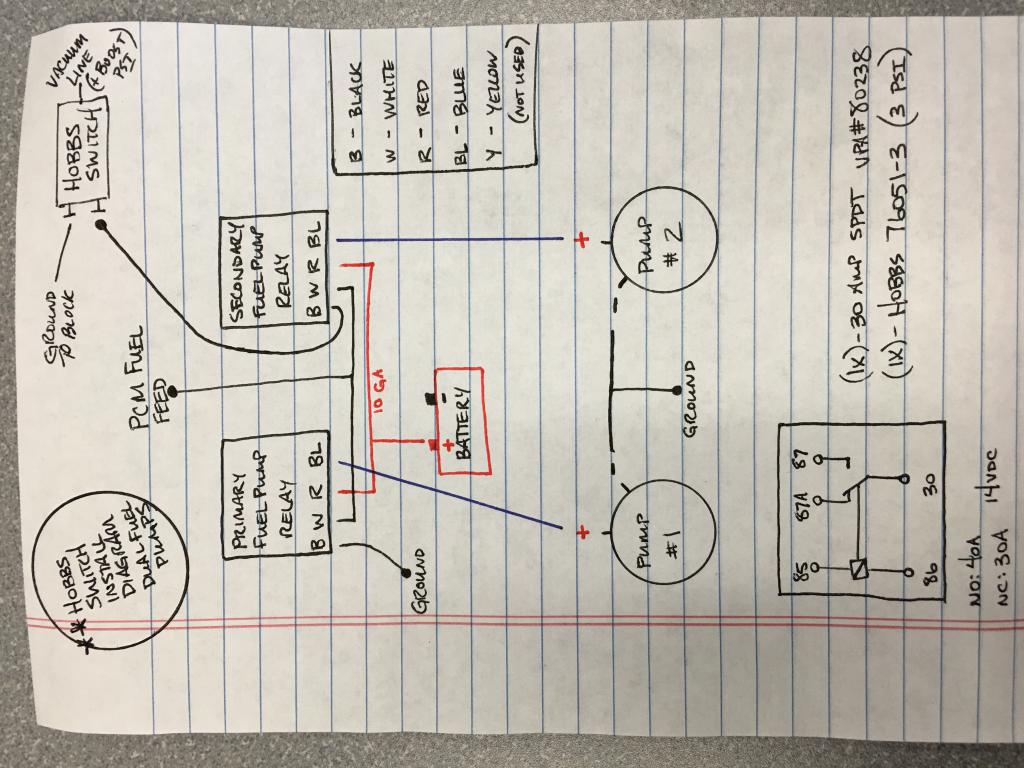
Well, I tapped the oil block off plate just above the oil filter and the aluminum cuts like butter. I'll add the specs for 4an threads sometime in the future but it was super easy. I also dropped off the oil pan to have a 10an fitting welded on ($55) and feel like it was good/cheap insurance vs a bulkhead or another route. 1 day turn around on the weld job didn't hurt either. This grade B 25 lb box of 3" bends from Columbia river mandrel bends looks awesome! They're just dirty vs the other new 3" I purchased before. A ton of bends for the price. Lastly, I have drawn out the Hobbs switch installation diagram I will be using. At 3 psi the second walbro 255 should kick in just in case fuel from one pump isn't enough. Use 10 gauge wire from the battery to the relays and the yellow isn't used. Other than that it's a bunch of grounds and connecting to the pcm wire already plumbed to the existing fuel pump. I'm out of town this weekend or I'd have a lot more done come early next week. Ordered a 45 degree 10an fitting for the oil drain, 4 to 2.5" reducer for the cold side at the throttle body and some other random misc parts. I can't wait to get this thing moving again! It feels like forever after tearing it down early November.

-
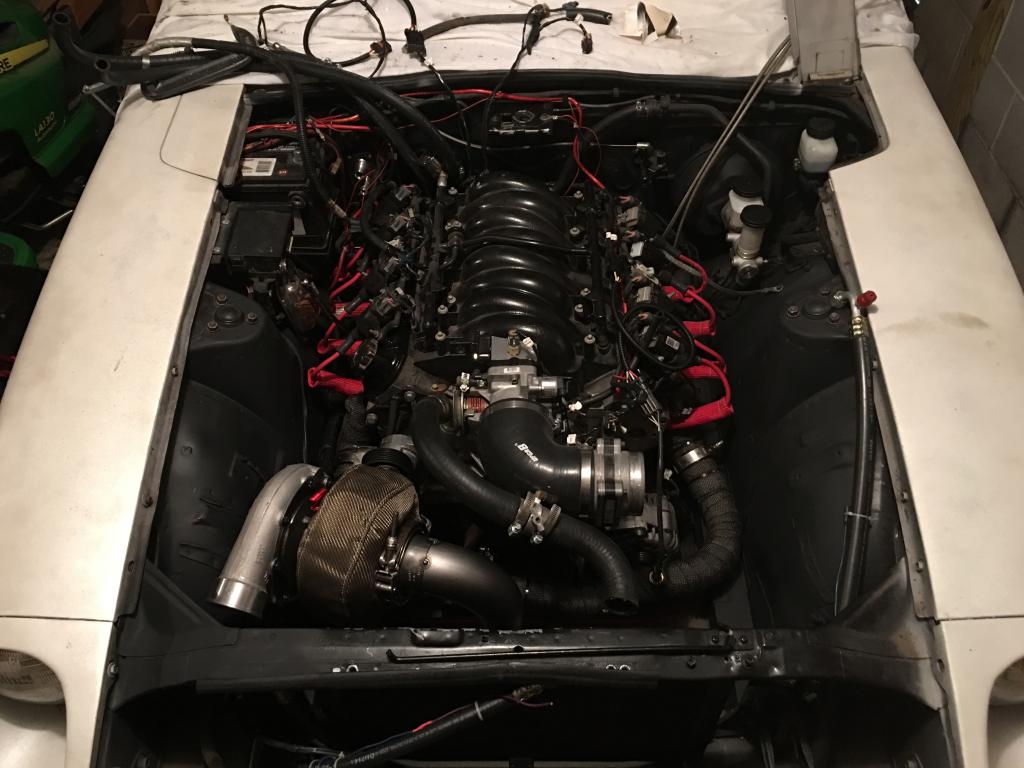
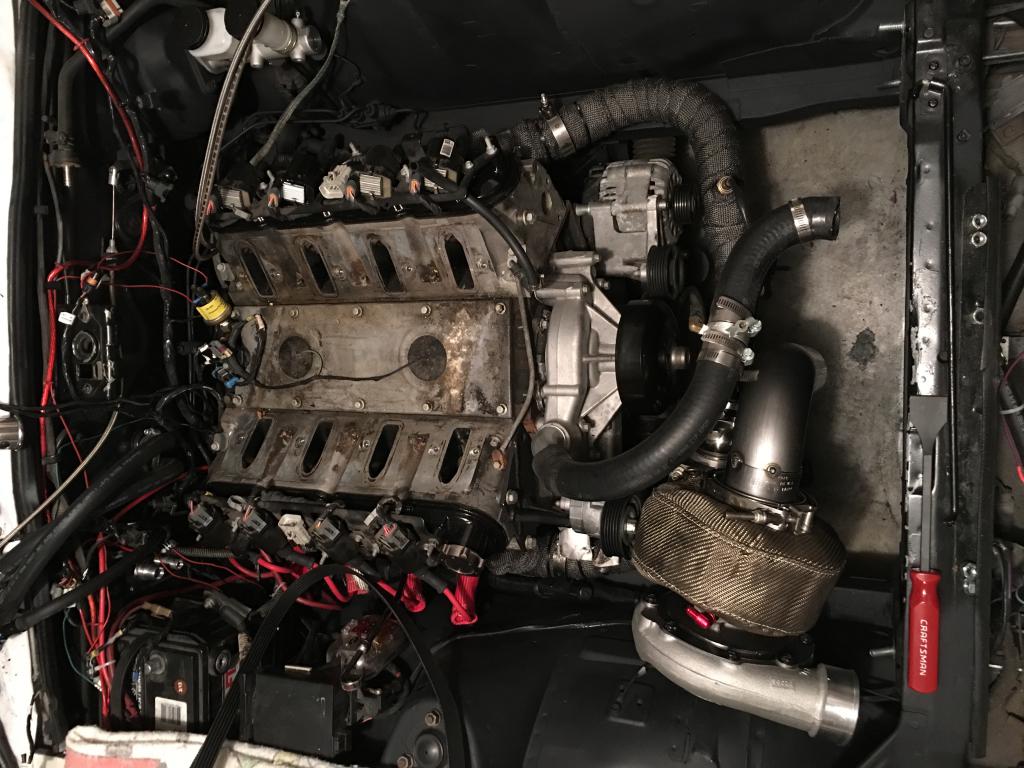
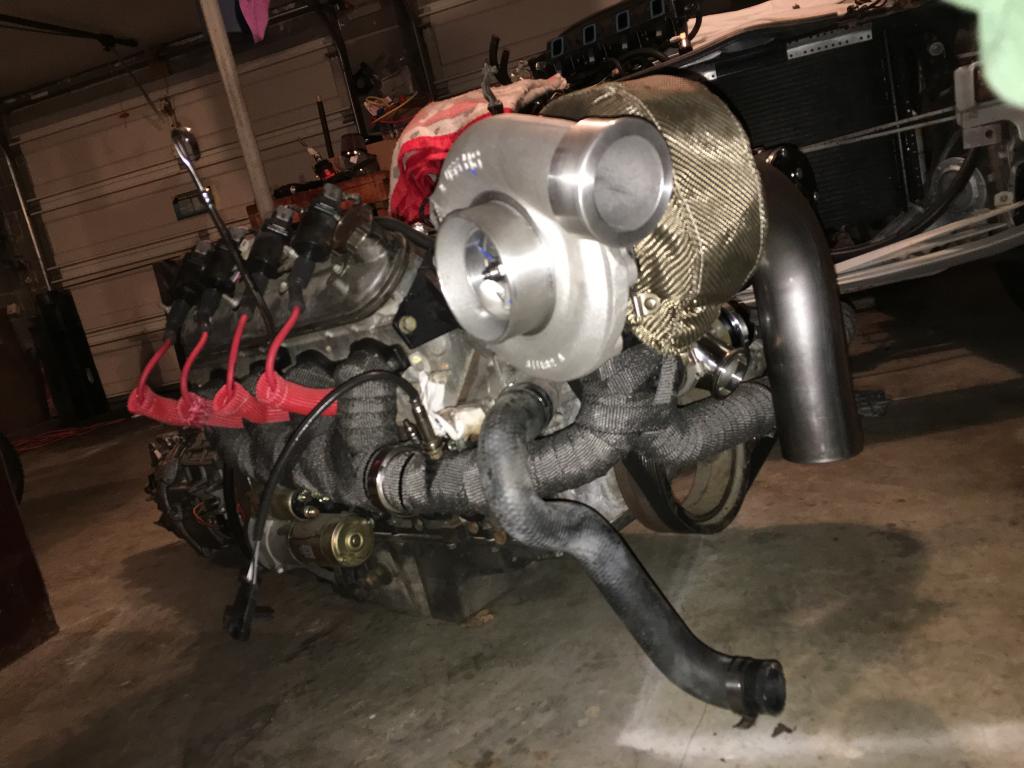
Well, I got her back in for hopefully the last time on the turbo fire up! Engine bay has been touched up with paint, new AC bulkhead installed, rubber grommets patching up factory AC holes (1/2" solid plugs), 90* elbow on AC drain hose, remove surface rust off passenger side frame rail, wrapped Datsun harness with insulted heat wrap on passenger side, cleanup wiring crimps with solder and heat shrink tubing, cutoff factory engine bay metal for more turbo air filter room. Then I prepped the transmission and motor for install and it went in smooth! Lol. Time to cleanup the heads and valley cover due to bad intake manifold gaskets and no catch can system... There's a coating of oil in the intake... Hoping the morose parts I bought will solve this issue.
-
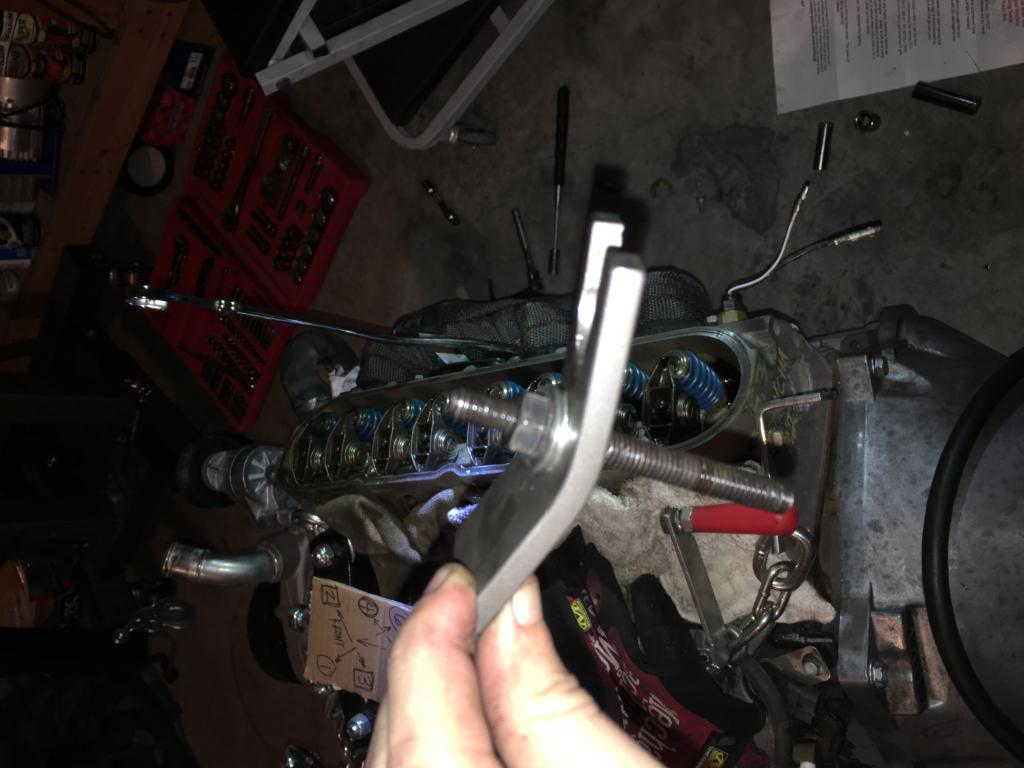
Yes, I wish I had the budget for the coil over conversion but at the time I was more worried about completing the swap and all my struts were blown so tokico's and lowering springs were way cheaper. I've got a 4 point bolt in roll bar that I got from Keith but probably will upgrade some parts over the next year or two. If I tracked it more I would be worried but it's a daily driver and cruising long trip car for the most part. I mash the gas every time I'm in it though!! T56 was the route I had always planned and I even bought a t56 clutch package but ultimately all of the deals I came across fell through so I was at a turning point in my build and had to have a transmission so I found a way to make the tr6060 work and it's served me well. Supposedly it shifts smoother and I think it's not half bad. The t56's that I've shifted are notchy but I had to fab up a lot more because the shifter and mounts weren't readily available. T56 is an easier route to go. Hopefully the stronger parts in the tr6060 will pay dividends with the turbo build though! Good luck with the swap and keep wrenching it's worth it!!! Had a few minutes this last couple days and changed out to LS6 springs (I almost forgot!) I think the tool is one time use because it and the stud used are both bent substantially! Piece of cake install though after you get the first one done. I used the top dead center method and it was very easy.
-
I like the sound of the borla muffler I have on my z. It was nearly identicalsize wise to the factory muffler. It kept my semi stealth look going til you smashed the gas haha! Checkout my build thread, it has the part number for it. I think it was like $75 or close to that. Borla 40359 Pro XS if you're searching for clips on YouTube for the sound.
-
So 15x7's with 0 offset rear wheels will work? I currently have 16x8's. I'll dig back through my texts for the tire dimensions and will be contacting you before I purchase just to double check. Thanks for the info!
-
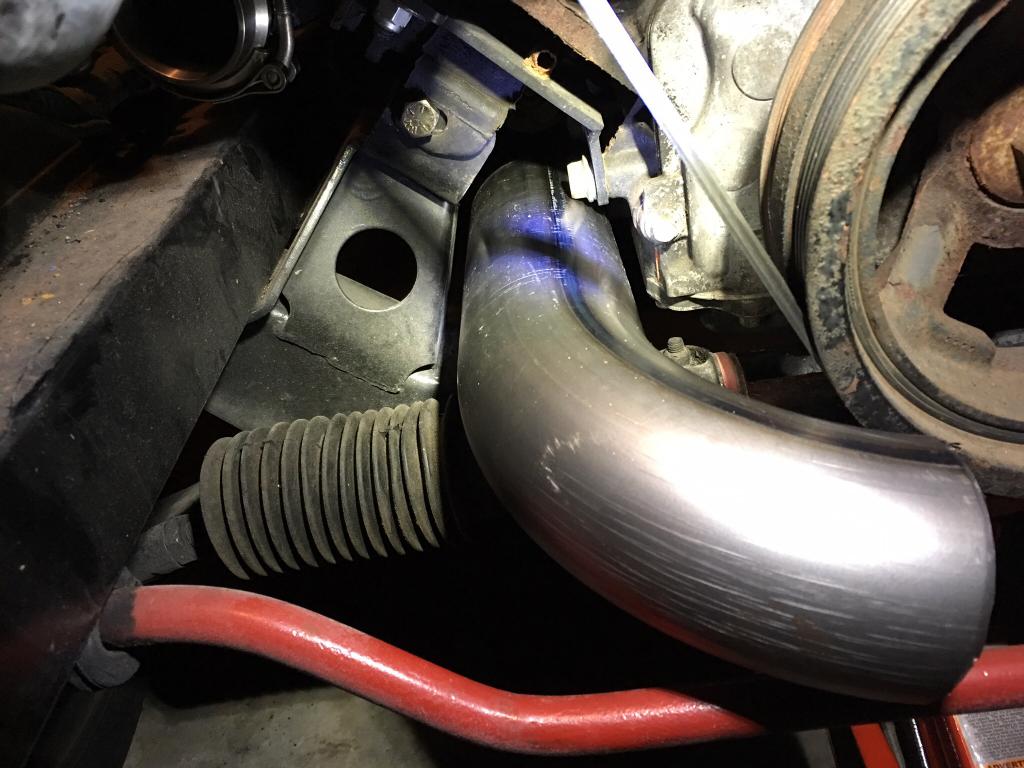
I hadn't planned on moving it but we will see how it holds up over time. Honestly there's not a lot of room left for it to go anywhere else lol. Thanks, I'm working to start tuning this thing by the end of February. Cleaning up the engine bay the rest of the week and insulating wiring harness in parts, then the engine goes back in for good. Once it goes in the rest should be pretty trivial. Just waiting on rubber grommet plugs, insulation and random parts I ordered. The only thing I have to have farmed out is the oil drain bung into the oil pan because I don't have a welder that will do aluminum.
-
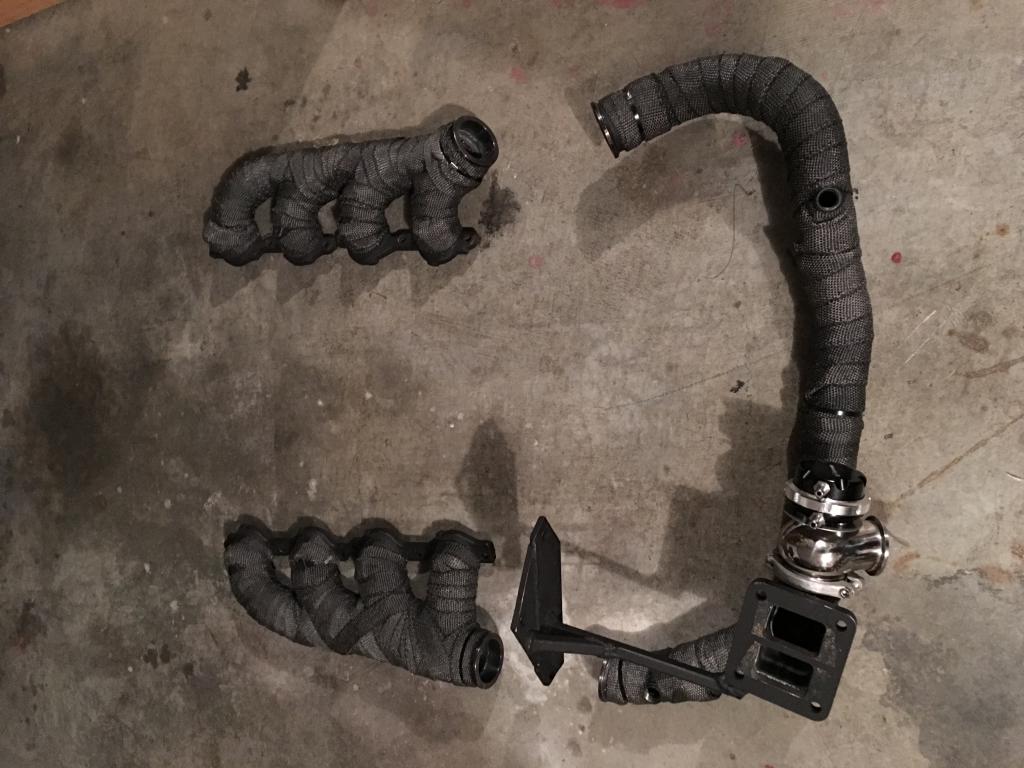
Well I have a small update: New brake master cylinder has been installed and the crossover pipe is complete with the wastegate and narrowband o2 bungs installed. I have also coated the pipe and manifolds with VHT before wrapping them. Still trying to figure out a route for the oil drain among all this piping haha...
-
I used the universal vintage air mount brackets you can buy. I spaced the sanden 508 compressor to the truck spacing depth and it actually works! Tight fit (less than 1/2" to the inner fender) but this compressor and setup will not work with non-truck setups. It nearly hits the coolant temp sensor location on the driver side head as it sits. Truck spacing is 3/4" forward of the ls1 f-body setup or equivalent. Check back through my previous posts. I think I have some pictures and info on it.
-
Try to fit a 3" downpipe with JCI mounts they said... It'll fit they said... It'll be wrapped and angled down so it should be fine. Wish I had those custom mounts like SunnyZ! On a brighter note, I pulled the combo after I took some measurements once the t4 flange was mounted. Next the crossover for the hot side will be fitted, welded, vht painted, wrapped and then it's fire up time soon! I just cut my existing exhaust in half where the merge went into a single 3". I'll attach the downpipe to it so it will calm it down a little.
-
I'd use the red one. My 5.3 had low oil pressure and I changed the blue o-ring to the red o-ring and it jumped 40 psi. Before the new o-ring it was 15psi and dropping, after it was 55 psi hot and does not drop. Cheap $4 insurance.
-
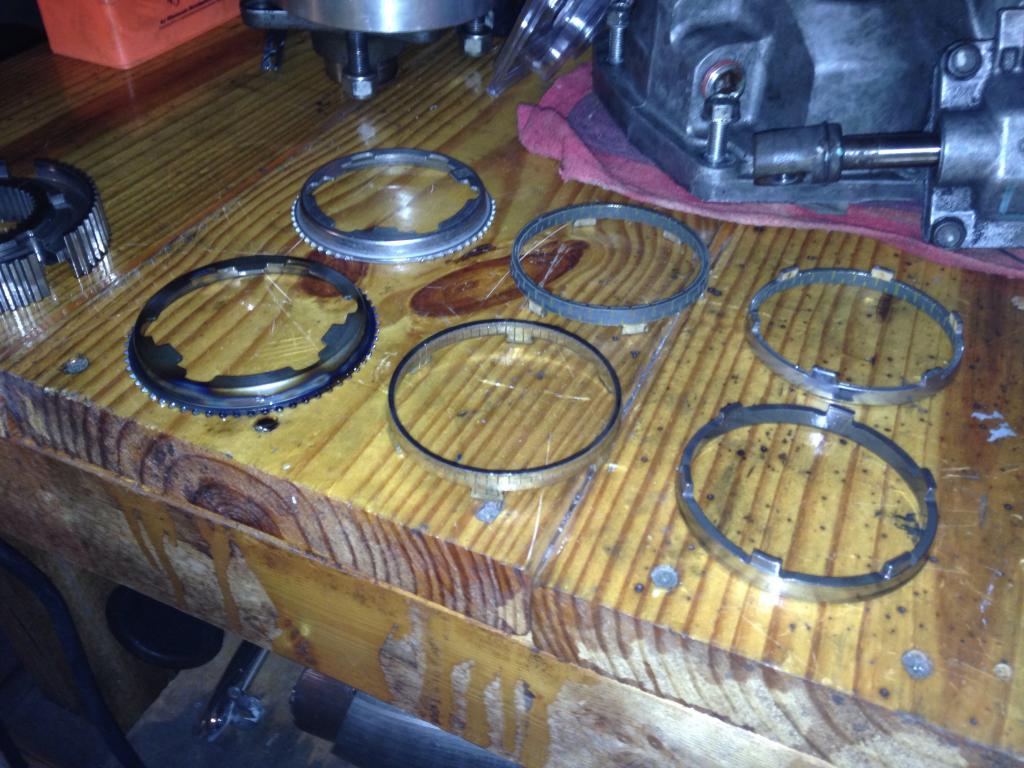
Oh and the other main reason for the engine to be pulled was a grind in second gear. Stupid factory blocker rings in the TR6060 were bad. You can easily see how hot the blocker rings were compared to the new carbon fiber ones... I've never rebuilt a transmission but I can tell you that I have a new respect for quality snap ring pliers (channelock brand is the only way to go for me). And I didn't have any leftover parts either!!
-
Yeah I know lol I wish I had fiberglassed the whole thing while it was out. I had the materials to do it is the sad part haha Right now I'm searching for tuning how to guides and studying tuning files to see what values I need for the myriad of tables available in hptuners. Hoping to get a few responses back soon from some guys on the forums.
-
Haha it's a cracked original dash that I repaired with foam and bondo but inevitably cracked again while I was reinstalling it. I need a dash cap.
-
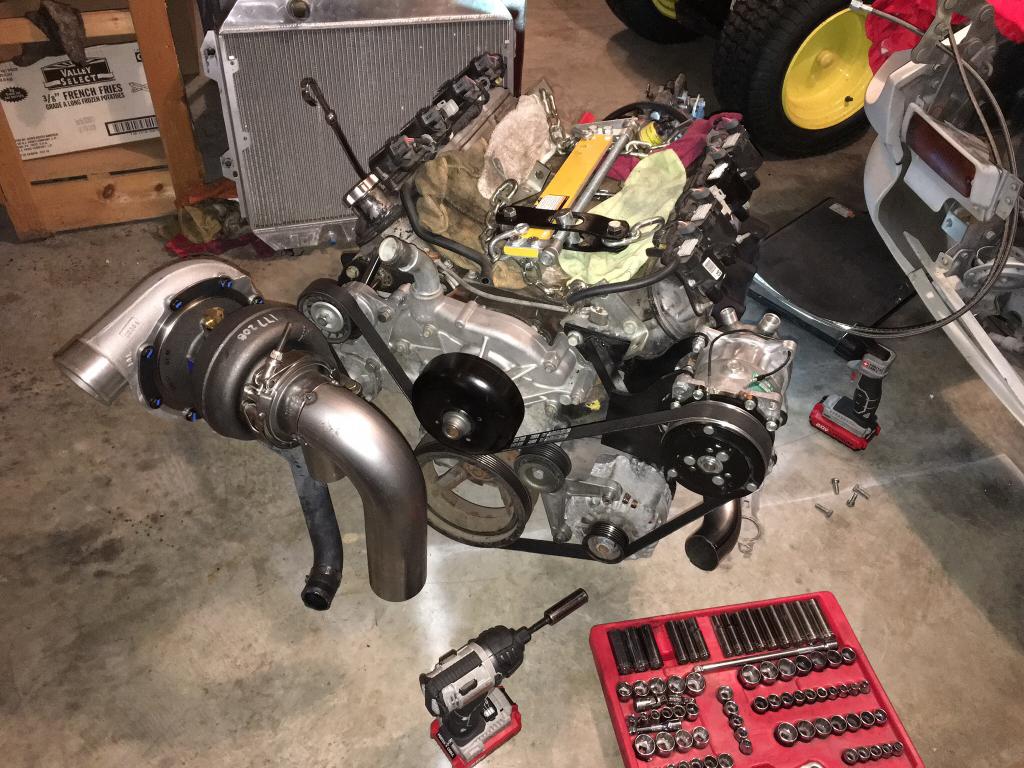
Update: I only lack the oil drain/feed lines and a 90 degree fitting on the 10 an side for the oil pan. I am dropping off the oil pan for a local fabricator to weld a 10an bung onto it. $40 is the going rate and I figure that's better than worrying about a bulkhead fitting or something similar. Parts bought: -60 lb Siemens Deka Injectors EV1 107961 -2" crossover, t4 flange/gasket, & 3" downpipe mild steel piping from columbia river mandrel bends -2.5" intercooler kit -upgraded fuel components (dual walbro setup - same existing 6an feed) -adjustable bov -44mm wastegate 5/10/11 lb springs -VHT black paint -APSX-D2-WHT Wideband O2 Gauge (DO NOT BUY THIS PIECE OF JUNK - AEM UEGO Wideband is what you need and it's very similar in price) -GS-C701 52mm Glowshift Boost Gauge -RU-2510 stubby K&N Air Filter -12615136 GM 2 Bar Map Sensor -12578342 & 12571680 Non EGR Truck Manifolds -12499224 LS6 Valvesprings -S366 Borg Warner .91 A/R 177275 Turbo Hoping to have it all mocked up and ready to start tuning shortly after the holidays in January but we'll see. Goal is to be running around in it by March.
-
Holley Hi Ram Intake Manifold Fitment
EastTnZ replied to JustinOlson's topic in Gen III & IV Chevy V8Z Tech Board
I envy your intake and metal fabrication skills. The intake looks awesome!!! -
A big thank you - 240 LS Conversion
EastTnZ replied to Mikey303LSZ's topic in Gen III & IV Chevy V8Z Tech Board
Great job on the details! It all looks great! Keep us updated on the turbo build. I'm hoping to thread the needle as well with my truck manifolds down and forward too this winter between the AC and alt setup. -
TrackZpeeds CXRacing LS1 T56 240z
EastTnZ replied to trackzpeed's topic in Gen III & IV Chevy V8Z Tech Board
Looks clean! Great work too! And what seats do you have installed? (They fit well from the pics) -
Just starting my ls1/t56 build!
EastTnZ replied to CableSrv's topic in Gen III & IV Chevy V8Z Tech Board
Exactly, I filled out the order form online and sent a copy with the pcm and got it back in less than a week. You have 90 days of free updates too, you pay shipping both ways each time. I listed all of the codes I couldn't get rid of and he cleared them out. The relearn procedure couldn't be done on mine so he got rid of it for me. -
Just starting my ls1/t56 build!
EastTnZ replied to CableSrv's topic in Gen III & IV Chevy V8Z Tech Board
I had a code pop up that i had to get tuned out so I went with a mail order tune from tunedbyfrost for high octane and it runs great! More hp too! I get around 30 mpg cruising on the interstate/highways. -
Yeah he's looking into alternatives to run e85. Apparently that's what ate the pump.
-
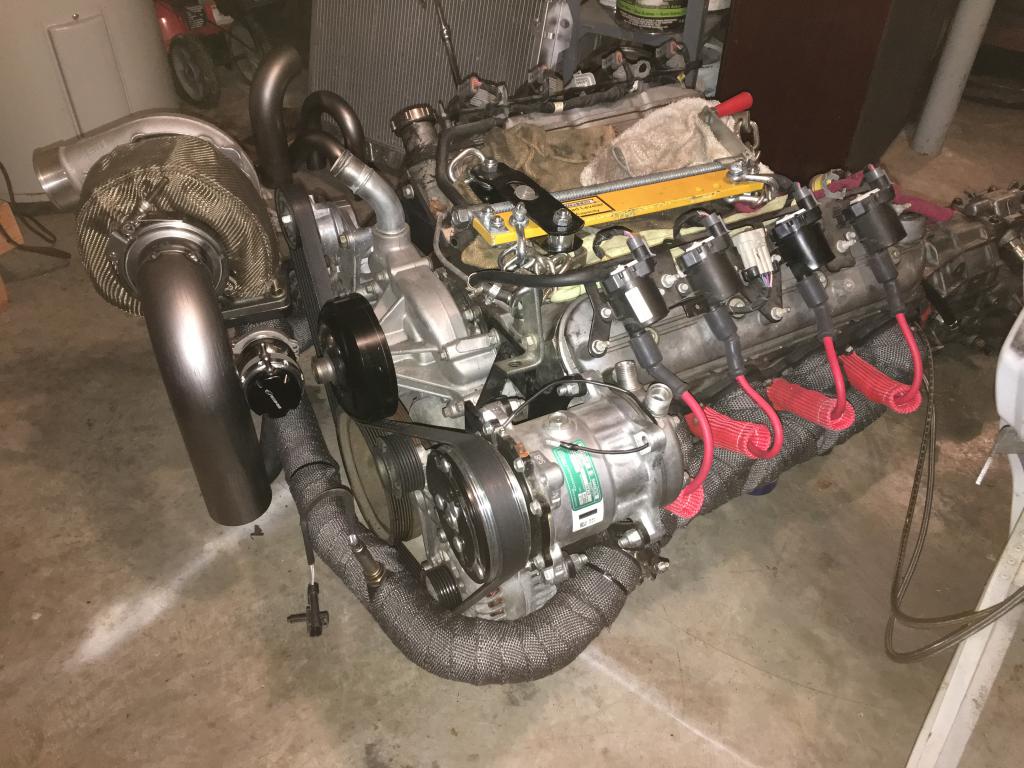
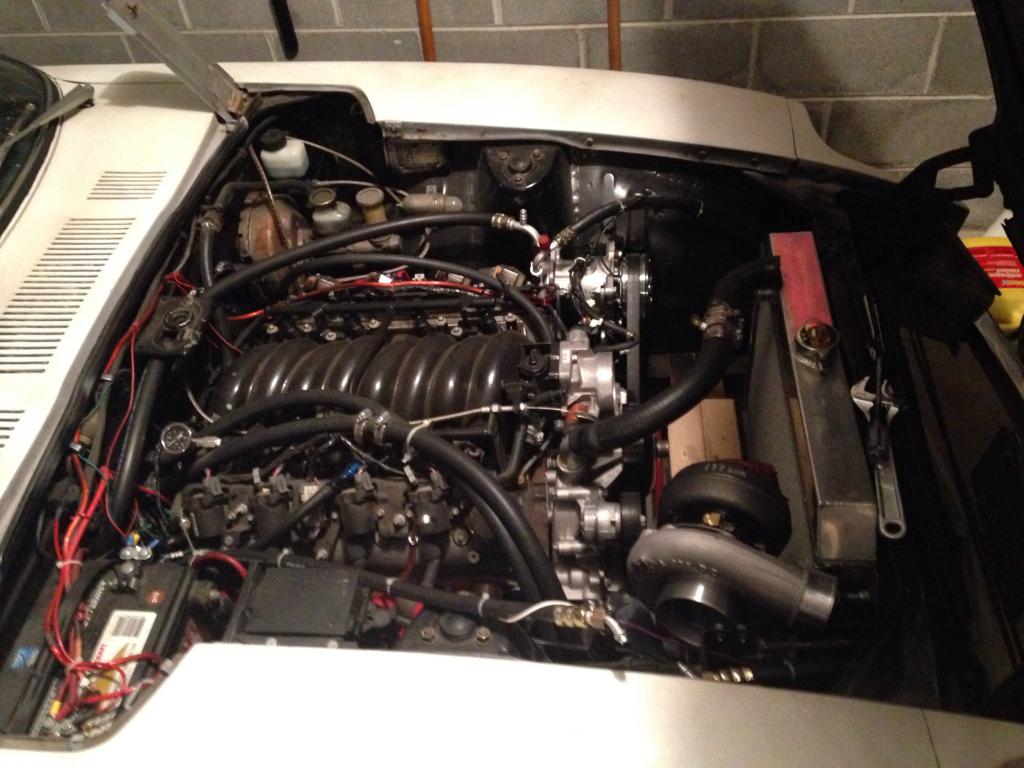
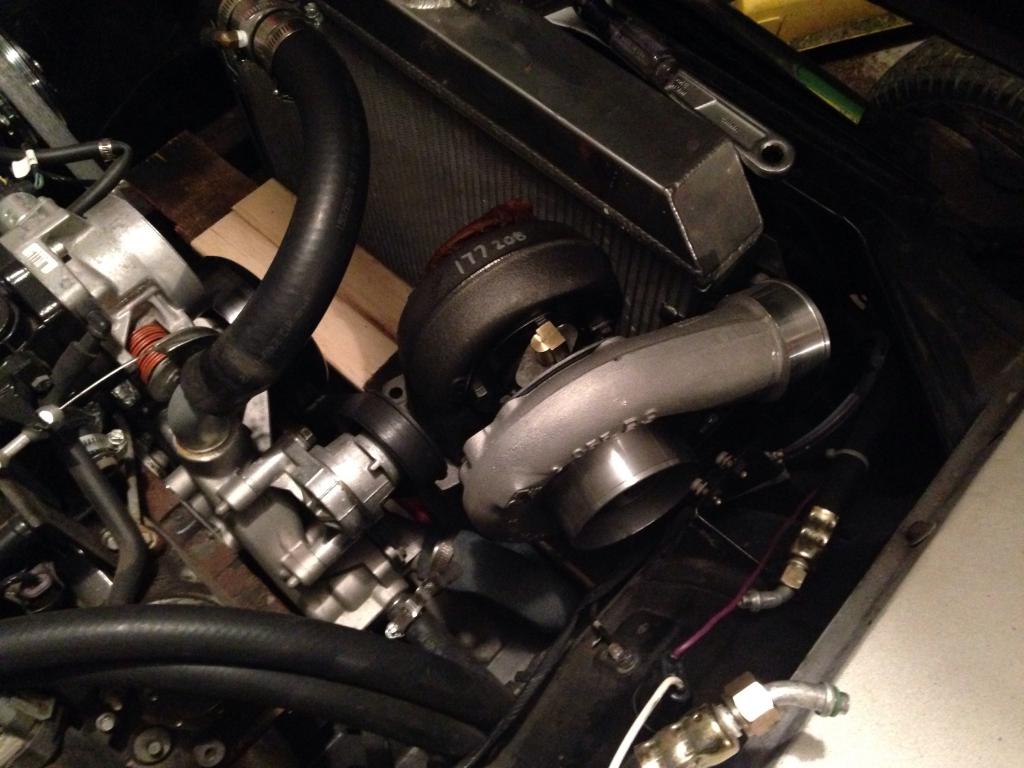
If it fits it ships! Lol it's a little guy by Borg Warner standards but I was doing a little bit of rough test fitting earlier today and the pictures do it some justice. It will be moved 1" forward towards the radiator and I need to clock the compressor housing more but you get the picture. Trying to get 3" intercooler hosing to fit in through those stock frame holes too. Stubby air filter is going to be hard to come by. Seems to be an issue with most afterthought turbo setups.
-
I'm hearing this... Summer time- use a short piece of heater hose and redirect the outlet and inlet from the waterpump to itself and loop it (not plug it completely). This gets rid of heat creeping through the hoses. Insulate the firewall. Winter time- reconnect the heater hoses to the firewall so you can have heat. Problem solved The only time this happened to me was because the heater control valve didn't work and was stuck wide open. Couldn't get the air below 55ish out the vents. Put a vise grip on one of the heater hoses and bam 30 degree air. It was July or August and it worked great!
-
Sadly no it's just a show n shine type deal with raffles and best of show type awards for the top 3. Voted by all people that entered cars in the show. And you can go earlier to see the assembly plants near by if you sign up in time. Keith had talked about racing close by after potentially but we haven't made plans yet. I'm hoping to get my turbo build done before then but we'll see. If not I'll go naturally aspirated but I'll be there!