
Challenger
-
Posts
3411 -
Joined
-
Last visited
-
Days Won
3
Content Type
Profiles
Forums
Blogs
Events
Gallery
Downloads
Store
Everything posted by Challenger
-
76 280z turn signals inop.
Challenger replied to 1rad280's topic in Trouble Shooting / General Engine
By flasher relay do you mean the flasher canister under the drivers side dash? I also have this issue, but the lights work, but no flash. Im guessing its the canister. -
-
So regarding cutting them, just carefully cut them in half? The tokico instructions say no more than half. Assuming youd want as much travel as possible you want to cut it at half, correct? Thanks
-
-
-
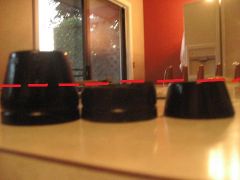
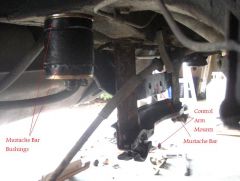
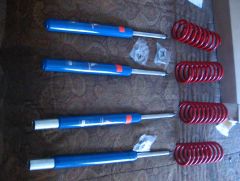
Wait till you see the springs.. PROGRESS... Installed the mustache bar/bushings, and the rear control arm mounts. Removed the cover for the diff and cleaned it up stripped the paint and then painted it red like the other pieces. Cutting bumpstops (included in bushing kits) is neccesary to gain suspension travel. The bump stop sits on the strut shaft between the gland nut and the top perch under the dust boot. Like this. (not my photo) EXAMPLE OF WHAT CUTTING THEM DOES-Just imagine the shock can travel 5 inches till it hits the 2 inch bump stop. Now I lower the car 1 inch so I need to gain that inch back, I cut the bumpstop in half and I have the extra inch of travel I need. Tokico suggest no more than cutting it in half due to possibility of the bump stop failing (splitting??) and the strut being destroyed. As of 7 oclock no gland nuts... I guess no shock assembly today.
-
Just curious, is your car a 78, 74, 260 or 280... title says 78 280, sig says 74 280.. Maybe try pulling a injector to see if its spraying.
-
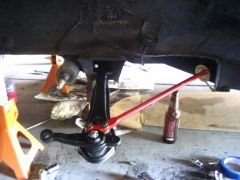
UPDATE- Both control arms and TC's are on. Ball joints and knuckles are attached to the control arm. All bolts were tightened but not torqued to specs. Id feel safe driving it cause theyre all really tight but not to spec. I had mentioned using both rubber and urethane bushings for the red TC rod. I used my old rubber bushings in the back (they were newer, no cracks) and then I used the new urethane on the front. Tie rod ends will be attached once shocks are in. Now onto the u joints.
-
-
Well I really didnt want to take the hub off, but I did salvage all the other parts and am selling them. As for the GB thanks, I actually posted interest there a while back but never got a response... thanks for the link.
-
Still unsure about which engine swap to go
Challenger replied to RaDeuX's topic in S30 Series - 240z, 260z, 280z
Basic engine knowledge like you have is good, but I meant more about each engines capabilies, downfalls, etc. Sorry for the confusion. -
Still unsure about which engine swap to go
Challenger replied to RaDeuX's topic in S30 Series - 240z, 260z, 280z
I say you learn a little more about engines before you make a decision. -
Another good pic.
-
Love the handle, not so much on the matte black textured..
-
When I mocked it up I just slid bolts in or just put stuff on so it looked like it was bolted together. Youll have to take alot of it apart. Today I put the ball joints and knuckles onto the control arms and theyll go on that way. Then everything pretty much bolts onto that.
-
Uhhh, $165... Dont have that much to spend.. Guess Ill make a wanted ad, or what do you want for them? :)
-
-

-
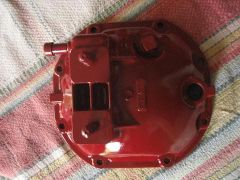
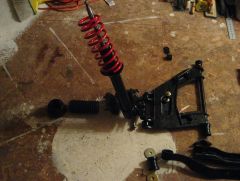
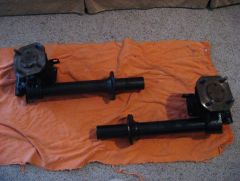
Hit a few set backs today but got a bit finished. STRUT INSTALL Began with both the front and rear bare shock tubes/hubs. The struts (blue tube) slides into the shock tubes and with the provided gland nuts is held into position. The gland nuts sit at the top of the shock tube over the strut shaft.... before putting on the nut your required to add light weight oil into the tube until it is about 1.5-2 inches away from the top. Wasnt able to torque them down since I recieved only 3 correct nuts, the last ones will be here tomorrow. REAR SUSPENSION MOCK UP- PARTIALLY ASSEMBLED This is what it looks like mocked up. Mustache bar at the bottom, rear control arm pivot mount and both control arms. Bushings to be pressed in have been and are ready to go. On the outsides you have the shock assemblies in a exploded view. Front sway bar is not pictured but runs from middle of one control arm forward and then to the other sides and down to the control arm. MORE BEING REPLACED Rear Halfshaft U-Joints- $100- Fixes any vibration and shutters from worn out U joints. Replaces one of the oil fill holes that was accidently broken off. (napa) PLANS FOR TOMORROW Actually start assembling front suspension. Torque down gland nuts Possibly finish assembling shock assembly Remove diff cover and drain fluid/replace, paint cover red
-
-
-
So what year/models are the ones on ebay? And where else can I get some like yours? Im gonna try the JY tomorrow.
-
-
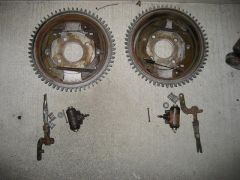
Drum brake backing plate
Challenger replied to KenshinX's topic in Brakes, Wheels, Suspension and Chassis
http://forums.hybridz.org/showthread.php?t=138734 -
Strut Gland Nut Removal Tool
Challenger replied to Challenger's topic in Brakes, Wheels, Suspension and Chassis
I already did (computer is next to shocks)... the back, but cant do the front since they have wet paint. Sorry for asking, Ill just continue to go on trial and error. Thanks for all the help you did provide John.