Challenger
-
Posts
3411 -
Joined
-
Last visited
-
Days Won
3
Content Type
Profiles
Forums
Blogs
Events
Gallery
Downloads
Store
Everything posted by Challenger
-
Strut Gland Nut Removal Tool
Challenger replied to Challenger's topic in Brakes, Wheels, Suspension and Chassis
My bad. I wasnt asking just you. I was asking anyone thats reading the thread since they are, or have installed the tokico's. I also figured why call them if there is no issue which I thought was as simple as a yes or no answer. -
Strut Gland Nut Removal Tool
Challenger replied to Challenger's topic in Brakes, Wheels, Suspension and Chassis
Ok, found the parts. Spacer that goes at the bottom, nylon nut, and new gland nut. I only pulled out the strut when I first got the package and then only was looking at the strut when I was trying to see what goes where. Does the front also need a spacer? Only the rears came with the aluminum spacer at the bottom. -
Strut Gland Nut Removal Tool
Challenger replied to Challenger's topic in Brakes, Wheels, Suspension and Chassis
Was I supposed to get the new gland nuts with the tokico hp kits they sell on ebay or do you only get them strait from tokico? John do you reccomend just using the tape and silicone as you described? Or is that only for the new ones from tokico? -
Windex for cleaning and lots and lots of duct tape. Also when putting on the silicone, dont put it closer than 1 inch from the edges, and less is better.
-
Oo, cam gear for $100.
-

-
Strut Gland Nut Removal Tool
Challenger replied to Challenger's topic in Brakes, Wheels, Suspension and Chassis
When you put the struts in, is the gland nut the only thing you reuse? It doesnt seem like it is enough to seal the oil in. -
78 280Z rear brakes on a 71 240Z
Challenger replied to Dave's topic in Brakes, Wheels, Suspension and Chassis
Ive got a 280z rear drum assembly Ill sell. The drums were turned and the shoes are newer. Ill include all the little pieces that I pulled off for rear disk conversion. (shoes, piston/cylinder, brake line, springs) All the brakes were redone a few years ago and its just sat. -
Nice!!
-
Hey, red riders are powerfull killin' machines!! Also thats a good idea on the G forces/tuning, never would of thought of that..
-
-
-
-
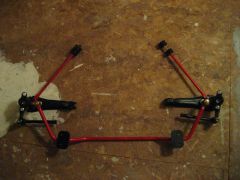
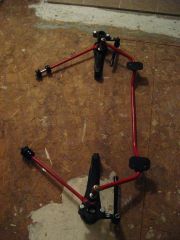
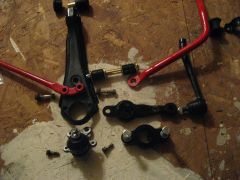
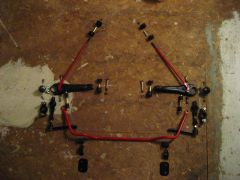
Well for my senior project Ive decided to document my suspension replacement/installation. As of now almost everything is repainted, new, etc. and I will take pictures as I go, explain what Im replacing and why, and what their benefits are... This seemed to be the best place to make a slideshow/documentation so here it goes... REPLACING- Ball Joints (L&R) $34 each- Old ones greese boots had deteriorated and lost the lubrication needed for constant movement. (purchased from MSA) Outer Tie Rod Ends- (L&R) $26 each- Like ball joints, greese boots were gone leaving metal on metal wear. (shucks) Tokico HP Springs and Struts- (all 4 corners) $330 shipped- Replaces the old springs and struts. The stock springs are softer leaving more possibility for body roll. As for struts, the stock struts leave the ride soft and is often compared to a boat. These springs also lower the car approximately 1.5-2 inches to further reduce body roll. The fact that the car is 30 years old amplitudes these effects. (ebay) Energy Suspension Urethane Bushing Kit- $163 shipped- Replaces and improves the stock rubber bushings with urethane bushings. Takes the "slop" out of the suspension for a firmer feel and better handling characteristics. Note- Several issues have surfaced regarding the TC bushings (breaking) and it has been "solved" by using normal rubber in the back and urethane in the front. (Energy Suspension) Bump Steer Spacers- (L&R) $60- Fixes alignment issues associated with lowering the car. Reduces cornering "jitters" because of changed alignment. (MSA) Rear Spindle Pins- $77- As rust is common in Z car bodies, its common in the suspension... when attempting to remove the spindle pins, you almost always have to destroy them, or they get damaged in removal. It is easier and much better to just cough up the money and buy new ones. (Jaremko Nissan) RESTORED All other parts related to suspension were either painted in black or red (sway bars and TC rods). MOCK UP- FRONT SUSPENSION- EXPLODED VIEW MOCK UP FRONT SUSPENSION Plans for Tomorrow- - Install struts and springs into the shock body/spindle assembly. - Begin to install and torque down mocked up pieces above. Depending on how far I get start mocking up the rear suspenion and do the same process as above.
-
-
Tips for modifying,upgrading,or restoring a Z on a budget.
Challenger replied to MJLamberson's topic in Miscellaneous Tech
Yeah open it 3 months later, and find its the wrong part. Errrr... -
Yeah I got them off with a combination of a angle grinder with cut off wheel, cold chisel and a hammer. Took awhile... As for a plasma cutter, I was also thinking of that... just imagines making 4 passes and they would just fall off. So can anyone answer my question regarding the parts? Are those all correct?
-
Will do. And do I have the right parts? THanks
-
-
-
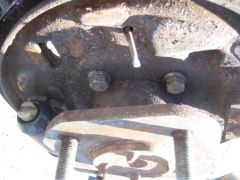
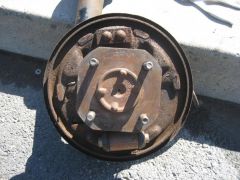
Hey, Ive been reading through the brake FAQ and I have to say what a jumble of a million people saying a billion different things... I decided on the 280zx disk conversion and have a few clarifications being that the faq didnt answer them. I am getting the following... 83 280zx 2+2 rear calipers and rotors Maxima Brake Caliper Brackets, specifically these. http://cgi.ebay.com/ebaymotors/ws/eBayISAPI.dll?ViewItem&item=120303520666&ssPageName=ADME:X:RTQ:MOTORS:1123 Are these what Im looking for? The auction says to use maxima calipers and 300zx rotors, but FAQ says the 280zx calipers and rotors. Which one is it? I see that the auction above is for the brackets that arent flat, do I need the flat ones? I saw in the faq people say either way... Just need some clarification. Also since I dont have the parts yet Im not really able to see what goes where etc. I started pulling the drums apart in prep. but Im not sure how much goes. This is where its at now.. Do I need to remove the bolts on the inside of the hub? What about the piston (obviously wont need it)? Thanks for the help.
-
S31's as in RHD japanese "s30's"?
-
Maybe he meant shaving the front bumper. If so look at my sig. Didnt really shave it, but its removed, and theirs sheetmetal blocking some of he mounting hardware to make it look cleaner.
-
Not your typical 280zx... check it out, quite different & unique
Challenger replied to a topic in S130 Series - 280ZX
I think the idea behind the riveted panel style one is good, but not great execution. -