
Challenger
-
Posts
3411 -
Joined
-
Last visited
-
Days Won
3
Content Type
Profiles
Forums
Blogs
Events
Gallery
Downloads
Store
Everything posted by Challenger
-
http://www.google.com/search?sourceid=navclient&ie=UTF-8&rlz=1T4ADBF_enUS291US291&q=350z+forum Might get more help here. Also if you have to ask that question I dont think your ready to make those kind of modifications. Just being honest.
-
Where do you want it to exit?
-
If I remember correctly I had a #0 for some time.... :mrgreen:
-
So what number is he? Congrats!
-
Well I went out at about 10pm and made a bunch of noise... (mom came out and stopped me) But the one side came out really easily. Didnt have time to do the rest. What it came down to was shucks told me there werent clips to hold them together. I even showed them the new ones and the 2 guys were sure there werent clips. Thats why it didnt work the first time I tried it.. Also the yoke isnt bent, it was what I thought it was. I hit the area around the cap and it "loosened" the cap back to how it was normally. Now the joint moves freely.
-
Ill try it in the morning.. Funny that that was my first idea... seemed logical.
-
Well it obviously didnt work. I ended up not using the heat but from pounding on the cap as explained now the u joint will hardly move up and down, will go side to side still. @%#% Im done for tonight, Im gonna see what it costs for a shop to do it, hopefully I didnt bend the yoke. Hopefully it just pushed the caps in and its a little tighter then normal...
-
Alright, will do. Yokes cooling down now... Now I just need a friend.
-
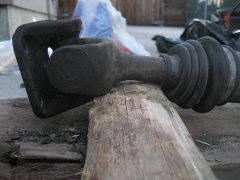
So that is the correct way to hammer on it? Thanks for the help.
-
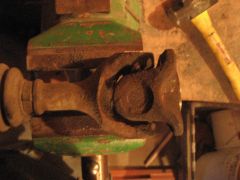
Well the guys at shucks said these didnt have clips but after some inspection I found them and poped them off. Will this work, Ive pounded on the socket like this and hasnt budged much. THanks
-
-
-
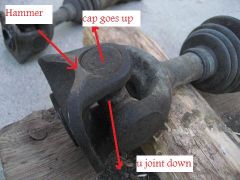
This is another thing I found. I didnt understand what parts he was hitting what part was on the vice... Is this it?
-
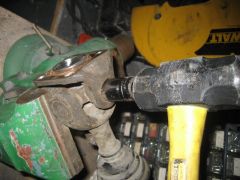
This is what I have now.... am I doing it right? Hammer it down so the cap pops off, flip it over repeat, etc. Ive read that some needed to be pressed out while others said it came out with a hammer. Also I talked to the guys at shucks and this is kind of what I got out of them, I think... Everything is obviously closed at 7pm (get them pressed out), and I have nothing else to do, should I just hammer away???? Id like this to be ready for tomorrow... Thanks
-
-
-
Sounds sweet!!
-
Id possibly use the clear wheel paints. Stands up to corrosion and is really tough.
-
 Had forgotten to grease the control arm bearings, pulled them apart and greased them... took awhile but it said it was important on the instructions. PLANS FOR TODAY Still waiting on my gland nuts. Once I get those I can put the shocks together and attach them to the control arms. Also when I go out hopefully today to get the gland nuts torqued Ill pick up some gear oil for the diff and reassemble it and put it back in the car. Also need to pull the U joints/halfshafts apart to put in the new ones. Trying to figure out how...
 -
DOHC, Twin turbo, direct injected, all aluminum L34.
-
Sweet, thanks. So either head youd still need to drill a hole. So the diesels dont have a glow plug?
-
Oh yeah forgot about the diesel head. Id like to see one of those...
-
For all the motor builders, could it be done? I understand youd need a standalone that can run the fuel injectors at different timing for different rpms, loads, throttle position, etc. and then lots of fuel pressure. Heres a version of BMW's direct injection. Would be hard to do on a L series with the cam in the way. Here would be a more practical way, with the injector from the side. Ive got a spare head that is complete (really nice, kind of rebuilt) that I may experiment with since I cant seem to give it away ($75). Anyone have thoughts. I figure its impossible and would be extremely difficult but hey its a cool idea, and you could have a cool intake manifold.
-
So who else went to formula D at infineon?
Challenger replied to MJLamberson's topic in Non Tech Board
I dont like drifting... -
76 280z turn signals inop.
Challenger replied to 1rad280's topic in Trouble Shooting / General Engine
Fixed it.. maybe I did ramble a little to myself.