RUSSJZ-ZED
-
Posts
142 -
Joined
-
Last visited
Content Type
Profiles
Forums
Blogs
Events
Gallery
Downloads
Store
Everything posted by RUSSJZ-ZED
-
The Z32 ratio's 4.08 for R200 (NA), From memory 3.7/1 R230 (tt),(or is it the other way around(?) with either of these, in combination with a R154 in a street car,, first gear would only come in handy for hill starts. The oil pressure sender for the idiot warning light is the same thread as the Datsun 260Z sender, screw in -gauge works. ( JZX 100 Chaser_ don't know about other applications of the Jz engine series) My magic wire guy didn't mention any problems making the volt meter work off toyota alternator.Took it for granted there werte no hassles. Toyota don't play around with stuff like Nissan do, check out if it is just plug in gauges and drive away on your V8 Tony, They might just work .
-
also none of your gauges will work! Gidday Tony, how goes it? you must be nearly finished by now;-), Dat Z fuel, volts oil presure temp all work with no dramas, easy hookup, speedo and tacho probably cost efficient to update to VDO. Yo880,pictures of auto, and R154 clearance on link below, page 5, PM a phone number if you want to eyeball close up. I can put you onto a driveshaft specialist that will mate Toyota /Dat, and balance for about $300, I could not find anyone in Sydney to do this for under $500.
-
-

the start of the B.customs Z has begun..2jz 1000hp
RUSSJZ-ZED replied to Overkill Z's topic in Toyota L6 Forum
Got it:), didn't read back. I would not be surprised if HK$ made an ECU that tells you when to scratch your butt. Another point about just bridging the wires, there is one school of thought on local rev head Toyota site that goes with also hooking Standard auto ECU so that it thinks it is in 3rd, but so far as I can read into it all, the mixtures are regulated by rev's, so there is no real advantage in doing this hook-up as well. -
the start of the B.customs Z has begun..2jz 1000hp
RUSSJZ-ZED replied to Overkill Z's topic in Toyota L6 Forum
On a toyota computer, sorry, no you don't. bridge the wires turn the key, (and if you have done everything else right ,ignition.) I've been running auto ECU, with R154, no fuse-no go. Fuse in place no problems, no extra computer. (all the neutral start switch does is stop you engaging the starter when in gear, bridging the two wires tells the ECU it is in neutral all the time.) -
the start of the B.customs Z has begun..2jz 1000hp
RUSSJZ-ZED replied to Overkill Z's topic in Toyota L6 Forum
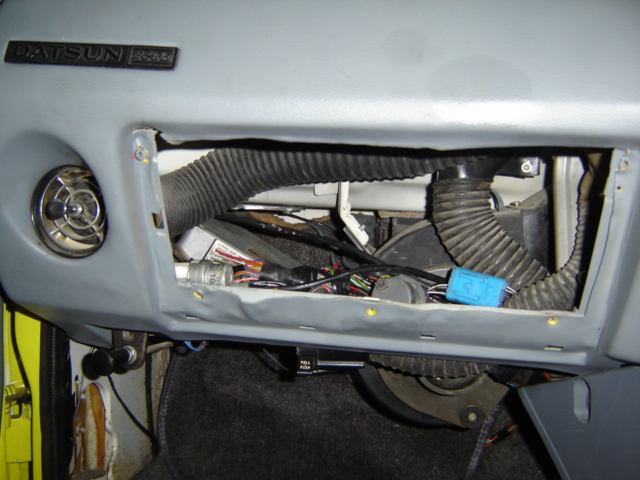
The mini-fuse is a perfect fit to bridge the two wires, I did it like this to keep the plug intact incase I decided to re-install the auto . Just as easy to cut and solder the two wires indicated behind the plug. Does not matter which way you do it as long as you connect the two, if you don't, your ECU will lock out the starter . As indicated in the picture, the other two wires taped together are the reverse switch wires, does not matter which way you hook them to the plug on the reverse switch. (hope you removed that spacer on the back of the crank shown in the picture on the same page-you learn by other peoples mistakes, you will never live long enough to make them all yourself:) -
the start of the B.customs Z has begun..2jz 1000hp
RUSSJZ-ZED replied to Overkill Z's topic in Toyota L6 Forum
pic and description of how to do it here, a mini fuse, or just cut and solder behind the plug. http://www.flickr.com/photos/russjz-zed/sets/72157601989530227/detail/?page=6 -
-
1JZ 2JZ installation instructions for dummies,2 weeks, drive it!
RUSSJZ-ZED replied to RUSSJZ-ZED's topic in Toyota L6 Forum
The original datsun shifter cover was never going to work, and as the heat coming through the hole was a bit much to take when the outside temps here are 25C-42C at this time of year, decided it was time to seal off the hole. Pictures are on the link below around abou page 7 (labeled shifter,). Simple to block it off effectively, all required is an old Z front brake backing plate,(amazing what you ca find in your own garage.) and a CV boot from whatever car came with a halfshaft size about the same as the Toyota stick. (I went through the scrap bin at a local driveshaft rebuilder , most FWD cars seem to have about the right size boots) Cut the brake backing plate on about the chalk lines shown in pic'(I used the backing plate because it had about the right sized hole, and the edges of the hole are raised without sharp edges- the first cover I made,I just hole sawed a piece of aluminium, after about a week, sharp edges cut the boot.) panel it on the tunnel to get the shape,does not need much. push the CV boot through so the plate holds it on the bottom concertina piece, get a silicone gun, run around boot top and bottom sides, leave for 24 hours. silicone the four bolt holes at the same time. cut a rubber gasket out of an old inner tube, fit over stick, bolt down. The cover is made of 6mm perspex, made a patern, and cut out with table saw, not advisable, sort of like pushing a sheet of glass through a saw, -lots of splinters flying everywhere. If there is ever a next time I will take the patern to the perspex shop and get it laser cut. The fold in the perspex I achieved by routing a chanel to weaken it on the line,and heating with a blowtorch then bending. There was room for a couple of gauges, so I put in an oil temp gauge. Wife made up leather boot. -
1JZ 2JZ installation instructions for dummies,2 weeks, drive it!
RUSSJZ-ZED replied to RUSSJZ-ZED's topic in Toyota L6 Forum
Sorry Gritz, apart from the heavy duty wire back to the battery, the others disappear into the inner guard, cannot even guess where he has taken them to. -
-
1JZ 2JZ installation instructions for dummies,2 weeks, drive it!
RUSSJZ-ZED replied to RUSSJZ-ZED's topic in Toyota L6 Forum
Temperatures here set to hit 38C today thats close enough to 100F, second summer with only one 12 inch fan working,I live near the center of the city, 99% of driving is stop/start traffic light to traffic light,No over heating problems. must replace the dead relay in case the remaining one dies. these engines do not run hot. -
1JZ 2JZ installation instructions for dummies,2 weeks, drive it!
RUSSJZ-ZED replied to RUSSJZ-ZED's topic in Toyota L6 Forum
I bought 2X12 inch thermo's of ebay, they came with thermo switches that are supposed to be fed down the top radiator hose, never had much luck with these things, found it easier to drill a hole the size of the sensor in the top tank, feed it in, the wire behind the sensor is usually thinner, get a piece of copper or brass about the size of a 1 cent piece, drill a hole in the centre the size of the sensor feed, hacksaw a cut from edge to centre hole, slip over the wire and silver solder to top tank, probably laws against defacing currency, but why not use a 1 cent piece? nice neat and round. Don't use more heat than you need to solder. 2 fans? the sensors with cheap fans usually have a narrow switching band, if you need a few degrees separation between the fans coming on, put the second fan sensor into the bottom tank. Thanks shaggyz,as you have probably found out by now, this is a swap the village idiot can do, I did it! anyone can. -
These part numbers off the boxes, It is the 100mm version. part number for the 200 kilometre PH is 437 015 029. (obviously different numbers for the 300KPH and 120 MPH and 160MPH) matching tacho 8000RPM is 333 015 034. also 10,000rpm available
-
quote; Its all downhill from here You will find pointing it uphill is even more fun!
-
Brake lines almost stripped
RUSSJZ-ZED replied to ORANGEZ's topic in Trouble Shooting / General Engine
Vise grips that are made anywhere, EXCEPT China.(Chinese made will always slip with load on-real vise grips, plus 3 pound hammer for gentle tapping) -
Unknown victim in this one, (his karma really caught up with him.) I have a lot of slate around my house, which needs sealing every year, much less costly to buy the sealer in 20 litre drums(about 5 gal), lasts a couple of years.It's clear, varnish like, strong petro chemical smell. A couple of years ago noticed the drum had a small leak, the only thing I had to transfer it into was a empty oil drum labelled "synthetic oil 05-40". several monthe later when cleaning out my garage, had the door open to the street, someone stole the drum. Would have loved to have been about when they tried to get it out of their engine.-I think impossible.
-
Part number link,DRZ man, and the person who's message I somehow deleted before got to reply to. The link to pic's of install in first post is now obsolete, use the link to my build at the bottom of that post (and this one)VDO Install pic's, and easy to follow,idiot proof instructions are in there, on about page 3. below are links to spec's. Speedo.(MPH) http://usa.vdo.com/products_solutions/cars/performance-instruments/vdo-performance-instruments/instrument-series/cockpit/speedometers/speedometers+-cockpit.htm http://www.egauges.com/vdo_mult.asp?Type=Speedometer&Series=Cockpit&Units=E tacho. http://usa.vdo.com/products_solutions/cars/performance-instruments/vdo-performance-instruments/instrument-series/cockpit/tachometers/tachometers+-cockpit.htm http://www.egauges.com/vdo_mult.asp?Type=Speedometer&Series=Cockpit&Units=E VDO range,and some prices http://www.idee-systems.nl/Documenten/Layout%20VDO%20instruments%20uk%20final2.pdf
-
Once again, different model Toyota's different applications, The ECU in a Chaser is located in the centre console under the stereo, this gives enough harness to mount left side easy(remember,I'm right hand drive) behind the glovebox, probably just enough harness to make the same position on a LHD.I never tried as my steering is on that side. It was a tight fit up there, drilled a hole through from inside the wiper cavity to hold bracket to mount it, it was impossible to access, but as my dash had been reskinned by an idiot(previous owner)the box lid never fitted in the closed position anyway,I've since eliminated the glovebox, going to make up a plate /cover to fit where plastic box/insert went, maybe use the face to mount some gauges. Easy to get to at the moment, no cover, and will only have 4 screws when I fit a cover. Now the glovebox has gone, heaps of room in there.

-
The pic on page 1 of this thread shows you have a manual ECU, diagram of pinout on jzgte.com is showing one of the pins on the 4th plug(plug T) as neutral start switch , so this is (probably) a diagram for an auto. If you have got the engine to start and run, don't worry about additional wires .-it works, don't fix it. I'm running an auto ECU with manual transmission, when it was rewired, probably eliminated about 20 wires, a lot from plug 4. can't do pic of what is not used, as 1) different ECU 2)wires still running to plug- disconnect was done by simple un-plug at auto end. 3)Beware! Toyota also changes colour codes of wires,regually! so be prepared for total chaos when trying to follow wire diagrams. first thing to do is get the part number of the ECU, (not visible in your pic) and identify the EXACT model car it was out of. (throttle body, and gearbox /shifter indicates it is early Mk3 Supra) looking at pin outs for other cars will only lead to total frustration.There are a heap of different ones out there for 1J engined cars.
-
the start of the B.customs Z has begun..2jz 1000hp
RUSSJZ-ZED replied to Overkill Z's topic in Toyota L6 Forum
That's a part of the price you pay when you start messing with nature, and start driving on the wrong side of the road. -
This information could be of use to anyone in the States looking for an alternative gearbox to bolt up to a 1J/2J (and 7M?) The Saturn Sky and Pontiac Solstice were never sold in Australia (never even heard of them untill I saw the lextreme post) Second link to jeep site seems to confirm that AR5/MA5 Aisin gearboxes will bolt up . (there is a truckload of information on this site to inform or confuse...) http://www.lextreme.com/forums/showpost.php?p=79614&postcount=16 http://www.jeeps-offroad.com/showthread.php?t=4740
-
I'm running 1J Vvt auto ECU with R154, no problems,all you have to do is over ride neutral start switch,and hook up speedo(cable or electronic??)and reverse switch, if you are lucky ,toyota may have used same plug on 1G-GTE as they did on the 1J .pic's of my plug modification on link to pic's below. Only an expert will be able to tell the difference between an Auto and manual ECU, just remove the sticker that says its an auto. I think you only have to pay $50 to be a financial member of Toymods, signing on and using forums is free (used to be, that's Australian dollars anyway, current exchange rate is 50 dollars Australian = 2 flat rocks)
-
quite a few people on this forum http://www.toymods.net/forums/ have used this engine, someone should be able to tell you if it's compatible. (search first)
-
Best Dat Z diff write up you will find anywhere, thank you J Mortensen http://forums.hybridz.org/showthread.php?t=116207 centre swap, thanks to NZeder (also on hybridz) http://www.zclub.org.nz/viewtopic.php?t=102&test=test