Ben's Z
-
Posts
282 -
Joined
-
Last visited
-
Days Won
2
Content Type
Profiles
Forums
Blogs
Events
Gallery
Downloads
Store
Everything posted by Ben's Z
-
Looking at the How To manual, I think I am ok but what to verify I am not off a tooth. Thanks.

-
Running the NA cam that came out of my car. (77) Tony D thought the NA cams have little more lung on the top end.
-
I won't try to explain it, but here is what Z Greek sent me. Here is a quick way to set your cam at "split overlap," or "straight up" 1. Put the cam in "hole number 2" Set the engine to exactly TDC on the compression stroke for cylinder number one. Intake and exhaust lobes should be pointing at about 10 and 2. Hopefully you verified TDC before you put the head on, if not you will have to rely on factory timing marks which could be off a degree or two, hopefully not more. 2. Set the valves to zero lash on number one. 3 Roll the engine around one full revolution to TDC on the exhaust stroke for cylinder number one. 4. Back off the adjusters until you have zero lash again. 5. Roll the engine back around to TDC compression for cyl. number 1. 6. Measure the amount of lash now at the intake and exhaust valves, this measurement tells you how much the valves were open at overlap (to get actual valve lift, you would need to multiply the number by the rocker ratio, but we don't care about that right now. We are only interested in comparing the relative opening of the intake and exhaust valves) If the intake has more lash, that means it was further open at overlap, and the cam was advanced. If the intake has less lash than the exhaust, that means the cam is retarded. Move the cam one direction or the other, and try again. Try to get the lash as close to equal as possible, a little avanced is OK, the chain will stretch in the first few thousand miles and naturally retard cam timing. If you do not have enough adjustment using the 3 factory holes available, you will need to create a means for further adjustment. I use off-set bushings designed for Chevy V8's. All you need to do is drill out the middle hole in the cam sprocket to the OD of the off-set bushing, and your in business.
-
Let me be blunt. Does a turbo motor run better with an advanced or retarded cam?
-
Peter, I am intrigued by the one finger spin of the crank. What are the steps to getting it to that level. I wouldn't even want to guess the amount of "free" horsepower one picks up if the crank spins with such ease. Any longterm issues with oil pressure on something like that? What is the theory behind that glyptol (spelling) engine paint?
-
I just looked at my Airtex. It is definitely cast. FWIW.
-
This leads to something I had a question about anyhow. In the "How to" book it talks about multiple bright links on the chain. My new chain from Cloyes only has two... Also my slack side guide had no figure 8 or elongated hole on the bottom bolt hole. Per Peter at PMC and Z Greek, I elongated this for adjustment purposes with a dremel and rotary rasp. I will have to fool with getting the tensioner tighter this evening. I guess I am confused as to why the tensioner needs to be fully compressed.
-
With the gracious help of "Z Greek" Andy I was able to find if my cam was advanced or retarded last night. He instructed me to start out with the cam gear on Hole 2 and then proceed with his instruction on setting the valves at zero lash and turning the engine over. Here is what I came up with. (It should be noted Andy said run it in hole 2 based off of these results be he also confessed his knowledge of forced induction and cam timing was limited) I had lash of .017 ex and .024 intake at TDC on the combustion stroke. He said with some chain stretch after break in I should be good. I did find TDC on #1 with a dial indicator before the head was put on. Thanks.
-
"How To" says to have spring completely compressed on the tensioner. Not quite there as you can see. Suggestions?
-
I just bought a water pump yesterday and I'm quite sure my impeller is cast. I will check tomorrow. I bought an Airtex
-
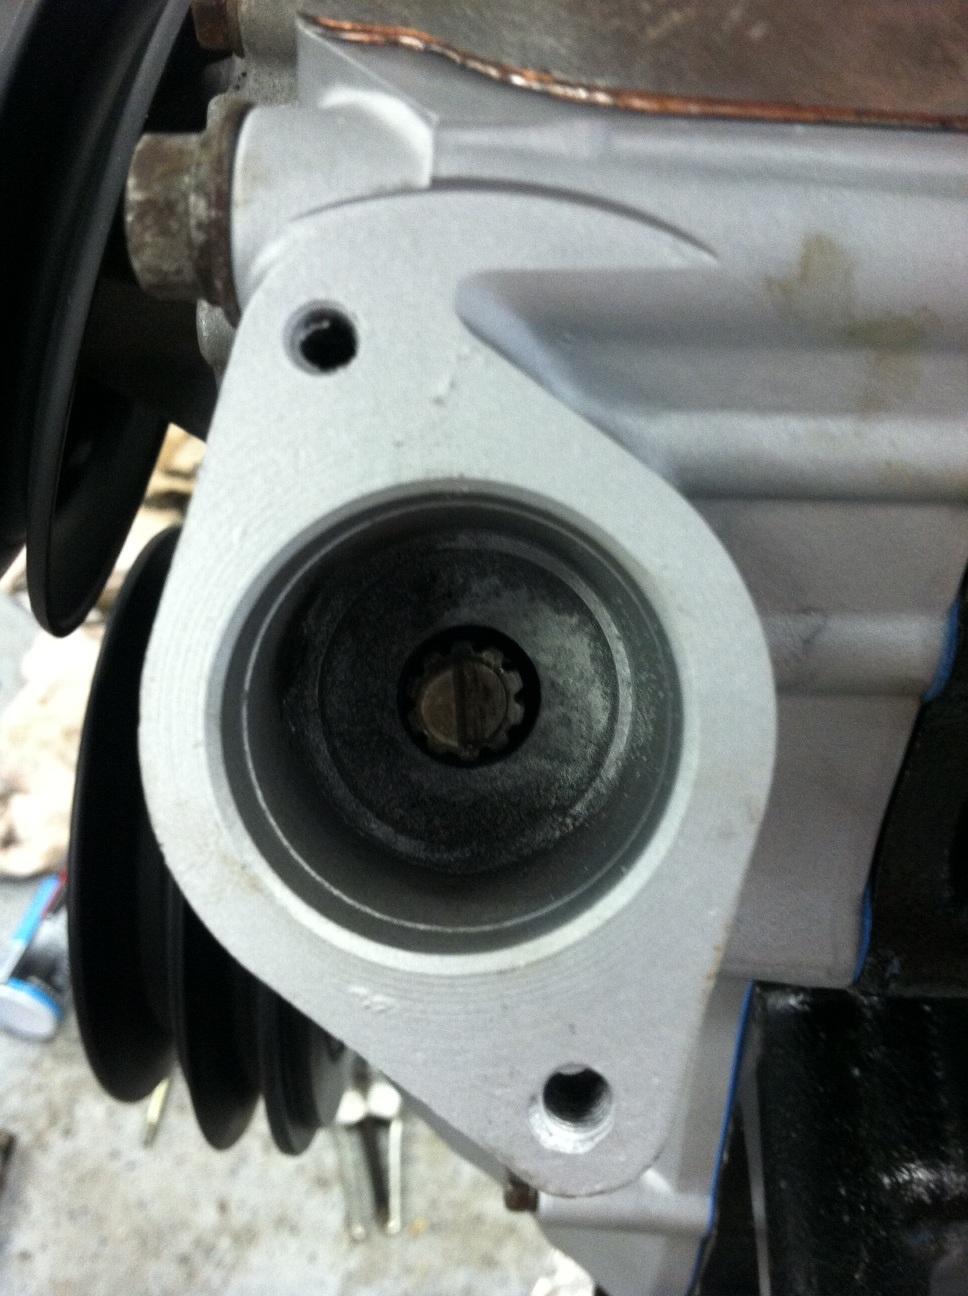
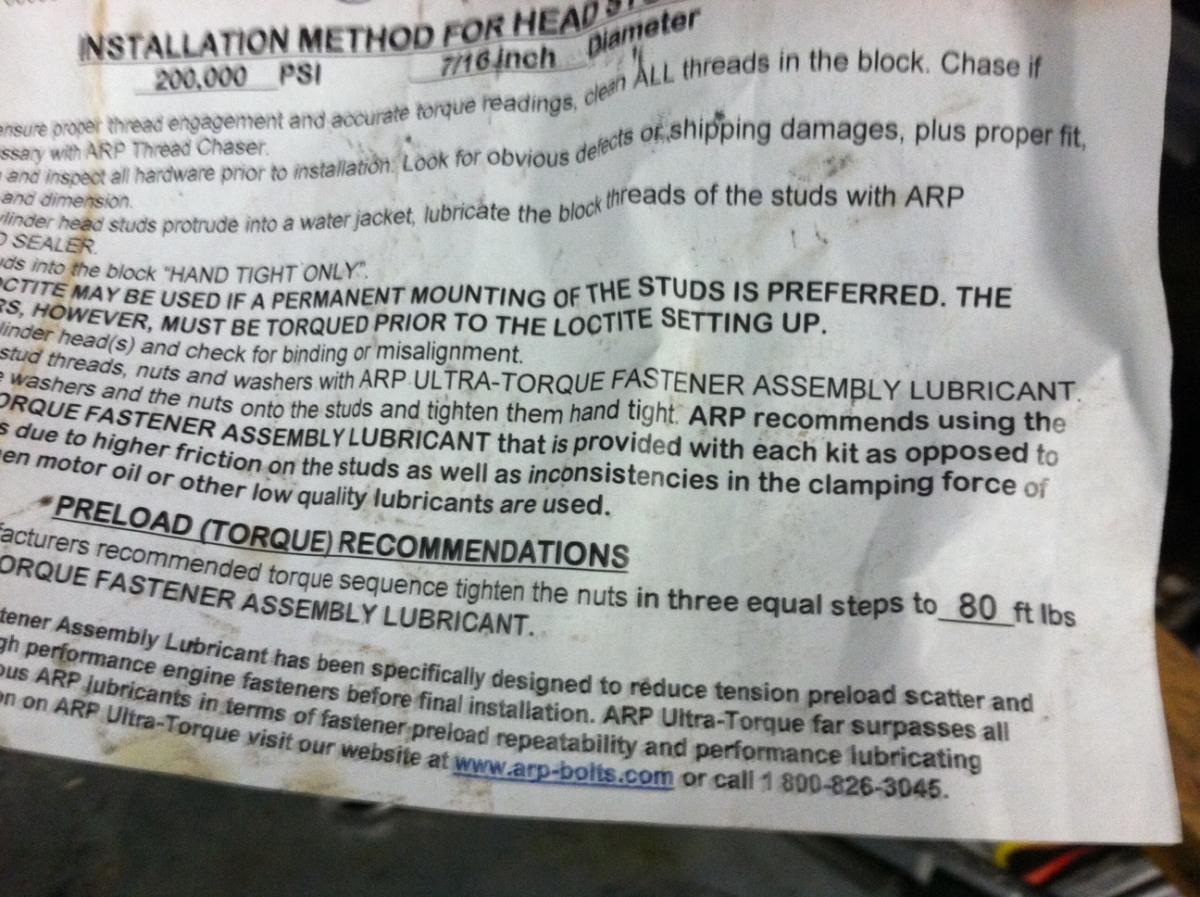
Tony seeing 7/16" on what was the wrong instruction sheet I use 1/2" 12 pt socket. It stripped it because you are right, it wasn't 1/2" it was 12mm. Again all the parts were correct. I think my picture sums up the packaging error. In no way feel I have cheaped on this job. It has taken longer than I have wanted with more hurdles than I care to remember. I believe had I taken it to the machine shop that finally got me fixed up, I would be well on my way. This motor has New or reman injectors timing chain guides tensioner(s) complete gaskets rings freeze plugs water pump oil pump rod and main bearings All from OE Tier 1 suppliers like Federal Mogul or equivalent. The head was given the blessing of the head machinist at the most well respected shop in Houston. All the rods were resized and the crank micro polished AFTER I installed the ARP rod bolts. All new valve seats and valves reground or replaced as needed. I am using refaced rocker arms from Delta. I have checked my wipe pattern more than once. You really don't have to be a dick all the time.
-
Update: ARP stepped up and took care of me. Shipped enough studs incase they were over stretched and one new nut. Head is on. One question. These studs fit N/A and turbo engines. As we talked about the instructions say torque to 60, but this is a turbo motor, FSM says 65 on turbo. Should I take up another 5 ft lbs? Thanks.
-
I agree and it did, but I had never used ARP before for anything. The studs threaded into the block by hand no problem. Being "in the industry" I know how companies will consolidate part numbers, I just figured I had the correct amount of studs, nuts and washers and the box was in the shrink wrap. It probably wouldn't kill them to put the part number on the instruction sheet before they put it in the box. Perhaps they could adopt Toyota's "Kaizen" philosophy. I wonder if I sent scanned them my invoice and instructions they would at the very least ship me new nuts. Hell the studs could be junk for all I know now.
-
Found my invoice I have 202-4206, but even when I put in those instructions it says to torque to 60 ft lbs. I must have gotten the wrong instructions in the box. What a punch to the balls this is. I am sure my head gasket is now f*cked.
-
I tried looking for the box to see what the hell I was sold, but no dice since doing some garage cleaning. I am going to try to find the invoice. I got them from a Uni Select jobber who gets them out of a speed warehouse in Oklahoma. I told him to use a "1982 280zx Turbo" for the order.
-
You are really smart.... Still angry I didn't buy your turbo? Here is the instruction sheet tool. Next response?
-
Well, going around to my final torque sequence on my turbo head I was torquing my head studs to 80 ft. lbs. per the ARP instructions and there it went, the 1/2" 12 point socket stripped the nut. Nut is now rounded off and won't come off the stud. So I am somewhere between 60 and 80 ft lbs. on one of the head studs going through the cam tower. Clearly they should have used 6 sided nuts. Yes I used ARP supplied lubricant. Yes the socket was completely seated on the nut. Took it in 3 steps starting at 40 than 60 than 80. Got about 6 at 80. I also like their disregard for stopping at 65 per the FSM for turbo apps. Thank you ARP. Probably no chance in hell I can back the stud out with an allen at this point.
-
Should I take out that valve and have it cut down?
-
My cam spin and head troubles are well documented on this forum. I mentioned in an another thread that my cam wasn't spinning like my old one so I took to a highly recommeneded shop here in Houston. Lead machinist is a former Z owner and has done numerous heads for the local Z club and he said my cam is fine. I did end up having a shop before that clean up the top of the head (.012) at everyones suggestion on here and that helped the cam spin better. Shop number one just did the piston side of the head. I was setting my cold lash on the bench today and for some reason I couldn't get #1 (front) exhaust any more than .007 lash with the pivot all the way down. I tried swapping in some different pads with the same results. I turned the head over to get a look at the combustion chambers and I noticed that the valve is sitting a little deeper in the seat than the rest. I had machinist blue on my rockers and while my wipe pattern has changed from before having .012 taken off I am not running off the end of the rockers with the lobes. Is this ok, or does it need to be centered more? Running my '77 N/A cam if that matters. All other valves intake and exhaust are fine. Knowing this wipe pattern and my problem with what I believe is the exhaust valve seated too deep, should I consider changing all of my lash pads or just exhaust valve #1 pad? Thanks.
-
Took this bastard to a HIGHLY recommended shop by not only the local Z Club community, but a friend who said they use to send VW cranks and heads over there by the truck load. Apparently they also do all the warranty work for a vast amount of car dealerships in Houston. Lead Machinist was working on a DOHC BMW multi valve head when I went in. Anyhow, he looked at my head and said "run it". He owned a Z himself back in the day and said he has sent out multiple heads that turn about like mine with no comebacks. He basically guaranteed I would not have a problem. He did also say that if you need to remove one set of tower alignment dowels he had done that before to really "make it right". He didn't recommened this for every tower, but said the fact it is torqued down means it is not going anywhere when all assembled. I did ask him to remove a bust exhaust stud out of the head. Fingers crossed. Like I said multiple Houston Z club people recommended this shop.
-
For grins I have messing around with this head a little more. I took some Prussian Blue and wiped it in the cam towers, inserted the cam and spun it. On the last tower it was taking off more blue at the 2 o clock position looking at it from the back of motor. Another interesting thing to note is while I believe this head is banana shaped I can take the cam out with the head and towers torqued without loosening. I can also get the cam back in but I have to lightly tap the nose of the cam to get it to fit in to the rear tower. I am contemplating running this just to see how long it will last. I am 90% sure it won't be long. What kind of carnage might ensue on the shortblock? On another note I am actively looking for a P90 head. However there are a ton of P79 Heads around here available. I know this has been discussed with the liners and such, but one of these will work too correct?
-
This head is parallel top to bottom. It is curved side to side with the inside curve dead center on the two center exhaust ports.
-
One final thought on this head. Would a shop or could I do the following... Use the exhaust/intake gasket for a template and buy some steel flat bar that is about the size of the side of the head Drill out all of the holes in the steel template where there are threads in the head. Put all thread in all of the holes in the head, slide over the bar stock heat the head and slowly turn some nuts and washers on the bar stock trying to get that few thousands out of the head to re align it? Could I ever get it hot enough? Would it distort the valve seats? Would I just end up pulling the threads out of the side of the head? Fruitless? Peter, to your argument, why can't a shop do something similar to this now? As I said looking down at the head now from the cam sprocket the head makes a slight banana shape like this "(" front to back.
-
I forget if I found the seller of this head on here. If I did that makes two items out of three that have been junk. There should be feedback on sellers on here.
-
I contacted some Houston z club folks via Facebook today and I called the shop a few of them recommended. I told the guy on the phone my problem and he said he cannot correct a head that is distorted in this manner