-
Posts
859 -
Joined
-
Last visited
-
Days Won
2
Content Type
Profiles
Forums
Blogs
Events
Gallery
Downloads
Store
Everything posted by Z-TARD
-
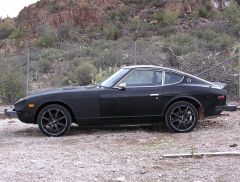
I should have taken some pictures of the event, it ended up dragging the car sideways about a foot through the dirt. You may not be able to polish a turd, but you can definitely paint them flat black. The good thign about this is that because I have rescued this car from certain death at a crusher, I can drive it like I stole it and not feel bad about it. Once I get it running good again of course. Right now a good stomp on the go pedal only results in lots of stumbling and popping with no discernable increase in speed.
-
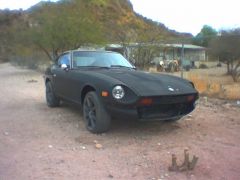
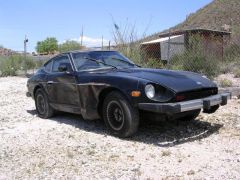
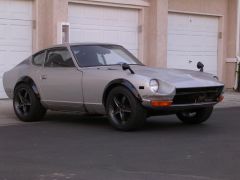
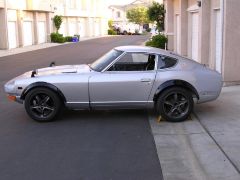
If I hadn't already paid for it via Paypal I probably would have walked. It did run well enough to drive the 2 miles to my brothers house, although it left a James Bond style smoke screen behind it for the entire distance. The car was actually from Nebraska of all places, I figured on encountering a lot of rust on it but so far have only found a few spots. The floorboards are good, which is more than I can say for my 240. Of all the sheetmetal on the car that was bunged up, the rear roll pan is flawless. This is the only un restored Z I've seen that has absolutely no damage at all to that area. The rest of the car looked like it was driven off a cliff however. I've been painting everything flat black as I fix or replace it. It's my way of tracking progress. So far I've replaced both fenders, headlight buckets, the hood, and installed a new lower valance which was missing entirely. I found the wheels on ebay kind of on accident, but they were flat black/gunmetal as well so I couldn't pass them up. I'm going to take my 240's bumpers out there on my next trip and fab up some mounts to stick them on in place of the slab'o steel 280 crash bumpers. My plan for this car is to leave the drivetrain pretty much stock, maybe swap in a turbo motor from a ZX down the road. I'll probably end up swaping in a later model T-5 tranny to replace the 5 speed thats in there now. I know it's only a matter of time before 5th gear grenades itself in that thing. At this point I'll be happy just to get it titled and smogged so I can drive it on the road again. Mike
-
Mine are just the plain fiberglass flares, I posted them on here just to show how they fit up, as I've heard they are from the same mold as the CF flares. Maybe someone with the CF flares will chime in on this concerning the weave. Mike
-
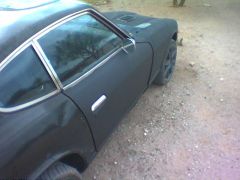
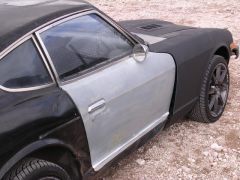
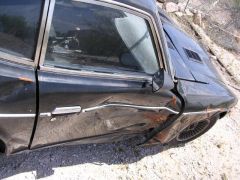
I bought this Z on Ebay about a year and a half ago: The Ebay description of course neglected to mention tiny details like major collision damage, etc. For $260.00, I wasn't really complaining. The general appearance of the car, along with it's nearly complete lack of straight sheetmetal quickly earned it the nickname of "The Turd". At some point a previous owner had decided to retrofit it with a sunroof, which another owner had sealed shut with what looks like Henry's roofing compoud, and also painted it black on the inside. Evidently Vampires dig first gen Z's.... Over the last year and a half I've made several trips to Tucson, the city where I purchased it, and where it still resides, to restore it to a driveable and presentable condition. I considered bringing it to San Diego, but after driving it the first time I quickly decided against that and it has been parked at my brothers house ever since. The passenger side door was a major concern for me since it had taken a pretty severe hit. Even after replacing the door, it was still mis-aligned by about 2" near the bottom front edge. Using a slide hammer I was able to get it to within about 1.5", but to fully pull it out to the correct placement I had to use the ultimate redneck slide hammer.... The 1998 Jeep cherokee has a listed curb weight of 3,700 pounds. Add a complete set of tools and a driver and this climbs above the 4,000 pound mark. By attaching this via a stout chain to the afflicted area of the Z, and gunning it with about 3 feet of slack in the chain, I was able to pop the door piller area out the additional 1.5" to make the door line up with the fender with only 5 good tugs. Honestly, I think a sixth tug was in order as it was still about 1/4" off, but I broke the chain on the fifth tug and took that as a sign from all that is holy to stop. In retrospect, I'm probably pretty lucky that I didn't exceed the deployment threshold for the airbags during the pulling. I'm not sure how they are triggered, and to be honest I never really gave it any thought until after the fact. Evidently Charles Darwin was smiling at me that day..... Anyway, here are the before and after pics of the project: Passenger door in as purchased condition: Passenger side after installation of "new" door: Pasenger door after pulling with jeep: As of now the car still doesn't run well enough for smog testing and registration, hopefully my next trip out there will take care of that. Mike
-
-
-
-
Unfortunately no. I've been procrastinating quite a bit, along with getting side tracked on a few other projects. My current apartment complex is also pretty quiet,and probably not the best place to be cutting auto body sheetmetal with anything other than hand snips as all my neighbors seem to be little old ladies who sit around all day at home with nothing better to do than complain about noise........ Rant Rant Rant. I'll either be moving to another apartment pretty soon, or towing my car to the auto hobby shop at the local Marine base so I can do the cutting, along with all the other metal fab work I have to do to the car. I will post pics as soon as I have anything worth showing though. Mike
-
-

What kind of rear end do you want to drift?
Z-TARD replied to 240ZR's topic in Brakes, Wheels, Suspension and Chassis
Heh Heh Heh, I guess you need to be a dirty old man or a sailor to get that one. -
The sheetmetal on the front and rear of the 280 differs slightly from the 240 as far as bumper fitup is concerned. In the rear, the 240z has slight depressions along either side where it's bumper fits into, located behind the rear wheel openings. On the 280z this area is smooth, because the side extensions on it were made of rubber and fit directly against the body. In the front, you'll notice that the 240 turn signals are mounted below the bumper, directly under the headlights. On the 280, they were moved inboard into the grill area. Because of this the entire lower valence is different, the 280's is more bulbous and lacks the cutouts for the wraparound turn signals. Body kits for both cars are different because of this. A 240 airdam will require 240 turn signals, a 280 airdam will require turn signals located inside the grill. The bumper mounting between the two is significantly different as well. The 240Z bumpers are mounted up with simple flat bar brackets that bolt up to sheetmetal with little reinforcement. The 280 brackets are large hydraulic cylinders that bolt up to reinforced areas, these are supposed to act as shocks in low speed collisions. For a closer fitting bumper, I've seen people drill holes in the cylinders to drain the fluid, after that they can be collapsed backward about 2 or 3 inches. To fit 240Z style bumpers on your 280, you will need to remove the hydraulic bumper mounts it currently has and fabricate mounts to bolt up the 240 bumper with. There are several threads on here covering that subject, although I don't recall any of them having drawings for the brackets. A search for "bumper swap" or "240Z bumper" should yield some results. The brackets shouldn't be too hard to figure out for a guy who can turbo an Audi to the tune of 750 HP. Hope this helps, and good luck with your new Z Mike
-

what a beautiful Z! (not for the weak of heart or stomach)
Z-TARD replied to JaysZ's topic in Non Tech Board
Throw some 450 series rear tires on there and it'll look just fine! You guys are too harsh...... Mike -
Sounds good, two brains are always better than one. I'll actually be adding about 50% or so of a brain on account of all the fume inhalation and everything, but you get the basic picture Mike
-
Thanks for the tips John. I've already started on the resurection process for the dash. I've added a layer of fiberglass mat and cloth on the backside of it to add some strength. I used a bodo squeegee to get most of the resin out after the cloth and mat had been wetted through, so it shouldn't add too much weight. Once I get a rigid enough structure I'll tackle the outside surface. The wrinkles are only caused by excess resin, the cloth is still flat under that so all of the surface irregularities should sand out without too much trouble. I'm still kinda bummed that it didn't turn out as well as I wanted it too, but not bummed enough to start over from scratch I've already started accumulating supplies for the next CF project, which will be the hood. This one will get a proper mold made, and will be vacuum bagged with a layer of peel ply to make sure it comes out light and strong, unlike the dash. This will have to wait until all the rust repair, structural mods, and cage are done in my car, probably in a month or two ( In HybridZ time, more like a year or so) Mike
-
Awesome work! I've learned more about Datsun unibody structure in the last few day by reading your posts than I have over the last 5 years of having my own 240z in various stages of deconstruction. It has been pretty inspirational as well, I spent the entire day in the garage today, for the first time in at least a few months. Keep up the good work! Mike
-
Absolutely, the whole thing could have been wrapped in a large plastic dropcloth and hooked up to suction. I just got in too much of a hurry, and figured I could take a shortcut on it. Knowing what I know now, I would buy the right materials if I were to do it again. A decent vacuum pump, bagging material, and peel ply material to sandwich between the workpiece and the vacuum bag that absorbs extra resin. I think the part I have now will work, and will look fine after some cosmetic work. Anything I make from now on though will be done without taking the same shortcuts. I'll probably still take shortcuts, just not the same ones.... Mike
-
Some of the later 280Z's had a hump in the floorpan on the drivers side to make room for the catalytic converter. I've seen a few like this, with a big lump right under the drivers seat. Mike
-

1971 240z - Should i get it? (pics)
Z-TARD replied to 240zV8's topic in Gen I & II Chevy V8 Tech Board
I'm pretty sure the joint behind the quarter windows was welded, and then leaded over. Not 100% positive about that though. -
The bumpers might be an issue, because the mounting methods between the 240z and 280z were quite different. The 280z bumpers are bolted up to large hydraulic cylinders that act as shocks, the 240z just had metal brackets that fit the bumper much closer to the body. Would it be possible to make the fiberglass bumpers fit on a 280? Absolutely, but not without doing some rework to the mounting points. The ZG flares, side skirts, and air dam should go on without too many issues. Probably the most difficult of those parts will be the ZG flares. I used threaded inserts to attach mine, they go in like rivets, but are threaded on the inside so you can bolt something to the surface of whatever you put them in. I've seen them advertised as both Nutserts and Rivnuts. They will require a special tool to install them. I've been able to find them on ebay quite often: http://cgi.ebay.com/Threaded-Riveter-Combo-and-140-Nutserts-Rivnuts-NEW_W0QQitemZ7579270144QQcategoryZ42903QQssPageNameZWDVWQQrdZ1QQcmdZViewItem Be sure to buy plenty of whatever size rivnut/nutsert you intend to use. You'll need at least 24 to do the fenders flares if I remember correctly. You could also use them on the side skirts and airdam. Sometimes they dont pull right, and have to be done over so get enough to make a few mistakes with if you plan on going this route. Also, for the fitment of the ZG flares the method that worked for me was to drill all the holes in the flares first. Use wood backing behind them when you drill so the drill doesn't delaminate the fiberglass when it goes through. Once all the holes are drilled, use masking tape to position them on the side of the car exactly how you want them to sit. Use lots of tape and make sure they are sitting flush with the body, then mark the location of the holes with a permanent marker or grease pencil. Remove the flare and drill out all the holes to the correct size for whatever rivnut you are using. On the rear flares, you may end up drilling through both the outer fender AND inner wheel well on some of the holes, depending on how the flares are positioned when you mark the holes, keep this in mind when positioning the flares. After your holes are drilled, install the rivnuts (patience is key here) and bolt up your flares. It's a good idea to install all the bolts for the flare very loosely at first, and tighten them down once all of them are installed. This allows any stress from tightening it down to be distributed over the entire flare, not just one or two bolt holes which could lead to cracking. Hope this helps you out a little, Mike
-
"I'm sorry, I think some of my rust got on your bling" "Sodomizing Hondas since 2000" "Think of it like one of those mega makovers on the Oprah show, only its for old rusty cars instead of old fat women, and it takes about 5 years of your life to complete rather than half an hour....."

