Bob_H
-
Posts
783 -
Joined
-
Last visited
Content Type
Profiles
Forums
Blogs
Events
Gallery
Downloads
Store
Everything posted by Bob_H
-
Any of you down under types - I'm having a heck of a time with Castlemaine Rod shop - aka CRS that you have linked. I had several e-mails back and forth about bellhousings and am all ready to order - I just asked for a final quote with shipping and the info for how to transfer the money,(out of country needs to wire transfer into their account). I haven't heard from them in 10 days since that e-mail and I wrote them 5 days ago and last night...... I can understand if they are busy, but in the last 4 e-mails, they responded w/in a few days at most. Could I talk one of you into calling them and prodding them to respond to me? A gent named Craig had been responding to their sales e-mail address. Its frustrating because I'm ready to order after they answered all my questions/concerns, but noone is responding now. Unfortunately for me, they are the only game in town for the part I need, (a custom bellhousing to adapt the RB motor to an older GM tranny - actually my G-Force GF-5R which has an older T-10 and Saginaw type bolt pattern). Any help is greatly appreciated. -Bob
-
Megasquirt rb26 maps? Curious to compare my tuning numbers....
Bob_H replied to a topic in Nissan RB Forum
I think you are the first I have heard that is running a MS on the RB26. Are you still running individual throttle bodies or did you convert to a single throttle body? If you didn't, where are you getting your vacuum signal from?(load signal). -Bob -
Tips on removing cambelt sprocket from crank?
Bob_H replied to NickandM 72 240Z's topic in Nissan RB Forum
I used a finger style puller - it isn't on very hard, so it took only slightly more than finger pressure turning the nut on the puller - it just ensured I could pull on both sides evenly. -
I don't think a high volume pump is absolutely necessary - but can help. The N1 pump only increases the pressure, not the volume. The HKS and JUN are on the lower end of the "high volume" pumps while Tomei and NISMO are on the higher end of "high volume" - (usually measured at 6000 rpm or so). There are lots of ways to skin a cat - so several different solutions can work well. -Bob
-
Updated the post and put the pictures in. If your thinking about doing this mod - please read my recent addition to that post. -Bob
-
Dave, Thanks for responding in this thread. For those who aren't familiar, he modifies your harness and repairs turn signals/headlight stalks. Info can be found here: http://forums.hybridz.org/showthread.php?t=123689 That is three links to classiczcar where the threads are located. Anyways, to answer your question, no, none of the existing harness is present. I have the turn signal/light switches and their ends, and the hazard switch. I will gladly utilize parts of my dash harness if required to make a workable solution. The hazard lights did previously work through the stock harness, but obviously are not connected right now. I'd be willing to bet that whatever wiring setup I utilize will allow me to use that switch. -Bob
-
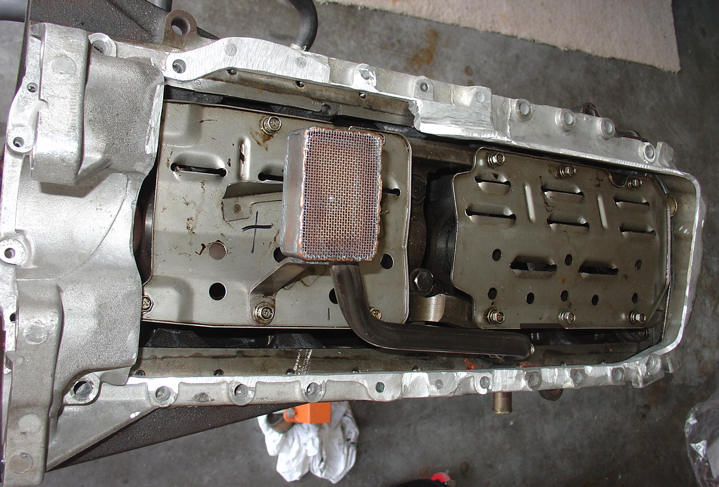
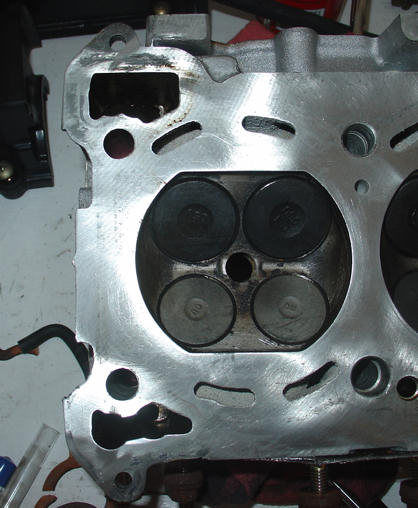
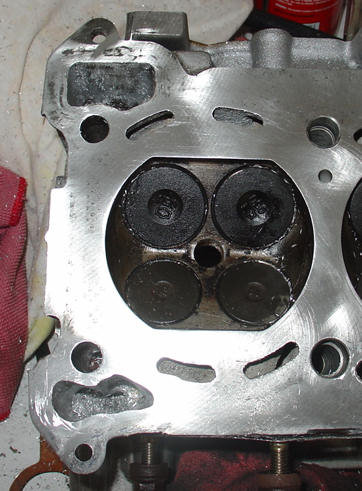
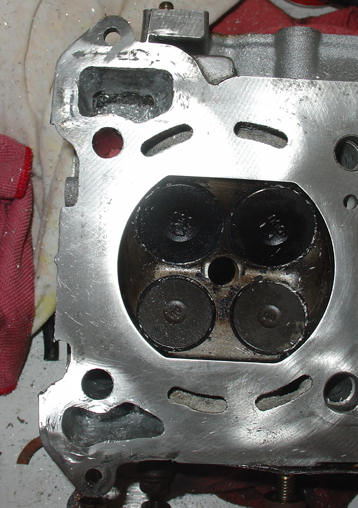
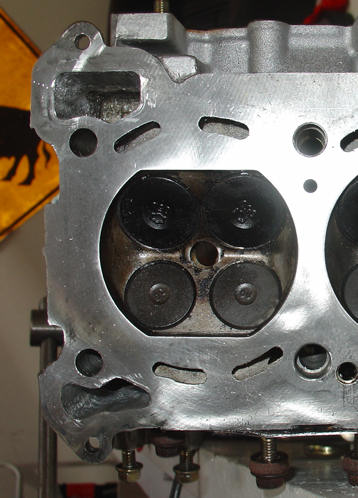
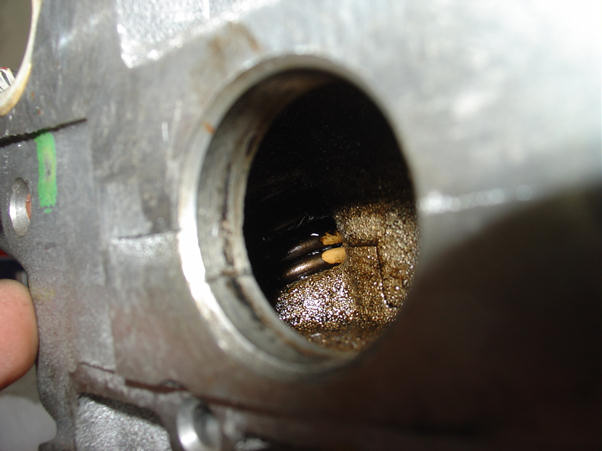
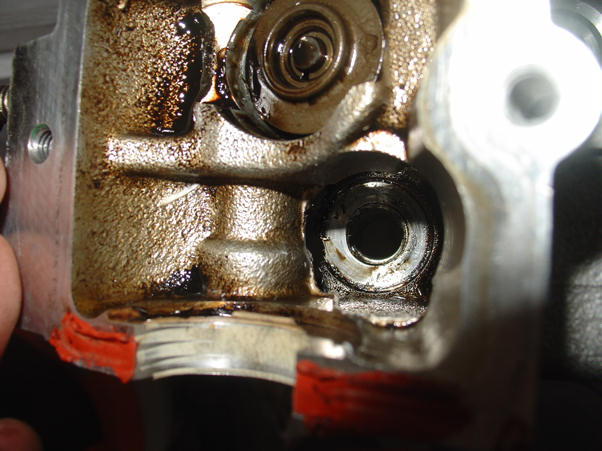
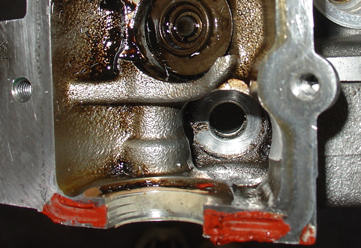
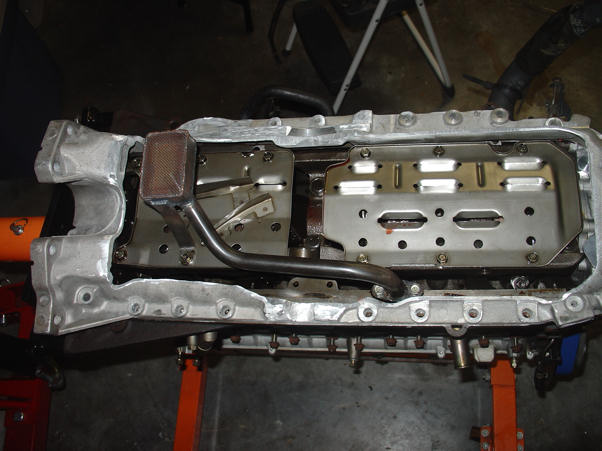
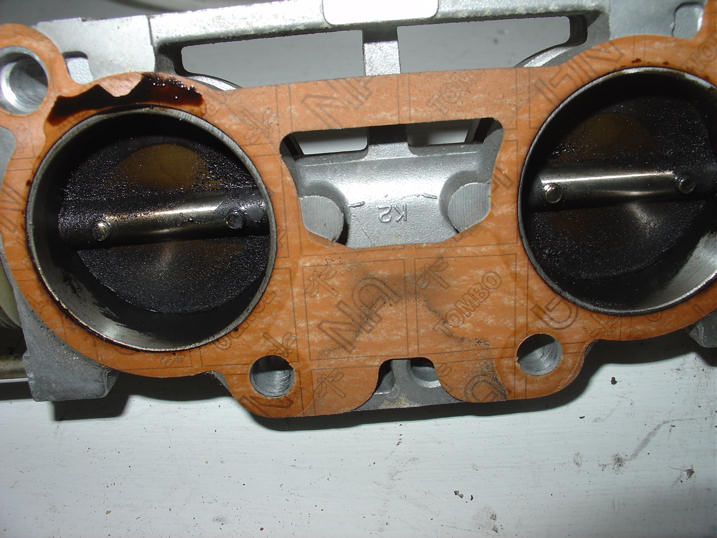
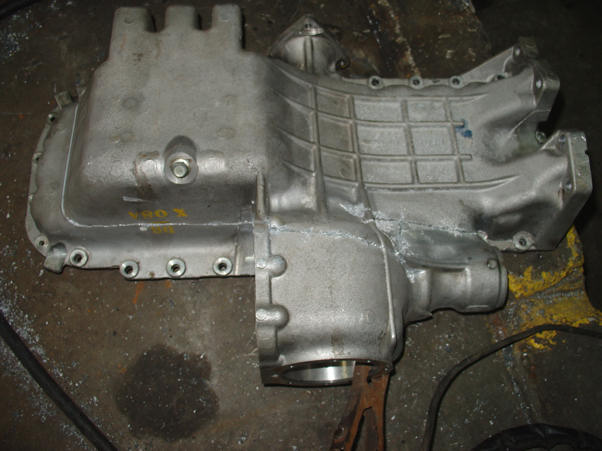
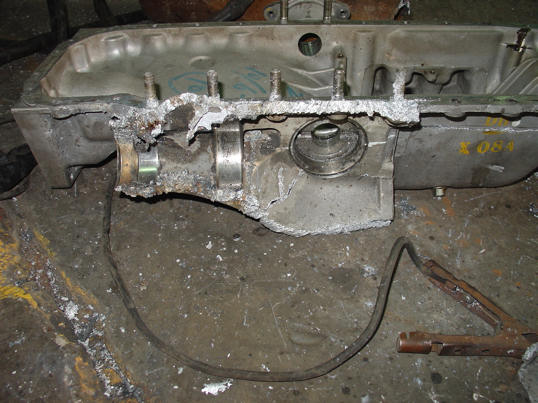
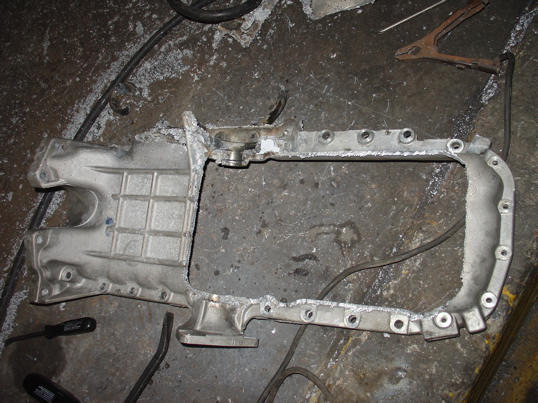
Well, had to take the oil pan back and do some more grinding so we cold get a workable solution to start with. Now I have to fab it up in cardboard, then off to get it made. The pictures are of the newly "ground" setup - i.e. I needed a flat portion in which to start. I can't decide on the thickness to use - i can use 1/8 or 3/16th. 3/16 is thick - big time for an oil pan. As a reference, I think the thickness used in my older oil pan is on the thinner than 1/16 - almost sheetmetal thick. The same as the other pans out there,(240z turbo's oilpans) but for my intended purpose, not thick enough. We did discuss just adding thickness to the pan I already have, but I can sell it,(and recoup some of the cost) and get exactly what I want with the RB oil pan flange. The other issue is the oiling problems that are common. I recently posted in this thread: http://forums.hybridz.org/showthread.php?p=792565#post792565. Here are some pictures of what I modified. The first ones are the head before I started grinding - the next ones are after. The smaller hold is the side of the head that is lower.....not a very good design. And yes, the springs/valves are coming out - so don't worry about the shavings/etc... I'm likely pulling the entire rear suspension out tomorrow! Yea...... Ok, pictures: 1st and 2nd are the new oil pan cuts - i.e. its prep'd for the cardboard mock-up next is the cylinder head before any work was done. I took the head gasket and scribbed the outline of the area available. Over the next few pictures, opened it up to that line and smoothed out the drilling. The 7th picture is a shot into the freeze plug that is normally removed to install a head drain. You can see the side of the rear most valve spring. As you can see, the space is rather small, and it connects to both sides of the head. All the oil must drain down through what you can see in the final two pictures. The hole is for the cylinder head bolt - the opening to the drain area that I enlarged is to the left of the picture - its about as big as the end of my thumb - maybe slightly larger. Not very large..... In the first shot from above, you can see the flashing I removed which is shown in the last picture. The cylinder head is still being disassembled so it can be cleaned and then it will go back together. -Bob

-
BTW, Do you have any pictures of your custom 7 litre oil pan? I'm very interested in the baffle setup, etc.. I didn't find it in any of your other posts. -Bob
-
I've been following all the oil threads everywhere and am making the mods listed later to my RB26. As I have come to understand it, and reading many setups, including those w/accusumps - it really does come down to insufficient oil in the pan - which can be from several causes - a aftermarket high volume pump,(such as the HKS I have), coupled with a stock size restrictor,(or both restrictors as the RB20's and 25's), pumps out all the available oil in the oil pan, which ends up starving the oil pump - which has led to oil pump failures,(catastrophic gear failure), or bearing failure, which can vary in its effects from minor to major. Having spent the day today opening up the cylinder head drains - its no surprise that the stock head has issues returning oil. If you look at the openings and the way the motor leans - you would think that they would cast the larger hole on the lower side of the motor,(drivers side for the US), but it is actually SMALLER. In addition, it is very restrictive, and comes as no surprise that oil pools. Now there are small returns along the head - but they are just that, small returns that allow oil out from the valve spring areas,(they are actually on one side only, 4 holes, near the cylinder head bolts). I'm editing my photos so I can post them in my Super Datsun thread - and I'll try to put them here as well. Bottom line as I see it now: -Accusump is only a band-aid fix - it will work as long as it has a supply - once that supply is depleted, i.e. more is pooled up in the head, it will no longer help. This is proven by several folks who have an accusump on their RB26 and have still suffered oil starvation -The oil in the head must be addressed - either via opening up the returns through the head and into the block, or with an external return, or preferably both. -Higher volume pumps,(Jun, HKS, etc..), will exacerbate the problem unless steps are taken to reduce the amount going to the cylinder head - mainly a smaller restrictor in the engine block,(1.0-1.2mm, rear blocked off). And with a high volume pump, I personally would consider an external return a mandatory option if you are taking your car to the track,(circuit for the rest of the world). -The N1 pump may be a better solution than some aftermarket pumps as it doesn't make the problem worse by drastically upping the volume it is pulling from the pan over a given period of time. -Expanding the sump for more volume is always a good option, as is baffling to prevent pooling away from the pickup - but again, if you don't address getting that oil back into the pan, it doesn't matter. I'm doing all of the above - I've already expanded the cylinder head and engine block returns. I'm installing an external return. I'm installing a 1.0mm oil restrictor,(I have the very high volume HKS pump) I'm installing restrictors before the turbo's - again, I have a high pressure and volume aftermarket pump - and that tends to push oil out beyond the turbo seals into the intakes. I'm building a completely custom oil pan with baffling and extra volume. I expect approx 7-8 quarts. Its a lot of work, but this motor should be exclusively on the track - and I'd rather not pull the motor for new bearings or worse every track weekend. On my edit to add pictures: These measures matter mostly to those who will spend a lot of time at high rpms. If you are going to primarily drive your car on the street, maybe do some 1/4 mi drag races, you likely won't ever need more than what most people have done on this board - a good oil pan, a decent oil pump and no issues with your clearances/bearings/etc... For those of us who will spend lots of time in the 5000+ rpm category, or 6-8k on the track for 20-25+ min, you have to address those issues or you can plan on pulling your motor for a bearing rebuild and/or oil pump replacement on a regular basis assuming something catastrophic such as a rod through the side of the block doesn't happen. That is not to say you won't have issues if you drive it on the street, just that the likelihood is much less. A smaller restrictor in the block, (1.2mm), an N1 pump and you will likely be fine. If you are going to an aftermarket high volume pump such as the HKS, Tomei, and JUN, you need to look into the rear cylinder head external return. And that should solve 95%+ of peoples problems. It is that 5% of us running at high RPM's for extended periods of time that need to look further. I also want to mention the following: Modifying the cylinder head by opening up the passages in the rear is not for the inexperienced. The aluminum in the cylinder head is very soft and with a die grinder or similar it will/can take a lot of material quickly - much more than you planned. In addition, you must plan on completely disassembling the head and having it completely cleaned as those shavings will get down into the small space in the rear of the head, and down in the valve spring area of the furthest aft springs potentially causing much more significant issues when they are moved back into the oiling system after you button the engine back up and oil is moving around again. Don't do that unless you are disassembling the entire cylinder head and cleaning it afterwards! The following is pulled directly from my Super Datsun thread. (Here if you want to read/follow further: http://forums.hybridz.org/showthread.php?t=115751 ) The first picture is the cylinder head before any work was done. I took the head gasket and scribbed the outline of the area available. Over the next few pictures, opened it up to that line and smoothed out the drilling. The 5th picture is a shot into the freeze plug that is normally removed to install a head drain. You can see the side of the rear most valve spring. As you can see, the space is rather small, and it connects to both sides of the head. All the oil must drain down through what you can see in the final two pictures. The hole is for the cylinder head bolt - the opening to the drain area that I enlarged is to the left of the picture - its about as big as the end of my thumb - maybe slightly larger. Not very large..... In the first shot from above, you can see the flashing I removed which is shown in the last picture. -Bob
-
10 hours on our RB board with low traffic isn't enough - give it at least a few days before you start asking why noone has responded. You also posted at near midnight - and its only about 10am your time - most of the traffic is in the evening - so I would wait at least until you've had the post up for at least 24 hours. Look at the part number on the old belt - and see if they can match that. Second, go somewhere like NAPA and get them to measure the old belt and match it that way. -Bob
-
You and about 10 other people on this board! Thanks for the compliments - it helps keep me motivated to work on the car. Flying 3 flights a day with 12-14 hours at work tends to sap the desire to jump on the car when I get home..... Anyways, going to talk to the guys about the oil pan tomorrow morning. I'll know what direction I'll go at that time.
-
Wow, I've seen a bunch of cylinder heads that are as dirty as yours - but it didn't hit me how nice the inside of mine was until I saw this shot: Link here if the picture link doesn't work: http://picasaweb.google.com/rb240z/20070527HeadDrainMod/photo#5088057061322142626 That picture is represenative of about 90% of pictures I've seen of the inside of RB26 cylinder heads. I don't have a shot of mine available - yes, it is the tan-ish color, but not black spots where it stuck, just normal coloring for what was supposedly a 12-15k mile motor. When I tore it down, what I saw supported the low mileage. -Bob
-
Two thoughts - first, did your motor originally come with the pull clutch and you converted it? I.E. is the throwout bearing "holder" the one that came originally with the RB25 transmission - and did the clutch? If you are using the RB26 clutch,(or a push version of it), it might not be designed to work with your RB25 clutch fork/throwout assy, etc.. The only way to be 100% sure is to have all RB25 parts - from the flywheel to the transmission. You start mixing and matching, there is no telling w/o careful checking. Is the slave cylinder from the RB25 trans as well or from the Datsun? I'm not sure of the Datsun vs RB25 slave cylinder bore, but if the Datsun is larger, you'll get less travel - or vice versa, with a smaller bore than required, you'll extend it too far. Can you engage or fully disengage the clutch with some amount of clutch movement - but full throw makes it an issue? If so, then it is likely an undersized slave cylinder. If it won't fully disengage, its either a bad slave, or too big dia of slave cylinder. For the oil problem - consider a few things. If you have an aftermarket oil pump - its pumping more oil that the stock setup, which can force past the stock seals in the turbo - making your two turbo's a secondary oil pump that feeds your intercooler! One way to ensure that is not a problem,(assuming you have something other than the stock oil pump), is to install a restrictor in the oil feed line before the turbo. They are available on e-bay and various other locations. I believe they are about $10-30 each. Food for thought. BTW, I missed it - are you running the stock ECU? -Bob
-
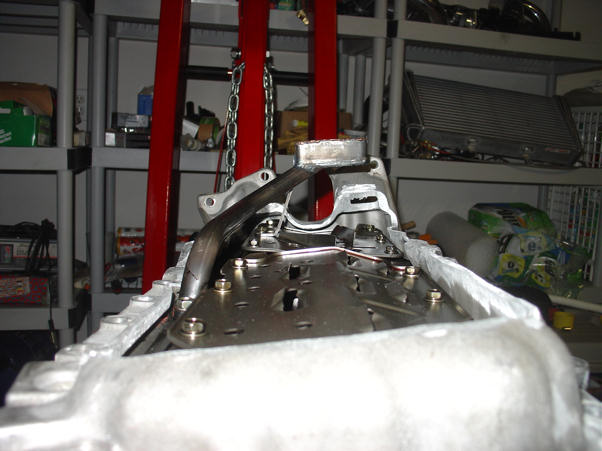
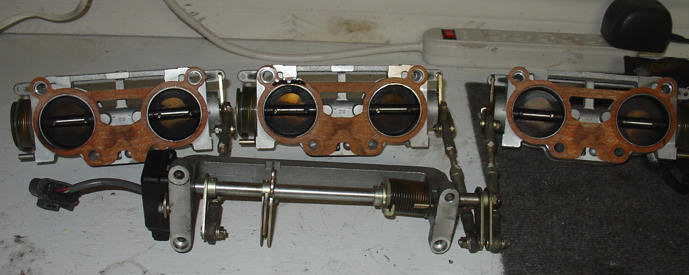
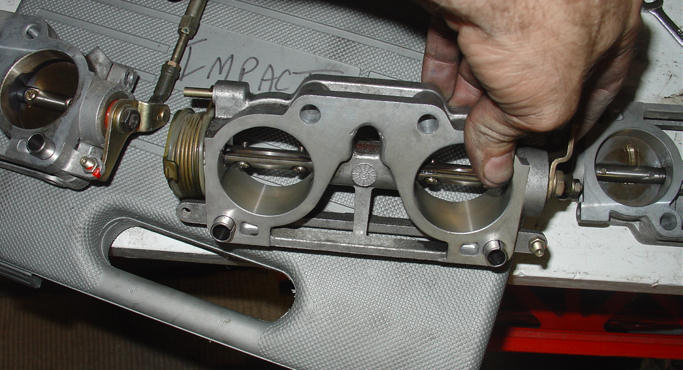
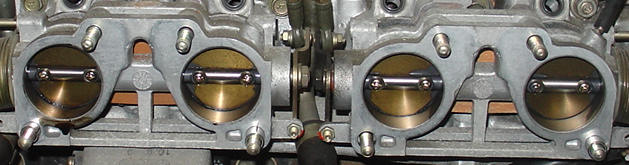
Ok, pan is "cleaned", engine is completely disassembled. Put the original cut up pan on with the new rear sump pickup and took it by the fabricator - judgement is still out on using the new pan or completely re-doing the oil pan... not sure. Its tough with the non-even sides that were cut - may have to use a machinest to straighten it out. We'll see. Also, take a look at the throttle bodies - The first two are before I cleaned them - the closeup shows just how dirty they were. The second two are the clean ones. They did have a anti-seize type compound that seemed to be on the throttle plates originally - maybe to help seal things? I don't know - any insight? Anyways, suspension later this weekend, fuel pump install, and future work on the wiring. I think I found a good solution for my gearbox situation - trying to work the G-Force GF-5R instead of the RB25 RWD tranny. Castlemaine Rod shop in AUS has a bellhousing that will adapt the RB's to a GM T10, Saginaw, etc.. which will work directly with the GF-5R - I'm just trying to find out what clutch flywheel, starter and clutch fork/throwout bearing to use. CRS has been slow to respond. Anyways - still pushing hard to get this done quickly. My next two weeks will be light on flying since our planes are down for a short period due to some issues with the ejection seats - should be fixed soon. So more time off for me! -Bob
-
Nice work! A few questions/comments. First, with your external pickup location in the pan - realize that you will have about a full quart or more of oil that it cannot pickup,(the pickup will need to be completely submerged for it to draw oil up). That means if under normal driving, it becomes uncovered - oil will stop flowing.... something to keep in mind - and i suggest overfilling. Make sure you mark a "full" mark on the dipstick. I did mine when the pan was off the car - and marked it just below the girdle. However, if yours is already installed, you might have to get creative. Whatever you do, don't rely on the stock markings as they were designed for a different pan depth/location. Second question - your custom head drain mod - what sizes, how did you make it fit, etc..? I'm working my own custom head mod solution, and I like your start and am interested in following. I assume your running the stock computer for now - any future plans or will you stick with that. Last, have you fabb'ed up an exhaust yet? I'm interested in seeing the front pipes,(that connect to the turbo's) -Bob
-
That is neat - I hadn't seen that before. For others, here is the link to that product: http://www.hammondsplains.com/z/zworld/zraceproducts/ Its at the bottom. And my intercooler - custom setup, large, lots of custom work. Made by PWR - nice cores, good performance, lower psi drop.
-
Do you have a picture showing the powerglide mount and how it works with the starter? I'm trying to figure out if I can use a chevy bellhousing,(for a manual tranny), to adapt my RB to my G-Force GF-5R transmission. It appears as if the roughly "3 o'clock" position would interfere with the lower ear on the block? Any insight into that? -Bob
-
Most of your questions are answered here, but not exactly in the direct way you are asking, so I'll bite. First, welcome to HybridZ - its not like nico forums or freshalloy,(or even zcar.com, etc..). You'll find some of the best Z car RB swap info on the net here. First, not true about the tranny. I have a 72 and a 73 and have test fit the motor in both cars - there is no appreciable, if any, difference in the transmission tunnels besides the tranny mount configuration, (bolt from beneath on the 72 and earlier, bolt front to rear on the 73 and later). You will have to make a custom tranny mount of some kind. I have the later model RB25 RWD trans - which is physically larger than the earlier models. Yes, its a tight fit, but no beating required. you will have to removed the trans mount "ears" in the trans tunnel. If you have a pre 73 with the bolts that go straight up, it will fit w/o cutting. 73 and later required some cutting of the "ears" and new mounts fabricated, but no beating of the tunnel, etc.. The Original driveshaft will not work with the RB25 transmission - the input yoke is different. Depending on what you received, the "front" portion of the rear driveshaft on the GT-R can be made to work - depending on where your engine mounts are, that you have the R200 flange, etc... Its a big iff - I happen to have one that will work - but each GT-R model is slightly different, and my driveshaft was actually from a Stagea 260 RS - basically a station wagon version of the GT-R with R33 parts. The rest of the info for driveshafts is contained in posts in this forum. My recommendation is to have a custom driveshaft made - it will run around $200 at a decent driveshaft shop and will fit perfectly assuming you measured correctly. Here is a thread on driveshafts: http://forums.hybridz.org/showthread.php?t=105297&highlight=rb25+transmission+driveshaft Good luck - again, you'll find 90% of your answers in previous threads. I suggest when you post questions that you post a link to threads you did find, but that didn't quite match what you were looking for - it helps us from pointing you in the wrong direction. -Bob (72 Datsun with RB26 swap ongoing).
-
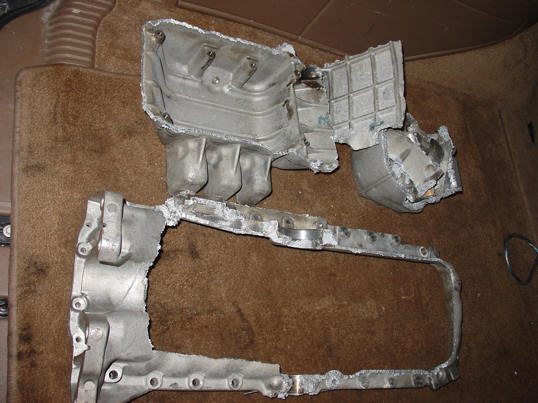
Well, finally stated on the cutting of the original oil pan. I thought I'd post some pictures before it is all cleaned up. I wanted to show just how difficult it is to cut off the diff and flanges. There are a few very thick portions - and it was heck to cut it with a plasma cutter turned up to max. I'm going to take a grinder to it this afternoon and smooth things out. Next is to take the engine apart again and then bolt up the oil pan and pickup so we can fabricate the new pan. Enjoy. -Bob
-
I knew that one was coming! -Bob
-
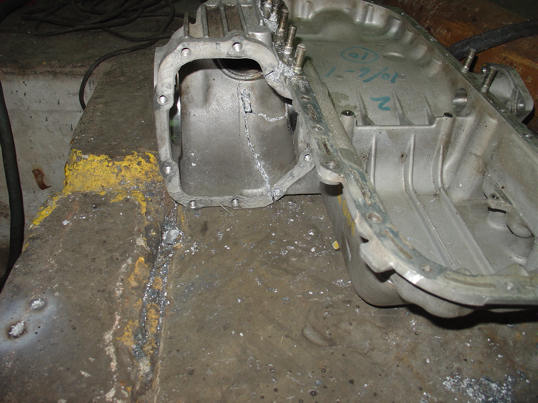
Ok, last post before I hit the sack and get up to fly tomorrow. This last picture is of my oil pan and one of the reasons I pulled it. It was rubbing on the steering rack - specifically on the pass side that holds the rack and on the "bumper" in the middle. I could just move the "bumper" and that takes care of one issue - and grind down the "ear" on the pass side. (remember, US passenger side). This would have been a no-go for driving until it was fixed. I think my engine mounts are slightly shorter than others - in an attempt to minimize the the vertical height - it was cut too close. Someone else wouldn't likely have this problem. My plan is a completely new pan - not because this hits, but because for my intended track use - its too thin. Brad Davies old car,(don't know who owns it now), has been using this pan for some time now with no issues. I'm looking for a completely different route in my solution - modifying the stock oil pan. We'll see how it goes. If I can make it work - I'll put this pan up for sale. I'm also seriously debating the engine mount situation - as for the power I'm planning on ultimately - around 600hp, I'm not real enamored with the stock Datsun 240z engine mounts. I'd like to find a way to make the GT-R engine mounts work - but that may be some additional fabrication... we'll see. Let see - what's left... here's my current "must buy" list. -complete lock set - the ones I have don't have a key for them -two aluminum thresholds - again, don't have any. -Fuel pump, pre filter, surge tank, post filter, fittings, fuel rail, etc... -Window channel fuzzy trim -carpet kit -new 6 point belts,(old ones are just that - old, and full of dust/grime from body work - not a good combo in my opinion) -complete wiring kit....that should be fun! -PF-01 pads all around -LOKAR accel cable and dipstick,(current setup is not a good solution) -hood support,(didn't have one?!) -New fittings for PVC setup -Possible NISMO intake surge tank? -lots of misc.... That's just the "buy" list, which seems to grow daily. The list of what to do is slightly longer, but thankfully not that much. The biggest time consuming items left: -Wire the care with a new setup - completely new -Plumb/install new fuel pump setup - am considering a new fuel cell to bring it more current and have a complete installed surge tank/pumps internal - any leads? -new oil pan fab Those three will likely consume 80% of the remaining build time. The rest is straight forward and a few days worth of work. Good thing my wife is in NC gonig to school - I can work on the car as soon as I get home until its time to hit the sack and start over again! -Bob
-
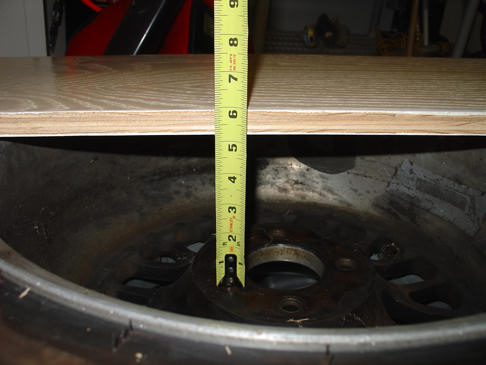
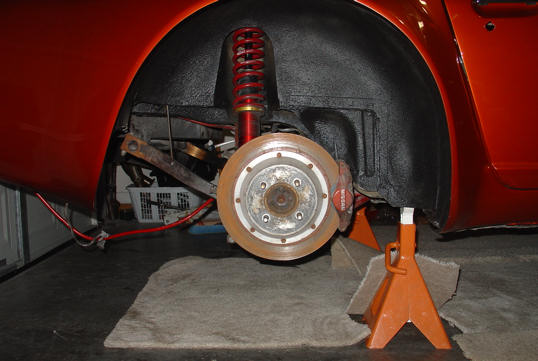
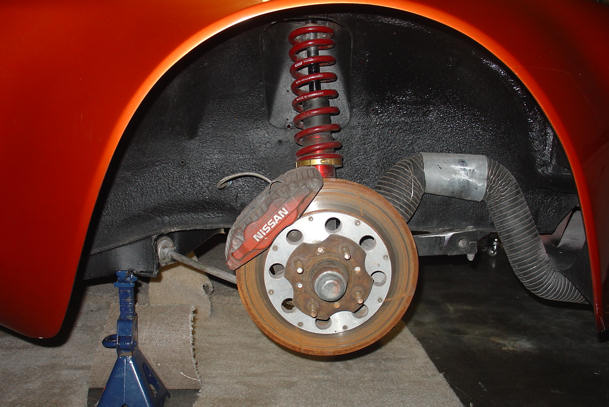
Well, Terry had asked about the offset of my rims. I first need to clarify for anyone searching this thread later - my brakes are a custom setup - meaning my figures might not apply to you. I have a ground control coil-over setup - which of course means more clearance. The sway bars are speedway engineering sway bars - massive, but bent out of the way - I don't know how stock bars would clear for rims of my size but most likely would be fine. I also put pictures of the front and rear brakes. They are Coleman rotors with custom hats and a thick bracket for the calipers - which astute eyes will identify as from the Z32 parts bin.... My only change will be to remove the hawk blues - as they are brutal on the rotors, and replace them with PF01's, which I love on my BMW - very few can compare to their stopping power, capability, and more importantly - rotor friendly composition. The front hubs are 17 or 18mm thick - I don't know what that corresponds to,(240/280/300z hub) The larger offset is the rear rims - smaller offset, front rims. It is important to note that my 17" rims have different offsets - more in the rear, on the order of 6.5". The pictures are of the 18" rims. Again, for the record, they are CCW classic rims. These are 18x12 rear rims and 18x11 for the fronts and the 18's have black centers. The "chrome" centers are the 17" rims which are 17x12 and 17x10 respectively. The 17" rims have 335's in the rear and 275's in the front. The 18's are running take off Goodyear slicks which are 25.5x11.5x18 all around (for those not familiar with slicks, it is overall dia x tread width x rim dia). You can also see the brake cooling ducts - and the aluminum protective cover - as the tires will and do rub under near full lock. -Bob
-
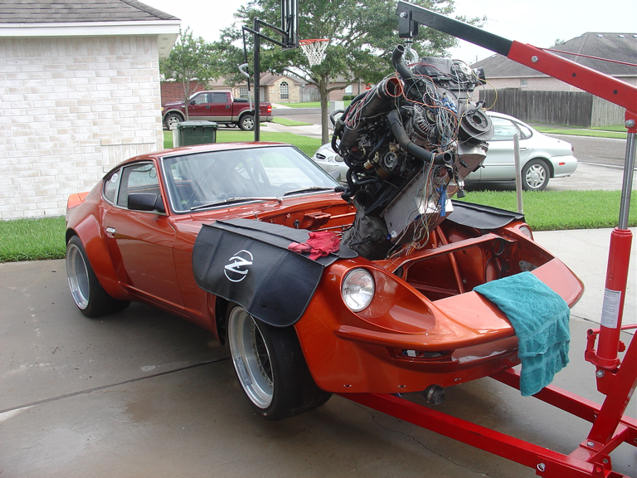
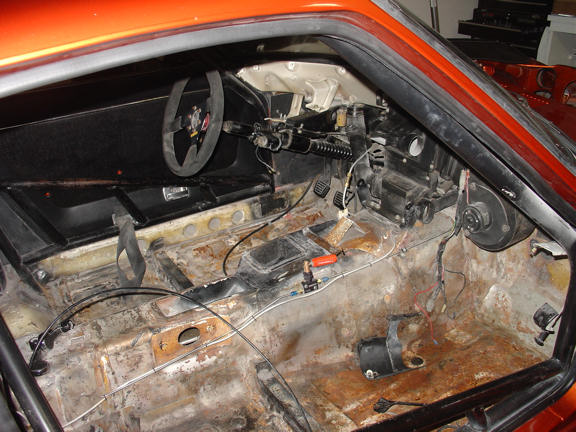
Well, another productive day. And photos finally! Engine was pulled to facilitate the new oil pan, oil mods, fuel lines, etc... So, first, I pulled my 18" race tires which have black centers out and put them on the car - and I'll flat out say it - they look much, much better and those will be what I keep on the car eventually. The black centers contrasts well with the paintjob. Speaking of the paint - I'll need to fish back through some papers to find the exact year - somewhere between '98 and '02. I wish I could be more specific than that - it may be a few weeks before I can get you more specific info. Ok, photos. First, current ops, next post, wheel info. First photo is it in the garage prior to the engine pull. Next two are pulling the engine - you can get a good idea what the rims look like with the car loaded up,(instead of up in the air). Look at that wire mess! I was trying to see what wires were extra/not required to pare down the harness. Bottom line - not much... Last shot is the interior after I pulled everything out. The rust on the pass side is just surface rust from under the carpet - the metal is very solid. -Bob
-
The Z with Porsche center locks
Bob_H replied to chelle's topic in Brakes, Wheels, Suspension and Chassis
Chelle, I don't agree with your goals considering the use. You want the "lightest rotor" available. For any incremental improvement from unsprung weight - there are tons of other areas in your car which will make it faster. And the carbon brakes won't necessarily reduce braking distances - if any at all - they just improved unsprung weight. You can do a lot to the suspension to reduce that number - and avoid a costly, and not well proven on the aftermarket, upgrade. Some high quality racing calipers such as AP, Alcon, etc.. and some high quality rotors with a custom hat will go a long way, will blow you away as far as braking capability, and will fit well w/in your cost constraints. Pads will likely be the single biggest factor once you have a decent size rotor and caliper - not rotor composition. If you want the "ultimate brakes for the track" - build a dedicated track car. You likely won't have the rubber to take advantage of a serious brake setup anyways. Your car is beautiful and a testament to your fabrication skills and work. However, there are lots of areas you have already compromised to make it what it is - such as using a large V12, etc... Even on the best, fastest track Z car you can find - adding carbon rotors to that car won't really make it more than a tenth or two faster per lap.... There are areas where you can improve the car by 1-2 seconds a lap over what you have now. Having significant dollars available for upgrades is fantastic - but there is a smart way to spend that money, and I don't believe carbon rotors are the answer. If you want a center lock setup allowing your wire wheels or a track wheel - expect some significant cost for a BBS or similar track wheel with a custom spacer to allow the wire wheels to fit - changing the offset you currently have etc... Are you currently using an adapter to make the center nut work? If so, just unbolt that setup and then bolt in a set of rims which will work with whatever brake setup you end up with. Your hardest part will be making the small offset wire wheels work with a large brake caliper setup. I can point you in the direction of someone who makes adapters for the coleman racing rotors allowing them to work with the Z32 brake calipers, (and may have some other options as well - my setup was on a GT-2 racecar and worked well enough considering the power and rubber size - both large). -Bob -
The color is a late 90's Renault color. I spent about an hour looking through all the paint books/chips, etc... trying to find what I liked. I settled on 3 different colors and they painted them on the hood. It was a clear winner. It was much lighter than most of the copper colors available today and had a slight green tint in certain lights. The more I think about the dash - the more I am leaning to keep the stock dash, just gut it - well, its already gutted. What I don't know about is the Heating/vent control panel in the middle. I really like what Brad Davis did,(a custom panel which used the stock controls and had two gauges down low). Lots to consider. -Bob