lbhsbZ
Members-
Posts
409 -
Joined
-
Last visited
-
Days Won
1
Content Type
Profiles
Forums
Blogs
Events
Gallery
Downloads
Store
Everything posted by lbhsbZ
-
Please Help with Brake Problem
lbhsbZ replied to clayton 260Z's topic in Brakes, Wheels, Suspension and Chassis
Pump the pedal about 5 times with the engine off, then holding your foot on the pedal, start the engine. The pedal should fall a couple inches when the engine is started and pulls a vacuum on the booster. If the pedal doesn't drop, your booster isn't working. Could be a booster issue or it could be simply lack of engine vacuum. You need at least 18"/hg of vacuum for the booster to function properly. If you don't have that much, the pedal may drop when you start the engine, but it won't provide enough assist to be effective. Edit: and turn your caps lock off. -
Front 13" low buck brake kit....DONE!
lbhsbZ replied to lbhsbZ's topic in Brakes, Wheels, Suspension and Chassis
I used a 94-03 maxima rear rotor, and I used rear calipers from a 95-07 taurus, which in retrospect were a little big at 43mm. I probably should have used a smaller bore caliper, like a 40 or a 38mm. I'm trying to get the bias dialed in my prop valve and I'm playing with different friction pads. Right now I've got PFC-01s on the front and Axxis Ultimates on the rear, but I may go to something a little less aggressive on the rear. -
No More Clutch Type LSDs!!!!!! (Nismo, Power Brute, etc)
lbhsbZ replied to Savage42's topic in Drivetrain
I beleive KAAZ also makes one, its a clutch type, and still cheaper than the Quaife. I know a couple people at KAAZ, so if there is some interest, I may be able to put together a Group Buy to save $100 or so per unit. I'll see what I can do on monday. BTW, the Quaife I bought is friggen awesome. -
M&K metals in Gardena, on Western just north of Rosecrans is where I always go. There is also Action metals in Wilmington on PCH just north of Alameda street, but I can never figure out where the front of the place is or where to park, so I always end up at M&K And there's always yahoo yellow pages: http://yp.yahoo.com/py/ypResults.py?stx=metal&stp=n&city=Long+Beach&state=CA&uzip=90802&country=us&msa=4480&cs=4&ed=Ml7ZoK1o2Tz7LGVA50idRaamqnUlOw_cUhO07HASFF.AVQ--
-
Z31 Front Hubs Needed 5 Lug Conversion
lbhsbZ replied to TONY C's topic in Brakes, Wheels, Suspension and Chassis
Tony, I can get you all the brake parts you need. As for the hubs, every time I've been in the Wilmington junk yards, theres at least 1 set there. -
http://cgi.ebay.com/ebaymotors/Datsun-Z-Series-sportsman-Drag-racing-car-Rons-alcohol-injected-358-ci-chevy_W0QQcmdZViewItemQQcategoryZ6187QQihZ019QQitemZ290147589500QQrdZ1QQsspagenameZWDVW Not mine, just found it.
-
Wheel Show! Post your pics of you wheels
lbhsbZ replied to k3werra's topic in Brakes, Wheels, Suspension and Chassis
Cobra wheels...ebay $450 17x10.5 w/ 315/35/17 R 17x9 w/ 275/40/17 F -
Before you do any more cutting, I would try to wire wheel the rest of the seam sealer out and get the remaining piece of the floorboard down to shiney metal to see how bad the rust really is. If its just on the surface and the material isn't too thin, I'd leave it and apply sealer after you weld in the new floor board. As far as the cage mount in the seat belt bucket, I did that on mine. I made a box that I welded on over the bucket and mounted the main hoop on that. I bent up my own cage. The autopower sucks IMO, the main hoop mounts to the fenderwells. They different main hoop for the 2+2 that they claim will work in the regular Z, but the attachment points on the legs were too close together for my liking....it would mount about 6 inches inside the seat belt buckets. My advice would be to find a buddy with a bender. To make a 4 point bar, you only need 2 bends on the main hoop, then you can make the rear legs straight.
-
Definately a good stroke of luck....tell her to go buy a lotto ticket.
-
New idea... need some photoshop help...
lbhsbZ replied to the.goodhumorman's topic in Fabrication / Welding
-
New idea... need some photoshop help...
lbhsbZ replied to the.goodhumorman's topic in Fabrication / Welding
There's a video on youtube of a car at the MSA show...flat black cobra kit with the window trick done. It looks good. -
Geez Grumpy, how could you forget the only guys in the world that carry a 5 pointed socket and a 3 pointed phillips screwdriver? http://www.lara.com/cgi-bin/store/commerce.cgi toyota ABS valves and a couple of Jaguar rear brake calipers use a 5 point nut...go figure. And for some amusement... http://kalecoauto.com/index.php?main_page=index&cPath=5&zenid=b9084ce0b36b4177daf427fa7387d092
-
So thats how you do it. I spent about 20 minutes the other night trying to figure it out.
-
I'd put the motor in a spot where its close, but without the oil pan. Get a long piece of 1x1 angle aluminum and drill a couple holes in it to match up with a couple of the oil pan bolts. Use a long enough piece of angle to make it all the way back to the diff. then get another piece of angle, cut about a 3 inch long piece and using 2 bolts (or welding) bolt it to another long piece of angle to make a TEE. Clamp the short piece to the pinion flange, and the long piece should stick out at a right angle to the pinion flange. Then, adjust your mounts so that the 2 long pieces of angle are parallel in both the vertical and horizontal planes. I'm a visual learner, and don't do too good measuring stuff like this, so this would be my plan of attack if I wanted everything perfect.
-
Now that's an impressive build...talk about 10lbs of @#$^ in a 5lb bag!
-
I just checked through my cataloging, and the only 11" 14 spline clutch used by GM is on the '86-'89 4.3L Astro Van. The only other options in a 14 spline clutch are 9.125" for the 4 cylinder astro and the 6 cylinder cars. The LUK clutch part number on the 11" kit is 04-086.
-
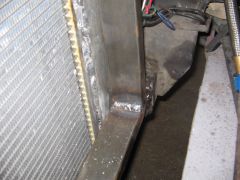
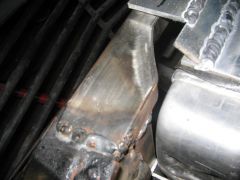
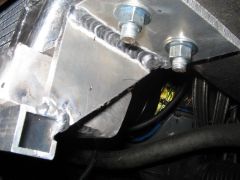
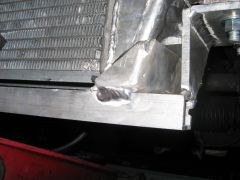
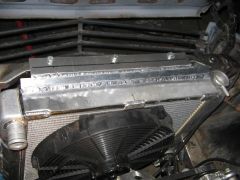
Well, I aborted the idea of mounting the radiator on an angle becuase I couldn't come up with anyplace to put the oil cooler, and it made the lower hose fitting on the radiator level with the water pump fitting, and figuring out the hose would be a problem. So I'm back to mounting it just like I had it, but a little differently. I was pissed off at myself for almost destroying a perfectly good radiator because my aluminum TIG skills suck, so I spent the whole day welding aluminum. I got a lot better at it, and I've got some decent mounts now. I also might have stiffened up the front end a little bit. Here's pix. I didn't like that top mount so I made a better one...and here's another picture of the finished framework: The welding isn't the best, but its better than it was yesterday...I probably went through a pound of filler. The top piece doubles as a duct....I'm going to fill in the holes in the morning and make some sheet metal for the front of it. I've also still got to mount the oil cooler, then figure out how to get all the air out from under the hood. I'm gonna try to to take some of the air from to top half of the radiator out through a hood scoop, then maybe I can build a couple boxes to catch the bottom corners and use 5 inch dryer hose to vent that somewhere. I'll take off the little access hatches too. I could cut a hole in the firewall on the passenger side and duct it out the passenger window, but I'd like to avoid doing that if I can.
-
Thanks for the pics guys, it gave me some ideas.
-
I searched, and found a couple of good ideas, but still need some more. I've got a griffin radiator, which has no mounting holes or anything. I had originally built a cradle for the bottom of it and rivited a piece of angle to the lip on top and mounted it in the stock location....which worked OK for around town, but I went to the track and I can make about 3 laps before coolant temp goes to 230 and oil temp to 290. I think the problem is getting the air out of the engine bay to make it a lower pressure area than in front of the radiator...so that air can pass through it at high speed. 500hp makes a lot of heat too. I decided to lean the radiator forward and make a vent in the hood like BlueOvalZ, but I just can't come up with a good clean way to mount the radiator and my oil cooler. I started by building a frame for the radiator to sit in out of angle, but it looked pretty crappy so I cut it all out and started welding brackets onto the radiator. My aluminum welding skills leave a lot to be desired. I think it will be functional, but it still looks like ♥♥♥♥, so I'm planning on cutting it all out and starting over. Upper and lower core supports are already cut out (the lower one was pretty beat), and I replaced the lower with a piece of 1x2 rect. tubing. This came out nicely. Does anyone have detailed pics of radiator mounting in a succesful cooling system for a track car?
-
Would you mind emailing me some pics of the radiator mounting and shroud work? lbhsbz@hotmail.com Beautiful car BTW
