
Dragonfly
-
Posts
674 -
Joined
-
Last visited
-
Days Won
1
Content Type
Profiles
Forums
Blogs
Events
Gallery
Downloads
Store
Posts posted by Dragonfly
-
-
Personaly I like the looks of that kit, as long as the car doesn't seem to have any hidden problems that are going to bite you in the wallet later I would go for it. The kit to me looks like a copy of one of the 70's era race cars that I think was driven by Paul Newman, but I do not know the history of the race Z's like several other members on here.
Dragonfly
-
Or anyone who is interested in going to a Buell Launch party as a VIP. The date is Friday July 20 and if you are interested in going or would like to know more about it post up.
Dragonfly
-
As far as the starting issue I think that your cables are history. They may look fine by a visual examination but they are probably very corroded under the insulation. If you have a multimeter you can check them but it may just be easier to replace them, both positive and negative cables.
Dragonfly
-
Dammit. I feel dumb. Anybody got an answer to the bracket question?
Thanks- Whis
The two bolts with the sides shaved off are the dead giveaway on this one... those bolts fit your transmission tail shaft mount. When you look at the transmission where the mounts are drop the bolts through (on the tail shaft) so the shaved head is facing upwards and the threaded portion faces downwards, rotate the bolt and it will drop into place when the flat (shaved side) is lined up properly. The metal strap looks to me like it is the correct width to cross under the tail shaft and tie the two sides of the mount together
-
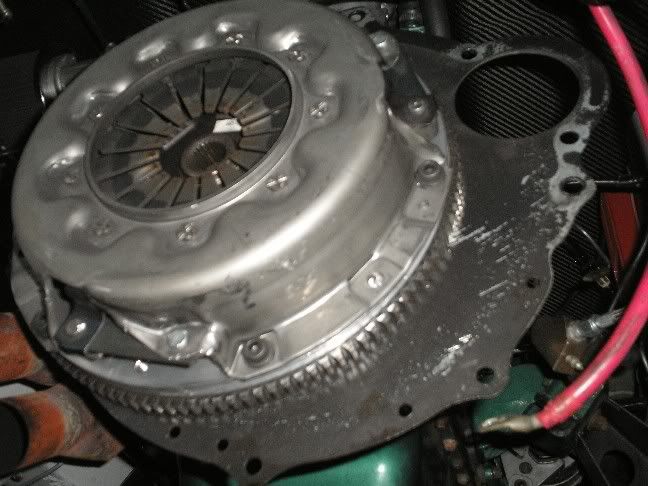
My transmission is out of the car for a warranty issue so I went out and took a couple of quick pictures.
This picture is a little out of focus but you can see the new bolts that I am using, they are a capscrew type with a built on washer, they also have a short shoulder on them.

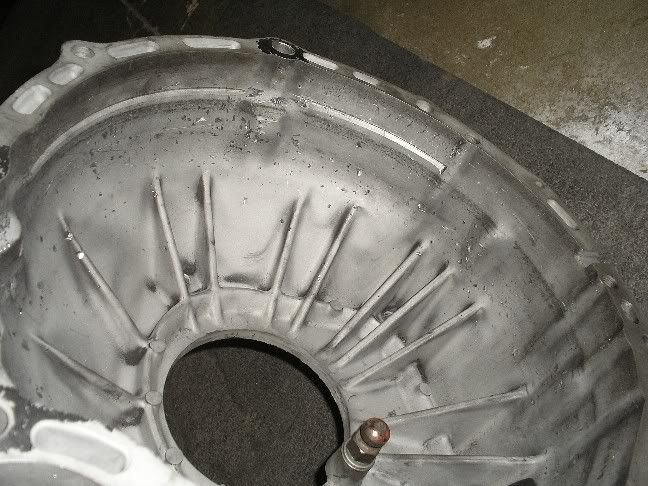
This picture shows the damage that the bolt that came out did to the inside of the bellhousing. I threw all the old bolts away without taking a picture but the bolt that did that damage was smashed almost beyond recognition.
I have that flywheel, and I had to use shorter bolts with it as well. I have a Nissan 6 puck clutch disc that has the center springs. It drives and responds very nicely with only minimal chatter upon initial takeoff.I do remember your post and at that time I did not realize that mine were also to long, I just wish mine had been to long enough to have been obvious... it would have saved me a lot of swear words and time.
mike321go Yes that is on an L28 block, but the block has nothing to do with the length of the bolts that hold the clutch/pressure plate to the flywheel.
Dragonfly
-
Grade 8? Those are metric threads - no such thing. Do you mean grade 8.8? If so, those are roughly equivalent to "standard" grade 5.
You are correct, the bolts that I purchased were the metric equivilent that was closest to an ASE grade 8. I do not remember off the top of my head what the metric indication is. I am very fortunate that within walking distance of my work there is a huge bolt and fastener supply place, I just walked in showed them the old bolts, asked for the metric equivilent to an 8 and in a matter of minutes I had them in hand.
cygnusx1 this is the place where I got my clutch and pressure plate http://www.southlandclutch.com/ they will sell you just the clutch if that is what you want. They are an actual manufacturer and can build you what ever you would like. If you call them try to talk to Kim (Kim is a guy) or if he is not available talk to Tom. Who ever you talk to let them know that Miles from the Z club of San Diego told you to call and you should be able to get a club discount (about 10%) off the regular price.
Dragonfly
-
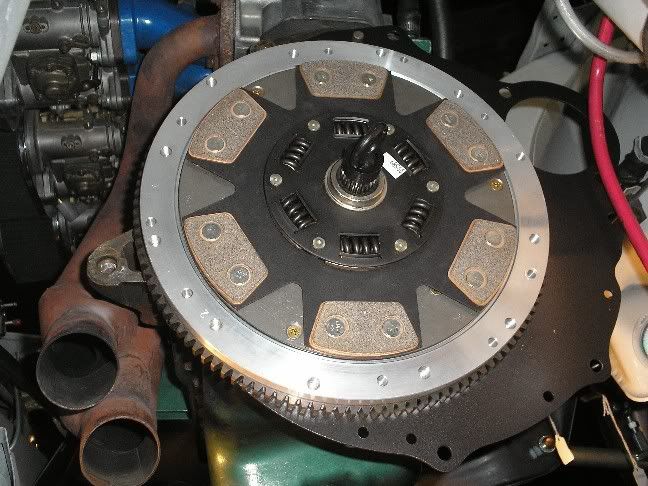
I use an ACT 6-puck unsprung disc and it chatters even on the stock flywheel. I am sure it's going to be worse with a light flywheel. I am hoping I can live with it or I will switch to either a 6-puck sprung or a solid sprung disc.
I have no problem living with mine... Here is a pic of mine
Dragonfly
-
whats it like drivn with such a light flywheel anyways???
After I fixed my issues I would have to say it is nice after you get moving, the throttle response is great. I personaly have some issues with clutch chatter when taking off from a dead stop but that could be from the 6 puck clutch more so than anything else.
Dragonfly
-
I just wrote about that in this thread http://forums.hybridz.org/showthread.php?t=123299
but I do not recall what the actual length is that you need. What you can do if you would like is to find at least two bolts that are the correct thread then using your clutch alignment tool put the clutch in place, set the pressure plate in place and put the two bolts in (they do not need to be tightened) take a tooth pick and stick it into one of the bolt holes, make sure the clutch and pressure plate are pushed against the flywheel then break off the tooth pick even with the outside face of the pressure plate. Remove the assembly take out the broken tooth pick and measure its length then get bolts that are 1/8" shorter than the measured length of the broken tooth pick.
Dragonfly
-
What I paid for mine also... a few months ago there was a thread about the length of the bolts used to hold the cluth and pressure plate to the Fidanza wheel... the post said that Fidanza drills its holes for these bolts shallow and your stock bolts will bottom out. Well I showed some pictures of mine torqued into place (with lock washers) and the assembly was flush and proper, well I learned about two weeks after that that my bolts actualy bottomed out at about the same time they pulled the assembly flush. When I heard the noise it was a little late, one of the bolts had come completely out and managed to wedge itself between the flywheel and the bellhousing. I was fortunate that the damage was very minor but when I pulled the transmission I found every bolt had backed out and at least one was so loose it fell out in my hand when I grabbed it.
The cure for this is to purchase bolts (I used grade 8) that are 1/8" shorter than the stock boltsthen use a lock washer, I also used loctite when I reassembled everything. I have again since that time pulled the transmission to check and verify everthing and I am happy to say that the problem has been taken care of.
I would highly recomend that you purchase new shorter bolts to install your clutch and pressure plate with but if you are in a hurry or can not find the right bolts here is a test you can do to make sure you do not have the same problem I did. Install the entire assembly and torque down the bolts as if you are doing the final assembly but do NOT use loctite, after every thing is bolted up and torqued down remove one bolt and useing a good light examine the bottom of the bolt hole to see if the bolt bottomed out, remove all of the bolts and examine each hole, if any one of them bottomed out change the bolts. After you have verified that you have not bottomed out then you can assemble with loctite and feel confident that you will not have any problems with it.
Dragonfly
-
This is not a Z by any means but I thought it would fit into this thread nicely... http://electrogeek.com/blog/2007/05/08/worlds-fastest-street-legal-car-runs-zero-to-60-in-1-second/
By the way it is not much faster than Zgad.
Dragonfly
-
In my opinion with the exception of the head the work could be done by any reputable machine shop. All of the machining work i.e. boring, honing, bearing clearances etc. are esentualy the same job from one engine to another and any shop with good equipment and knowlegeable employees will be quite adequate. The head on the other hand requires someone with difinitive experiance especialy since it is done by hand from one chamber to the next. With that IMHO you should probably put the bulk of your money into sending the head to a place such as Sunbelt or Hybridz's own BRAAP.
Good luck
Dragonfly
-
Careless here is a test that you can do to verify your tools to each other and if the machinest will let you (big if) you can verify his tools to yours. Get something like this:
If you want you could make something like that from a NEW ball bearing and a wooden dowel by epoxying or super glueing the bearing to the end of the dowel. Once you have your "standard" take each of your measuring tools and measure the bearing, take at least four measurements on each tool at different points on the measurement surfaces and write down each measurement. It doesn't matter what size the bearing is as long as it is small enough to work in each of your tools.
You will probably find that some of your readings are different from one point to another on the same tool, that indicates that you have an error in the parallelism of the measuring faces of that tool, if that differance is greater than 1/2 of the smallest increment of the tool (or one of the least significant number on a digital readout) then that tool should go in your "measuring wood for the garage" pile. All of your tools should be within one increment of each other when you compare your readings, the tools of the machinest should be within one increment of each other as well and no greater than two increments from your tools. Be aware that ambeint temperature can affect these readings so try to make sure that if you check the machine shop tools the temp is as close as possible to the ambient temp when you checked your tools.
If you are anal enough to care the thermal coeffecient of a typical precision bearing is 6.5 millionths of an inch per inch per deg. F, which means that if it is 80 degrees when you check your tools and 70 degrees when you check the machinest tools and you are using a 1/2 inch diameter bearing you will be off by almost one increment (on a high quality micrometer).
Dragonfly
-
I did mine the hard way... I took a piece of flat steel cut it to shape, spent hours forming it then I held it in place with magnets in order to put a few spot welds on it. After that I brazed it into place in a buttweld fashion so there is no acual overlap of the piece I made and the clean steel of the original body. It is difficult to do but if you work it out ahead of time you can "hammer weld" part of the job which means less grinding and blending after the part is fully welded/brazed in place.
Dragonfly
-
Ideally what im looking for is a workflow sheet of what people usually include in their measurements. I bought an engine blueprinting book and read it cover to cover, and it's mainly for pushrod v8's like sbc and sbf, but I need some OHV blueprints that most people look after.
You probably have the same book that I do, in the back it has pages that you can use to "pen and ink" all your data/specs which is how I did mine. I realize that the book is geared toward pushrod V8's but most of the critical dimensions exist in OHC engines as well. I did also use the "How to Hot Rod and Race your Datsun" book to provide me with additional info on OHC engines. With all that said if I were to do this on a spreadsheet I would probably copy most of the info from the blue print book following that format then add any other dimension that your engine has that is not covered. As much of a PIA as it is one of the important things is the more measurements you have the more accurate everthing is.
Last comment "if" your measurement tools are calibrated and the shops tools are calibrated you should not differ in measurements by any more than one increment (the smallest increment on a given tool).
Dragonfly
-
When I did the dog legs on mine I used magnets to hold the pieces in place because there are not any "good" spots to clamp the parts in place for welding.
Dragonfly
-
Fom looking at the work you've already done I think the dog legs will be no problem.
Dragonfly
-
I found this and thought it was interesting, the price is a bit steep but I have no doubt that he is still taking a loss on it. http://classifieds.streetfire.net/viewlisting.php?view=466
Dragonfly
-
OMG! this sux but im kinda happy to see it considering i had an appointment to have my flywheel lightened tomarow. I didnt think that could happen. at 1st i thought it was just a broken clutch and flywheel, i didnt see the hood and other stuff
I don't have any pictures of my old flywheel but I had it lightened from stock to 16.5 lbs. The day I went to pick it up Jim Wolfe (of JWT) was there and we talked about my newly lightened flywheel, he told me that I should be very careful and should inspect it on a regular basis because he had found in the past that they do not disipate heat properly and tend to get super fine cracks in them. Do you know how hard it is to inspect your flywheel on a regular basis... after doing it once I figured it was no big deal... wrong, when I took my car down for other work after about 5000 miles on the lightened (machined) flywheel I found it had overheated and turned blue in three places it was also riddled with spider cracks, that thing was probably only a few hard launches away from looking like the one in the pictures above.
I am now running a Fidanza flywheel with a custom clutch and pressure plate that are designed to handle more than twice the power I am putting out as well as more power than the transmission could survive. I should not have that problem again in the future, but I am seriously thinking about getting a scatter shield and a drive shaft loop for my car. Personal opinion here but I think in the long run you are better off to pay more for an engineered from scratch light flywheel over paying a machine shop to remove material from your stock flywheel to bring the weight down even remotely close to that of a flywheel like the Fidanza.
Dragonfly
-
I have never seen the CF car but I used to watch him race the 3 rotor RX7 here in SD all the time. That car was crazy fast and used to beat most carts. The guy is a very talented driver, but he also has a lot of resources that most others don't, just to give you a hint his father races a gutted and lightened Ferrari in SCCA SU class.
Having seen his orriginal RX7 in person and seeing him drive it I am not suprised at all about his CF RX7 and I am sure the pictures do not do it justice.
Dragonfly
-
Yes...
Here is the post these came from http://forums.beyond.ca/st/178859/skyrine-destruction/
It was mentioned in there that the stock flywheel had been machined down... in the past I had my stock flywheel machined down and when I took it out I found several spider cracks in it. I personaly do not recomend getting your stock flywheel machined.
Dragonfly
-
is it possible to use the original glass in the cf rear hatch?
Yes, but the glass is the heavyest part of the rear hatch so you would not loose much weight. Also the rear hatch has to be pinned on, there are no reinforced points for hinges or a lifting cyliner/arm.
Dragonfly
-
Hey guys,
lots of neat work going on in the front end. I'm working on mine too right now. I have even more crap im trying to get around though.
However I thought i would through this out before people start buying sheetmetal....
You can take a flat piece of glass or sheetmetal and lay carbon fiber or fiberglass on it. Just wax the glass good and then apply the cloth and resin, let it dry and peel your carbon sheet off. Its easy to cut and work with, is light and strong. For connecting it you can get a piece of angle iron and make 90 degree corners and rivot or use sheetmetal screws to hold it all together.
Ill post some pictures when i get done.. if i get done lol ....
I like that idea and I may give it a try. With everything you have in the front of yours its going to be tough but I think if you buy some aluminum tape you should be able to seal everything up and as long as you cover everything with metal or fiberglass etc. you don't have to worry about the tape showing. You could also tape everthing up from the engine side but then it would show. Just had an idea... having seen your skills and inginuity you could probably make a fiberglass facia to mount inside the engine compartment that would seal off everything but the radiator then use rubber moulding to seal around everything that has to penitrate the facia and to complete the seal around the radiator.
Dragonfly
-
JamieT is selling off his Zcar stuff, and I picked up some tasty bits from him yesterday... This BetaMotorsports CF hood is AMAZING and silly light...
Mike
Gotta love those BetaMotorsprts CF hoods... mine weighs in at a whooping 7lbs. If you really want to shed some lbs from the car get yourself a BetaMotorsports CF rear hatch with lexan, mine tips the scales at 10lbs and you will find the same quality in the rear hatch that you find in the hood.
Dragonfly


California at it again (A.B. 616)
in Non Tech Board
Posted
Every year the state of California tries to get our cars off the road and they are at it again with the proposed legislation A.B. 616. I personaly have already written to each California senator and I hope that all of the rest of you Californians do as well. Here is the letter that I wrote, if anyone would like to copy it you are more than welcome just be sure to change the name and or club affiliation.
Dragonfly