Sanchez
-
Posts
200 -
Joined
-
Last visited
-
Days Won
3
Content Type
Profiles
Forums
Blogs
Events
Gallery
Downloads
Store
Everything posted by Sanchez
-
@Gumiho3 I’ve been deliberating that along with my flywheel choice too. The ZFever seems solid and measured out very well for a swap but I think only comes with an R200 as the rear end, and I’m planning on a Ford 8.8 so I’ll probably need to go completely custom. I may just bite the bullet when the time comes and have a carbon composite shaft custom made, looking around it’s surprising how relatively cheap it is to have driveshafts made in steel, and aluminum and carbon are only a bit more expensive. I would not trust myself to modify a carbon shaft personally and it seems to me that aluminum usually comes out to a similar weight as carbon composite. In fact in the RX8 aftermarket community they make an aluminum driveshaft that weighs less or the same as the stock carbon.
-
@rossman Thanks! It was a big relief to figure out the problem after spending 3 weeks pouring over hard to find diagrams and ECM logic charts to figure out it was just one simple broken wire. Would have never figured it out without a high end diagnostic machine that could read values my normal OBD2 app couldn’t. My friends who own the garage got a video of it firing up with some revs so I’ll post it up when they upload it to YouTube. I’m using TinyCad because it’s free and has a lot of options. I can make my own switches which is nice but wire color options are lacking and the diagram size is small so I had to make supharnesses on separate worksheets in the program. I was planning on posting it soon to get some feedback and share the component files I made for everybody to use like the combo switch and ignition switch for a late model 1973 240Z.
-
Got the engine fired up! It took bribing a local Nissan/Tuning shop to bring over their CONSULT III machine to discover that the ECU was never getting a “Start” signal because there was no continuity from the Neutral Position Switch back to the ECM. A simple and easy issue to fix but one that is near impossible to diagnose without professional equipment or continuity testing 150 individual circuits. the engine fires up in 1/4 second and sounds healthy and shoots some pretty nice flames out the headers so It looks like I’m done with half the wiring on the car which is a relief since I’ve nearly finished my body wiring diagram in some CAD software. I did eventually hear back from Matt at HexaGarage so all-in-all I’d recommend them for a alternative to ZFever on the wiring. Though I know ZFever has a test engine to make sure everything is ready to go before sending out their harnesses.
-
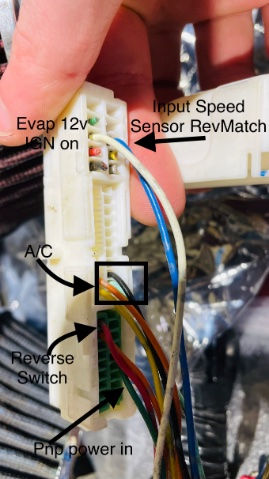
@gumiho Yes on + side I have the ignition wire to a switch, ECU battery connected, VVeL battery, and fuel pump relay positive, along with starter and and alternator leads attached. On - side I have the 4 labeled ground wires, fuel pump ground, and an engine to battery ground. When I turn on the ignition switch I hear the throttle body motors whine (which a friends G37 does too so I assume thats normal) and when I tap the starter wire to battery + it cranks (OBD2 scanner shows cranking RPM at 160). Got a quick fire on starting fluid so there seems to be power at the coils but for some reason the injectors aren’t firing. We tested continuity form the ECU to the sub harness connector for and it was fine and supply a power and ground to injectors for a second opened them and we watched fuel pressure drop at my regulator when doing it so I’m leaning towards they didn’t modify the ECU correctly. I even cracked open the ECU to see if maybe it was damaged since I got it from a totaled vehicle and all of the resistors and connections inside look clean and undamaged. I also had an unterminated connector on mine that I had to spend hours pouring through the horrible 370Z/G37 FSM just to find out what they were because I haven’t heard back from Hexa yet. I added a picture of what I believe they are and connected the Neutral Position switch to power and that had no change either. I had an idea that it might be the Cam and Crank sensors since I have an Altima that had a similar crank but no start situation due to the Cam and Crank sensors, but there’s also some odd readings from my OBD2 that seem like things just aren’t right with how it was reprogrammed. I’m getting a code U1001 which is for ECM CANBUS communication error. The Wideband 02 are reading a constant 14.7afr when cranking even though no fuel is being supplied. I’m getting absolutely no other codes so unless they bypassed the cam and crank codes for some reason there’s no reason to suspect those are the problem. So far HexaGarage has not replied to emails from a week ago but it is around the holidays so I’ll give them the benefit of the doubt.

-
@Gumiho3 Over the holiday I went to fire up my engine with the HexaGarage harness and ran into an issue. I had everything wired up how they labeled it but seem to not be getting and pulse from the ECU to the fuel injectors. We got it to fire for a second by spraying starting fluid in the throttle body but the injectors just aren’t pulsing. I emailed Matt at Hexa and I’m waiting to hear but is there anything I may be over looking that you used to fire yours up? We were thinking maybe the clutch pedal switch to tell the car my foot is on the clutch or something?
-
Agreed, forgot to mention this in my post. There are even quite a few modern cars that release TSB’s for diff fluids to combat chatter and whine. Another additional comment I didn’t put in my last post: You can’t go wrong with an 8.8, InvincibleExtremes, Apex Engineered, or TTT all have options and they’ll all give you option to run off the shelf parts that will continue to be fairly cheap and easy to source for easily 30+ years from today.
-
Just listened to the video it’s definitely a pronounced whine which has me partially agreeing with @bunkhouse. But maybe a few more questions and tests would help pinpoint the problem area. 1) Find a good long on/off ramp to a highway that has a good curve to it where you can safely keep the the speed where it whines throughout the turn. Does the whine change, get worse, or go away? 2) Lift the rear end so all weight is off the suspension, start her up and take it through your common drive cycle where the whines occur. Does it go away or still persist? 3) If you have a friend who can safely get under the car with a stethoscope they may be able to pinpoint the exact area the whine is coming from. I’m sure I don’t need to stress this safety point but do it safely with a 2 post lift, not with the back on jack stands. 4) You said you replaced all the bearings in the diff and have tried 3 different ones, but did you reuse the same stub axles between all of them? My next thought is that from my understanding is the R200 is just a very noisy diff even when everything is totally fine with them. The cars they came in had a lot more sound deadening and thicker metal in the trunk so if your car is untouched/unrestored maybe start probing around the trunk area for some rust holes (spare wheel well most likely culprit) or missing material that could be letting excessive noise in. The tar insulation and undercoating combined has a history of making the car look solid until you press somewhere and find a softball sized hole.
-
I’m definitely going to tie it all together from front to rear. Any reason for choosing 2”x2” and 0.125” thick metal? That seems like it might get tricky to weld to 18ga steel, at least for a novice welder like myself. How did you notch it and add metal for the holes where the subframe bolts with 2”x2” I measured that the middle of the bolt holes actually go into the lip/seam where the rail and fender wall meet?
-
Try and get a quick video on your phone and upload it to YouTube or a video hosting website of your choosing, hearing the sound is a lot easier for us to diagnose than a description of a sound (though I will admit I’ve helped a few friends out of a jam with cars and boats based on a description of what they were hearing). Start with 30s of the sound filmed from right next to the diff (but not directly behind the straight piped car for the sake of everyone’s ears), and then 30s of the sound from in the cabin with the windows up. What immediately stands out to me is the fact you can hear the sound in the cabin even with an uncorked I6 which makes me think it’s a vibration being transferred directly to the body. My half-shaft joints and front diff mount were incredibly worn out and I would regularly get a roaring clattering noise when driving at speed on any sort of crappy road, but smooth roads and highway never made more than the normal sounds you’d expect from worn pieces. When I took my Z apart last year the bushings looked fine when unbolting pieces but turned to plastic crumbles as I slid them off.
-
The wire harness from Hexa Garage should be arriving today, hopefully I’ll get the engine fired up in the next few weeks. I’ve moved on to the front chassis rails for repairs now and keep finding myself in the dilemma of: 1) Get pre-made rails like the ones from Zeddfindings or KFVintageJDM (minimum $500 after shipping) with stock strength and will still require bracing the sway bar area, and frame rails (another ~$400 from same vendors)… or… 2) custom rails using 14ga 2.5” square tube and butt weld it to the inner fender and firewall, then tie it into custom full length frame rails made of 1”x3” box tube (cheap and strong) like was done in this thread https://www.zcar.com/threads/how-i-replaced-the-frame-on-a-budget.402729/ I like the idea of the custom hybrid-frame made from thicker steel for keeping everything strong upfront and the price is hard to beat, my only worry is the strength of a butt weld holding those rails to the inner fender and firewall. Any thoughts or experiences? I’d like to hear how others on here have done it to decide what’s the safest route for a mostly street driven car?
-
Suspension spring availability for early 240Z ?
Sanchez replied to Daniel Fox's topic in S30 Series - 240z, 260z, 280z
I had Eibach lowering springs while running some fairly tall tires on 14” rims (205/60r14) for the past 7 years and they were actually pretty good. Stiffer in the front and the rear progressive springs seemed to go from about stock stiffness to ~30% stiffer. Gave me about a 1” drop across the car with a very flat level stance. The only problem I ran into was I was on a tight budget and only changed the spring trying to get the ride height I wanted, and neglected my old worn out struts and bushings. The result from the stock dampening level of the worn out struts was that the progressive coils on the rear would make contact on most potholes on our horrid city streets here in STL. But on the highway and flat streets of Tampa it was a dream. I’m certain with new struts it would have been 100x better. If you want a slightly stiffer than stock ride and a bit of lowering and plan to drive the car more on city streets or uneven roads then I would go for the eibach spring set, but get some stiffer, struts or better yet adjustable struts, and change as many bushings as you can on your suspension along the way and I’m sure you'll be pleased. I’m actually getting ready to sell of my full rear stock suspension with the eibach springs (control arms, drum brakes, and full strut assembly) if you’re interested message me. -
I just took a break from body work to take care of restoring a few small parts on the car and started with my whole heater/blower housing assembly. Aside from the actual heater core everything should be pretty easy to clean and paint. If you have a sandblasting cabinet you can get a really nice finish. Get a good sheet of cork gasket material and some adhesive foam like they use for sealing camper shells on trucks and you could have it painted in one day and assembled the next. As for the actual heater core I’ve seen some people using new aluminum cores from a 2000’s Ford sedan that requires a little modification to the housing and coolant hose routing but apparently blows some desert-like heat when combined with the Honda/Kia blower.
-
@Gumiho3 Glad to hear you got yours fired up! I placed my order about a week ago before reading this post. Sending mine out in the next few days once I price out shipping.
-
Maiking some good progress, almost finished up with the final touches on the passenger floor pan and firewall/battery tray which is only about 20% of the body work the car needs but the rest should be faster and simpler stuff to recreate and weld around. @Gumiho3 Did you ever get your VQ fired up with Hexa's wiring harness and ECU flash?
-
Progress made on the firewall recently. Got some large pieces tacked in but I don’t have the right clamps to get some of the corner really pushed into place so may wait a bit on those. Just had pay day and going to order the wiring harness and ECU tune from Hexa. Looking forward to firing this engine up in a few weeks given it’s been sitting for close to a year.
-
@Gumiho3 Yeah let us know what Matt says about some of wires, it would be great for reference. My guess is that it is a battery current sensor plug, interestingly I recently replaced a battery on a friends Nissan Rogue and it has a battery current sensor. I’m not sure how important it is for function when the harness and ECU are stripped of dependencies, but my guess is it may have been an option on the G37’s if your harness came from one and probably protects the intelligent power distribution module in case of an over current situation. I can look at my buddies G37 this weekend probably and see if it has one.
-
@Gumiho3 Thanks for the pictures, those are the first I’ve seen of the Hexa harness around the forums and it looks pretty professionally done. Definitely find out what those wires do before hooking it all up though. Probably won’t harm anything if a few wires get crossed or ungrounded, probably just cause so CANBUS universal codes that systems aren’t talking to each other right. But better safe than sorry. @Sadeem28 Yes the fuel rail on the VQ37 needs 51psi constant, and I believe it is regulated at the intake pump. A 255lph pump should be just right and give you head room for some mods but since you’re adapting it to the Z fuel tank you will need a pressure regulator and return line. For reference I replaced the pump on my RX8 which requires 60psi at the rail and those things guzzle down fuel and it is run on a 165lph from the factory which keeps up with the demand.
-
@Sadeem28 I expect I’ll be in the stages of body work through the end of the year and then get it primed around January 2022… hopefully. In the mean time I’m waiting on Apex Engineered to release their VQ front cross member. As for the wiring harness google Hexa Garage, check out this link (https://www.hexagarage.com/schassis-vq/vq-swap-universal-wiring), and send Matt an email too. He does the ECU modifications and base map that need to go with it also. The belt has me a little bit confused too, but I think you should be able to essentially run it just like an L24 without any of the accessories. The VQ37 has an internal water pump so you can make a pretty simple alternator adjustment bracket and essentially run a small belt from crank to alternator and not even use and idler or tensioner pulley. Or just fab up a dummy pulley somewhere on the front cover if you really wanted to.
-
@Sadeem28 still chipping away very slowly at rust and body work. My time to work on it is pretty limited due to some changes at work the past few months. I am thinking of investing in a rotisserie with a friend because it’s also starting to beat up my back some of the bending and twisting required to do these panels on jack stands. As for the engine specifically, very shortly I will be sending out my wiring harness and ECU to Hexa Garage and hopefully firing up my engine soon since it’s been sitting for a bit over a year now. I think I should be able to fire it up without needing a starter or trans hooked up with a strong impact driver. @Gumiho3 Did you ever get around to firing up your engine with the hex’s garage harness?
-
Wire Question - Where do they go?
Sanchez replied to Gotham22's topic in S30 Series - 240z, 260z, 280z
@Gotham22 Yeah the AC wiring complicated the wiring around the front cover a fair on the early Z’s. My 73 240Z had dealer installed AC that had already been removed when I purchased the car. I found about 5 wires associated with it bundled into the harness that were cut and terminated, but visible which made tracing some stuff difficult. And these wires weren’t referenced in the Haynes manual. The 280Z diagram may actually have AC wiring because it was probably a bit more common addition around the end of the 70’s. AC wiring is a good place to start, but have you done any (or previous owner done any) mods to the ignition system? If you have the 280ZX dizzy and module, or HEI module than there are some things that get bypassed and deleted in that area of the harness. On the 240Z it’s the ballast resistor, on the 280Z I believe they would bypass the Ignition Transistor module. That would be another good place to start looking. -
Wire Question - Where do they go?
Sanchez replied to Gotham22's topic in S30 Series - 240z, 260z, 280z
From my recent experience with sorting out and selling the L28 from my 240Z, and helping a friend with a SpeedHut gauge install, it seems that even when the Z’s were new (Before previous owners started hacking up the harnesses for whatever reasons) is that there were a handful of stock wires that seemed to serve no purpose and don’t really go anywhere. My guess is that nearly all the harnesses from 70’s Z cars were designed with automatic transmission wiring and factory option wiring installed to save time and money. Unfortunately the Haynes manual doesn’t show these wires in specific diagrams so if you had factory AC originally or if this is a manual trans, you may want to look for for some community made diagrams instead of the Haynes. -
@AydinZ71 Yeah the blower intake seems like an area pretty prone to rust and causing issues in the cowl. I’m surprised that I haven’t seen more impressive engineering solutions to the stock part other than just recreating it. My thoughts are, with the Civic or Kia blower motor a lot of people upgrade too, is how necessary is keeping the chimney the stock volume? Could I find a way to weld a plate in to flatten the area, cut a hole and weld some 2-3” diameter flared exhaust tube and not cause any bottleneck to the air flow? I plan on trying to figure out a way to make water drain better around this piece and have more access (more room between the chimney and firewall) to weld the piece in and seal it so this never happens again. I think even just tilting the stock chimney 45deg away from the firewall would be an improvement so debris doesn’t get trapped as easily and sealer can be applied better than what they tried 50 years ago at the factory.
-
This Sunday I finished up all the welding of my passenger floor pan, ton of work having a buddy hold a flash light from the under the car to see all of the small holes here and there but it is fully in place (minus a frame rail, ordering those soon). Waiting on a sheet metal punch to finish up the firewall now that I have all the metal cut and then I have to figure something out for that little fan blower intake chimney in the cowl area that’s rusted through. I may just weld it smooth and make the system pull cabin air or modify it to take fresh air from the passenger side fresh air duct.
-
Question about potential engine swaps
Sanchez replied to Projectcarguy's topic in S30 Series - 240z, 260z, 280z
If keeping it Nissan isn’t a priority than I think the LS is the best bet for reaching your power goals, but won’t get you that import sound you mentioned. I’ll throw in my own build engine the VQ37VHR but any VQ can get you close to the power you want with a bit of building and a turbo. Plenty of single turbo, twin turbo, and supercharger options, 8k redline and makes the car front-mid engine with the entire engine squeezing behind the front tires. More and more people are swapping to the VQ and more companies are making support for them. The manual trans that mates to them is pretty much bulletproof aside from issues I’ve heard about of the concentric slave cylinder on 370Zs prone to premature failure, but there are kits that eliminate it or upgrade it to heavy duty stuff. -
I do agree with @Zetsaz that this thread could use more input and photos and information on performance/install of the AE subframe. It would be nice to hear and see more peoples experience with this part even though it seems like for the most part once the pieces are in your garage it is pretty straightforward to put in the car. Also saw the update on their website recently that the subframe is being updated to use the 370Z diff which gives the option of using an open carrier, VLSD (sport model, but have heard negative reviews on it by 370Z owners), or adjustable LSD (Nismo model). At the same time I put about the vendor is very helpful to this process, but like all businesses they will have happy customers and dissatisfied customers. @ohmster101 So far I have not ordered any parts from AE yet because I’m still waiting on the VQ37 front cross member so I can order my pieces all at once, but your business has always been quick to respond with updates and answer questions when I message them. And your responses to this thread have been very professional and make me feel comfortable when it comes time to order from a newer Z part manufacturing company. AE seems to be expanding and growing their business and from the timeline I see recent reviews show they have greatly improved customer outreach to solve issues and fix the lead time issues they encountered when getting off the ground.