-
Posts
199 -
Joined
-
Last visited
-
Days Won
3
Content Type
Profiles
Forums
Blogs
Events
Gallery
Downloads
Store
Everything posted by Sanchez
-
-
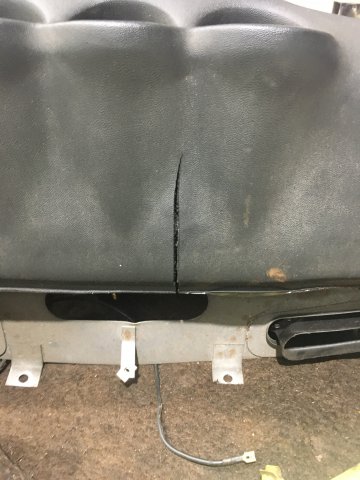
Picture of my dash, original with no cover. Developed it’s first and only crack about 2 years ago. Hopefully I should be able to fill it in with some bumper repair and some texture paint. Interior sound deadening/tar may removed using the dry ice method. I highly recommend doing this with dry ice which I got from my local CeeKay.
-
@BrettR Changing to a dry sump oil pan for the VQ37 is possible and could make it so you don’t have to cut the crossmember. But the cheapest I’ve seen for a complete setup will set you back $5,500 USD. You can really set the engine where ever you want to make it clear the crossmember, provided you don’t mind reshaping/deleting the hood. @74_5.0L_Z I’m having some trouble accessing getting a good look at your custom crossmember or viewing that PDF, any chance you could re-upload the PDF or post a few more pictures while your engine is out?
-
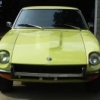
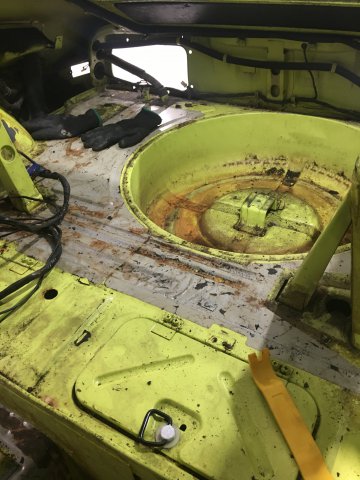
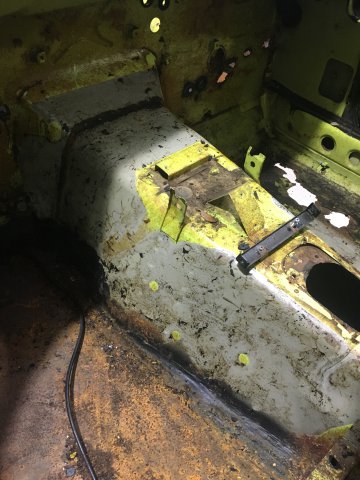
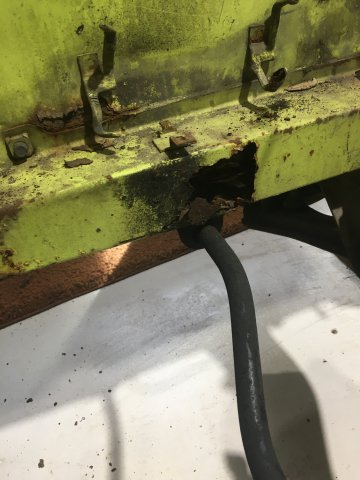
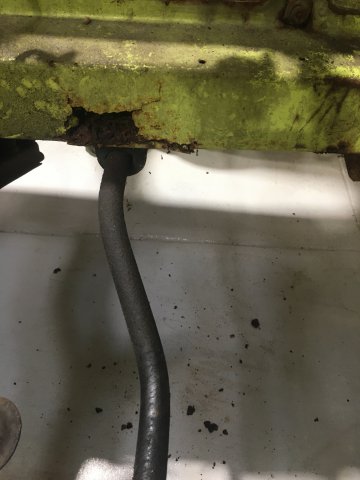
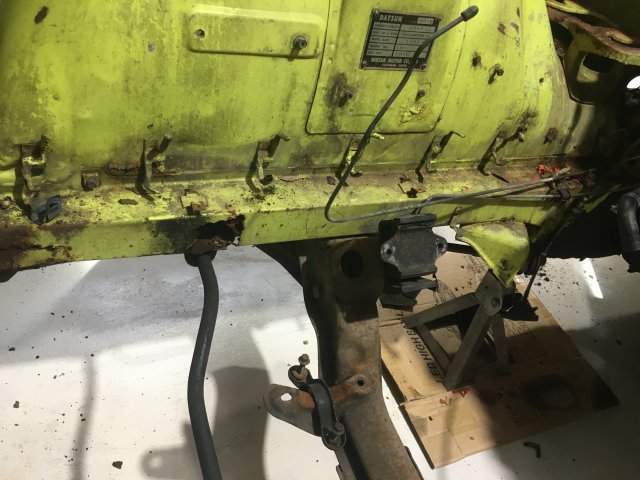
With the free time I've had due to being unemployed from this crisis I have had the time to put in some good hours working on my 240Z. I'll start this thread for my plans of my build in the long run: 1. Complete chassis restoration, rust removal, minor chassis strengthening 2. Stock VQ37VHR (using ZFever wiring harness and McKinney engine mounts) 3. CD009 6-speed transmission (using McKinney trans mounts) 4. Complete suspension overhaul with coilovers and TTT or Apex Engineered front and rear pieces (either a R200 or Ford 8.8) 5. Complete re-wire of the rest of the car (simplify the wire harness, Honda wiper and blower motor) The past few weeks have been reserved for completely stripping the car, finding damage and rust, and getting it ready to get sandblasted before going to my body work guy. I decided to avoid doing any sort of write-ups or videos on the chassis stripping because for the most part this is a pretty easy to disassemble car, but if you've got a rusty Z I suggest having a good deal of your favorite beer nearby and be ready to snap at least 25% of the bolts on the outside of the body. Interior removal was pretty smooth and can be done easily with simple tools and buddy to help with the dash and glass. GET A GOOD ORGANIZER BIN AND A TON OF SMALL BAGS TO KEEP TRACK OF BOLTS! One of the Z parts websites sells bolt kits, but having the originals well organized makes it easier if you plan on reusing your bolts and screws. Here is my Z sitting in the garage before starting the work. As you can see I have a pretty basic workstation, but my buddy who owns the garage has the other wall lined with toolboxes and equipment. Got the VQ37VHR sitting on my engine stand there on the left (Only 25k miles, pulled running from a rear end totaled G37, pretty lucky find) Old Engine Removed. At this moment I still have the engine for sale and will probably post it here soon. It's a running L28 with ZTherapy SU carbs connected to a 4-speed trans. Some bad rust on the front main frame rails, both sides. My floor pans and their respective frame rails are also kinda garbage, so I got a new set of floor pans from Zedd Findings and I am about to order the Baddog Frame Rails and rear subframe connector soon. Got the interior pretty much stripped down. Still need to remove glass, headliner, and steering column, then strip and remove the doors Fenders off. Need to find a way to modify that cowl drain, who designed it that way????
-
Or if you feel like taking a crack at being the first to use the Apex Engineered crossmember in a VQ swapped Z that would be a great thing to test to, if you talk to the guy he may work something out with you, I was told they would lower the price and send me an un-powdercoated one for ~$50 off if I wanted to give it a shot.
-
Glad to see somebody else also doing a VQ37VHR swap around the same time I am, but you seem pretty far ahead of me since I’m just starting the rust repair/body repair part of mine. if you haven’t checked out Austin Hoke’s webpage with his VQ35 swap I would highly recommend it, he covers cutting the front crossmember in a whole post with photos that is very useful. And ask Doug at ZFever for his whole PDF of the swap procedures. check again on where you placed the McKinney Motorsports mount kit? Because to me it looks like you cut out a bit more of the crossmember than you needed If it was positioned better, so you may try to slide your mounts just a little bit closer to the firewall. I was considering the Apex Engineered crossmember because I thought it might clear, and from speaking to them their piece sits approx 1/2in lower the stock x-member and is made from 1 5/8in diameter tube. My measurements led me to believe that it might work (might need to be notched Still) but since I lost my job at the moment due to the recent crisis I’m not going to take the financial risk Of finding out it doesn’t. Maybe one day if VQ swap become more common they will adjust theirs to work, and it’s not a very difficult piece to replace since our engine won’t mount to it any more. Definitely reinforce that sucker by boxing up all the areas you cut though and start looking into getting another cross member incase yours starts to show signs of failure while your still Safely testing if she’s roadworthy after you do the swap.
-
Yeah AE control arms looked pretty good to me, I just don’t know why they went bushingless for the actual full suspension, but I guess then it wouldn’t necessarily be a full subframe. One thing that makes pulling the trigger on either a TTT or AE kit is simply the lack of user experience write-ups or videos. I would certainly be up for being the one to do this with one of the kits probably the AE kit, but I lack the knowledge of suspension engineering to feel qualified to make many comments beyond the installation process.
-
My 240Z has succumbed to dreaded front sway bar cracks and rust along the main engine bay frame rails while I was at college. Now I have the time and money to straighten up the chassis and I was hoping to hear from the community their suggestions on whether these rails can be repaired or whether it would be better to order a set of rails from Zedd Findings since I’m already buying their floor pans. I am aware that these spots can be patched easily but my main concern is that them being open for a long has allowed the entire inside of these frames to start rusting and they will slowly deteriorate if not fully replaced. I will add that I do have access to an excellent body shop that always cuts my dad a good deal when he brings cars in.
-
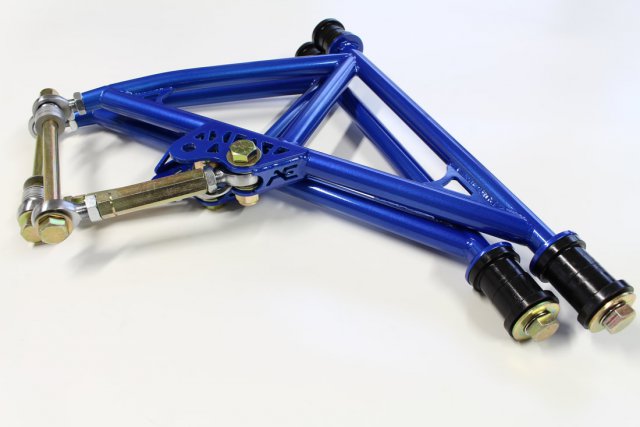
That is a good point, if it’s driven light then the suspension doesn’t need to be super beefy and maintain perfect geometry when pushed to the extreme. But I do want the peace of mind that comes from a solid setup that will stand up to the test of time, occasional road trip and the need to floor it on the highway occasionally. As a side note they do offer their control LCA’s as replacement piece for people with stock diffs, and it comes with bushings at the front and rear for soft mounting. I am wondering why they decided to do away with that for the kit when it would probably hold up for most street driven cars and would have likely simplified the design and engineering of the kit. This is what their bushed control arms look like:
-
I’m glad I’ve heard thoughts from some of the experts around since suspension systems and body/frame design are my weaker areas (electrical and engine mechanics are where my knowledge base lies). I from all the information I’m hearing one of the areas of improvements would be soft mounting in the front where the LCA’s connect to the body. I have heard a lot of input about using this as a race setup, but I would be interested in hearing how the experts here think it would hold up to casual and city/highway driving since that is my intended use for my? I don’t plan on doing any hard cornering, track, or drifting when my Z is on the roads it’s gonna be a weekend cruiser mainly.
-
Yeah I am definitely not buying a large "bolt-on" kit for my car like these without seeing the instructions that come with them first. I'm fairly certain Apex and TTT are not scammers, they are very new to the market and as a result nobody has done detailed write-ups, videos, or how-to's with these kits yet, and most of the pictures I've found are marketing pictures from their websites with a few amateur photos or videos of them installed. It sucks to think that scammers are here on the HybridZ forums. Thanks for the warning though, sometimes it's easy to get super excited about something new for our cars and make a move on it before taking the time to protect ourselves financially.
-
I have been looking into the Apex Engineered and Techno Toy Tuning suspensions parts as I start my full restoration and VQ37VHR swap and this thread has been very helpful. I spoke to TTT recently and they informed me that they were developing a Ford 8.8 rear suspension swap that involved a custom diff cover for mounting to their mustache bar, and it would use their new power cradle (https://technotoytuning.com/nissan/240z/z-power-cradle-short-nose-r200r230-and-ford-88) for front mounting and tying together the whole rear suspension for added support effectively combining the mustache bar to the LCA via the diff similar to the Apex rear end, only using more pieces. Both companies look like they make excellent suspension parts for these car and have done the testing and engineering, I think when its all said and done if somebody wants to put a Ford 8.8 in their 240Z for the strength, availability, and aftermarket support, and wants to do it using either of these companies kits they are ultimately going to end up with the mustache bar, LCA, and diff connected in some fashion. I know what has sold me on the Apex kit is that it is roughly half the price of TTT kit which totals ~$4K when you factor in the power cradle add-on for the Ford 8.8 and uses 370Z hubs which is good for my application since I am swapping in a 370Z engine (maybe able to actually get a speedometer signal from the wheel sensor to the ECU now which would simply gauge wiring immensely). For a true-to-240Z resto-mod I could justify spending the money on the TTT kit. I am basing this some conversations with both companies and the limited amount of pictures and install instructions for both of these kits, so please feel free to correct me if I am wrong in my reasoning or understanding here.
-
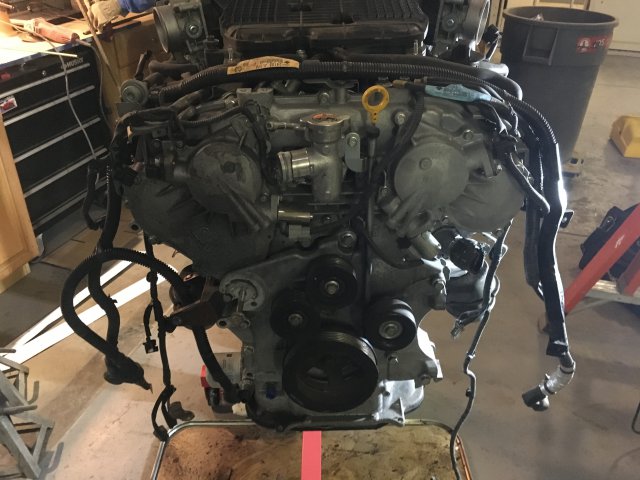
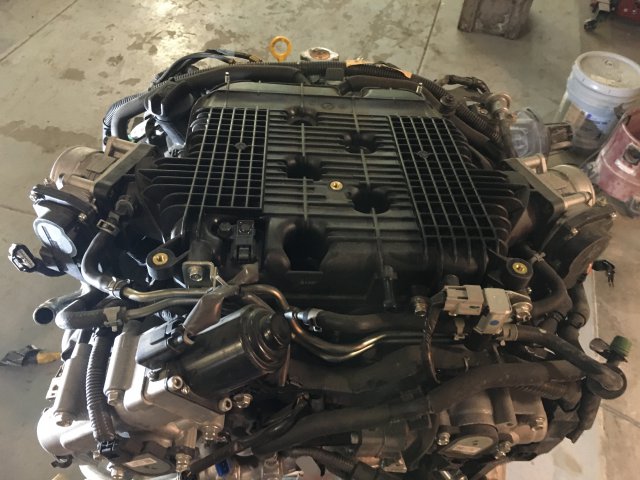
Thought I would drop a few pictures and an update here before starting a build thread and informational text/videos for others to reference. I have the engine ready for a clean up, inspected the cylinders which were pristine, and turned it by hand. Got all of the pieces together to send to ZFever for the wiring harness service. I’ll be posting about the adventure in finding the wiring parts soon.
-
Just picked up a running VQ37VHR from a t-boned 2011 G37 with 25k miles on it, with the EFI/Engine harness (unfortunately two of the connectors got smashed up a bit) so I will probably be starting a thread soon on my build progress. Also pulled the VVeL module and cut the subharness from a different G37 a week ago, and I will be posting about how to correctly do that after I get confirmation from ZFever that I did cut every thing out correctly. If you are in the market for a running L28 with Ztherapy SU carbs and a rebuilt 4-speed keep an eye on the for sale section.
-
On the 350Z/370Z and G35/G37 forums there are a number of threads going over FI for the VQ motors. I have done a fair bit of research into it even though I will almost certainly be happy with a mild street build NA power (honestly I think for putting a VQ into a 240/260/280Z the single supercharger looks like the cheapest and easiest solution and would be my go to over turbos). For a S30 chassis non of the premade turbo kits will work, just to put headers on your VQ for the 240Z requires custom manifolds, so any turbo manifolds and piping will be mostly custom pre-fab stuff. As for spool times twin turbos are gonna feel better on the street as they will come on sooner and make a nice curve, but trying to hit 600HP on a VQ with single turbo is going to require a pretty large housing and going to have a steep torque curve later in the RPM range depending on other engine mods.
-
The more I’ve been trying to figure out building my own harness for a VQ37 swap the more I believe the ZFever harness service is worth the money. At their price point for a plug and play harness it is worth knowing that it was tested on a good running motor in their shop (which I’ve been to a few times with my Z in the Tampa area) and it comes with a UpRev tune and license to fire right up. In my personal opinion most early Z cars are worth restoring with L-series engines or RB engines to keep that pure Z-car feel. But as L-series engines struggle to make the power we want with out a balls-to-the-wall build, and the RB engines become more expensive and scarce I believe the VQ swap should become more common and excepted as a way of preserving these cars long into the future. All of the number and budget crunching I have done shows the price to have a VQ37VHR mounted in a 240Z with the CD00x transmission and custom driveshaft to cost as much as a LS or RB25det swap, and cheaper than an RB26 by a modest amount (I’ve yet to find a complete long block RB26 stripped of turbos/harness/ECU for less than $3000). Just as an update on my progress: My friend has recently purchased garage space which will become space for projects and started a YouTube channel to showcase projects/builds and make content for vehicle maintenance and component installation. In the coming months we will start a video build log of my 240Z as we resto-mod it with a VQ37 Check it out at the Cherry Garage on YouTube Cherry Garage
-
Did a little digging into the 370Z factory service manual and found a pin out of the ECU. Using some other information I came across online I think I’ve narrowed it down to 30 pins (and respective wires) necessary to fire up the engine and keep it running right. With this it could make it much easier to do the VQ37 wiring harness ourselves for the DIYers. I’ll try and post up a picture when I get some free time of which pins I believe to be crucial to operation and maybe some of you more experienced with these engines could chime in. My only road block is learning about the ECU rom editing using Osiris/Uprev because I can’t find any videos going over the software, or how to make changes so the engine won’t look for or require signals from the NATS/BCM/IPDM. Hopefully somebody on this forum who has used it before for any VQ engine could shed some light on the situation. My hope and goal beyond building this car for myself is making this swap more accessible to the DIYers so we can get some more of those older Z’s resto-mods on the road.
-
The way I see it is that a VQ37VHR will cost roughly the price of a donor vehicle and the wiring/ECU modifications from Z-fever. So $2000 for salvage vehicle + $2250 for Z-fever = $4250 to just have the engine/trans running ready to go into the chassis. Add mounting kit, driveshaft, and gasket based on the mileage for another $1500 = $5750 for the engine in the car making the tires spin. You can recoup some of that parting out the donor car. Giving you 306hp and 270tq from an N/a motor with an 8k redline and room to improve that power. From what I see that is the same price as a good aluminum block LSx swap or an RB25 completed swap, and about the same price as just an RB26 before you even put it in the vehicle. Plus once the VQ is in and wired it’s quickly becoming the cheapest to replace.
-
I am a fan of the VQ37 for keeping the car Nissan and using an engine still from the Z family. Z-Fever made the point that the VQ37 is in so many Nissan cars that it’s starting to become a throw-away engine, that almost every scrapyard has a wall full of them and are trying to get rid of them. I can get a whole engine assembly with 52K miles on it right now for $750 or a whole salvaged g37 for $1200-1700, so his point makes sense to me. Basically once the engine/wiring/everything is set up and swapped, should I ever blow the engine replacing it would cost just as much as sourcing a new LSx motor.
-
Hey guys, it’s been a while since I posted on here because my Z had been a hot streak of not having any critical. Now that I’m out of college, have a good job, and a new daily driver I finally was able to put my Z up to get prepared for restoration. I have been toying with the idea of a VQ swap, and having spoken with Z-Fever/Fever Racing he made some great points to using the VQ37 as a power plant. He sent me a bunch of info PDFs about doing the swap and the stuff involved and what they offer to make the swap easier. They customize the ECU rom to bypass any unnecessary portions of the harness and modify the engine harness to need a 12V source, ground, and start relay so the engine can run pretty much standalone, and it comes with an Uprev license. I was wondering if anybody had done these things themselves and could offer a bit of insight into making the wiring something that can be done DIY style. I am the type of person who likes to do the work and learn as they do it, and I like to know my car front to back which is why I am interested in trying to wire the thing myself before paying to have it done. Not to mention it would be great if I could get this done for just the price of the Uprev/Osiris software as I have access to an endless supply of wire, wiring tools, and wiring hardware. Thanks in advance for the help
-
I forgot to specify, I have no mechanical pump cause I have an L28 with P79 head. I have an electric fuel pump at the tank with a splitter/pressure regulator (of unknown origin, but PSI is within 3.5 spec for carbs) and a fuel hose running from each outlet on that to a carb. I'll post photos later when I am done with classes.
-
Thanks for the outline, it was a bit of a confusing photo. From what Beermanpete is saying I should be able to trace it back to the tank, disconnect it at the tank, and seal it off well. Or is there any benefit to using the fuel return with an electric pump and how would I go about doing that since the previous owner deleted the stock fuel rail and ised fuel hose instead.
-
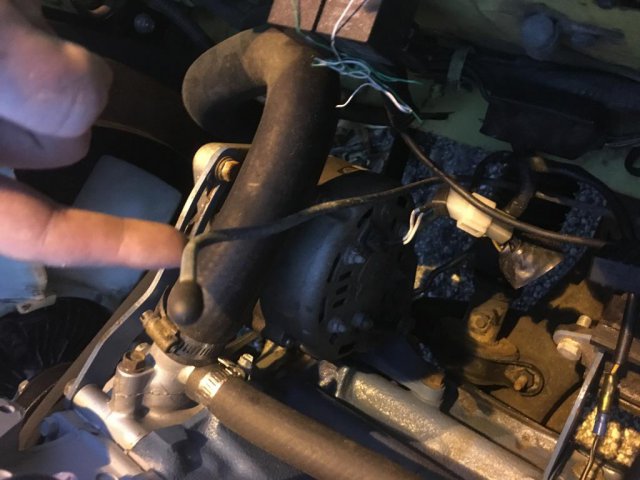
I got my car up and running after being down for a few weeks with a bad case of old wire syndrome. This smoothed out a whole lot of electrical issues and all of the systems seem a helluva lot more stable. But in that time I started a new job, and I cannot drive this car at all without saturating all of my clothes with the sweet smell of gasoline (not to mention the girlfriend won't let me drive her anywhere in it cause she can't stand the fuel smell). I have read all of the posts about fixing the fuel/exhaust smell in the cabin, plugging firewall holes, real hatch seals, getting mixture set right (still working on that one), etc... and I am going to tackle those soon. I also found out that the lines from the fuel fill to the tank leak when slightly overfilled and I am correcting that now. I also remembered a bit of advice given to me by a Z-Expert when he worked a bit on my car about a line running from the tank to original mechanical fuel pump. He suggested a way to connect it to the intake manifold using a valve and some other fitting, but I forgot where to run the hose to and what direction the valve needs to face. It is the hard line that my fingers are on. Any information on what to do with this hard line would be greatly appreciated. Is there pressure running through it, should I run it with the rubber cap for the being or could it cause other issues? Thanks for the help fellow Z-enthusiasts!
-
Thanks for the info. I'm actually currently a student at Eckerd College in St. Pete. Like I said I've rebuilt the L28 currently in my car, so I generally do my own engine work. My main fear is that I may have warped the head and will require a new one or a resurface. So if you have any advice on a trusted machine shop in the area, or a junkyard/pick a part you have had luck at finding Z car parts, it would be greatly appreciated.
-
Hello Hybridz: I just moved my Z-car down to St. Petersburg, Florida and experienced a disaster the other day during a pop up storm and I was hoping to make some Z owner connections in the Tampa/St. Pete area in case of an emergency. The other day I was in terrible traffic on the highway during a heavy down pour and my car started making a chattering noise and seemed to have lost the ability to accelerate. I noticed that the temp gauge was pegged at 250 so I started to plan an escape route off the highway but I could not see 20 feet in front of me. I probably ended up driving at highway speed for 5 minutes before I could get off the highway and let the car cool down for an hour. Turns out a freeze plug popped out on the highway and the heat from driving started to melt my valve cover gasket and bubble the engine enamel I put on the head during a rebuild. She still starts and seems to run like before this incident but I'm afraid It could have warped the head. I can do a decent amount of work my self if something goes wrong, but I need the community to clue me in on trusted names in this new city. Back in St. Louis I had a guy called the z-man who owned a z-car junkyard I would scavenge for parts. My question for other z-car owners in Tampa is: Where do you go for spare parts? Are there any shops that you would trust to do work on your z-car? Any notable machine shops in the area that you have had work done at? Thanks so much!

