Sanchez
-
Posts
200 -
Joined
-
Last visited
-
Days Won
3
Content Type
Profiles
Forums
Blogs
Events
Gallery
Downloads
Store
Everything posted by Sanchez
-
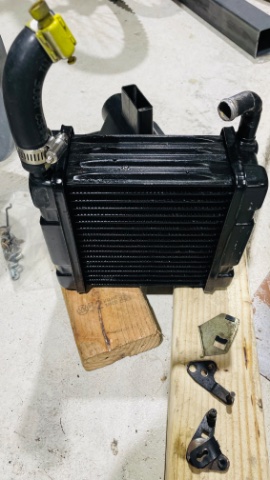
Been a hot minute since an update. Progress slowed due to life coming up. I haven’t had a lot of time to do the welding needed to finish repairing the front frame rails and test fit the engine because we've been pretty busy at our garage doing repairs and getting ready for hosting Boeing’s Annual Car Show. I also ran into an issue with those little pocket to access the front cross member bolts on the front frame rail curtain. I swear they used to sell them individually but I can’t find them anywhere and they appear to be 16ga which my cheap metal brake won’t handle. Ran out of welding gas and my local AirGas was back logged because they are supplying gas to the construction team finishing up the new soccer stadium here. Lots of road blocks. What I have accomplished in this time: - Getting the fuel tank hot tanked this weekend and getting a buddy going on installing a Holley Sniper Return Module fuel pump hanger. It looks similar to the Aeromotive Phantom unit but $150 less and no foam baffle. But while I can make my own little metal baffle box for a few dollars. - Started welding some on the body panels, mainly rear hatch and the channel around it where some of the metal disintegrated. - Radiator. The inlet and outlet on the VQ37 is reversed from the L24 so the options are buying a 240Z rad and having the bungs cut and moved, or some crazy piping. After a lot of measuring and cross referencing I found the radiator from a 70’s-80’s Jeep CJ has bungs correctly placed, has a 24”x15.7” (LxH) core, so almost identical to the Mishimoto/Champion Z rad with a little taller core but same overall height. I’m going to purchase a cheap Amazon one so I can test fit it, then get a higher quality Champion rad later.
-
Front frame rail moving along. Driver side ready to be tacked and tweaked after getting a liberal amount of 2k Epoxy primer in it. I’m thinking given this frame rail had to be welded after the crossmember I will need to do a bit of bracing with thick square either inside the rail and weld to it or some angle iron on the outside for support. Ford Performance trak-loc arrived, the pumpkin in my 8.8 currently is being really stubborn so I might need to take it to an axle shop to separate it from the housing. And I’ll be ordering more suspension parts from Apex Engineered at the next payday.

-
 I’ve been looking into rim/tire combos recently and have settled on 17’s partially out of necessity, and partially out of trying to use as many easy to find parts for replacement in the future should I need so. I’m going to be using the Apex Engineered 8.8 subframe and front uprights which use 350/370Z brake parts very few 16” rims will clear and I need a 5x4.5 lug pattern. It’s looking like a set of Rota RK-R will be my choice 17x8.5 with -10 offset under marugen shokai flares and the new Apex coil overs. Should fit nice with lots of travel and flush looks. With VQ power I’d like to run 225/45r17 or 245/40r17 on all corners, again because staggered makes rotating tires a problem. A lot of the guys on here will tell you don’t go staggered for handling which I agree with especially if your suspension is staying mostly stock and you spend more time cruising than racing. Where I differ from some of people is that I think 17’s are a good look on the Z and modernizing the suspension even with heim joints instead of rubber bushings you can run a 225/45 or 245/40 tire without the ride being anymore harsh or fairly decent road/highways than a stock Z on taller tires. Compound and tread are more important for traction than width, and given you want 250hp I’m assuming a mild turbo L28 is your goal. You won’t have instant peak torque like a diesel or modern car with VVT-i, VVEL, etc. that will give 200lb-ft right off idle. Choose the rims you like for looks, the tire width you want for suspension travel and firmest, and then the tire compound and tread for performance. Depending on your hearing I’d bet you’ll be happy with 225/45r17 tires, and might actually like the look and the ability to not have to wait a few days for tires like you might have to for anything performance oriented that is 16” or less. My beater Altima got new basic fuel savers/daily 16” and I had to try 4 places in a major city before I found a place with the correct profile.
 -
Yeah definitely sticky the video. It should be pretty helpful for those digging into the stock steering system or rebuilding it for originality or cost effectiveness. Now for those who have a really shot rack and pinion, TTT just released completely new reproduction complete and assembled steering rack. Price seems really on point too, so it may be a better option for some.
-
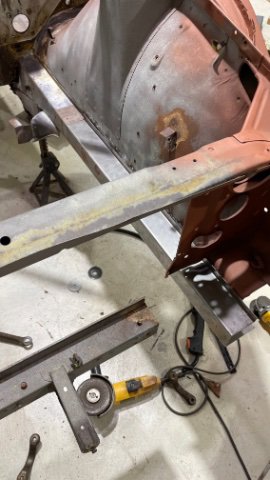
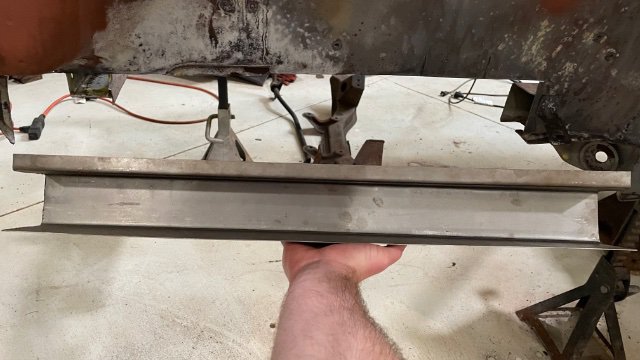
Been a hot minute with work getting busy as more staff change over happens and finishing up the plumbing for the front of the garage building… oh and all the car shows which always happen on Sunday’s my one day off each week. Got the seal kit for the 8.8 and I’m waiting on the 3.7 ring gear and trak-loc to arrive. Just wanna get that all buttoned up and stuff it out of the way. And started on the front frame rails. My car suffered from rust at the sway bar bushing mounting points and those little pockets that allow you to reach the subframe bolts so I’m doing everything from the subframe mount location forward to the lower radiator core support new/custom. Still using 18ga and hoping that the car won’t fold in half at the weld when I hit a pothole. I did botch the channel in the photo by about a 1/4” on the top face so I’m gonna remeasure and try again to get it closer.
-
@Zetsaz @berton Video is up. Ended up being a longer video than expected so editing took a while. 240Z Steering Rack & Column
-
Shout out to @ohmster101 over at Apex Engineered! The front subframe and VQ mount kit arrived while I’m still slowly making progress on the front rust. Check out the video linked below for the Steering Rack and Column rebuild with VQ parts at the end. 240Z Steering and VQ Subframe
-
@Zetsaz Yeah I’ll link in this thread along with my build thread. Just got most of it filmed yesterday, so should be up soon. I have the same issue with tensioning that you have. My guess is that the best way to go about essentially “seating” all the metal on metal contact points back in is to run it loose while the brass is still touching the rack shaft to let them “lap” each other smooth then you should be able to re tension and maybe do that 2-3 times while turning it lock to lock a couple dozen times between each. The rack and steering column were clearly designed to be replaceable items instead of items a dealership would rebuild back in the day, so that’s why I get the feeling the FSM and manuals don’t have a ton of detail on these pieces.
-
I just did my steering rack, shafts, and column very recently. At the very end of each side of the rack there is a brass lined steel bushing that holds the rack centered in the tube. Your actual rack will never touch any other parts of the tube in the housing. You have a 240Z rack housing which means that the bearing for the pinion is only sealed by a press fit on plastic cap instead of the the bolt/gasket style of later models. Likely your pinion seal let water in which made its way past the bearing and sat just under it for a while allowing the corrosion to happen. The good news is that your pinion or rack will never actually touch that area so I would suggest trying your best to convert that corrosion to stop it, and maybe a high grit barrel sander or grinding stone on a dremel to smooth it out some and it should be good to go. ZCarDepot had quite a few hard to find steering rack parts including that pinion seal and a new koyo bearing that was a perfect fit after a little scotch bright on the pinion and housing. I’ll be posting a video on our garage YouTube channel soon because I found that there are parts on the rack that were never in any diagrams likely because they intended on them never being part of servicing.
-
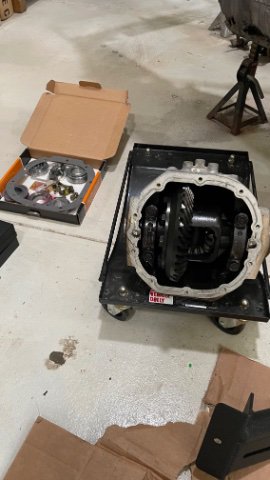
Additional small update: Ford 8.8 from 2008 Ford Explorer arrived yesterday afternoon, 102k miles, turns smooth. I plan on on getting a master rebuild kit Eaton TrueTrac and 3.73 gears.
-
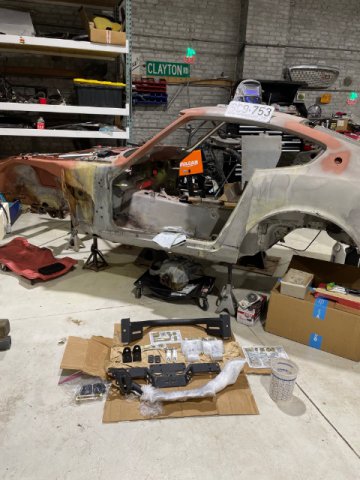
Quick update: Passenger firewall patch finished up. Now I’m waiting on a laser ruler to align the main front frame rail and weld it in. Got talking to Apex Engineered and they are letting me get in on the VQ swap front crossmember and mounts preorder!
-
I had a similar problem with my SUs after getting them back from ZTherapy, who did an excellent job. And my issue was fuel routing, the FPR I was using wasn’t properly marked (2 outlets and a return) and I had accidentally plumbed the back carb into the return so I had to run it pig rich to get it idling decent. I can’t see your entire fuel line plumbing, but I see you have the float bowl vents tied into the return line. They normally vent to the filter housing which would be at atmospheric pressure. It might be worth trying venting those to your filters if it has provisions for it or atmosphere, and plumb the FPR return directly to the return hard line on the passenger side.
-
So my dog caused a nice little hairline fracture of my elbow about a week ago, so body work on hold again until that heals up in about 2 more weeks. I swear this body work stuff takes forever if you can’t commit full days to it regularly. In the meantime I started work on the steering rack, column, and shaft. I ordered a big haul of parts from ZCarDepot and started ripping it apart. It came apart pretty smooth and the grease inside looked pretty good (I feel like 7-8 years ago I may have topped it off) but the steering effort was really high and I had a pretty bad wheel shake above 30 on pretty smooth roads which is why I decided to go all out on restoring it. As a “fix it before it becomes an issue” person I decided to do rack tube end bushings as well as the steering shaft u-joints. 1. The rack tube end bushings are a small cylinder that is pressed into the steering rack at each end to center the rack in the tube, seem to be brass lined steel with a small oil/grease channel. These are not shown anywhere in the steering diagrams I could find in the FSM or searching. Mine did not seem to have any excessive wear but since I found the OEM pieces at $9 each it seemed like a good precaution. They are only one length but the driver and passenger side are different lengths so cutting required. Just need to find a good way to pull these out without scoring the tube too bad and hopefully they will be a solid fit without machining given they are OEM. 2. The damn steering shaft u-joints! Like a few joints on our cars these were made non-replaceable after the Series 1 run, so any 72 on Z will have the 15x38mm u-joint staked in (early Z was 16x40mm and used external clips to retain the cups. Again mine aren’t necessarily too bad, but piece of mind is worth a lot to me. I unfortunately can’t find any 15x40mm u-joints that have internal/external clips, though there are options for staked ones: 15x40mm (can’t be staked if used) https://www.amazon.com/Febest-AS-1540-FEBEST-Universal-Joint/dp/B00HAQIUDQ 15x39mm (could be staked, or a slot cut for a thrust ring in the bore if you have the know how) https://www.driveshaftparts.com/index.php?route=product/product&product_id=1343&search=uj15 Ive seen some discussion on the other forum sites about replacing these. Cutting the old u-joint out is a requirement. Since this would probably be something you would only have to do once, for keeping the caps on I was thinking it could be kept simple by using either Loctite retaining compound or just epoxy a stainless washer over the end when done if using the 15x40mm since the cap will sit flush. If you wanted a clean look a press fit plastic end piece could be used it you have access to a 3D printer to make one. I’ll try and get a video out going over what I did soon.
-
@Gumiho3 I’m not gonna run AC, I used to drive around FL in the summer with black leather interior in my RX8 and never really used it. I don’t even like that my Altima forces AC on when I use the the defroster. I’m sure you could make some mounts that move the AC compressor so that it doesn’t interfere with the steering joint. Plus why would I wanna take power away from the crank… or make it harder to fit a centrifugal supercharger on it in the future…
-
Worked on the heater core housing the past week. Unfortunately our sandblasting cabinet started to act up mid way through blasting, and the cold and humidity of the garage makes rattle cans come out looking 7/10 stars at best so it’s not the prettiest but it’s hidden. Pressure tested the rebuilt heater core I got for free in exchange for working a local Z. I repaired the heater valve and I used cork gasket for the large door area, camper top sealing foam tape for other areas, and pro tip… a beer coozie and one of my old wetsuits from work cut into strips makes a perfect seals for some of the areas where the pivoting door doesn’t lay flat.
-
Quick update on the Z and quick video about the VQ37 with some footage of it fired up. https://youtu.be/387XBy1wQ4o
-
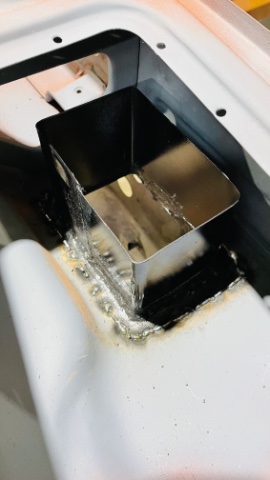
It ain’t pretty but nothing about welding in that area is easy. I did some tacks all around on the underside and will finish up the 2 accessible sides fully from the top, then the other 2 sides will be sealed with epoxy for water tightness. I think that will be sufficient for a weekend cruiser.
-
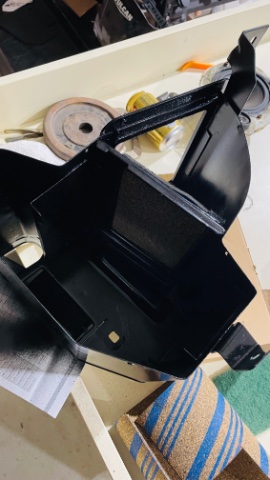
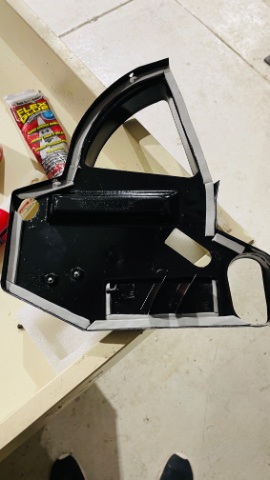
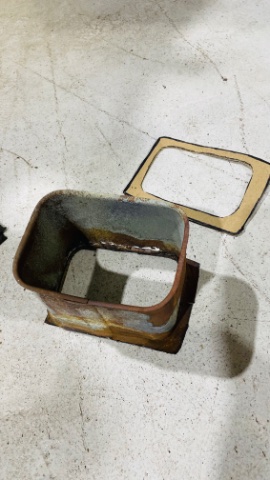
Did the fan intake chimney, my cut out rusted one can be seen in the picture below. This area is definitely not a breeze to cut without a really good dremel or a really slim profile cutoff wheel. I ended up making a few modifications to the design, namely shrinking the whole chimney by about a 1/2 inch in each direction to hopefully allow water to flow around it easier. I also think I will also be making the cover that keeps water out able to be unbolted and place a screen mesh or even some non-restrictive HVAC filter on the opening to keep leaves from hitting me in the face when it’s on. But welding it in will need to be done from underneath and I’ll need to get some good seam sealer and paint on the area. I would say that based on how hard the Kia blower motor moves air that anybody else doing this could problem just weld a 4” long piece of 3” diameter pipe in the dead center and not worry about choking anything out. My buddy also suggested 3D printing the chimney and bolting it on with gasket and sealant, maybe if I lived in a drier area I would try that.
-
My 2 cents from when I installed a l28 (IIRC F54 block, P90 head from a ZX). If funds aren’t an issue now just make the engine track ready now with the compression ignition and triple carbs. Get the adjustable cam gear and tensioner mentioned (I wish I had when I rebuilt) and spend the money to go to an EDIS electronic distributor-less ignition system (the distributors for these engines just really start to have issues now after 40-50 years). Better fuel delivery and ignition timing will make detonation control a breeze even on those higher compression numbers and you should be able to safely push the 10-10.5:1 compression so you don’t have to tear the engine apart again later to get that comp where you want for the track. If funds are a limiting factor, which is kinda my problem at the moment, then what you mentioned in your plan seems like the way to go and just upgrade as you can. It will be a longer process and you’ll certainly want access to another daily anytime you have to put the new parts on.
-
@acpmick Your question about the gauges had me look at Speedhut website the other and see that they actually just released a line of JDM 240Z replica gauges using their gauge technology which look very similar to the originals with some great custom options. None of these were Can-Bus gauges I’m going to see if they can just transfer those gauge faces to the Can-Bus gauges for the tachometer.
-
Looks to me like it should fit. The clutch slave cylinder doesn’t stick out much farther than the boot for the CSC hard lines. Though the CSC delete kit to me sound like it was designed to fix a factory flaw on these vehicles for people who daily drive their cars to the moon and back each day, but also if you are constantly wailing on your clutch at the track. I don’t know what your intended use for your car is but I plan on using one of the heavy duty CSC from JWT since I’ll just be using the car for nice weather fun. Even a factory replacement has a lifespan of roughly 60k miles from most reports and I doubt I’ll put even half of that on my Z if I take the car to my grave in 60 years.
-
@acpmick Wiring wise the hard part is just finding the car to cut the VVeL sub harness out of, and then cutting it correctly. But if you take your time and make sure to trace wires between the connectors and be careful with your cuts it’s pretty easy. Fans are pretty simple. I don’t know how Zfever could retain the fan function because that is all controlled inside the IPDM. The ECU itself has no pin for a fan trigger, it sends can-bus data to the IPDM which controls a ground trigger to the 3 fan relays and a PWM controller module. I wouldn’t bother with trying to wire that mess up, I’m planning on get a PWM style dual fan controller with adjustment (Derale makes one) so that the fans can run at multiple duty levels based on need. But if you are racing and don’t mind full on or full off and the noise than you can do something really simple with 2 relays and a basic thermo switch. For the gauges you can get by without any Can-bus gauges, I am going to get a can-bus tachometer though because it takes some electrical trickery to get a standard tach signal off this engine. Have to use a GPS speedometer and the other engine gauges can be what ever you want, but if you’re only using the stock gauge locations you’ll probably have a coolant temp, oil pressure, and fuel level (not part of engine wiring anyway). Those gauges will be programmable and the signals sent into the ECU by those sensors will play nice with most universal gauges. They also make OBD2 splitters which means you could always have an open OBD2 port for a scanner and run a full set of speedhut gauges which will daisy chain with each other (except speedometer which will need to be GPS).
-
Before I disassembled my Z I measured a few and took some pictures (this one was edited so you could actually read the numbers). Between the door and fenders I found my panel gaps were all falling around the 5.5mm range, and the hood and rear hatch gaps were a little smaller in the 2.5-3mm range.
-
@Gumiho3 My suspension will be Apex Engineered all around, likely the 8.8 rear end but they recently made it available with a 370z R200 rear end which would be nice for having to buy less things (wouldn’t need to also buy Ford axles just for the CV and could just buy a 370z driveshaft and have it cut to size possibly). They are also hopefully releasing their VQ engine mount front crossmember soon. As for fuel tank I like the look of ZFever but a universal in-tank pump like the aeromotive stealth or a “black box” seems like a better way to go and while installing it you can get in the tank and clean it out. I think when dealing with handmade items and small business parts or service garages you end up with all these small issues like Zfever fuel tank needing work to fit right or in my case I opened up the wire loom from Hexa yesterday and found the neutral position switch signal wire didn’t have continuity because it was never actually hooked up to the wire it need to be hooked up to. Most of them are trying their best with no I’ll intentions for the consumer, they’re just trying to run a business while also usually be a part of the production, shipping, and customer service team all at once. Can’t fault them too much for some delays and small errors as long as they accept responsibility for them.
-
I have been to their shop 2-3 times while I lived in Tampa with my Z as my daily driver to check out the shop and for a multipoint inspection before taking my Z on a 1000 mile trip back home to the Midwest. I’ve heard some good things from other people in the area who have work done directly with them, but haven’t experienced dealing with them through online storefronts like eBay or general shipping. I will say Hexagarage’s product works, it’s 1/2 the price of Zfever, and I had my harness back in my hand within 3 weeks of them shipping it. Matt did say they continuity res their harnesses before sending them back, but in my case they definitely did not continuity check at least one wire and it caused me 2 weeks of headaches and $100 dollars to borrow a Consult 3 capable diagnostic tool. It seems I’m an outlier though since @Gumiho3 had no issues with his.