
Ben280
-
Posts
353 -
Joined
-
Last visited
-
Days Won
26
Content Type
Profiles
Forums
Blogs
Events
Gallery
Downloads
Store
Everything posted by Ben280
-
Time for some major upgrades (again). Seems like in each off season I try to pick one system and upgrade it. This year I knew that with all my fuel system issues, it was time for the stock tank setup to go. I also suspected that a big chunk of my issue was that I was pushing close to 50psi through the injectors and really overdoing their duty cycle, so an injector upgrade and new fuel pump would also be needed. I lucked out in a major way and found a Fuel Safe FIA cell on craigslist of all places, complete with mini surge tank and pump, all wired with an Amphenol connector. The woman I got it from said it was in her husband’s car for a while, and he was just going to toss it. Goodbye old buddy! I knew right where I wanted to put it, and I started to make the hole! No turning back now! I also knew that I needed to make a full cage for it. I see a lot of light duty strapping holding these in place, but I wanted to safeguard in case of a rear end collision. It’s gonna weigh more, but I can deal with adding weight back there, and for safety, additional weight is worth it. Fuel cell mocked up in its final position. Not pictured is the new SVT Focus fuel pump in the tank, and a really nice Aeromotive fuel filter. No more clogged injectors for me!
-
Oh don't worry, there are many more updated on the way! This is only up to September of 2015.
-
2015 race season was overall pretty successful, with a couple major disappointments! The National Tour stop in Packwood was more frustrating than fun. 2nd run in, and the car developed a major misfire and my co-driver and I realized that it was fuel related. We also smashed off a flare! Luckily an observant station worker grabbed the 2 pieces and brought them back to the pits for me. Overcast day, time to bust out the tire bags. What’s better than destroying nice parts from the motherland? Swapping out injectors at 2am before a major event! That’s what. The injector swap didn’t work as we managed to clog 2 more the next day, and only had one spare. Thanks to Rock Auto for speedy shipping! Arrived just in time to be installed and head back up for the ProSolo. Like mana from heaven! I also managed to get out to Lincoln NE for the SCCA Solo Nationals. As far as an event goes, it’s phenomenal. As far as driving goes, I was driving a new car with not nearly enough seat time! Mental note, Formula Ford’s are bastards to drive in the rain. OS Giken bringing the H20 for human lubrication on hot Lincoln days. I didn’t get to watch as much of the FP competition as I wanted to, and only saw one FP Z car. He was having some kind of EMS issue, so I didn’t want to distract him too much! Somewhere I have a photo of it. Saw a few XP Z cars, basically glorified converted GT2 cars from back in the day. I also got a chance to meet Tom Holt, one of the gods of FP competition. He was driving a Boxster that was missing its windshield, and wicked fast! Hopefully he brings his Z out this year. I also met Kirkster and his BSP Z car! The last big event of the season was a track day out at Oregon Raceway Park. It’s an amazing track in a beautiful location. Can’t wait to get back there! The “Halfpipe” on the far end of the track, HUGE banked turns. The night before loading the car, that misfire came back, and I again found myself swapping injectors. This time with the car already on the trailer! Luckily I had the 4 good ones that were replaced earlier in the season, so I swapped the bad one out, and tossed the rest in the truck. This is becoming an all too common experience.
-
Ok! Picking up where I left off 6 months ago: The first major event of the season (2015) was NissanFest up at Evergreen Speedway in Monroe WA. This was the first time I’d had the car up at high speeds since putting the cage and everything in so it was a good test of all the systems. I had been having brake issues (not releasing pressure) and so it was going to be a test event for that as well. Turns out I just didn’t have any brakes! Once I got home I hit up Edan at Silvermine motorsports and got their smaller brake kit. Don’t have enough weight to really need the full size kit, and I can’t go fast enough to generate massive heat slowing down! The backing plates put up a pretty good fight, but I won. Rear brakes looked pretty, so here's a photo of that! I also used this as an opportunity to upgrade to a dual master setup. After a lot of calculations, I decided to go with 7/8” driving the fronts and 3/4” driving the rears. I used some of the info from here and a couple other posts to modify my pedal box for dual masters, as well as modifying the pedal for a wilwood balance bar All installed, note the large chunk I took out of the side of the pedal box for balance bar clearance. Larger hole cut out of the firewall. I was thoroughly unhappy with the Wilwood remote reservoirs, they leaked EVERYWHERE!! Not even sure why they bother. The main failure point that I noticed was the joint/o-ring at the bottom, so I decided rather than fiddling with finicky o-rings, I would go with a Tilton 1 piece resevoir. Very happy with this new piece, significantly better build quality Also had time to get the car dyno’ed! I won a baseline at PSI at the 2014 national tour, and figured it would be good to seen what the car was actually doing! Surprise surprise it was a minor disaster. Running super lean, and very down on power. I rolled into the shop making 115hp at the top end, and left making almost 150!
-
Very sad to hear this news, the Z world and the racing world have lost a treasure. Whenever I saw a post by John I stopped to take note, and always got a kick out of reading old SoCal bench racing stories about his Z. Sending my thoughts to his friends and family. Rest in peace John, we miss you down here. The Benton Performance guys are having a memorial meetup on May 7th at their shop (details are on their instagram page). I'm sure they would be able to point you in the right direction for further gestures.
-
Hey Madkaw! While I was using a 240sx throttle body, I had done away with the sensor and converted the throttle body to work with the 280z TPS. I figure if I have to go to a junkyard or search Ebay, I might as well see what other options were available to me.
-
Hey all! I'm doing my megasquirt conversion, and I am wondering what others have used for TPS sensors and throttle bodies. I'm still using the stock manifold for now and already have the adaptor to use a 240sx throttle body. Any idea what will bolt up, and be easy to program with MS3? Thanks!
-
Looking forward to seeing your progress! I think we might have met this year at Nationals, (Orange Z right?) Hopefully you can sway the SEB, but they don't seem to give much thought to the older cars!
-

Trailer modification - Good idea or bad?
Ben280 replied to JMortensen's topic in Fabrication / Welding
Well, I'm glad I decided against Medford (seeing as how I'm still in Lincoln!). There is the OR-SCCA event in Packwood on 9/26-9/27, which should be a lot of fun. -
Trailer modification - Good idea or bad?
Ben280 replied to JMortensen's topic in Fabrication / Welding
Glad to see this got sorted out! What events are you going to try and attend before the end of the year? I remember you mentioned Medford in October. -
Ended up buying a tow rig, I wasn't able to build the car out all the way I wanted to and keep it streetable! Tow hitch worked awesome just not for my particular scenario.
-
ZSleep- Unfortunately, turbos are illegal for my car in FP, although not illegal for the class. It would be a great way to make the car WAY faster, particularly with modern electronics. Glad you are experimenting with the wing! Lots of people asked about it, only a few actually went for it. RyanT67- Thanks! I'm excited I was able to make it my vision, although there is still a little bit left I'd like to do exterior wise. I'm excited I was able to get it so light. I think a lot of it had to do with all the fiberglass I threw at the car, and a lot of time drilling out random brackets. My goal was to be at 2000lbs, and I'm excited to be super close!
-
Thanks man! One of these days I'm going to have to drop in a built L28, but that is a long way off! I've often thought about doing a run of those spoilers for people, might have to start up a group buy over the winter. The parts are somewhat expensive though, not sure I could charge enough and turn out a quality product.
-
JMortensen; I was thinking about going, but I'm doing a track day later in September at ORP, co-driving a FF at SCCA Solo Nationals, and going to the last OR-SCCA event in Packwood, so I'm about out of fun money for the season. Maybe if I can score a co-drive, but the fuel bill to tow down is going to be too much. Maybe next year I'll be able to budget better haha. RebekahsZ; Thanks!!! Really glad you are into the car! I've definitely used your various posts around this site for inspiration so your post means a lot. Feel free to pick away. I will say I think the shortcuts will always pick away at you. Always something you wish you had done better or differently!
-
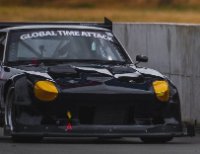
Got a bunch of driving photos from the weekend! Thanks to all the photographers that were out there getting the goods! Exciting new updates coming next week so stay tuned!
-
Wiring was next, and having never wired up a car before, I was a little nervous! I bought a label maker from Epson to make the going a little easier, since I didn’t want to buy piles of different wires. I also bought a JEGS switch panel which is fused and has lights that show if a switch is active or not. The one thing these cars have going for them is that in stock form, they are brutally simple. The charging system is essentially 1 wire and with a little added simplification this was a pretty easy re-wire. Dash situation has yet to be totally decided, but this is where we are at now. Needs something, but not decided on what just yet. Here is a good 3fer, back hatch lexan installed, super clean wiring and a sneak preview of the fender flare-airdam union. For the time being I’m not running ANY rear lights, or fuel senders, but the car is wired for them, just with hidden pigtails. Another big exciting development was deciding to DIY Vinyl wrap the car! I’m still learning how to do this, but its going pretty well. If I have leftovers, I’ll re-wrap the hood, but for now its pretty good. You can get a good sense of how the flares will blend into the airdam now. Talk about chopping up expensive ass flares! My brother gave me some extended studs for Christmas. These are the ARP mustang/camero studs, they fit perfectly. This job also sucks though, and required getting a slide hammer from autozone, and making a custom plate to hold the hubs in place while the nuts were loosened! Got the doors Vinyl wrapped and that means its time for new numbers! I really liked the old school vibe of the gold meatball, so I did that again. #46 rides again! I went over to the shop today and got the car weighed out finally to get a sense of where we landed! I was SUPER impressed. Anything under 2200 would have been awesome, but I wasn’t expecting this. When the car was first weighed, before the gutted doors, and gutted metal hood, the car weighed in at 2357lbs. Last year in July we weighed it at National Tour and it weighed 2230. Having the car come in now at 2090 is phenomenal. That means that even with the addition of the cage, the car has lost 140lbs! The minimum weights for FP are 2064/2164lbs, so I can ballast up to the wide wheel weight, or shed some more pounds and get to the 10” wide wheel weight. Depends on how corner balancing goes, and if additional weight helps level the car. In reality too more fuel will be added and few more pounds of vinyl and fender flares, but from the original weight, this car has lost over 800lbs!!! Damn near half a ton. I’ll take that all day.
-
OK! First update in a long time. Sorry about that, but Instagram and facebook are way easier to update than these build threads. But I can’t abandon my loyal Ratsun brothers. So. We left off in early December when the car was about to get caged. This meant doing TONS of prep work to the chassis. Cleaning all the seam sealer out, old paint, flaking undercoating, old rubber, the works. Gotta have the proper equipment when angle grinding! Spent some quality time as well with the paint stripper, worked a treat to pull all the crap out of the front wheel wells. Thought process is that it will be easier to keep the front suspension clean and help ID leaks. Wire wheels were the name of the game on cleaning the wheel wells out. Made a mess but they look great now. Had to remove the windshield for caging so the guys can work in that area. Not the biggest pain, but hardened rubber wouldn’t let the glass go without a fight. Came clean though finally, had to go back and clean out the track. Had some rust in the corners but it was just surface rust so I hit it with the grinding wheel and then some rust reformer acid paint. The day before the car was heading to the fab shop I got a package from John Washington at ZTrix.com. Fiberglass!!! This will help a TON with offsetting the added weight of the cage. Panels fit super well, and John was a treat to deal with. If anybody on the forums needs FG pieces for a Z, he is my first choice. I ordered all skin parts for maximum lightness, and HOLY CRAP these are light! And super ridged as well. Very little finishing work needed. The next day the car was all set to roll up to the shop! Loaded up and strapped down, this is the last photo of the car as a “whole” Since I have to keep an eye on weight for my race class, I wanted to try and track weight as much as I could throughout the process. The shop I went to (SV Performance in Portland, OR) has scales so we were able to do a before and after. Light, but then again, it’s just a rolling chassis, nothing else! I left Scott and Oscar with some drawings and rulebooks to go over and get a basic design. Meanwhile, back at home base! I still have all those motor pieces from a couple posts ago to install! And what better time to install them than when the motor is out of the car! I thought the motor deserved a nice new paint job as well! Ford racing blue was pretty close to the original, or as close as I could get. Figured I would leave the accessories on the motor since I had other plans for those! Day 1 of the cage build and the guys got pretty far. The deal I made with them was I do most of the sheet metal work and generally help out and they gave me a deal on labor. We tried as hard as possible to get the main hoops and bars super tight to the body. Gratuitous welding shot on the rear main hoop The cage design is a main hoop with a halo and A pillar bars. The whole thing is built to SCCA GCR spec meaning an 8pt cage. We used .095 wall DOM 1.5” tube for everything! Dash bar installed, checking for level. Door bars installed. The bend towards the main hoop is pretty tight to clear the seat, but then again, everything is really tight to clear me! Ladder bars in the door, should be pretty good for a side impact! Getting to that point on the cage was pretty much a week of work, and in the meantime I had motor parts to work on! Plus the shop closed for 2 weeks over Christmas. I cleaned up the timing front cover, new gaskets, new bolt kit and you can see the new motor mounts. Seriously though, why did Nissan use different bolts at EVERY opportunity on this thing??? Had to get a little Christmas cheer in! these motors get cluttered quickly! I ended up finding a new oil pump off of a KA24de equipped truck. A little research showed that it flows more oil and at higher pressures, which can only be a good thing. And they bolt right up! Back at the shop after a week, it was time to wrap this cage up. That means gussets!! Back out with the angle grinder! We put gussets on the A pillar bars, from the main hoop to the door jamb, the halo to the roof in the front and back, and from the down bars in back to the hatch frame, where these cars always crack. All said and done we added about 120lbs to the car. Each foot of tube weighs just about 1.45lbs and we used almost 100ft of it. Lots of scaffolding in the back there! Once the car came home, it was time to figure out how to hang all these new panels! The door skins had no provisions for mounting, as its assumed that each race team has their own method. Some quick angle iron bends and some more fiberglass to keep them attached and the door was good to go! Once doors were hung, it was time to shoot a little paint. Engine bay was first to go. I used some semi paint in a gloss black to keep the bay nice and clean! The cage went white to keep the cockpit nice a bright. You can see most of the gusseting here, there are a couple more that are less visible, but these are the big ones! All of them are dimple died for added strength. Once all the paint was laid down, time to get back to fitting panels! Drilling holes and angle grinding expensive pieces of fiberglass is fairly nerve wracking, but I’m getting better at it! Hatch was a big one, since it meant that the rear of the car was pretty much sorted out. Back to the front, the motor went in one afternoon, and the rest of the parts on the shelf went into the car. Same old same old, but with new motor mounts from McKenny Motorsports, a new 240z steering rack and a new sub frame. This car at one point was crashed, and the result tweaked the sub frame and motor mounts. Somehow the suspension isn’t really affected by this, but the motor mounts were all tweaked so new ones were required. Windshield went in next, no real reason on the order here, but I was tired of tripping over it! There is never a good place to put a windshield. New supple gasket made the going much easier, but this is still a bitch of a job.
-
Alright All!!! You guys have gone far too long without an update! Car hasn't done a whole lot this month. Wrapped up the racing season end of september, and the next day I had the motor out. I was planning on replacing the cross member, steering rack, and all the front gaskets on the motor, and that all is easier with the big lump out of the car. Blame the free shipping deal MSA had a while ago, made me spend some more money to get free shipping on my brake lines! Timing cover gaskets, water pump gaskets and oil pump gaskets! Prepping the motor to pull it out And out! Only a little greasy, overall, not a bad deal, but annoying for sure! Uhoh, whats this?! Bent ass motor mount is what! damn! Now I have to figure out how to make a custom one! No sense in using the torn up stock rubber ones now either. Something custom out of plate is gonna have to happen. With the motor out, I'm getting antsy about the amount of crap that is still in the car, and thinking I REALLY need to finish stripping it. If you recall back to the 2nd or 3rd page, I premiered a lot of the interior, and left it. Well that primer has picked up a lot of dirt and looks gross in person now, so I'm going to re-paint the whole deal. And if I'm going to paint it, well.... Strip it out (again) I'm liking the all black look! (wing is gone by the way, something better coming for next year! Totes top secret) Chisel out the rest of the seam sealer and mess strip out the rest of the front (and make it look nice too dammit!) All in prep for the big kahuna, An SCCA Road Race GCR compliant cage! 8 point fully braced. This car is gonna be ready to rock and roll soon enough. Need to do some more weight reduction to make up for it but I think we will be ok. I sold a bunch of little parts to fund some nice other purchases as well. Drove up to Centrailia a few weeks ago to pick up this pile, 8 Hoosier R75A Radial slicks! 23.5x11.5R16! Big sticky meats! Mmmmmm Hoosiers! All that tire's gotta get covered up by something! The BAMF flares are too small for these, so we have to go bigger! We can do it, we have the technology. Well, the Japanese have the moulds. Gonna be sick! I liked the old version of the car, but with the front bumper gone, I felt it needed an overall change. Color scheme is staying though. I'll try and post some in progress photos of all this stuff, should be exciting!
-
So the front airdam and splitter combo is officially in its new home, so I had to replace it with something! If case you're not familiar with the reasoning behind ditching that particular version was to be SCCA FP legal. the FP rules state that you can't have any front aero that extends beyond the body line of the car when viewed from above. This means no splitter, no canards, nothin! I originally wanted to keep the airdam and just have a spare, but that wasn't going to be financially possible. New box showed up from MSA the other day. wonder whats in it! OOOOOO!!!! Something different! Decided to go with the Works style air dam. Haven't seen ANY of these on Z's in person, and thought it would be worth trying something new. I'll post a photo tomorrow with the new bits! I also changed my transmission fluid for the first time! When I installed the trans the fill plug was stripped out so I filled it through the drain hole and called it good. Reverse started to grind a bit was in order. Those fill plugs are a bitch, and it took some convincing, but out it came! Looked a bit different. Of course I couldn't find a replacement plug, so I cut and re-welded the last nut onto the fill plug. 27mm wrench will make it easier to pull in the future.
-
Update time! Been lots of time and no real work so car developments have been slow. Decided to go on vacation instead of sitting on my butt! Family had planned a trip to Iceland, must say I was impressed with their trucks! TONS of trucks like this. Lots of old Land Rover Defenders on 44's. Note the convenient normal SUV for comparison. Anyway, was a great trip, if any of you have the chance to go over there I highly recommend it. Came back with just enough time to get some work and then mount up the race tires for a PCA event two weekends ago! Had a bit of a problem fitting them in the car! Stupid small car problems. Also took the seat out, saves weight and now I can put a real seat in there! Need a seat for adult sized people so I can have an instructor ride with me when/if I do a track day. Couldn't drive like this so I had to figure out some useful solution. Enter my friend Perry and a small trailer he had lying around. TOW BAR TIME! Friend of mine works at a shop and gave me the bends for free. Lined up initially, and was winging it on the height. Added a drop bar to get the hitch level and then boxed in the hitch plate. 1 7/8" ball. Comes off with 4 bolts, and with my new impact gun I can take it off at the track in about 10 seconds. Its just tubing and not DOM so I'm not keeping it on the car for bash bar purposes. Great easy solution. Also spent some time to paint the rear tail light garnishes. my chrome was all pitted and there was crap overspray on the plates so I cleaned them up and made it all nice and pretty. Car all set up! Trailer looked pretty ok, but needed some love. The plywood was all weird and I wasn't loving the red. That toolbox and tire mount setup is legit though. Easy to move fully loaded by myself Little more flat black and some gold paint to match its daddy! I've since painted to plywood. Redid the wiring too, just have to add the wiring harness to the car now. Officially race season, so the updates will mostly (and hopefully) be about racing stuff and not about building the car! And finally, some eye candy from the PCA event. Just the parking lot though, don't have any action shots yet! And super secret bonus, I made a little welding cart!
-
Another update! Been working on the wiring, gauges and some super cool wheel stuffs! Pulled out all this trash wiring from the front end/coil harness. mostly useless, but a lot of it was from side markers and the ballast resistor. Spent some time working with the gauges. Tired of having them on the on the tunnel where they were hard to see, so I decided to move them! Step one, gut the stock gauges! if you cut the cross piece and massage the fit a 52mm gauge slots right in! Step 2, cut the back off so you can run wires. Re-install, and do some wiring hocus-pokus and here you go! I also found that with some trimming you can make one of the stock gauges fit into the airvent slots. Fits pretty well! Also been working on project racing slicks, which requires me to free up my current 15" Bassett wheels. You all remember the Gotti's from a few pages ago. Well, after some hard work, here you go. Only have the fronts fitted up now, but rear tires will be here tomorrow! Also got this for christmas, Can anybody translate Japanese for me?!
-
Ok a real update!! Been puttering away on some projects this week, mostly prepping a new rear end to go in. Bought a ATS 1.5 way diff in a s13 pumpkin that will bolt right in. Took a lot of reading to figure out exactly what I needed but the carrier section (and by extension LSD's) for the open diff s13 will bolt right up, and use stock 280z output shafts. Very slick! Carrier bolts were SUPER on there. Needed to have my friend stand on the pumpkin, and use a 4' cheater bar to get these things even close to loose! Was important to remember to loosen these bolts before pulling the LSD out, otherwise, you have no good way to hold onto the carrier to loosen the bolts. Getting the carrier out of the housing was a trick too. Didn't want to pry at it, so a ratchet strap filled in nicely! Shot of the whole mess! Going to use the ring and pinion gears from a 3.90 NA 280zx. Take a look at the back plate, this one is from the s13 Open diff. The VLSD s13 cover is deeper and has more fins. Decided that while everything is out I should try and make it look a little prettier. Spent some quality time with my wire wheel and got the housing and halfshafts cleaned up! In progress with the diff housing, looking good. Before: Middle (need to hit with some engine enamel): Next on the table is a mustache bar from the crew over at T3 that will accept the bolt pattern on the s13 diff cover. Hopefully I'll be able to get my hands on a VLSD diff cover, which holds a little bit more oil and has better cooling! Cooling is very important for the life of the LSD.
-
Bump from the depths of abandoned threads! Thought the ratsunverse deserved an update since a few cool things have happened recently! Between racing and moving into a new house, nothing MAJOR has happened. Lots of racing the car and making it work! The main difference that everyone will notice is the addition of perminant numbers and SCCA class letters (wrong but thats ok!) and a fresh new splitter! It does its job to prevent the understeer in faster corners and it looks sweet! two locator pins on the cross member and the quick release pin locks hold it on, as well as being bolted to the airdam and sharing the airdam quarter turn fasteners. It has to be taken on and off to move the car out of the driveway, but this solution is pretty nice. She REALLY doesn't do speed bumps now! Finally got rid of the drivers side window too! The window track got tweaked somehow and the window refused to go up. I think it had something to do as well with the lack of hardware holding the window on, but thats all in the past now! Door is totally gutted and the new lexan window will be joining the party shortly. More dzus fasteners in this cars future! I picked up a set of Avon slicks from a racing friend of mine and am planning to get a new set of bassetts to run them. the 15x11 and 15x10's are fun, but they incur a 100lbs weight penalty for the class I'm moving into and its easy enough to get new ones. The downside of running slicks is that i need more offset to clear everything. Sort of fine though because with the 15's I have tierod clearance issues up front. You can guess where this is going! MOAR FLARE!!!! Luckily I was only running standard ZG flares which gave me one more step before doing something stupid; the BAMF ZG flares from Z force! Double lucky a friend locally ordered a set back in april and didn't end up running them on his project car. A quick trade later and they are currently in primer, waiting for final paint tomorrow! The other problem with slicks is that you can't drive them on the street. A keen eye may have also realized that in the last two photos, the wheels don't look like bassetts, nor do they look like 15x10's! A keen eye is right, they are in fact 16x12 Gotti 75ba's! Got them for a ripping good deal. 16x11, 16x12 staggered. Offset is perfect in the rear, and spacers are needed up front. Just how much remains to be seen. Anyway, gold powdercoat center sections and polished lips are in the works!
-
Got my spoiler attached! Here are some pics. Pretty stoked on how well this turned out. The plastic shape can be easily altered and replaced if needed now that there are the adjusters. anyways, PHOTOS!!!!! Gives you a good idea of the range of the movement I can get out of this piece. At this point its just inhibited by the plastic, but it has the ability to go from 35 degrees to well past 90 degrees relative to the hatch cover. You can also get a pretty good shape to the wing by adjusting the turnbuckles. In the last photo you can also see the new tow hook on the back! next time on ratsun threads, some cool vortex generators for the roof line and maybe an oil cooler?
-
Back from the dead!! Been working too much and trying to pay down some credit card debt that this bastard has put me in, but I got motivated and decided to finally fix my wingless situation in the rear. I could never find a wing that I really liked. the BRE style was cool, but expensive and a little understated, and the IMSA, while cool just never seemed quite right. So I resorted to building my own! I knew I wanted it to be adjustable, and armed with the McMaster Carr catalog and some cardboard, I went for it. Here's the basic layout of it. Got some large bolts countersunk into the front of the spoiler for "optimum aerodynamic performance" lol I had the piece cut at a local shop. They specialize in CNC style stuff, so my idiot cardboard cutout was a little weird I'm sure! They did a super nice job though, material is 1/2 glossy black polycarbonate. pretty much bullet proof! Next was to sort the hinging system out. Couldn't find anything that knocked my socks off as usual, so I went into fab mode! Got 4 of the strap style hinges, but in the worst finish possible! Toyed around with painting them flat black, but then my room mate told be about Gun Bluing, which I decided would be worth a shot. This is with one pass! took the shine right off, I was pretty impressed! I'm gonna experiment and see what another coat does to it, then probably do a matte clear coat for a teensy bit of protection. You can also see the tabs in this photo, and I'm sure you can judge where this is going! With the shape of the spoiler sorted out and staying on top of the hinge game, I got to work figuring out the adjustably part of this whole mess. I looked into APR and Longacre splitter adjusters, but they were all too long. I wanted a turnbuckle style thing, threaded rod and the whole bit, so again, I decided to cobble something together. Sensing a theme here guys? Anyway, McMaster Carr has literally everything for the DIY enthusiast so I put in an order and patiently waited! Here is the more or less finished adjustable hinge bracket. Up: Down: Going to have 4 of these badboys in total, should be pretty set! And if I want to change the shape of the splitter in the future, I can just unbolt the plastic chunk and keep all my hinges! Going to finish this project off over the course of a few days and them move on to finishing an oil cooler project that I'm in the middle of Oh yeah! I bought an oil cooler haha.