
Ben280
-
Posts
353 -
Joined
-
Last visited
-
Days Won
26
Content Type
Profiles
Forums
Blogs
Events
Gallery
Downloads
Store
Everything posted by Ben280
-
Ok! Not too much has been happening with the car lately, finally got a chance to enjoy it these past few weeks so I've taken advantage of it! Done 3 auto-x days with it and its been a peach each day! No more major mechanical problems (knock on wood) so it seems like we are moving along. Here are some photos I forgot to upload from some recent projects on the car. Aftermath of the alternator on hose violence at the drag strip! Here are some shots of the electrical cleanup in the engine bay. Before: After: Couldn't figure out that relay for a little bit, until I dug out a wiring diagram. Turns out its some kind of starter inhibitor switch only found on the AT models. A quick jump of the important wire there and out it came! Still need to recover the loom but looks 10000% better. Also did a harness tuck on the EFI power harness so that runs on the cabin side of the firewall rather than over where the hood latch was. Another, better angle of the electrical cleanup. You can also see my starter heat wrap, trying in vain to keep the starter from overheating and not starting the car! Might have to swap the starter again. =/ Installed a super cool badge in the dash, MSA has some pretty cool stuff! I also got around to making the windshield banner I've been thinking about for a while now. Wanted something cool and obscure that would stand out at the track. Says "Jaw Breaker" I'll let you guys and gals put your own meaning behind that one haha. Hand cut vinyl, used a print out from Illustrator to make them. I've always like doing paper cut out stuff so this was a fun little project.
-
Update time! Been busy with work, so the car is going a little slowly. Wasn't in love with my driving position, so I ripped out the drivers seat, and all the drivers seat mounts/floor cross members. The plan is to weld in new smaller cross members and bolt the new seat rails to that. So far the cross members are out and I haven't had time yet to weld anything new in! hopefully this weekend I'll have a day to make some progress. The other good bit of progress is a new front airdam!!!! This polishes off the exterior of the car for the most part, just need to get a spoiler! Anybody got a good lead on a BRE style one? Also want to put on the rear window louver still, but it needs a lot of prep/paint and put some more front aero stuff, but thats waiting on more time! Now, here's a photo! (sorry for going back to iPhone quality after real photos in the last update)
-
Ok, finally an update with photos! Got a bunch of boxes of parts from Dave at arizona Z car. His stuff is so pretty I just had to line it all up on my floor before I bolted it all up! All good things going on over here! Finished prepping the strut tubes for a good install, and started to test fit all the suspension arms. Everything was a nice fit, and pretty easy to bolt on. Pending the actual installation of the suspension, I figured I should step up my game and chop/weld up my fenders for the flares. Not chopping out too much fender, as I am trying to keep the car somewhat off the ground! Quick shot of the fronts installed. I used nutserts in the rear and normal bolts and washers in the front. And fender welting. LOTS of fender welting. Really not very happy with the MSA ZG flare fit, especially on the drivers side front, but that is a known problem I should have read about before I ordered them! Got all the flares installed and mounted over the weekend, and had a local welder come over and weld in the new strut tops after work on a Wednesday. We did weld the underside for maximum not-breaking-ness. I'm going to wait to sand and grind down the shock towers until I have time to do the whole engine bay. sprayed some clear to protect everything, but other than that I'm done with them! Spent an evening with my room mate doing up the hood pins. Kind of tricky, since I've never done them before but the came out ok! Kept the front hinges and she is a real treat to open and close now! My room mate is working at a shop that fabricate plexi glass and poly carbonate store displays and other stuff, so he made me a cool spacer for my steering wheel, and let me get rid of all the washers i was using previously! AND its yellow to match the steering wheel. Also took some time to "protect my investment" and installed a fire extinguisher. Just mounted up the hanger bracket onto the harness bar. When I eventually do a half cage I'll mount it to the diagonal bar. This one is the Kiddie Auto/Marine specific one. Works pretty well from what I have read and it is a good size, with easy access from the front seats and through the hatch. After another furious weekend of fitting, tightening and testing we finally got the car on the ground and I was FINALLY able to drive it somewhere!!! Still needs a handful of parts (mostly a front airdam) and some fiddling with ride height/front track width (which i think i got taken care of last night) and then I'll be mostly happy! OH!! I need a new exhaust too! The first one that I clamped together held solid but then one gnarly pothole/bridge joint that I didn't see ended it =(. Todays task is new gas for the welder and a bunch of tubing for a new exhaust and new y pipe. Once the car is back in the realm of drivable volume I swear I'll take a real photo of it. Iphones are just so much easier to take places!
-
My tires showed up while I was at work and my room mate was nice enough to go get them mounted for me. That combined with me mounting the control arms in the rear let me mock up a wheel in the rear for everyone to see! So there you go. Control arms are level in the rear, and according to my iphone app, its got 2.2 degrees of camber. Wheels are rocking out a 4.5" backspacing, so the dish is plentiful These things could be used as salad bowls! Hopefully the front control arms show up soon and I can mock one of those up for everybody!
-
Houston we have wheels! No real photos yet, but here is a teaser! Dont worry world, this is at almost full droop with the stock setup. flares will be going on next week and tires are showing up momentarily. Wheels are Bassett 15x10 in front and 15x11 in the rear, with Toyo r888 205/50 and 235/50 (respectively) on order. Should look pretty awesome when bolted up! (Still need to get lug nuts!) This was also the week where I dropped the rear suspension out and got to deal with the dreaded spindle pins!!! OOooooo! I was almost prepared to deal with them, my previous car was from the east coast, and every project on it required air tools, a torch and inevitably breaking every bolt you laid wrench to. But even seized A arm bolts had nothing on the frozen bolt hell I was about to enter! And in case anybody had any doubts about the quality of the rear suspension, the rear shocks were as blown as the fronts. see the video a few posts ago for reference haha. I had read enough going into the project that i knew i was going to chop the spindle off to get it out. No need to save it since the Techno RCAs came with new bolts. In hindsight I should have saved one end with threads for reasons that came apparent this evening! Started out normally. Torched the area where the pin goes through the knuckle, quenching every so often with PB Blaster. Anecdotally I've decided that doing it this way draws the penetrating oil deeper into the depths of the seized bolt, but it also makes fire when mixed with MAPP gas! Here's my room mate/partner in crime doin his thing Dont worry, we had proper ventilation and a hose in case things got out of hand. A couple minutes later we threw the knuckle into the vice and took a good whack at it with the 3lbs hand sledge. How stuck can it be i thought? Answer: extremely. More torchin! The sum total of evening #1 was; one entire empty can of PB blaster, a very greasy workbench, one half eaten bag of BBQ chips, and 1/2 an inch of spindle pin driven out of ONE knuckle! Holy shit these guys are stuck! Day two started out similarly- Jake back on the torch, one of the knuckles back in the bench vice. Then we had a stroke of genius. I'll give Jake the credit here, super good idea. Probably worth it for the rest of you guys who hate these things to give it a shot. We had already drilled small holes in each end of the pin so the air chisel we were using wouldn't walk around. Then Jakes brilliance stepped in and we ground the protruding end into a square. If I hadn't cut both ends off of the spindle we could have done this without driving lots of spindle out. Anyways, grind down one end into a square shape until you can hammer on a 15mm socket. I used a deep impact socket with a 3/4 drive. Nice and square. Once you have this, I drove on my socket and attached the breaker bar. This let me start to rotate the pin and break what was left of the rust bond. Sequence for me was to spray some penetrating oil one end, rotate the pin with the wrench, then smash on oiled side with the pointy chisel from the air hammer with the 3lbs sledge. Took about 30 minutes of spraying, spinning and smashing to get them out. That was after sitting on the knuckle for 20 minutes with the torch. Lesson of the day here is that i need an Oxy-Acetylene torch rather than MAPP gas! Next week I should be receiving an excellent package from Arizona Z and then I can start chopping up the strut towers to make way for camber plates! If all goes as planned, the car SHOULD key word here being SHOULD be rolling on the ground under its own power end of next weekend!
-
Got a couple things done this weekend/friday, but it was mostly a light weekend. Got out and enjoyed the nice weather (for once no clouds!) and fantasized about driving my datsun! First things first; got the motor running. Its official, no sputtering or stalling! Good solid running. This means I got my 240SX throttle working great and successfully converted over to cable from the linkage throttle! Horray for me right? I also got a few silicone tubes to pipe nice cold air into my AFM. Conveniently enough when using the 240sx throttle, you don't have to run a reducing size tube from the AFM to the throttle body like you do on the stock 280z throttle. Cleans up the joint for sure. Here are some photos of the engine bay for your perusal. Sorry for the lack of photos on the past few posts! Silicone plumbed intake: Even shittier photo quality than usual! boo iphones... Throttle cable brackets and routing. Need to figure out a more elegant way of dealing with the brake booster vac hose! Detail at the firewall where the cable meets the pedal. Drilled out the stock ball stud and replaced it with this one from the Lokar cable. Works pretty well! Got my battery situation sorted out for the time-being too. not the prettiest solution, might have to spring for a battery box, but its held solidly in place! I also got some of my interior shit sorted out. Got REALLY tired of looking at plywood in the back so i tossed this guy in there. really classes up the joint! Also finished FINALLY bolting up the steering wheel. Got the "short hub" powder coated by the same friend who did the intake mani. now i can sit in the car and make race car noises!! Deep dish momo 07 wheel. And finally for the interior, i HAD to hang my skull off the rear view mirror. When i get a hook for the wheel, He will get hung off that, but for now, mirror end it is! My suspension stuff also started to show up on friday with the delivery of my TechnoToyTuning rear control arms. Unfortunately FedEx is apparently run by walking talking man giants who hate all things fun, because when i opened the package i find this! To quote Gabriel from T3 "Yeahhh, your gonna have problems with that!". However, being a super cool dude, he immediately shipped out a replacement arm, which should be here tomorrow! Fingers crossed for a more gentil delivery! Seriously though, 3 hours after speaking on the phone I get a new FedEx tracking number in the mail. I am impressed to say the least! The only bummer part of the weekend was when i hopped in the car and put on my race helmet, I realized that my custom brackets sit up way to high in the car, and I have to hunch my shoulders super hard to keep my head from touching the roof! I think I have a fix, but I feel like i need to finish the suspension and get everything ship-shape before I start chopping the interior up again! Thats it for now, going to be waiting on parts for a week or so (Arizona Z Car will be providing the rest of the suspension), which means I'm gonna try and get as much annoying little shit buttoned up as possible! Clutch bleeding time!
-
Post weekend update! Didn't get much done this week cause of the holiday and I ended up taking a job today (I work freelance so I take the work when it comes!) Did get a lot of sanding and bondo finish work done and then got some paint on the car! Should be getting the rest of the intake piping this week and then the motor can FINALLY get tuned! And if I'm really lucky, the wheels might even show up by the end of the week!
-
Got some time yesterday and sunday to put in some work. Mostly it was on the exterior. Waiting on a couple hoses before i can really turn this beast over for real. Anyways, got my bondo hat on and went after it. Did some work smoothing out the front and rear side marker deletes, door mirror deletes, bumper deletes and cleaning up the side trim. Wish i had a good photo of the car before I pulled the trim off. Living in the PNW there was moss/algae growing on top of the side trim! Front passenger side passenger side trim. Can see where they got lazy and didnt pull the trim off when they resprayed it. I like black more than the caramel color, but its a shame they didnt do it properly. passenger side rear quarter. My room mate and our friend vandalized the bondo dust earlier. Fender flares are on the roof too. Waiting to get the wheels before I fit them though, might have to go with the BAMF Wide ZG flares. Drivers side rear quarter. Complete with circled low spot! Front drivers side fender. Today I'll have some time and can do some finish sanding and glazing putty. Might be covered in spotty primer by the end of the week! \ Ordered a aeromotive fuel pressure regulator that showed up yesterday so i got a chance to install it. Didn't let the thread sealant set long enough though, so it shot gas across my garage. No fun! looks pretty though. Once I am done sanding, grinding and fabing this engine bay is getting a serious deep clean. On a side note I am still thinking about suspension. As it sits looking at the ACZ coilovers, with T3 front and rear control arms with the tension control arms. Anybody have any advice on this? Comments on what I am thinking or other recommendations would be awesome!
-
Yesterday was a load of fun with some not so fun surprises tossed in there. I got my new hood sort of fitted. anybody have tips on how to properly align these? I know doing it in caveman style is wrong, but not sure the correct way! Louverless hood from a '73 240z. Nice and straight with minimal rust. Anybody want to old louvered hood? Then I started to tear into the front suspension. I was planning to just chop the springs and call it a day, but then i got this!! (not sure how to put videos in here so heres the link!) http://www.flickr.com/photos/66695733@N07/7469808964/ http://www.flickr.com/photos/66695733@N07/7469799476/ Needless to say they are trash, and I'm sure the rears are the same. This makes me rethink my strategy, and is making me look into a coilover setup sooner. In the good news though, I am a fuel pressure regulator away from firing up the engine! hopefully she runs better than last time!
-
SO!!!! With all the annoying back story out of the way, here is this week on the car! the manual swap is done, thanks to a AZC lightened flywheel and some other fun toys. No photos of the swap cause I'm lazy! And swapping transmissions isn't exactly exciting. I did get bored one day and decide that i needed to spend money i dont have, which resulted in this... GOLD WRAPPED HARNESS!!!!!!! In the background, you can see the offending cycinders/lack of header oxidation on #1 and #5. The main reason for this most recent teardown! I also did a TON of work on the intake. I found a junkyard '76 with a non EGR intake and decided to shave it. Also started the conversion to an s14 throttle body, for the cleanliness. That and linkage throttle is dumb haha. Got it shaved and welded up and powdercoated. the powdercoating was done by a friend of mine, and while he is a nice guy and didn't charge me for it, it does look now like the intake manifold is made out of clay! High performance ceramic anybody? Oh well, it looks way sicker than the stock cast manifold and there's no fun in being too serious about these things so screw it! You can also see the new fuel rail made by Mr. Pallnet complete with pressure gauge! Very exciting things. I also added a wool sock to the engine bay.... So between the wool sock header and the clay pot intake I'm doing pretty good!! Got a chance to refresh the steering rack bushings and after much torching, the tie rod ends gave it up and those got replaced. Once its running again, might actually have some steering potential!
-
Started to tick stuff off the list, around now. Got the pedals i need for the manual swap from a pick n pull car. that pedal box is a total bitch to pull. luckly somebody already had their way with the steering column and dash so I didnt have to feel bad about getting physical with them. Also had to fab up a new hub to get my steering wheel attached to! apparently even though the parts sheet says it fits, the NRG short hub for the nissan s13/14 doesn't fit in the 280, and its a known issue! not sure why they sold it to me then but oh well. The old steering wheel center will work just fine, even if its not as pretty as the NRG part!
-
The car finally is running, although there is little power, so I'm not totally sure what is up. It did make it to the local Taco shop for a bite. open header dumping under my seat is the loudest thing in the world. exhaust should be on the list soon! Take careful note of the bondo please! need to get a good sander and some finish putty. but I've got other things to worry about at the moment! After popping the hood and some careful observation, the motor looks like its not firing on 1 or 5. checked for spark and it was good, so I'm blaming bad injectors. Solution seems to be a Pallnet fuel rail and reman'd injectors. that will set me back on time, but will let me get after some good side projects on the car, IE cleaning up that ugly manifold and getting parts together to convert to a 5spd.
-
Was still waiting on my electrical parts. The downfall of ordering midweek ends up being a wasted weekend! If only I had ordered sooner!!! Anyway, I thought this would be a good time to move to the exterior of the car and make it look better. Or worse. Well, actually worse.. I don't really like the look of the side markers and decided those were ready to come off, with plates welded in. Never had experience with body sheet metal, but I thought we did pretty well. Couldn't find any magnets to hold the panels in place so we had to do it all sketchy like with painters tape! once you got the corners tacked on it was good to go, but getting there was pretty annoying. This was also when I discovered that the passenger side fender had about 3/8'' thick bondo on the front! at least I could be sloppy with my welds there! While we were borrowing the welder I fab'd up some seat brackets for the new toys i got from ebay. definitely not FIA certified, but they will hold me in the car for sure! Nothing super fancy, these are the canadian bride seats! still have all the right tags, but arn't from Japan. These will probably get replaced pretty soon, once i have enough money not tied up in trying to fix the motor!
-
While waiting for parts, my room mate and I went back to the center of the car and got after it with full force! We had one good night of REALLY cold weather and my room mate and I went after that sound deadening like speed freaks. One marathon night later (special thanks to our girlfriends on this one, since we finished at 3am) and we were left with this: totally stripped interior, ready for wire wheels and paint! I was particularly happy to find almost NO rust in the flor boards. Granted its a 77 not a 71 or 72 but still, I was impressed! Maybe the industrial carpet we ripped out did its job... Anyways, my next day off saw the wire wheel and paint hit the car. I was tired of the shitty interior and needed it to be cleaned up. 8 hours later and I had made quite the impact! Not perfect, but good enough for me!
-
I wasn't sure of the condition of the head, and since the rest of the car looked reasonably untouched, I thought it would be a good idea to have the head redone. One valve grind, decking, bead blast and new (ish) cam later, I was ready to rebuild my motor! Being new to the motor construction game, I managed to find a pretty good book/walkthrough of the process. The only hold up was that damn snapped stud! After a couple shattered easy-outs, much whining and frustration, I consumed a beer, sacked up and drilled that bastard into oblivion. Another beer and some more found testicular fortitude, I began re-tapping the hole to the original bolt size. Finally got all the threads tapped and test fit the head. The previous owner drilling off center definitely hosed me, but I was able to save it. Not a perfect fit but its close enough. When I threaded the bolt in, its a little tight, but it goes all the way down! Totally psyched and now I can move on and get this thing running! Shiny new head on the block. Bought a whole mess of parts from MSA to make the install go smoothly. Figured if I had everything i needed the install would go a bit smoother! Made me over buy, got a few things I didn't need, due to ignorance, and missed a few things, but it started going back together all the same! Repainted the valve cover, timing cover and all the coolant housing things. New shiny waterpump here as well! Got a little excited and put the new header on. The exhaust manifold wasn't fun to get off and I didn't plan to do it again soon, so why not? should make for a good sound right? Anyways, after a couple late night and lots of internet, I finally got it all back together. I was still missing a couple key parts for the electrical system so i couldn't start it up but I was close!
-
After looking at the car, the body was in reasonable shape and things looks about right for a car this old. Wasn't running when I picked it up, but the previous owner assured me that he had "hit 120 on the freeway a month ago!". Sure buddy... Anyways, he pulled the head to get a new cam installed and never did it. Thats where our story really begins. Luckily some of my friends had a big ol' truck and the came to the rescue of getting the car home. This is how she looked getting into my driveway! Not too bad, but the rain and my giddy school-girl like excitement hid from me the extent of this project! We got it in the garage and discovered immediately that one reason that the guy wasn't eager to rebuild the engine was the presence of an ugly snapped head bolt, just below the surface of the block. It appeared that he had tried to drill it, very much off center, but gave up. Undeterred, my buddies and I proceeded to rip out every last piece of the gross interior. Funny thing about pulling an interior out is that no matter how gross it was before, you inevitably make it look 1000% worse initially. Gutted interior here. Pulled out the rotting seats and carpet. Somewhere along the line the car had been resprayed black inside and out. And by inside, i mean all the interior plastics had been sprayed where they were. Looked like shit and was flaking paint all over the place so it HAD to go. Steering wheel was rotten too, need to fix that! And note the other MAJOR issue with the car here, in the form of two pedals. Not so hot! Starting to clear off the sound deadening. My slight OCD was making me go crazy before i started this! I had never done this kind of thing and was loving it sofar, but the monotonus nature of chiseling sound deadening was sapping my motivation. With real issues up front, I decided to turn my attention towards the front of the car.
-
First post to introduce myself! My names Ben and I've owned my Z since March 2012. Originally I was going to make it into a cool beach cruiser, but that dream quickly fell by the wayside, and a hardcore auto-x car began to emerge. Back in those early days I didn't have a great overall vision, but I managed to not make too many mistakes! I have had this build over on Ratsun for the past few years, but think you guys would probably appreciate it more at this point. I was going to try and edit these more, but the original text gives you a good sense of what's going on in my head at the time. But first, we have to go back! to the wet cold months of 2012, Enjoy!
-
So I am going to bump this from oblivion with what I hope to be a relevant update! I'd say this is the ultimate non-conventional diff option. https://www.sikky.com/view_item.php?id=203&catid=14 Gives me some ideas too about how to adapt a winters QC into the Z cars, and making a mustache bar that would support the whole thing. Hope this is seen in the spirit of the thread, rather than poking a dinosaur. Cheers!
-
 Post weekend update! First weekend racing with the new setup, and I'm impressed. The kit is awesome for sure, and I my math was in the ballpark for the master cylinders. If you are going to go through the effort of installing disk brakes, I HIGHLY recommend a dual master setup. These pedal boxes are fairly conducive to the needed modifications, and several users here have already made parts/modified their boxes. Parts I used, Wilwood Balance bar 340-1757, a 3/4" and 7/8" masters 260-3374 and 260-3376 respectively and the remote adjuster, cause I could! (340-4990). Wilwood does a really nice job providing all the measurements/drawings for their products, so all that is really required is some figuring on the bias bar! I moved the center pivot point on the pedal up 1/2" to get a better motion ratio on the pedal. That is to say, longer throw, but more pressure! The bias bar extends through the pedal box, so you need to cut the sides out. This was a little trial and error for me, figureing out where it was binding or not. I used a hole saw to make each end, and then connected them with an angle grinder. I should have made the cutout follow a more angled path, so the hole isn't as pretty as it could be. After the cutouts were made, I drilled the holes for the masters (another hole saw) and welded some bolts onto the backside, and then drilled the firewall for to accept some the new studs! I also had to measure and add some additional thrust washers on either side of the balance bar. Its important to keep everything even on the bar so its easy to adjust. The thrust washers keep everything aligned and free of binding. I decided to keep the setup fully bolted together and go into the car as a unit. Got everything in (had to make a larger hole, again, more hole saw!) and then bolted up the clutch master. Mounted up the remote masters and a local hydraulic shop got my lines sorted out. Bleeding Wilwood calipers is a little weird since they have 4 bleed screws. The top two are the ones that matter, outer screw first then the inner. Always bleed a new master cylinder first! Once it was in the car, I had to fiddle with the bias bar. In the neutral position, the ratio is VERY rear heavy. I fiddled with it for a bit and got it just about perfect! Hooked up the adjuster knob and project done! Final thoughts on the kit. Very good performance, ratio of front to back grab is great. The BP-10 pads have a very predictable grab characteristic and stop quickly without being too wild. Compared to stock pedal feel, the transition is very good and feedback is great even at the limit. The whole kit is easily installed and well thought out. Its a great setup for sure! Nice and light, and after messing with them this weekend, PLENTY of stopping power.
 -
Decided to start with the BP-10's, since they are billed as a low heat threshold pad, and are in theory less aggressive on initial bite. Will see how they work, excited to try out some other compounds once I get this setup dialed in. Ebrake is gone! But, my garage is pretty level, and I usually leave it in gear when parked anyways. Not a street driven car anymore so I was fine loosing that functionality. I'll update with if that was a smart move or not!
-
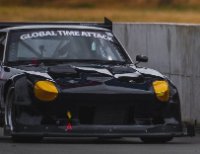
Hey HybridZ crew! So I finally decided that after upgrading nearly every other component on the chassis of my Datsun, and a couple really lack luster performances, it was time to do the brakes! I was suitably frustrated with their lack of grab that I started to look into other options. Since this is primarily an auto-x car, I wasn't too concerned with heat dissipation and brake fade like on a serious wheel to wheel machine, and I was more concerned with keeping my weight down. Here's the car, zooming around at Nissanfest this year at Evergreen Speedway. With those factors in mine I went shopping and settled on the Silvermine Motors "Small" wilwood kit. It has the forged 4 piston Dynalite calipers up front and the billet 2 piston dynalite in the rear and traditional drilled and slotted rotors, rather than 2 piece rotors The kit also comes with all the lines needed to connect to the factory fittings. It even has the little retaining clips that always shoot off and get lost under work benches when you pull the stock lines! Edan at Silvermine was excellent to work with and guided me in the right direction on a couple things. Fastest shipping I've ever had on a part. Think he put them in the mail Thursday afternoon, and I had them in my hands on a Monday! Boxes contents all laid out! Well packaged, and everything in its place! Comes with some awesome 10.9 grade hardware, the only bolts you reuse are the front brake caliper bolts, which hold on the new brackets. Really well made and well thought out kit. The rear install is a breeze, once the drum backing plates are out of the way, and the ebrake cables are gone! Hey, its dead weight right? Since the Silvermine kit uses a 3 bolt rear bracket, I didn't need to pull the whole rear assembly apart, so I just turned the rear drum plates into pizzas! Just cut to the bolt holes and then flex them a few times, and they snap right out. The whole rear install probably took about 40 minutes start to finish. For my method, you don't need any really crazy tools or huge breaker bars, just a reasonable quality angle grinder! You could absolutely take the stub axles out (and it would be a perfect time to do rear wheel bearings) if you wanted to keep sparks to a minimum. Part of me wanted thought to see if it was possible without removing the axles, which makes this job MUCH less of an endeavor. The caliper mounts at the 10 o'clock position, keeping its minimal weight inside the axle line of the car. The front kit goes on super nicely. Remove and save the caliper bolts, and then remove the hub/rotor assembly. Why Datsun did it this way is a mystery to me, but oh well. I wire wheeled the mounting surface on the hub and the rotor, as well as chamfered the mounting edge of the bore on the rotor to ensure a solid mount. Bolt the hub back together and then put your new rotor on! Bleed and you're done! Overall impressions, these were really well made, I give them 2 wrenches out of 5 for installing. Depending on how you decide to remove your drum backing plates, it goes up to a 3 or 4 out of 5, particularly for a new to Datsun mechanic. I'm racing the car this weekend, so hopefully I'll have developed an opinion about the brakes this time next week!
-
WTB 77-78 280Z Partial or Complete Matching Lock Set
Ben280 replied to osirus9's topic in Parts Wanted
PM'd! -
I have a full set, all work well, and have good action. They are from a '77 280. The drivers side has a little trouble locking, but will unlock just fine. I use the lock with button and close with the handle up method. Ignition is excellent. PM if you are interested/in need!
-
Here is a basic kit for these from my favorite supplier. https://www.pegasusautoracing.com/productdetails.asp?RecID=6208 Fairly expensive, and you have to think about how you plan to attach them. A caged car and this is no problem, anything else and it might be interesting. I imagine they are really only useful for quick suspension adjustments or swapping tires, but sounds like that is your stated usage. Their bottles are large because its more cost effective to buy large bottles, and if you are charging the system multiple times a day, you probably go through that quantity of gas.
-
I got you on the turn signals! Send me a PM.