74_5.0L_Z
-
Posts
1194 -
Joined
-
Last visited
-
Days Won
30
Content Type
Profiles
Forums
Blogs
Events
Gallery
Downloads
Store
Everything posted by 74_5.0L_Z
-

Pic of my custom rear strut bar
74_5.0L_Z replied to Jersey's topic in Brakes, Wheels, Suspension and Chassis
How's this for a rear strut bar? -
I have the stock 260Z master cylinder (15/16" I believe) with the following brakes: front Outlaw 2800 calipers with (4) 1.75" pistons 11.75 " x 0.81" rotors rear Outlaw 2800 calipers with (4) 1.38" pistons 10.75" x 0.81" rotors Hawk HP plus pads Wilwood proportioning valve I run this set-up with NO booster, and my brakes work very well. The modulation is very good, and the pedal effort is moderate. If you use a large bore master cylinder then you had better run a booster or the pedal effort will be very high. Larger master cylinders require greater the pedal effort but less pedal movement. Smaller master cylinders require less effort but more pedal displacement. Either way the work required is the same W=F*x W is work F is pedal force x is pedal displacement
-
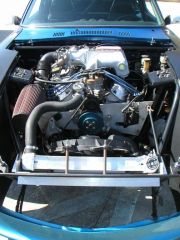
I have a 1989 5.0L in my 260Z. The motor was completely stock when I originally install it five years ago. In stock form, the motor would rev to the 6250 computer enforced redline, but power pretty much signed off at 5800. Now the motor has Edelbrock aluminum heads, crower 15511 hydraulic roller cam, FMS 1.72 roller rocker arms, Cobra intake on the original stock bottom end. In this configuration, the car pulls very strong all the way to the 6250 rev limiter. In first gear, you rev so fast that it is hard to shift fast enough to stay off the rev limiter. I have put several thousand miles on this motor and bounce off the rev limiter countless times without any problems. The main impediments to revving the 5.0L are the computer (6250 rpms), and the mass of the hydraulic roller lifters. The computer is an easy fix, but the hydraulic roller lifters are a little more difficult. The hydraulic roller lifters are heavy and start to bounce after a certain rpm. I have heard that this occurs around 6500. To a certain degree, this can be controlled by installing better valve springs but if you install too stiff a valve spring on a hydraulic lifter, it will collapse. Some people are exceeding 7500 with the hydraulic roller lifters with the right combination of cam and springs. Anderson Ford Motorsports boasts that their cams and valve train can do this. I have considered installing a chip to raise my rev limit, but have decided to wait until I can build a new bottom end and switch to a solid roller cam. As an aside, my best friend and I run a NHRA Super stock Comet with a 289. That engine with a stock crank, stock rods, stock block (filled mexican 302), solid roller cam and Jesel valve train sees 8200 rpm every pass. There are others in the class that are twisting the 289 well past 9000 rpms.
-
1974 260Z 1989 5.0L Mustang engine Edelbrock aluminum heads Cobra intake aluminum radiator half cage/ tubular front end/ subframe no carpet, no under coat, no sound deadener 16 x 8 inch centerlines with 245/45/16 HoosierA3S04 tires stock seats, full doors, all glass 16 gallons of fuel Me (190 lbs) 2716 total (53.6% r/46.4% f)
-
I use the Moroso filler neck without any problems
-
Thanks, I knew you were the one to ask.
-
Grumpyvette, I currently have dynomax block hugger headers, dual 2.5" exhaust, 2 two chamber Flowmaster mufflers, and H pipe on my 5.0L powered 260Z. I like the sound and I get a lot of compliments, but I want something a little better than the Block huggers, a little lighter than the flowmasters, and something more unique. My engine is mounted using a front plate / mid-plate set-up, and I have the late model rear sump pan. The engine configuration opens up a ton of space below the motor ahead of the rear sump. The engine currently displaces 302 c.i, but I plan to build a 331 stroker. The heads are Edelbrock Performer RPM, the intake is an Edelbrock Performer RPM with 30# injectors. The cam is a Crower 15511 hydraulic roller with 1.72 roller rockers. I plan to build the new motor with 10.5:1 compression, and want a usable 7000 rpm (I may change the cam to a solid roller). The car is used mostly for autocross and some track days. Here is what I want to do: I want to build some custom 180 degree headers such that the center two tubes from each bank cross under the oil pan and go into the opposite side collector. I plan to have the collectors mounted at an angle behind the front tires such that they exit the from the fender midway between the wheel opening and the door. From the collector exit they will run parallel to the rocker panel(higher than the plane of the floor) and dump outward and down in front of the rear tire. My questions are these: First, what size primary tube would you use (packaging will probably limit my minimum length to 36")? Second, what size collector (length and diameter)? Third, what would be the lightest/smallest muffler that will pass SCCA sound allowance (90dB at 50' I think). Thanks,Dan McGrath
-
Damn!!!!!!!!!!!!!!!!!!!!!!! An SFI scattershield just moved to the top of my priority list.
-
Subframe conectors, what kind of steel?
74_5.0L_Z replied to a topic in Brakes, Wheels, Suspension and Chassis
I used 2.5" x 0.085 wall square mild steel tubing for my subframe. The cage tubing interior to the car is 1.625 x 0.120 wall 4130 steel, the hoop at the firewall is 1.625 x 0.083 4130, and all of the tubing forward of that is 1.625 x 0.065 4130 steel. -
If you are talking about symbol that looks like this: --)|-- (only with an arrow through it), then it is an adjustable capacitor. Without the arrow, it is just a capacitor. The one above it is a three position switch
-
Custom adjustable t/c rods please critique
74_5.0L_Z replied to 240hoke's topic in Brakes, Wheels, Suspension and Chassis
Jolane is correct. You have one too many degrees of freedom in your set-up. What you can do is cut the stock tension compression rods down and keep just the ends that bolts to the control arms. Cut them so that you have about 6" of rod after the bend, and have the 5/8-18 threads turned on the rods. Then of course you will need two new (5/8-18 tube adapters). Bolt the ends in the stock location, and thread them into your tubes. -
Thanks for the praises of my work. It means a bunch after all the time and money involved. I use the stock rack and pinion and stock front crossmember(with the LCA mod). The suspension mounting points are the same as stock except for the following: The top of the front strut towers have been moved aft by 3/4" to increase caster. The angle of the strut tower top has been increase from 13.75 degrees to 15 degrees. The T/C rod pivot at the body has been moved upwards 3/4" and out 1/4". The drawing of the main hoop is the exact drawing that mine was made from. It fits VERY, VERY tight. One thing that is not shown on the drawing is the angle cut on the bottom. My bar is installed leaning back 10 degrees, so the bottom of the main hoop has a 10 degree cut to match.
-
I have several pictures of the car in my member's gallery. http://album.hybridz.org/showgallery.php?cat=500&ppuser=7833 and a couple in my garage http://forums.hybridz.org/vbgarage.php?do=view&id=7833
-
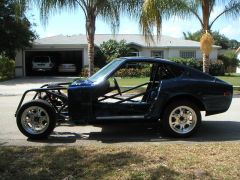 Just back from the welder
 -
I am in the process of putting the Subtle Z fiberglass fenders and quarters on my car. After that is complete, I am planning to buy some wider wheels to try and take advantage of the extra space. Unfortunately, all the wheels these days seem to be 7" wide or 20" in diameter. My old wheels are 15 x 8 and 16 x8 and have 245/45/16 tires mounted on them. I would like to find some 15 or 16 inch wheels that are nine to ten inches wide and decently light so that I can use 275/45/16 tires. So far the only decent option that I have found are Real Racing wheels (wide 5 with an adapter). Any suggestions?
-
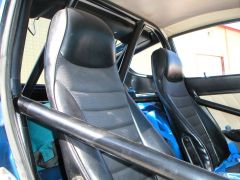 Cage with interior installed
 -
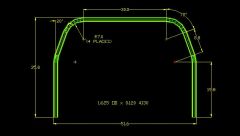 These are the dimension of my main hoop. I sent this drawing to the chassis shop and they bent it perfectly. This roll bar fits very tightly, and requires trimming the interior plastic.
 -
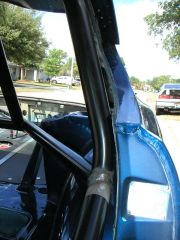 I couldn't fit a credit card between the B pillar and main hoop after it was installed.
 -
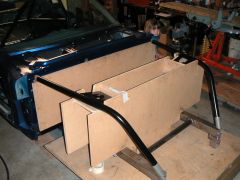 The fixture was constructed used 3/4" MDF
 -
At what torque level is frame stiffening needed
74_5.0L_Z replied to a topic in Brakes, Wheels, Suspension and Chassis
I can easily fit a strut bar because the distributor cap is behind the centerline of the strut towers. I can fit it either between the intake and distributor or between the distributor and water neck. When I still had the stock strut towers, I ran a strut tower brace between the intake and distributor. I don't use a strut tower brace now because I don't need it. The engine plate ties the two strut towers together. -
looking 4 an old tread
74_5.0L_Z replied to datsun327's topic in Brakes, Wheels, Suspension and Chassis
Try this thread: http://forums.hybridz.org/showthread.php?t=75481&highlight=angle -
If you would have searched this forum using "Best 5.0L" you would have come across the following thread that offers very well thought out and thorough answers: http://forums.hybridz.org/showthread.php?t=75349&highlight=5.0L It's amazing what you can find here using the search function. There are very thorough post regarding just about any topic that you can think up. So, if you have a question, please start by using the seach function. Also, I have seen the upper intake reversed(stock intake). I considered doing just that but decided against it. Dan McGrath
-
I too am interested in this subject. I currently have the RCI polyurethane cell (16 gallons), and unless I keep it nearly full, I have fuel starvation problems. Several ideas have occured to me: First, simply replace the "cheap" RCI cell with a good ATL of Fuel safe unit that was designed for road racing. ($500 - $1000) Second, modify my current cell to a accept ATLs "Black Box" sump and pump combination. (~400.00). Design and build my own tank (aluminum) that has walls similar to those that Terry described (~400.00 in materials and labor). Jolane had the following concern: "My concern though was refilling the walled area. If the car was to be in a turn for a decent amount of time, will the walled area become completely drained?" Most fuel injection systems use a pump that flows more fuel than the engine uses. The extra fuel is returned to the fuel tank. This fuel can be directed into the boxed area to help keep it replenished.
-
At what torque level is frame stiffening needed
74_5.0L_Z replied to a topic in Brakes, Wheels, Suspension and Chassis
For rotational forces, it gets more difficult. Ideally, you would want to run a "Petty Bar" that runs diagonally across the passenger compartment (from the driver's side strut tower to the front of the passenger side rocker panel). Unfortunately, this isn't a good solution for a street or dual purpose car. My car is now primarily an autocross car, but I still like to drive it occasionally. The chassis in my car was completely rebuilt after I wrecked the front end so my solution is a little extreme. I built a tubular front end, installed a square tubing frame, and mounted the engine using plates that tie the strut towers together. -