74_5.0L_Z
-
Posts
1194 -
Joined
-
Last visited
-
Days Won
30
Content Type
Profiles
Forums
Blogs
Events
Gallery
Downloads
Store
Everything posted by 74_5.0L_Z
-
Here's how I tied my cage to the rear struts.
-

Chromoloy Adjustable Rear Control Arms
74_5.0L_Z replied to 74_5.0L_Z's topic in Brakes, Wheels, Suspension and Chassis
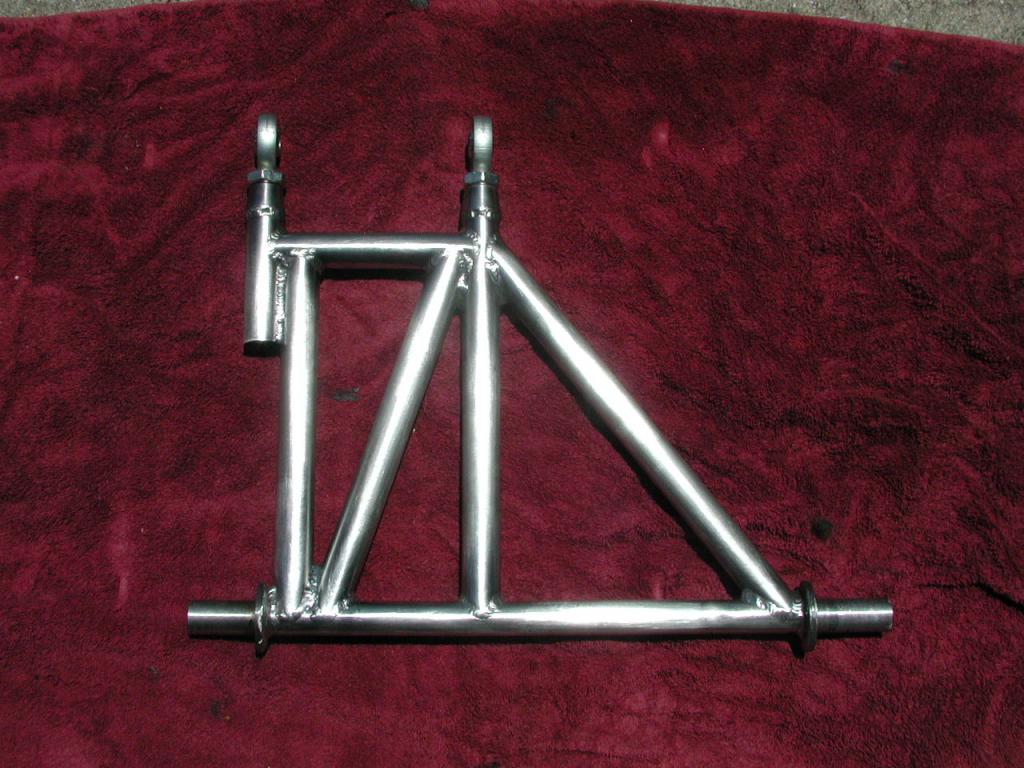
I got the control arms welded thursday, and I am very happy with the way they came out. I spent Saturday morning cleaning off the remainder of the mill scale from the cromoloy and getting them ready to paint and install. After I finished sanding, I had some doubts about whether to paint them of just clear coat. Rick Bowers(speeder) was nice enough to come by to take a look and to take a few pictures. Tell me what you think. The control arms have since been painted black and installed. I'll test drive them sometime next week. I am considering forming an LLC to sell these if there is interest. NOTE: Edited because links to old pictures were broken.
-
What's an Average Price for a 5.0L?
74_5.0L_Z replied to Kevin Shasteen's topic in Ford V8Z Tech Board
I paid $1200.00 US for my 1989 5.0L, wiring, computer, and T5 transmission. (all from a 1989 5.0L mustang police car). When I was shopping around, the price varied from $1200.00 to $2700.00. I found that the price was highly dependent on local economics: in metropolitan areas, the price was higher than in rural areas. One thing that makes the 5.0L HO attractive is that you can install it stock, and have a fast ride while working the bugs out of the car. I did just that, and upgraded the suspension and brakes while the 5.0L was stock. The stock 5.0L HO was good for 13.70's at the quarter mile, where as the other available stock 5.0s would only be good for 15s. I am still running the stock bottom end of my 5.0, but have added the following components over the last three years: Edelbrock Performer 5.0 heads Ford motorsports 1.72:1 roller rockers Crower 15511 cam Ford Motorsports 24# injectors C&L 73mm MAF Edelbrock/BBK 70mm TB Cobra Intake With these parts, the car now runs 12.40's at 113 mph. Next, I plan to build either a long rod 306 or 331 bottom end. -
I saw some values of damping coefficients being discussed here: http://www.eng-tips.com/gviewthread.cfm/pid/800/qid/82047
-
Chromoloy Adjustable Rear Control Arms
74_5.0L_Z replied to 74_5.0L_Z's topic in Brakes, Wheels, Suspension and Chassis
Thanks Mike, The issue that you have encountered, as well as marginal profits that are to be had from making these parts (compared to the amount of work that goes into making them) has me wondering if it's worth the effort. My set is essentially complete (less welding). After some time has elapsed, I may offer them to others. If I do offer them, it will be as a company, and the control arms will be designated race only. In any case, I'll post pictures when they're available. -
Chromoloy Adjustable Rear Control Arms
74_5.0L_Z replied to 74_5.0L_Z's topic in Brakes, Wheels, Suspension and Chassis
The intended purpose of these is for racing applications with limited street use. I made these for myself because the primary purpose of the car is more and more race oriented, and because I have not had the best of luck with the adjustable aluminum delrin bushings offered by some of the aftermarket. They are a pain to adjust, and after less than a year, one of the holes in bushing became elongated enough to cause slop in the rear suspenison and an annoying thud every I hit a bump. The analysis I ran was very conservative for static loads. I assumed 2500 lbs simultaneously in the lateral and longitudinal directions. I have yet to do a fatigue analysis. I am working on Pro-E model, and later perhaps a Catia FEA analysis as time on my lunch hour permits. Regardless, I plan to test them on my car first. -
Chromoloy Adjustable Rear Control Arms
74_5.0L_Z replied to 74_5.0L_Z's topic in Brakes, Wheels, Suspension and Chassis
I will post pictures as soon as I have some(next week). I was supposed to get them welded on Saturday, but the guy who does my welding was ill(aircraft certified welder who does welding on space shuttle and space station components at KSC). I performed a quick and dirty stress analysis just based on statics and strength of materials. Based on this analysis these control arms have at least a factor of safety of 4. Still, real life doesn't look at the equations, so I plan to install them on my car and run a few autocross events and a track day before making them available. Speeder, do you have access to some strain rosettes? Maybe we could instrument the tubing to get some data. -
I just finished making some Chromoloy Adjustable rear control arms. They are a direct bolt-in replacement for the stock control arms and feature Aurora XAM10T rod ends. The complete control arm(rod ends included) weighs in at 6 pounds. The factory control arms weigh 10 lbs. In the process of building my control arms, I fabricated a fixture so that I can build more if I desire. Is anyone interested in purchasing control arm sets if I decide to make them? I will post pictures and a price soon.
-
I tried the Corbeau Forza, and didn't like it. The seat positioned me too high, and my helmet hit the roof. I am only 6'0", but I am very long in the torso. I sent it back and got a kirkey intermediate. For daily driving, I use stock 280Z seats. For autocross, I install the kirkey.
-
It was many years fom the time that I started wanting a fast, cool car to the time that I actually got one. I tried when I was younger to build / restore a 1965 Mustang Fastback on minimum wage($3.35/hr at the time). After about a year I realized that car restoration/modification takes money. In college, I worked as a mover and I drove a stock 1974 260Z that I kept running using a myriad of junkyard parts. I purchased the car for $800.00 did a cheap driveway paint job, swapped in SUs from an early 240Z, and the shortblock from a 280Z, went through three transmissions. I was at this point making about $10.00/hr and supporting myself and paying for college. I still had very little money for cars though I really enjoyed my old Z and building it using junkyard parts. By the time I graduated, the old Z was dying of cancer (rust), and I was ready to build a real car. I search and found a 1974 260Z with no rust, and promptly built my dream V8 260Z. I am an engineer and can finally halfway afford to play. What is my point? Start small. Learn on a stock Z if you want to play. My old Junkyard dog from college ran 14.9 second quarter miles, and was a blast to drive. They are great car to learn to work on. They are very simple and easy to work on. Go to college, and then delve into the expensive part of this hobby. By the way, when the time comes to get a Z make certain that the car is rust-free. You will be dollars ahead if you spend the extra time and money to get a rust-free car. Good luck, Dan McGrath
-
The engine is installed at a 2.5 degree angle relative to the frame rails. The adverse effects of lowering the crossmember are minimal. My holes for the inner control arm pivot points have been raised 3/4" and moved outboard 1/8", and bump steer has been virtually eliminated. The rack moves with the crossmember, therefore lowering the crossmember has no affect on bumpsteer. The only downside that I can see is a slight decrease in control arm angle which will change the point at which the front suspension stops gaining negative camber in bump and starts losing camber. (By the way, if you do the geometry you will see that the front suspension continues to negative gain for over an inch below the point where the control arm is horizontal.
-
I have had the motor mounted in two ways (both of my own design). I've built the same car twice. The first time as a primarily street car, and the second as primarily an auto-cross car. I wrecked the car in between. The first iteration of the car used the late model 5.0L mustang rubber mounts and steel body mounts of my own design. The steel mounts were on 3/16" plate sandwiched between the frame rails and front crossmember. The plates were reused after the accident to mount the crossmember to the new frame(shown in the links below). http://hybridz.org/nuke/modules.php?op=modload&name=coppermine&file=displayimage&album=topn&cat=0&pos=3 http://hybridz.org/nuke/modules.php?op=modload&name=coppermine&file=displayimage&pos=-466 In the second iteration of the car, the boxes have been removed, and the motor is now mounted on motorplates similar to Terry Oxendales car. The motor position has not changed from the first iteration. I don't have any electronic pictures of the new installation. There were some floating around that were taken at the SEZ3 event at Reynolds last September. P.S I laid a straight edge on the flat section on the bottom of the front crossmember, and extended it back to the pan. The bottom of the pan is ~1/2" below the bottom of the crossmember. To get the motor this low and still get clearance, the motor has to be mounted at a 2.5 degree angle like mine. Also remember that my crossmember has been spaced downward by 3/16".
-
The 5.0L engine in mine is mounted as follows: The harmonic balancer is ~1" above the steering rack. The front sump of the pan just barely squeezes behind the crossmember. The motor is centered left to right between the frame rails. The motor is angled 2.5 degrees down in the back. (The back of the differential has been raised to match. Yes, it is a pain to get the bellhousing off. I have to remove the transmission first (T5). Then I loosen all the bellhousing bolts, and remove the ones that clear the fire wall. Then I pull the bellhousing off the guidepins and rotate it 90 degrees clockwise to remove. It is a pain but worth it. Here are links showing the installed engine position http://hybridz.org/nuke/modules.php?op=modload&name=coppermine&file=displayimage&pos=-465
-
When I first adjusted the bias in my car, I adjusted the brakes so that all four wheels locked at about the same time (on flat pavement). A couple of days later, I was coming off the interstate, and down an off-ramp when I applied the brakes kind of hard. The car tried to swap ends. I suggest that you find the point where all four wheels lock on flat pavement, and then reduce the pressure to the back (just a little). Next, I would find a down hill section of road and carefully test the brakes for proper lockup. If the rear brakes lock first , the car will spin.
-
I have Mike Gibson's(member name scca) Stage II brakes on the front: 11.75" x 0.081 Coleman machine vented rotors Outlaw 2800 series 4 piston calipers (1.75" pistons) Hawk HB237 HP-plus pads On the rear, I have 1985 modified maxima rotors (10.75" x 0.81) Outlaw 2800 series 4 piston calipers (1.38" pistons) Hawk HB237 HP-plus pads I also have a cockpit mounted brake proportioning valve (wilwood) The proportioning valve is in the line to the rear of the car and is set at near full reduction in pressure(50% I believe). I have the same size tire at all four corners(245/45/16), 51% of the weight on the rear, and the brake balance is perfect. I think that 1.38" pistons will be perfect if you are set up similar to me.
-
He's right. The check valve is in backwards.
-
Another Half Cage (pics link)
74_5.0L_Z replied to 260DET's topic in Brakes, Wheels, Suspension and Chassis
I love looking at the different solutions that our members come up with regarding cages (or half-cages). I really like the way you provided tabs to attach the roll bar to the B-pillar, and the attachment on top of the driveshaft tunnel. My version is shown below: http://album.hybridz.org/showgallery.php?cat=500&ppuser=7833 -
Be careful here. The 93 5.0L has a hydraulic roller cam and requires a special gear on the distributor. I would give the people at MSD a call. They make some sweet Billet distributers, and they are reasonably priced. I am using the billet distributor that they make for the fuel injected 5.0 in my car and couldn't be happier with the quality. MSDs tech line is 915.855.7123
-
The entire chassis (cage sub-frame and front end) cost the following: Tubing (4130N) from ChassisShop 552 inches of 0.120 wall x 1.625 270.00 240 inches of 0.083 wall x 1.625 72.00 60 inches of 0.083 wall x 1.625 22.20 432 inches of 0.065 wall x 1.625 120.96 6 bends (4 in main hoop 2 in front legs) 140.00 24 ft of 2.5 x 2.5 x0.085 wall mild steel square tubing from Coleman racing ~80.00 ~100 hrs of autocad time trying to design the whole thing (Free) ~350.00 of TIG welding (welding done by a friend so I got off cheep) ~100- 200 hours cutting and fitting tubes using a tube notcher and mitre saw. Removing undercoating, soundproofing, building a wooden fixture (yes wooden 2 x 12 and 3/4" MDF), painting the interior and firewall, etc... many hours The looks you get when people check out the finished product.....PRICELESS
-
Here are some pictures of my cage/chassis (maybe its a roll bar with a lot of forward supports). http://hybridz.org/nuke/modules.php?op=modload&name=coppermine&file=displayimage&album=lastup&cat=0&pos=2 http://hybridz.org/nuke/modules.php?op=modload&name=coppermine&file=displayimage&album=1&pos=4 http://hybridz.org/nuke/modules.php?op=modload&name=coppermine&file=displayimage&album=3&cat=0&pos=4
-
Hey Mr. Gibson, Welcome back. We haven't heard from you in a while. Still racing?
-
So, how are my cars running (pics of spark plugs)
74_5.0L_Z replied to jmead's topic in Trouble Shooting / General Engine
Its been a while since I've adjusted the SUs (Mine has had a fuel injected 5.0L for 4 years). But to fix the top plugs, I'd lean the SUs out and balance them. Do you have a Unisyn tool? If not then get one. Do you know how to adjust the SUs and balance them? How many turn out are the big adjusters on the bottom of the carbs? What fluid are you running in the dampers? What needles are installed? As a base line, I always run the bottom adjuster all the way in then backed them out 1.5 turns. -
I was wondering.... Are both ends of the new CV axle able to change length? I ask this question because the old outer was fixed in length and the old inner could telescope to compensate for changes in length. If both ends of the new CV axle are free to telescope you may have a problem. You will have added an additional degree of freedom to the axle without adding an additional constraint. This will cause the position of the axle to be indeterminate, and may lead to vibration.
-
Anyone Running this wheel/tire setup?
74_5.0L_Z replied to z-ya's topic in Brakes, Wheels, Suspension and Chassis
I am running 245/45/16 tires on the back of mine (kumho victoracer V700) on centerline 16 x 8 wheels and 5" back space without any problems. I have the Ground-Control coil-overs on all 4 corners. I have also run 245/50/15 Dunlop SP8000 on the rear with no problem. The 16" wheels give better clearance than the 15" wheels. -
1974 260Z 2.5" square tube frame full cage with tubular front end (replaced after an accident) 1989 5.0L and T5 transmisssion Edelbrock Performer Heads Crower 15511 Hydraulic Roller Cam Ford Motorsports 1.72 roller rockers C&L 73mm MAF BBK 65mm TB Ford Motorsports 24# injectors Cobra Intake Bottom end stock w/ 200K miles 11.75" vented rotor and 4 piston Outlaw caliper on front 10.75" vented rotors and 4 piston Outlaw calipers on rear Ground Control coilovers (250#/in on rear 200#/in on front) Suspension Tecniques 1" front anti-roll bar 2700 # with fuel and driver 12.42 @ 113 mph in autocross trim