
74_5.0L_Z
-
Posts
1204 -
Joined
-
Last visited
-
Days Won
34
Content Type
Profiles
Forums
Blogs
Events
Gallery
Downloads
Store
Everything posted by 74_5.0L_Z
-
 Just back from the welder
 -
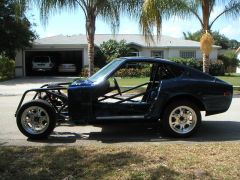
 I am in the process of putting the Subtle Z fiberglass fenders and quarters on my car. After that is complete, I am planning to buy some wider wheels to try and take advantage of the extra space. Unfortunately, all the wheels these days seem to be 7" wide or 20" in diameter. My old wheels are 15 x 8 and 16 x8 and have 245/45/16 tires mounted on them. I would like to find some 15 or 16 inch wheels that are nine to ten inches wide and decently light so that I can use 275/45/16 tires. So far the only decent option that I have found are Real Racing wheels (wide 5 with an adapter). Any suggestions?
 -
 Cage with interior installed
 -
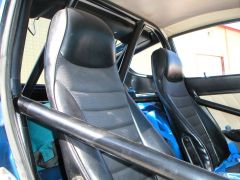
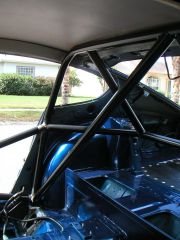
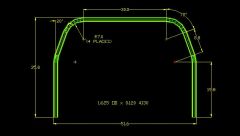 These are the dimension of my main hoop. I sent this drawing to the chassis shop and they bent it perfectly. This roll bar fits very tightly, and requires trimming the interior plastic.
 -
 I couldn't fit a credit card between the B pillar and main hoop after it was installed.
 -
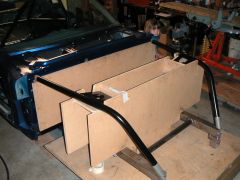 The fixture was constructed used 3/4" MDF
 -
At what torque level is frame stiffening needed
74_5.0L_Z replied to a topic in Brakes, Wheels, Suspension and Chassis
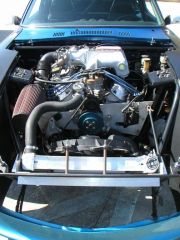
I can easily fit a strut bar because the distributor cap is behind the centerline of the strut towers. I can fit it either between the intake and distributor or between the distributor and water neck. When I still had the stock strut towers, I ran a strut tower brace between the intake and distributor. I don't use a strut tower brace now because I don't need it. The engine plate ties the two strut towers together. -
looking 4 an old tread
74_5.0L_Z replied to datsun327's topic in Brakes, Wheels, Suspension and Chassis
Try this thread: http://forums.hybridz.org/showthread.php?t=75481&highlight=angle -
If you would have searched this forum using "Best 5.0L" you would have come across the following thread that offers very well thought out and thorough answers: http://forums.hybridz.org/showthread.php?t=75349&highlight=5.0L It's amazing what you can find here using the search function. There are very thorough post regarding just about any topic that you can think up. So, if you have a question, please start by using the seach function. Also, I have seen the upper intake reversed(stock intake). I considered doing just that but decided against it. Dan McGrath
-
I too am interested in this subject. I currently have the RCI polyurethane cell (16 gallons), and unless I keep it nearly full, I have fuel starvation problems. Several ideas have occured to me: First, simply replace the "cheap" RCI cell with a good ATL of Fuel safe unit that was designed for road racing. ($500 - $1000) Second, modify my current cell to a accept ATLs "Black Box" sump and pump combination. (~400.00). Design and build my own tank (aluminum) that has walls similar to those that Terry described (~400.00 in materials and labor). Jolane had the following concern: "My concern though was refilling the walled area. If the car was to be in a turn for a decent amount of time, will the walled area become completely drained?" Most fuel injection systems use a pump that flows more fuel than the engine uses. The extra fuel is returned to the fuel tank. This fuel can be directed into the boxed area to help keep it replenished.
-
At what torque level is frame stiffening needed
74_5.0L_Z replied to a topic in Brakes, Wheels, Suspension and Chassis
For rotational forces, it gets more difficult. Ideally, you would want to run a "Petty Bar" that runs diagonally across the passenger compartment (from the driver's side strut tower to the front of the passenger side rocker panel). Unfortunately, this isn't a good solution for a street or dual purpose car. My car is now primarily an autocross car, but I still like to drive it occasionally. The chassis in my car was completely rebuilt after I wrecked the front end so my solution is a little extreme. I built a tubular front end, installed a square tubing frame, and mounted the engine using plates that tie the strut towers together. -
-

-
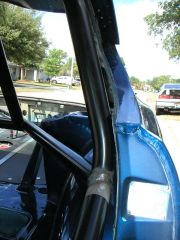
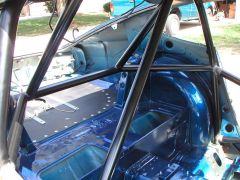 Rear Driver's side
 -
 Rear portion of my roll bar
 -
At what torque level is frame stiffening needed
74_5.0L_Z replied to a topic in Brakes, Wheels, Suspension and Chassis
400 ft-lbs of torque does not sound like much as far as twisting force on a frame, but when it gets magnified by the transmission and differential gear ratios, the forces get big fast. For instance, my car has 330 ft-lbs of torque at the crankshaft, has a first gear ratio of 3.35:1, and a differential gear ratio of 3.545:1. In first gear (assuming that the tire don't spin), the frame has to react a longitudinal twisting torque of 330 x 3.35 = 1100 ft-lbs. The frame also has to react a twisting force of the differential around the axles of 330 x 3.35 x 3.545 = 3918 ft-lbs. This last number is the reason that Z's with big torque and big traction crack where the hatch and roof are joined. To me, the best stiffening for a drag car is a six or eight point roll bar that ties into(and triangulates) the rear strut towers, and ties into the front and rear of the rocker panels. -
25mm Bump Steer Spacers and 15" Rims
74_5.0L_Z replied to Dan Juday's topic in Brakes, Wheels, Suspension and Chassis
I encountered that same interference problem with my Centerline Billet Scorpion wheels after I installed the 25mm spacer. My 16" wheels clear fine. Both sets of wheels are 8' wide and have a 5" backspace. I think the clearance problem is caused by the combination of diameter and backspace. The manufacturer probably envisioned a 15" wheel with the stock 3 7/8" backspace when they established fitment. -
I just ordered the last set of filled fiberglass headlight buckets from Dave at Arizona Zcar. I have decided to blend them in to the front fenders. I still have to decide what I want to do about headlights. I may relocate some small diameter headlights into the grill area, or cut some holes and do something akin to Terry Oxendale's first version of his "street" body. I'll be sure to update this thread after I get the headlight buckets installed.
-
Dan, I know that you have the SubtleZ front end on your car, and that the seam has been filled. Where did you get your extensions? I'm not sure that I want to fill the seam. I like the way that it looks, but I want to be able to replace the extension if (when) I screw up again. ArizonaZcar sells fiberglass extensions. Has anyone here used his fender entensions. How is the fit / quality? I am pondering using his filled extensions, but he states that he won't ship his fiberglass parts on the web site. Maybe he would for such small pieces. MSA sells fiberglass extensions, but they are listed for 162.00/ea. That seems to be a bit expensive unless the fit is perfect, and they laminated in gold. There are also the ones made by ShowCarBody Parts, but I have heard that all their stuff is crap. John Washington, I would buy fiberglass extensions from you if you made them (I'm sure that many others would as well).
-
I am in the process of installing a Reaction Research SubtleZ fiberglass front end on my car. I am very happy with the quality of the kit, but I have a problem: I need headlight buckets (fender extensions)! The fenders are made to use the stock extensions, but I am lacking one because I smooshed it in an accident. The one that I do have is a reproduction unit from Victoria British (junk), and I would like find some that fit better. I would prefer have some that are fiberglass that are not junk. Does anyone have some fiberglass headlight buckets that fit well (company or individual)? In lieu of fiberglass units, I would settle for some used factory extensions that are in good shape. Thanks, Dan McGrath
-
Should I have to turn my electric fan on often?
74_5.0L_Z replied to olie05's topic in Miscellaneous Tech
I have a griffin aluminum radiator in my 5.0L ford powered 260Z. I am using a 1995 mustang fan (3200 CFM) which I have wired using a thermal switch. When I installed the fan switch, I tested it to make sure that it would come on when the engine reached the prescribed temperature (185 degrees). Unfortunately, the temperature reached 200 degrees, and still no fan. So, I wired in a by-pass switch that gives me manual control. My fan cools the motor back to 180 degrees very quickly. Do I have to turn it on very often? No, when I start the car and let it idle, it takes about 10 minutes to reach 180 degrees. I do not ever turn on the fan unless I am sitting in traffic. I never use it on the highway, nor in traffic that is moving well. On my old Z (L26), I replaced the stock fan with a flex-a-lite unit that I had wired to run all of the time. This worked well until the fan motor burned up after 9 months of continuous use. Also, the flex-a-lite fan was insufficient as a stand alone fan (even for the six cylinder). It needed to run almost continuously to keep engine temps in check. Moral of the story: Buy a good fan (the Ford Taurus and 1995 Mustang fans pull more air than any aftermarket unit). Find a thermal switch that works so that the fan will last. A properly sized fan should only run intermittently (even in traffic). -
There are two ways in which you can remove the bumper mounts: First, you can remove the nut that is on the front side of the mount front underneath, and drive the shock unit out of the housing. Doing this will release the pressurized gas and ruin the bumper mounts. Second, you can undo the 6 fasteners attaching each shock mount to the body. You access 3 of the bolts on each side from below, and 3 acorn nuts on each side from inside the car. After the fasteners are removed on each side, the mounts will drop away from the unibody (so make certain that you have a hand on them before removing the last bolts). Once loose, you can carefully manipulate the "T looking things " out of the cutouts in the rear valance. After you remove the bumper mounts, be sure to fill the hole where the fasteners went. Otherwise, you will pull exhaust fumes into the car though the holes in the floor. Hopefully, you have room to remove the passenger side mount with the stock fuel tank in place. Under no circumstances, cut or heat the bumper mounts. They are pressurized. Good Luck, Dan
-
If the motor is set up for reverse rotation, you will need to change the following: Camshaft Reverse the pistons on the rods (the pins are slightly offset to counteract thrust, and the direction of the offset is rotation dependent). distributor drive gear (I think) oil pump (I think)
-
The struts are painted under the tape, and my car NEVER gets wet.
-
The weld-on washer locates it up and down, and the Ground-control kits came with a rubber O-ring that kind-of centers the sleeve on the strut. The last time I had mine apart, I tried something different that worked very well but sounds cheesy: I wrapped the strut housing with evenly applied layers of 2" wide electical tape until the sleeve would just barely slip on. This works much better than the O-ring. I kept all of the wraps of tape under the sleeve so that it isn't visible.