Blown77Z
-
Posts
405 -
Joined
-
Last visited
Content Type
Profiles
Forums
Blogs
Events
Gallery
Downloads
Store
Everything posted by Blown77Z
-
We should call you Mr. Moneybags O.o Can't wait to see the new setup! What tranny are you going to be using?
-
The whole kit weighs in at roughly 3-5 lbs, if that.... I did look into the door jamb wire boots on their website. However, $10 PLUS another $8 for shipping = $18 for a set of rubber boots I spent $2.50 on my "custom" wire boots Thanks for the compliments on my write up !
-
Pictures added !
-
 Plug Installed
 -
 Plug Installed
 -
 Plug Backside
 -
 Plug Set
 -
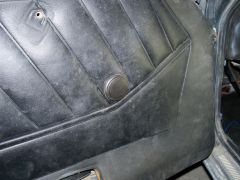
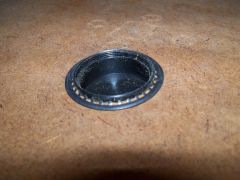
Here's what the door plugs look like before/after they are installed. Here's the plug combo set I used. They give you 3 grommets to choose from. My grommet was the thinnest one in the kit. The actual plug or cap I used was also the thinnest one in the kit. A 1.5 inch hole saw bit was used to cut through the door panel. You also have a retaining ring that holds the grommet to the door. Here's the plug or cap installed. The door panels fit perfect just like stock form.
-
 SPAL Diagram 3
 -
Yes, they fit behind the stock door panels. The driver's side works GREAT on the mock up test I did earlier. I haven't tested the passenger's side yet, however I will test the motor out before everything gets put back together It'll be awhile before the car gets driven again, it's in paint jail so to speak
-
In my dad's house. I haven't seen this in over 15 years O.o
-
 Toy 280zx 2+2
 -
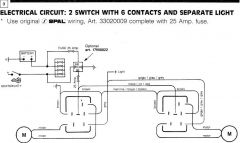
Now on to the switch plugs and wire harness. I used diagram 3 to wire it. There is 1 wire loom with 3 wires in it; Red, Brown, Grey. Red is for power (25 amp fuse comes with kit), brown is ground, grey is for your light. So, first thing you have to do is wire the other switch plug. You need to add 2 wires in order for it to operate the other motor. I used the extra grey and red wires from the other wire loom with 4 wires. MAKE SURE you cut the right ones! You can see what the plug looks like here, notice the red and grey wire with the BLACK mark on it, those are the wires I had to add to the switch plug for the other motor. Here's the diagram: Rinse and repeat for ther other side ! Finished install
-
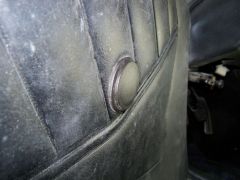
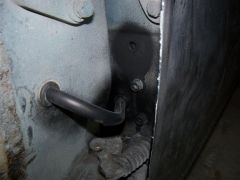
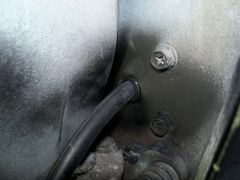
Now on to the wiring portion. Here's what I did to install the wiring through the door and into the cabin of the car. First I found a hole already on the chassis for the wires ! However, you must remove your fenders to get to it, lol. I was fortunate enough to be in the process of painting my car, so my fenders were already off. This is a rubber grommet with a 9/16s outer diameter and a 7/16s inner diameter This is a plastic snap grommet I used on the door side because the metal was thicker and the rubber grommet gave me problems. Again, a 9/16s outer diameter and a 7/16s inner diameter. Both sides installed. I used 7/16s fuel hose for my wiring boot.
-
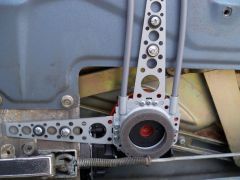
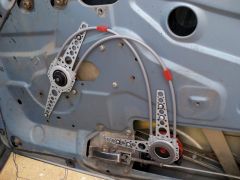
This is what the crank gear mechanism looks like fully assembled and installed ! Notice the small screw the holds the inner and outer gears together, very important ! Now on to mounting the motor assembly. The key part of this part is to make sure NOTHING hits the motor assembly. Test the window and track movement numerous times to make sure ! Here's the motor assembly installed.
-
I thought I would do a detailed write up on the SPAL universal power window kit I just finished installing today . I took pictures of the entire install including a good place to run the wires through. So, here we go ! KIT used: SPAL Deluxe kit 3300-0030 Place of purchase: http://www.a1electric.com/Merchant2/merchant.mvc?Screen=PROD&Store_Code=AEOS&Product_Code=3300-0030-0147 First you select the proper crank gear adapter and install it. For my 77 280z the correct one was stamped with a 1. This is the outer crank gear and its snap ring before/after it was put together.
-
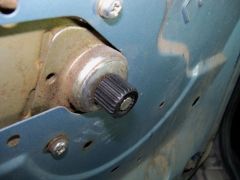 Crank gear adapter installed
 -
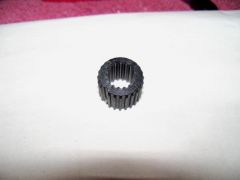 Crank gear adapter
 -
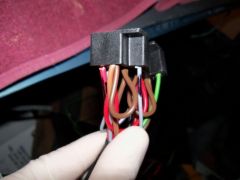 Switch plug with added wires
 -
 Passenger side window motor
 -
 Passenger side assembly installed
 -
 Driver side wire boot
 -
 Driver side window motor
 -
 Driver side snap grommet installed
 -
 Driver side snap grommet