

JMortensen
-
Posts
13742 -
Joined
-
Last visited
-
Days Won
68
Content Type
Profiles
Forums
Blogs
Events
Gallery
Downloads
Store
Everything posted by JMortensen
-

lightening Bad Dog subframe connectors
JMortensen replied to Pete Sprenger's topic in S30 Series - 240z, 260z, 280z
I was looking at that myself, but I think the issue preventing it is the exhaust hanging down. I had my exhaust tucked up really high and tight, and I don't think I could make it work. Sloppy exhaust would be damn near impossible I think. I haven't actually mocked it up, by the way. I just looked at the Bad Dog SFCs and the location of the front diff mount crossmember and figured it was a no go. You might want to take a close look before you rule it out. -
But do they work with the lights I have or would I need the flanged lights.
-
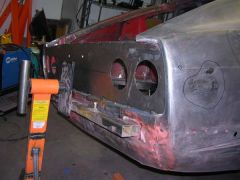
Thanks Paul! The goal was more to fix rust than anything, but when I saw 280ZForce's car I realized there was some potential here. The panel is cambered. Basically I measured the gap from the lip to the panel and kept it as consistent as possible all the way around. It's 5/8" on the bottom, about 1/8" on the top and the sides are as flat against the supports underneath as I could make them.
-
I think it would be this one: http://cgi.ebay.com/ebaymotors/Stainless-Security-Flange-Mount-For-4-LED-LIGHTS_W0QQcmdZViewItemQQcategoryZ33713QQihZ004QQitemZ7991417146 and no, I hadn't seen those. I wonder if they'll work with my lights, since mine didn't come with a flange. Seems like you'd need something to hold the light into the flange - glue or something? I see that the 4" lights that they sell have the flange on them...
-
Wow. That sounds amazingly bad.
-
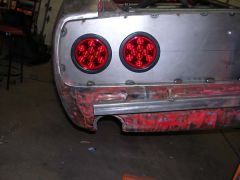
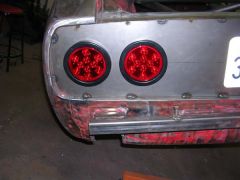
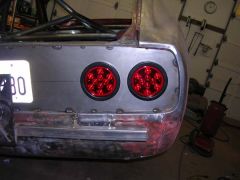
I had major rust issues with my tail light panel so I basically just cut it all off, from the sill under the hatch down to the bottom of the tail light panel. I got a new sill from Zraceproducts and since I'll be doing a pin on hatch I got mine with no latch hole. I then made the rear panel from sheet metal by making a cardboard template and cutting it out with shears, then using a flap disk on an angle grinder to finish the shape. I marked the center line of the panel as close as I could (it's not exactly a perfect rectangle) and then figured out my spacing on the tail lights. 280ZForce helped me out here, taking measurements and pictures of his car and sending them to me. Thanks for that! I did my spacing a little differently than he did. My lights are 2" in from the sides and then there is 1.75" between the two lights on each side. Since I didn't have any structure underneath to bolt this panel to, I just tacked it in place and started stitching around the edge to fix it in place. Later on I'll seam seal the panels together and then paint. It's really flimsy, but all it has to do is hold tail lights. I think it came out OK, but if I were going to do this again I'd get the flanged tail lights instead of the ones that are just held in with grommets. Heck, might just do that anyway. The tail lights are Harbor Freight trailer lights, $10 each: http://www.harborfreight.com/cpi/ctaf/displayitem.taf?Itemnumber=93263 Here are the flanged ring lights: http://www.harborfreight.com/cpi/ctaf/displayitem.taf?Itemnumber=94795
-

-
-
-
-
-
I seem to remember that Mitsubishi did this test for us already. If you read the Mitsubishi paper on VG's iI want to say that it found that downforce did increase by just using the VG's, but the amount was so minimal that there really isn't any point. The idea is to get the air closer to the hatch so that when it hits the surface of the spoiler it has a greater effect, or in the case of a wing it keeps cleaner air hitting the wing.
-
If you search you should find a lot of info on IMSA flares. There was a group buy a while back, but I didn't follow along to see how it turned out. There is also Reaction Research who makes the YZ flares which are IMSA style flares. zlalomz has a whole website devoted to old pics and info on IMSA Z cars.
-
The hoop support is creased. Joints suck. Bends suck. Not only is the tube ERW, but it looks like exhaust pipe?!? Rust is generally not recommended. That was part of a roll bar? Yikes.
-
450Z brake bias tuning
JMortensen replied to marcg's topic in Brakes, Wheels, Suspension and Chassis
That sounds like a load of bull to me. I used to run street pads and then swap in R4's when I went to the track. Never had any problems. I did bed in the R4's the first time, but after that I swapped back and forth multiple times with no issues. On my ex-boss's racecar we'd just keep throwing pads on it until the rotors needed replacing, then we'd swap the rotors and keep the old pads if they were still good and do the same thing again. Again, new pads, bed them in. Once they're bedded in, you can pretty much do what you want. That's been my experience anyway. -
Well I think I'm going to take your previous advice and put another tab on the bracket and have it go over and bolt to the outer rear hole for the ball joint as well. Cary's got me convinced it's going to fold up like a piece of paper the first time I hit the brakes. I figure if the tabs are roughly the same top and bottom and the top one is welded to the existing bracket that should work. I checked for clearance and didn't see any problems with the lower tab. I suppose I ought to check again before adding the upper tab. I realize there may be some issues with tire clearance, but I'm moving to a more positive offset on the wheels and using a smaller diameter turnbuckle than I had before, so I think I'll squeak in there, if not I'll put some sort of steering limiter in there like Terry Oxandale has.
-
'78 280Z: N/A L28 - Best HP Increases W/O Turbo?
JMortensen replied to OR-JO's topic in S30 Series - 240z, 260z, 280z
That is a pretty funky response that Brian gave you there. I'm guessing that he works on V8's. Never heard of "tilting the valves" on an L engine. Take a look at the L engine forum and you'll find BRAAP's post on head modifications. Read the others there too, and between them and some more searching you should be able to figure out how to get more power out of your NA L6. I think in addition to the headwork you'll have to do something about fuel management, as the factory computer doesn't deal with larger than stock cams very well, and that's going to be a must to get a significant amount of power out of the motor. -
I think you misunderstood me. I think both items work on their own, but putting both the VGs and the spoiler on the same car is a mistake made by someone looking for more bling.
-
ZX struts housing on an s30
JMortensen replied to TONY C's topic in Brakes, Wheels, Suspension and Chassis
I remember another thread where someone was trying to get past that issue. Seems to me it was a couple years back. You might immerse yourself in the search function for a while and see if you can come up with it... -
450Z brake bias tuning
JMortensen replied to marcg's topic in Brakes, Wheels, Suspension and Chassis
Yes, increasing the diameter of the rotor effectively increases the length of the lever that the caliper grabs onto, so it does increase the rear bias, in effect similar to installing a bigger caliper in the rear. The problem is that the front rotors in this case are so big that you'd probably need to play around with the rear rotors and calipers a bit to get the right ratio. That's why I like the dual master setup. If it's wrong, you buy another $50 master cylinder and try again. If you're changing brake parts you're making caliper brackets just about every time you change something. Something that hasn't come up yet is the idea of putting an adjustable proportioning valve in the front. It's a bad idea. Don't do it: http://www.stoptech.com/tech_info/wp_proportioning_valves.shtml -
ZX struts housing on an s30
JMortensen replied to TONY C's topic in Brakes, Wheels, Suspension and Chassis
What ZX are you talking about? S130, Z31, Z32? I think Stony hybridized some Z31 struts with some S30 struts. Search and you may find more info. I think the S130 is a tough one because the spindle comes off the strut at the wrong angle. No idea about if the Z32 would work. Does it even have struts? -
450Z brake bias tuning
JMortensen replied to marcg's topic in Brakes, Wheels, Suspension and Chassis
Agreed. Either go dual masters, or get a bigger rear brake setup. It will be really hard to get those rears doing much at all when you have the same size master for both front and rear systems. -
Need window net installation pictures
JMortensen replied to JMortensen's topic in Fabrication / Welding
lbhsbZ I will definitely take your advice and weld washers to the rods. I have the seat belt type quick release so that part is taken care of. I think I read somewhere that it is preferable to have the net to fall down rather than flip over the top of the car. John, I think that is just what I was looking for. I figured out I had several problems. 1st, the net I got wasn't a rectangle. I guess I didn't realize how many different nets there are out there, but the one I got was apparently designed to fit a particular car. 2nd, the net wasn't long enough to get down to the door bar. 3rd, the net was too long at the top. I figured this out yesterday and spent some time looking and couldn't find anything else that fit my necessary dimensions better. A custom net is going to be the answer for sure. Thanks for the help guys. -
I believe the XR700 is just a module. You could use that with the ZX distributor if you wanted. Or you could get the full on capacitive discharge setup from Crane or MSD and use that with the ZX distributor.
-
Just a warning in advance, there are some very anal retentive people who will naysay just about any new product with or without cause. So many people have been torn a new one when they come up with a new product that it really is kind of upsetting. Some of the criticism is justified, some of it is (in my opinion) people demanding a level of testing that isn't really feasible for such a small aftermarket.