

JMortensen
-
Posts
13742 -
Joined
-
Last visited
-
Days Won
68
Content Type
Profiles
Forums
Blogs
Events
Gallery
Downloads
Store
Everything posted by JMortensen
-
Why are we arguing over the relative strenth of CVs and U-joints? It's been done previously several times. CV's are better when the angularity is a factor, and ZX suspension has more severe angularity issues than the Z. Relatively speaking the U-joint is the stronger device (size for size) when used without angularity, but that isn't the case in the Datsuns. To put this in perspective, the 68 510 comes with the exact same U-joints and halfshafts that the jnj guys were using. The original app was a 100 bhp sedan. Compare to a 300ZXT CV which was designed for a 3000 lb sports car with 300 bhp. So size for size is not a parameter of our comparison. It's not a mystery which is the stronger unit in practical terms, and in the ZX application upping the size of the U-joint still doesn't address the angularity issues. As an aside, http://www.wolfcreekracing.com makes a CV setup for 510s which have similar (but worse) angularity issues. A 510 picked up 3% whp on a dyno just by installing these CV's simply by eliminating the binding of the U-joint at severe angles.
-
We can disagree if you like, but I really think the stock FI is crap. If you want to keep your car bone stock like you said, then we could talk about the disintegrating connectors and all that, the restrictive AFM and manifold, etc. If a person doesn't mind dealing with all those issues, then OK, stock can be made to function correctly. That's about the best I can say for stock FI, that it can be made to function correctly but probably isn't now, because of the crappy connectors they came with. If you want to modify the car we can talk about how a cam install will render it basically retarded. To me, that's crappy, since I don't tend to leave things in stock form. Every once in a while someone will say something about how bad carbs suck and that ANY FI (including the crap L series FI) is a step up, carb is a metered fuel leak, old technology, blah blah blah, yadda yadda. I wholeheartedly disagree with this opinion. Carbs in all common cases for the L, even dual Webers or 4 barrel setups, can be tuned to work with a bigger cam. They might not be the best carb setups that you can get for your L, but if you're installing a cam I'd rather have either of those than stock FI. But when you compare properly tuned SU's or triples to stock FI with the intention of making power, there's just no comparison. You can go WAY beyond the limitations of the stock FI and make a lot more power with good carbs. I will grant you that in a turboed application the FI makes more sense and is easier to get and keep running, although again I'd say that for peak performance, turboed carb setups have more potential than the stock FI (think turbo setups with triple Mikunis from the 80s).
-

Arizona adjustable strut experience
JMortensen replied to blueovalz's topic in Brakes, Wheels, Suspension and Chassis
Here's a thread on them: http://forums.hybridz.org/showthread.php?t=117917 -
The problem is the piston, although flat, would be way down in the hole if you shaved the top. I think Norm (former member, now banned) milled some pistons down and then ran a longer rod to get them back up to the deck height. It was either him or DAW. You can do it, but you need to cut just the right amount off the top, and then to get the height back run a longer rod, which gives a better rod/stroke ratio anyway. Much much much easier to just get the right pistons though or swap as e_racer1999 suggests.
-
Agreed. That stock FI is crap. Get yourself a decent FI setup or some good carbs and you'll find out how much power you've paid for but aren't getting.
-
Post of the month? Maybe not, but thanks. Seriously though, risk can and should be managed, but there will always be risk, and if there weren't we probably wouldn't want to race anymore. As to the why the Quaife might be more prone to breaking stub axles, it basically all boils down to loosing traction and having all the power go to the lifted wheel. That is a design feature which doesn't couple well with weak stub axles. It is true that a VLSD and a CLSD tend to do the same thing; jack one wheel up and it will spin. The difference so far as I can pin it down is that the Quaife has such an instantaneous torque transfer reaction to the tire lifting. Stub axle failure occurs with all types of diffs, don't get me wrong, it's just that in my experience the Quaife really seems to be an axle snapper, more so than the other types. If you want more detail, it's in here: http://forums.hybridz.org/showthread.php?t=93879
-
That is a really nice looking repair. The dents on mine are right on the outside of the frame rail across the back, so I can't hammer them out. I think I might take a few minutes to go at them with a slide hammer, but really the dents aren't too big an issue for me since this is a race car. The bigger issue is that I'm going to cut the existing rear area away and I guess I'm having some trouble with how to secure the new tail light panel. I think I'm going to leave the lip that the tail light panel sets on, and screw the new panel into that lip and cut all the rest of it away. We'll see how it plays out...
-
To me it looks like #1 is normal and the rest of the pistons have been steam cleaned by coolant in the chamber. I'm used to seeing nasty crusty black pistons in L series with lots of miles on them, don't see to many clean ones though.
-
what does a solid front differential mount sound like?!
JMortensen replied to proxlamus©'s topic in Drivetrain
You can have a machinist make you some. They're pretty simple to do from aluminum on a lathe. -
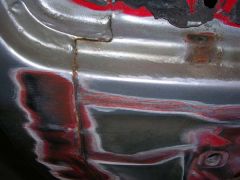
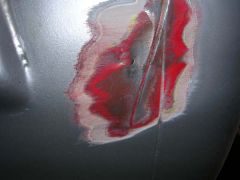
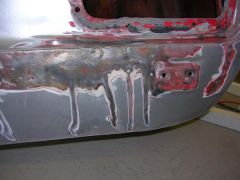
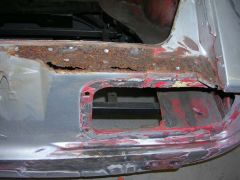
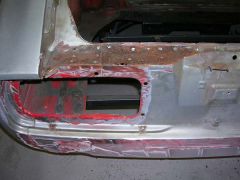
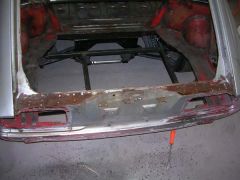
Since my car is still off of the rotisserie for a little longer I decided to work on the front and rear where the rotisserie mounts attached. The front was pretty straightforward, just taking the old paint off and trying to get it ready for some new stuff. The rear was a little different. I knew that the area where the hatch latches was pretty rusty, and I've determined that my next hatch will pin on, so I have already decided to cut out the rusty section and fab up a replacement. I was thinking that since this is the case, I should probably just do some other tail lights while I'm at it, because I think it will be harder to fix the rear and retain the stockers. So I go out there and start removing the panel which was fairly uneventful, but then I start thinking about the area under the bumper. I knew it was fairly full of bondo, but wasn't sure just exactly what I was up against. Well... now I know. I took a wire wheel to an area where I knew there was a dent on the right side. The bondo was between 3/8" and 1/2" thick. Then I started moving across the rear panel away from the dent to see if the thickness tapered down... not really. For some odd reason, the whole back end has a 1/4" layer of bondo on it, even though so far all I've found is the one dent. I started doing some stripes with the wire wheel just to get an idea, and it's pretty consistent 1/4" at the top and tapers down to about 1/8" at the bottom. What's weirder to me is that it looks like there were two repairs done here. One at the time the dent was made, and another when I had the car repainted about 10 years ago. Apparently when I had it repainted, they bondoed over the bondo, then carved what looks like a seam in it, but they didn't get it in the right place even. I guess if I had been more familiar with how the sheet metal comes together I would have recognized that this was wrong a long time ago. So here's the tentative plan. I want to cut the rear valence panel off right underneath the frame rail in the back for aero reasons. I'm going to make a panel which attaches to the last 1/2" or so under the hatch hole and extends out to the back of the car to replace the old part that I removed. I'm going to cut the center section of the existing rear panel off so that the only rear structure will be my rear panel that I fab up for the taillights and the one I fab up to replace the little deck back there. I'm a little concerned about the rust in the seam on the last pic. Don't know that there is too much to be done there, because all of these pieces overlap there so it seems like it might be a bitch to cut it off and really get a good look in there. Some pics: Rear "deck" removed: Left side: Right side: The dent: That's a lot of bondo: I know! Let's carve new body seams in the bondo! This is the side WITHOUT the dent: Little rust in this seam: If anyone has any suggestions or anything, I'd love to hear them. I don't know much about bodywork...
-
-
-

-
-
-
-
-
There is a ported vacuum source on the front SU, to the left of the bell as I recall. That's what you should be using.
-
The first one is a set of 44s since they say 175 on the butterflies. The other two are 40s. I wouldn't bother with the 40s.
-
1. Sounds like you need to turn the juice up on the tack welds. Unless you're tacking sheet together you can actually turn it up pretty high, because you won't be there long enough to really burn through. 2. Not enough info for me to make any kind of assessment. One thing that helps me is to hold the gun with both hands like a pistol and then stick my left pinky out and touch the piece. This steadies my hand. Bad penetration = not enough power or you're moving too fast. I like to turn the wire speed down and move more slowly, but that puts more heat into the workpiece. For your cart that will be fine and will probably help a lot, can't do that with sheet metal though... 3. I make this sort of motion )))))))))))))))))))) with the gun and it works for me. Sometimes I'll vary based on the position I'm in, but I pretty much stick with that shape. Other people I know use other shapes, I think the shape you use is more about making it pretty. 4. When you run out of gas the first time you'll really find this out. When there is not enough gas the weld will suddenly sound "fuzzy" and when you look at it it will look all boogered up and very porous. I have my welder set to something like 25 and that works, but almost all my welds are done in the garage with the door closed. I've turned it up and tried to take the nozzle off the end of the gun but apparently couldn't get enough gas in there on one occasion, and I've turned it up when I had to weld outside on another. Generally I just leave it alone.
-
Damn... somebody SCORED on that auction. $507... I would have bid had I realized it wasn't going higher.
-
Dave, read this thread: http://forums.hybridz.org/showthread.php?t=117818 You should buy 4 and that will put you at about 45 lbs breakaway. It's Jon, by the way, not Jim. I get that all the time. I guess I should change my screen name to jonmortensen or something...
-
Those have the nice rubber insulators and the Nissan Comp (good) manifold. Haven't seen that air cleaner before. I wonder if it's impossible to get filters... Nice setup overall. Killer price (with 45 minutes to go).
-
If you don't want risk you should forget racing and take up shuffleboard or ping pong as a hobby. You'll never take all the risk out of racing. As to reducing the danger or the stub axle breaking, I have two suggestions. 1. Don't use a quaife. 2. Reduce the power.
-
♥♥♥♥, looks like we're gonna have to start paying Coffey...