

JMortensen
-
Posts
13742 -
Joined
-
Last visited
-
Days Won
68
Content Type
Profiles
Forums
Blogs
Events
Gallery
Downloads
Store
Everything posted by JMortensen
-
Let me restate :/. For a car that is going to run pump gas and ~10:1 compression, the open chambered E88 is not the easiest head to use. If you're going to use custom pistons and weld on the chambers, it doesn't matter what L head you use, because you can modify the combustion chamber to any size/shape you want and the heads are all fairly similar as a starting point. But when the compression goal is ~10:1, running an N42 or milling a P90 and running the flat tops is the easiest way to get there.
-
I haven't really seen a "reality" show that I've really liked, so maybe I'm a bad judge, but this Pinks thing really wallowed in lameness. WTF is up with Speed lately?!?! They really have some crappy programming on now. Only day to watch is Sunday anymore...
-
You boiled the fluid somehow. Fade is when the pedal is rock hard but the car doesn't slow down. BTW, now that you boiled the fluid you NEED to bleed the brakes again ASAP. One stop from 60, no matter how hard, isn't going to boil the fluid. I can't remember your other post too well. Didn't you think you had a stuck caliper or something? You need to put quite a bit of heat into the brakes to boil the fluid. Can't say that I ever did that on the street, but it's happened a bunch of times on the track.
-
-

Coilover installation questions
JMortensen replied to john kosmatka's topic in Brakes, Wheels, Suspension and Chassis
Hmm. I have GC camber plates and they have a flat needle bearing assy on top of the hat. That bearing has a thin washer which sits in the aluminum hat, then the bearing rides on that, then a thicker washer that sits on top of the bearing, then that thicker washer sits on the bottom of the camber plate. I don't know what the non camber plate version looks like. Hope that makes sense... -
-
I've never had my car on a dyno, but I had a L28 with dished pistons and an E31 head (so 8.3:1 compression) with 280 valves very mild headwork, a medium sized .490/280 cam and 44s. I ran it with a Gtech and a badly slipping clutch and the Gtech showed 15.5 at 108 mph. 15.5 is crappy no matter how you slice it, but 108 in the quarter with the car, me and a passenger at 2650 lbs equates to ~261 hp according to the calculators. Then you figure that the original Gtechs read a couple mph fast because at the track they average the last 60 ft or whatever and knock the mph to 105. Hp is now ~240. That's what I was getting out of a basically stock engine (compression and valve size) with a medium cam and some very light port work. Then the harmonic balancer came apart and screwed up the front of the crankshaft on that engine. I built a flat top piston engine and did a LOT more headwork. I did some prep work on the block, took all the casting flash off and put new rings and bearings in and had the whole assy balanced, but that was about it. Compression is now ~11:1 and it doesn't run on pump gas. I haven't gotten a hold of another GTech to test with, but I'm guessing it now makes another 20 or 30 hp. That is with a BONE STOCK bottom end, and a decent amount of head work. Still running the same cam, same carbs, exhaust, etc. Is this engine going to last forever? Probably not. With the amount of compression and the amount of power going on stock cast pistons, I imagine that the life expectancy of this engine will be somewhat reduced. I am thinking V8 when this one blows, which is part of why I tried to keep this build cheap. My advice to maximize hp for $$$ is to go bigger than you think with the cam. A lot of guys I know went .460/260 on the cam due to the pervasive internet advice that "if you go any bigger it will be impossible to drive on the street." I believe this is the cam Bastaad used when his hot L28 put down 200 hp at the flywheel. When I bought my cam I had the advice of many people on the internet telling me what a huge mistake I was making. I remember a close friend who got me into autoxing was shaking his head and telling me how bad it was going to suck, and how that big cam would make it impossible for me to drive my car in traffic. My mistake was that I should have gone bigger on the cam. I went .490/280, and I wish now that I had gone .500/300 or somewhere in that vicinity. I drove my car to work every day for years in stop and go with 44's and a light flywheel and never had a problem with it. I'd forget about the stroker. Not trying to pick on Briann, but think of it this way. The stroker is going to give you .4 liters MAX. More common is the 3.1 liter stroker. So if your new engine puts out 85 hp per liter like mine did, then you're looking at 240 hp with a 2.8, or 265 hp with a 3.1. So your extra $1500 or $2500 or whatever it's going to cost buys you 25 hp. Not the best bang for the buck IMHO. You've specifically stated that you want power cheap. If you've run out of hp with the 2.8, and it's still not what you want, then do the stroker. But there's a hell of a lot you can do for a hell of a lot less money before you go with the stroker IMHO. No replacement for displacement is true, but you gotta take into account how much displacement you're getting. In the case of 2.8 vs 3.1 stroker, you're only getting 10%. If there's something else that will give you more than 10% hp gain for less money than the stroker, that's your next move. In my experience, a big cam and some headwork and some compression will give you a lot more than 10% hp increase, and it can be as simple as putting a late 280 block with flat tops together with an early 280 head and buying a cam. There are LOTS of different ways to build the L28, and there are a lot of different arguments for different heads and different blocks, etc. Bottom line is build something with mid 10's to 1 compression and put a cam in it and run your 44's with a good free flowing exhaust and I think you'll be surprised with what you end up with. Should run on 92 octane, and be really fun to drive.
-
Coilover installation questions
JMortensen replied to john kosmatka's topic in Brakes, Wheels, Suspension and Chassis
The washers are the new perches for the threaded collars. I used all 4 on mine. The only way you could not use one is if you used the original weld bead after cutting the original perch off. Energy Suspension sells bumpstops too. You can get them from http://www.suspension.com -
I've dealt with these guys: http://wolfcreekracing.com/classified.htm for Mikuni parts. I'm almost positive that the Weber and Mikuni air horns interchange. He shows 50mm bells for $115/set of 4 and 75mm bells for $120/set of 4. I'm sure if you email him he can tell you if they'll bolt up to Dellortos.
-
Sorry I can't help too much, but I think I know why the shipping charges are so high. It's dimensional weight charges thru UPS and FedEx that make shipping so expensive. DavyZ recently said that carbon fiber ZG flares were being charged for 30 lbs. No way the flares actually weigh 30 lbs, probably more like 3 lbs.
-
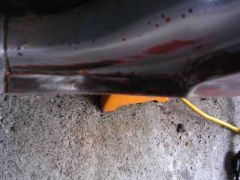
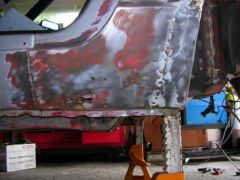
Well thanks all for the advice. Those two sites with all the pics really help. Perfect! Tim, I've got both panels in hand and I'm looking at this thinking you're right it really shouldn't be that hard. Don't think I'll get both sides done in a day though. I work like a snail, especially when I've never done a job before. I guess the thing that freaks me out is removing the original piece from this part of the car. I can see where the spot welds are, and I can see where the the panels overlap, and I guess that once I drill out the spot welds that the panel will come off, but for some reason I see myself prying these things off and bending the crap outta everything. I guess I need a spot weld drill bit so that I can drill out the spot welds without going all the way through... Larry, you can kinda see my Miller in the background with the gas tank. Vertical welding hasn't posed too much of a problem so far, and that welder makes all the difference. Compared to the previous welders I had tried this thing is great. It REALLY makes me look like I know what I'm doing (and I REALLY don't). Upside down welding has still turned out... less than desirable... but there shouldn't be any upside down stuff here.
-
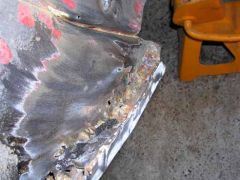
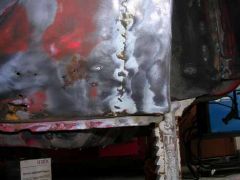
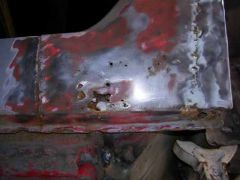
I've been searching and searching and searching and it paid off. I read in one of the old archived threads that Tabco makes the quarter replacements that VB sells, and bought them direct and saved some cash. Thank you Hybridz. I've got my front lower quarter replacement panels, and now I have some questions on how exactly it is that I go about putting these on. Let me start with the background on these pics. When I first got my car it had some rust in this area. I took it to a GEEZER to get it fixed. I'm not kidding, the guy who fixed the rust the first time was AT LEAST 80 years old. I asked him to give me back the rusty metal he cut out when he was done. The job was done in 2 days, and sure enough he gave me some chunks of rusty metal and I thought all was well. Later on I had the car painted and I got seriously ripped off on the paint job, and a couple years after that I started noticing some bubbling under the paint. CRAP. Well, I put it off for a few more years, and now I've finally decided to fix this issue once and for all. So I grab the grinder and put a wire wheel on it and start to try to find some metal. The bondo was about 1/4" thick. Not good. When I finally got down to the metal, it looked as if the patch panel that the GEEZ put in for me was actually brazed in, not welded in. The filler metal is yellow. He also only replaced about the last 2 inches before the wheel well, and apparently missed some rust that was forward of that area, which is now swiss cheese as you can see from the pictures. So I'm wondering how to do this repair. I've done absolutely NOTHING with auto body stuff before. I have been stitch welding my chassis, so I'm actually getting pretty good at welding the really thin sheet metal. But about the rest of this repair I'm pretty unsure of myself. I'm thinking the easiest thing to do would be to use the WHOLE patch panel. I think I can drill through the spot welds underneath, and the spot welds in the door jamb area. On the area where the quarter overlaps the rocker, how do I get this off? More spot welds? I think I saw a couple in there, but that is a seam, and I would think that it would be welded all the way down, right? What about the back end? My current thought is to cut away all of the G man's brazing which will leave me with a ~1 inch gap from the quarter to the fenderwell. I could just use a small flat section of sheet metal to then fill that in. Is that the right thing to do? Should I weld in that front seam and grind it down, basically removing it entirely? That seems like the right thing to do, as any crack there would just be a spot for more rust to show up. I had planned on using PickleX 20 and Zero Rust on any rust in the rocker forward of the rear quarter patch (can already see that there is some there. I had seen this website: http://www.autobodystore.com/door_rust.htm and was thinking I could use their little bridge piece idea where the top of the patch panel and the rest of the quarter meet. Anyone recommend any books or videos before I tackle this job? Any other suggestions? Thanks all. Jon EDIT--This is now a dedicated track day and autox car, not a show car and won't be driven on the street more than a couple days per year if that. If there is an easier but not as clean method, that's the one I'd like to use.
-
-
-

-
-
-
-
Search and you'll find that race cars use Lexan, which is basically the same as Plexiglas but easier to cut and not quite so brittle. It scratches easily and discolors fairly quickly, but I want to say that 1/8" Lexan is 40% lighter than 1/8" glass. Problem with door glass is that it is curved. There was some discussion about how to curve Lexan previously. Search and you will find a lot more about bending Lexan, but bottom line is every time you roll the window down and up you'll be scratching the crap out of the Lexan.
-
On the ZX they went to a gear reduction starter. It is smaller and saves weight, but other than that I see no advantage to it. I've personally used 240, 280, and ZX starters on my Zs over the years. I think I even had a 510 starter on my first Z. They all work. I think the ZX has an advantage in that it is more compact and lightweight, but it is also supposedly the most prone to problems. All Z flywheels have the same number of teeth AFAIK.
-
That's Terry's writeup. It says that 240 stub shafts will accept the 280ZXT companion flange and work with the S130 CV joints with some modification to the grease seal. This whole thing is broken down in detail on Pete's site: http://alteredz.com/240ZCVHalfshaftConversion.htm That is not the Z31 CV though. The Z31 CV has a different end and the adapter from MM is required.
-
3 women is tough. Stay strong!!! Congrats...
-
I had a problem related to this issue that was very difficult to figure out. I had a set of wheel spacers that were .010 or something like that too small. They looked like they sat flush on the hub, but they weren't quite there. I had the wheels balanced over and over and over again, never quite got it right. Finally the wheel spacer started to crack and I looked really closely and figured it out. Switched to a lug centric spacer from Coleman Racing and never had a problem again with wheel balance.
-
Is that really what you meant to say? Because you definitely do need the MM adaptors to bolt a 240 stub to a Z31 CV. You don't need to switch 240 halfshafts for 280 halfshafts as Trouble suggested (they're the same length) but any swap to CV's is going to require an adapter so the CV can bolt to the companion flange.
-
http://www.autobodystore.com/coatings.htm That link gives a little about PickleX and Zero Rust and using them together.