

JMortensen
-
Posts
13742 -
Joined
-
Last visited
-
Days Won
68
Content Type
Profiles
Forums
Blogs
Events
Gallery
Downloads
Store
Everything posted by JMortensen
-
-

Rear tower simple triangulation
JMortensen replied to cygnusx1's topic in Brakes, Wheels, Suspension and Chassis
I believe you heard wrong. It looks to me as if the area between the floor behind the seats and the deck between the strut towers is the strongest part of the car. There is more structure there than just anywhere else in the car that I'm aware of. I think the floor to deck area is the closest thing to a "torque box" structure in a Z. In addition underneath the doors connecting the firewall to the area right behind the seats are the biggest frame "rails" in a Z. I don't know what you call these parts, but they essentially look like very large frame rails and connect the front of the car to the back again in that spot behind the seats. So I think this is really the strongest area in the whole unibody, braced by the torque box in the rear and the "rails" in front. I think this is why the hoop is tied in right there. Katman just posted this link again. If anyone knows, he does: http://www.izzyscustomcages.com/ZCageArticle.html -
I missed the race, but caught some of the qualifying. So I guess that means that they pulled all the cars on Michelins? Ouch. Did you see last year's USGP? Watching Ralf back into the wall at 200 mph and then sit there for 2 minutes with no corner workers or emergency people even attempting to get to him was probably enough of a motivator for them to make that call. I guess if I had to miss a GP, I missed the right one.
-
Rear tower simple triangulation
JMortensen replied to cygnusx1's topic in Brakes, Wheels, Suspension and Chassis
I don't think that's going to do enough to prevent the B pillars from cracking. After having been crawling in around and under the rear subframe to stitch the whole thing together I've got a couple suggestions. First is weld a straight bar between the two strut towers. Second is do a proper hoop that attaches to the roof support (map light area) and tie that back to the strut towers also. That really is the answer structurally in my not-a-structural-engineer opinion. The trans tunnel has no support in it at all really (at least my 70 doesn't), so I just don't think that it's the right place to run a brace to. If you didn't want the whole roll bar you'd actually be better off just running the supports BACK and to plates welded over the rear subframe than to the tranny tunnel IMO. But really tying the roof to the strut towers is what you want to do and the best way to do that is with a roll bar IMO. -
Someone's blowing smoke... curb weight is 4031 according to Detroit News auto reviews: http://info.detnews.com/autosconsumer/autoreviews/index.cfm?id=19530 Still about 1000 lbs overweight if you ask me.
-
Illumina identification question
JMortensen replied to a topic in Brakes, Wheels, Suspension and Chassis
Here's a link to the Arizona Z car: http://www.arizonazcar.com And another to the Modern Motorsports: http://www.modern-motorsports.com They both sell coilover kits for the Z. Basically you have a threaded sleeve that sits on a new ring which you weld to the strut tube. Your new spring perch threads onto the sleeve, and you can adjust the ride height by screwing it up or down. The real advantage is that springs are cheap at about $40 per spring, you can get just about any rate you want, and they're easy to change since they aren't compressed. The smaller spring diameter also means that you have a little more room for bigger tires. That's the basic rundown. If you want to know more try searching. Should be tons of info on coilovers here. -
I got a little slide hammer from Harbor Freight which has a little dual hook end. You stick the hooks into the bushing and then screw the handle down. That spreads the hooks so that they hang onto the inside lip of the bushing. Then you use the slide hammer to remove it. There are also pullers made for this specific task. The one thing I've tried that I wouldn't do again is hydraulic-ing the bushing out. To do this you fill the area with grease, then hammer a spare input shaft into the bushing and the pressure of the grease pushes the bushing out. That was a PITA. Installation is pretty simple. Just get a socket that's the same size or close and hammer it in. Just have to be a little careful so that the bushing goes in straight. Any Chilton's guide should have this stuff in it. If you aren't familiar enough to know where it is and how to get it out, you should probably be using a guide to help you along anyway.
-
Me too. The only problem I've come across that directly relates to the tensioner is the chain guide getting torn up on the bottom. That is a real bummer when it happens because little pieces of metal get in the chain and fall into the pan.
-
The 240 and 280 are not the same. The 280 is EI, and uses a trigger wheel and a magnetic sensor. The 240 uses points. The ZX is also completely different. You have a 280Z? I didn't realize that before. Pull the cap and look and see if it has points. If it doesn't, then just disconnect the vacuum to it and run it as is. Or, if you want to recurve it you can pull it all apart and do that.
-
Anything wrong with mounting a seat straight to the floor?
JMortensen replied to tyson's topic in Miscellaneous Tech
This other post may or may not help you, but take a look anyway: http://forums.hybridz.org/showthread.php?p=549683#post549683 -
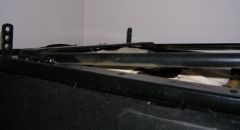
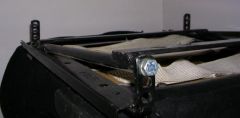
Since you liked that idea so much, and the seats are literally about 5 feet away from my computer I decided to take some pics for you: You can see kinda see that the front of the frame rail that would attach to the three holes up front is cut off. What you can't see is that we ground the crap out of the top of the rail. Where the rail attaches to the slider it is probably a good inch shorter than it was, and it is ground basically to a point at the front end, so that lowered the front end another 3/8" or so. Anyway, hope that helps you straighten your situation out.
-

-
-
-
That hood looks MUCH better now. Nice job Tim.
-
I wouldn't go back to points for anything. Theoretically that is a better setup than the stock points distributor. I wouldn't buy it though. You know you can also modify what you have. You can put a Pertronix EI unit in a 240 distributor, then if you want to recurve it you can braze up the advance slots to limit the total advance. It's not that hard to do
-
Illumina identification question
JMortensen replied to a topic in Brakes, Wheels, Suspension and Chassis
Try the 1 setting. I used to drive on the street with 200 in/lb and 250 in/lb springs on the 1 setting, and I found it fairly comfortable. Then when I'd arrive at the autox I'd turn the struts up to 4. Worked well for me. A couple times I'd forget to set the adjusters back and about 1/2 way home I'd have to stop at a gas station and change them, because it would beat the crap outta me, and it was a 2 hour drive. Autox a couple times before you ditch the springs. I think you might find that for the autox the Eibachs are a little on the soft side. If you go with an aluminum headed V8 the weight is only going to change by about 40 lbs, and I believe if you do the JTR most of that weight goes to the back although I'm not exactly an expert on the V8 swap. I seem to recall that if you do a T56 trans that adds close to 100 lbs too, so that will tame the springs a bit too. As far as springs go if you went to coilovers and 2.5 ID springs they would be a lot easier to swap, but I wouldn't swap them out for autoxing. Not worth the hassle IMO for 3 or 4 minutes of racing. -
Anything wrong with mounting a seat straight to the floor?
JMortensen replied to tyson's topic in Miscellaneous Tech
Seems like the floor wouldn't be a very strong mounting point. Maybe take some 1" square tube and build a frame and weld that to the body like you said and drill your holes through it. -
I modified the Recaro brackets for my Z. The problem wasn't that the seat was too high, it was that the front of the seat was too high in relation to the back, and it made my feet go to sleep in about 1/2 hour. So I cut the front adjuster holes off the Recaro bracket and ground down the front of the rail a bit. I left the rear in the top most adjuster. I was able to get it pretty close to where I wanted, then a friend of mine welded it all together. Worked like a charm. BTW I have older Recaros, so maybe the newer ones are taller. Mine are very thin on the bottom, and every time I sit in a stock Z seat I feel like I'm going to hit my head on the roof.
-
Illumina identification question
JMortensen replied to a topic in Brakes, Wheels, Suspension and Chassis
Illuminas have a red adjuster at the top of the strut. If you have the little caps on the strut towers you have to pull them off, and then you can adjust them with a small flat blade screwdriver. The center part has a tiny little arrow, and you can spin it to line up with any of the 5 settings. 1 is the loosest, 5 is the tightest. -
Since the chain tension isn't a factor of the oil pressure in this system, I don't know that this is necessarily true. Plus the chain effectively has a "tensioner" (idler) at both ends, so it should be less reliant on tension to keep it steady. As you said earlier: I think you were right in showing the superbike chain tensioner and that looks like a good system, but again, it looks to me as if the WHOLE guide moves and the WHOLE guide acts as a tensioner, not just a shoe at the bottom of the chain. So your argument for the superbike tensioner is compelling, but the argument for the L series tensioner is not IMO. I'd like some of the other benefits too, personally. I'd love to mill the crap out of my head and not have to deal with any of the other BS, just adjust my chain tension and cam timing and call it done. Well apparently they think it is good to 13,000 rpm, so that doesn't look to be much of a problem on a L series unless you downshift from 5th to 2nd, in which case there will be plenty of other problems to deal with.
-
1"1/16 MC good?
JMortensen replied to rudypoochris's topic in Brakes, Wheels, Suspension and Chassis
The later 15/16 bolts right in, there are only 2 modifications needed IIRC. The first is you need to bend the lines so that the front brakes go to the big reservoir and the rear brakes go to the small reservoir. I did this by hand. The 2nd is that you need to lengthen the rod coming out of the master. This I did by finding a bolt that threaded into the adjuster, cutting and rounding the end off. That was it. Other than that it just bolts right on. -
Just for anyone else looking for an Ultra Flo, I think I found a pretty amazing deal: http://www.jegs.com/cgi-bin/ncommerce3/ProductDisplay?prrfnbr=1363&prmenbr=361 I believe that is $67.99 with a $50 rebate. Wow.
-
This thread got me thinking that I should look for another one, since mine is 8 years old. Got to the jegs site and found an amazing deal I think. It LOOKS like the Super Turbo is $36.99 with a $25 rebate. or $11.99 for a Super Turbo. http://www.jegs.com/cgi-bin/ncommerce3/ProductDisplay?prrfnbr=1276&prmenbr=361 It LOOKS like the Dynomax Ultra Flo is $67.99 with a $50 rebate. That's $18 for a welded Ultra Flo. http://www.jegs.com/cgi-bin/ncommerce3/ProductDisplay?prrfnbr=1363&prmenbr=361
-
When I bought mine JC Whitney had them for $29.49. There are a couple different "turbo" mufflers out there, so make sure you get the Dynomax Super Turbo.