-
Posts
5399 -
Joined
-
Last visited
-
Days Won
58
Content Type
Profiles
Forums
Blogs
Events
Gallery
Downloads
Store
Everything posted by RebekahsZ
-

Drifting handbrake (hydraulic handbrake)
RebekahsZ replied to RebekahsZ's topic in Brakes, Wheels, Suspension and Chassis
Rear brakes are all sorted out; pads are starting to bed-in. I can now lock my rear wheels on dry pavement going straight with a little flick of the wrist. -

Drifting handbrake (hydraulic handbrake)
RebekahsZ replied to RebekahsZ's topic in Brakes, Wheels, Suspension and Chassis
Rear brakes are all sorted out; pads are starting to bed-in. I can now lock my rear wheels on dry pavement going straight with a little flick of the wrist. -

LSx s30 Longtube group buy thread
RebekahsZ replied to 1 tuff z's topic in Gen III & IV Chevy V8Z Tech Board
If the gaskets are the only hold-up, do we want him to just deliver them minus gaskets and just source our own gaskets? The gaskets shouldn't keep each of us from moving forward, seems a little trivial in the grand scheme of things surely they don't account for that much of the cost - I wouldn't sweat the difference in money. -
That "might as well do it, now" plan is what makes problems most of the time. Skip it 'till you need it.
-
Bump steer spacers sometimes make you go to larger wheels. In hindsight I would skip them. So much of the components that are available arent really needed.
-

LS/T56/240z Project Mentor Wanted
RebekahsZ replied to RebekahsZ's topic in S30 Series - 240z, 260z, 280z
Went for an early evening drive tonight. I used to drive this car with the L24, now I EXPERIENCE it. There is just nothing like it. Brakes are getting bedded in and are working great. The hydraulic handbrake is working better too. I can lock the rear wheels on dry pavement rolling in a straight line. That's what I'm talkin' about. -

Ordering Wheels Tires for 280Z
RebekahsZ replied to DuoWing's topic in Brakes, Wheels, Suspension and Chassis
I would stay away from "stretched" tires. When running a stretched set up, you are trusting the bead and it's seal to the rim to basically keep you off the pavement. So what happens when you have a flat or hit a pot hole-destroy your wheel? That turns a $5 problem into a $200 problem. Run the size tire that the rim manufacturer recommends, or the size rim that the tire maker recommends. -

Ordering Wheels Tires for 280Z
RebekahsZ replied to DuoWing's topic in Brakes, Wheels, Suspension and Chassis
Unfortunately, at some point you just have to "go for it," and order some wheels. All this offset vs backspacing gets rather trivial when you find out that every wheel maker and tire maker measures things differently. There are just too many variables to totally answer your question without risk. When your rims arrive, just get one tire mounted on one wheel, so you aren't stuck with all of them. Try that one wheel/tire on all 4 hubs and if it clears everything, mount the set. If it doesn't fit, send the other 3 back and you lose on the one. I have coil-overs and have the 16X8 RBR +4 that you are considering mounted with 225/50/16 Kumos Ecstas. Brakes are stock 240z. The tires have lots of room in the front, but did not clear the fender in the back. I pushed in the top of the strut with DP camber plates (giving me more negative camber than I really want) and thought I had plenty of clearance. On my first test drive, I nailed the gas and squated the rear suspension and rubbed a little on the driver side rear wheel. Took an angle grinder to the inner lip of the fender (just took a few mm off) and I'm not rubbing anymore. Still have more neg camber than I want ultimately. If you lower your car, all the clearances become more critical. If you keep the ride height up, you can let the tires hang out of the fenders and just about any width wheel will fit. But, if you nail the throttle too hard or hit too big of a bump, your tire will hit. Your 15X6 swashtica is a good wheel-mount 225/50/15s and you'll have as much traction as anybody out there with no problems at all. It is a great performance package and looks classic. Bigger wheels are a lot of sugar for a dime and are often just a big PITA with no measurable performance gains. -

LS/T56/240z Project Mentor Wanted
RebekahsZ replied to RebekahsZ's topic in S30 Series - 240z, 260z, 280z
I think it was MSA....but I can't remember. If I find a receipt, I'll let you know for sure. So many parts, so little time-it is starting to run together! I like it. The metal tabs that connect the hood to the hinges are already loosening up-that may be a problem in the near future. -
I just put a Champion 3-row aluminum in my LS swap with their dual fan kit (the ebay seller I used was back-ordered on 4-row kits). I've run it up to operating temp several times: so far so good. Both fans are coming on with input from the ECU/PCM and LS thermostat. So far, I'm using the cap that came with it, but I'd like to get one of those caps with a little gauge in it (I'm developing a gauge fettish). I'm using the stock L24 water temp gauge and sender and it warms up to the same place as my L24 and hasn't climbed higher on the gauge yet, although I know that these LS motors run best hot (like 239F -ish). Real test will be drag racing in July. The fan shroud took a fair amount of "tweaking" to bolt up and there were no holes drilled in the aluminum shroud for the fans, so I had to drill those and make my own wiring harness for the thing. It bolted to the 240z radiator support properly with no mods to mount it. I added a Summitt overflow bottle with a sight-gauge on it to keep the track dry. This is all covered with photos in my "Project Mentor Wanted" thread in the GenIII V8 forums.
-

LS/T56/240z Project Mentor Wanted
RebekahsZ replied to RebekahsZ's topic in S30 Series - 240z, 260z, 280z
Ever wake up early and can't stop thinking about all the crap you still need to do on your Z-car? Well, instead of going out and doing it, I spent the last hour cleaning out 2 years worth of PMs from this website. That is a lot of forum input for my build. Thanks guys (mentors). -

Need Advice on how to test and tune brakes
RebekahsZ replied to RebekahsZ's topic in Brakes, Wheels, Suspension and Chassis
Thanks johnc (and everybody else!). I wasn't really concerned with achieving a particular pressure (I have the sense to know that it will vary with my foot pressure)! I just wasn't sure if I should spend time getting the pressure/temperatures equal on the left and right sides before working on the front to rear bias. Gauges haven't arrived yet, so we'll see which I get to first. I really can't be doing a lot of accel/decel maneuvers until car is quieter. I'm gonna consider this question answered. I've got a friend who is doing a Toyota front brake "upgrade." I've had enough with "upgrades" for a while and am going to focus on enjoying what I have! -
I made new insulator rubber pads for the top of my tank with rubber blocks that I found in the 4X4 suspension section of O'Reilly's parts store. and I installed all the lines to the top of the tank before installing it (thank goodness there have been no leaks). I recommend that you leak test your tank before installing your tank for the last time by filling it up and turning it in all directions. Mine leaked like a mother from the big Tanks gasket surface and I put 15 gallons of 93-octane down my street (the stain is really big). I also recommend capping off some of the extra vent holes in your tank (I just fill the tank slowly and filling it is not a big deal). All those vent lines make installing the tank a real pain. I now have only one vent line to fight. If you make thicker insulator pads, you will have to lengthen your fuel tank mounting straps. These tanks fit REALLY tight. I had a lot of trouble getting my new rubber filler neck to slide onto the tank. Grease it and tilt the driver side of the tank down while you cram the passenger side of the tank up. If you get a good seal on your filler tube, tighten the big hose clamp, then raise the driver side of the tank, which will stretch the rubber fill tube, but it is rubber and has planned points of flexibility.
-
Increasing rpm may only be masking the miss. Check fuel, spark and air: in that order. Don't worry about air - I 've never seen a dirty air filter stop a car from running (although it may for off-road vehicles where things get REALLY dusty). If the car ran before, the last thing I would do is adjust the carbs (you can open up a huge can of worms "adjusting" a carb that is not the actual problem. Check fuel filter and banjo fittings on each carb. I find a cheap fuel pressure gauge VERY helpful in trouble shooting. Install it in the flex line leading to the carbs away from anything that can break it - you are looking at about $200 and it will work for years. I learned to carry a few fuel filters and a screw driver in my glove box. If car started sputting or died, I'd look for zero fuel pressure, then a new fuel filter would almost always get me home. Got to be such a problem that I had to carry some compressed air to blow the crap out of the solid fuel lines and back into the fuel tank, where it stayed for a while, but soon stranded me again. A re-built fuel tank finally got me some sanity. I have already used a fuel pressure gauge to help me find the problem on my new LS2 (clogged fuel filter)-without the gauge, I'd have gone thru the whole ignition system for no reason at all. These old cars get old rust, varnish and algae in the tank. This stuff will look like rust or red-clay mud in a paper filter and if it gets past your fuel filter it will look like little rock fragments in the banjo fittings. When I used to clog a filter, for some reason it was almost always right after adding fuel to the tank, maybe it aggitates the sediment or water in the bottom of the tank. Check your distributor cap and Sand off any scorched places and inspect the "button" in the distributor cap to make sure the spring under it still works and make sure the cap has no cracks. While you are checking the fuel filters, look for corrosion on distributor rotor and button, clean contacts with fine sand paper or a pencil eraser, ensure distributor cap has no water (condensation) inside of it and replace it. Pull out plugs and look for fouling, then pull one plug wire off at a time and see which one fails to reduce your rpm (that is the bad wire). Ensure plug wires snap on firmly. Your maintenance manual may be able to tell you how much resistance your plug wires should have, and perhaps you can check that with a voltmeter. Make sure none of your plug wires are touching each other direcctly (cross fire). Draining the gas does not clean sediment out of the tank-the drain hole is in a flat section of the tank. The draining may have just pulled more crap closer to your fuel pick-up hose. Good luck.
-
That has to be a record.
-

Need help with dragging rear disc brakes.
RebekahsZ replied to RebekahsZ's topic in Brakes, Wheels, Suspension and Chassis
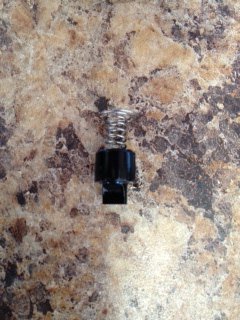
I bet many of us who have done this "upgrade" have the same problem. I was only dragging in the back (even after driving around for 3-4 miles my front brake rotors were no hotter than air temperature, while the rears were smoking and stinking and making the car seem like it was losing more power by the mile), so I only looked for a check-valve in the portion of the master cylinder housing marked "R." I was able to do this all with the master cylinder still in the car. I used a syringe to suck the reservoir dry and put a lot of rags all over the place to try to protect my paint. Then, I disconnected the proper line, then remove the larger fitting that screws into the master cylinder (17mm wrench is too loose, 11/16 fit pretty good). I used a mirror to look up into the master cylinder and there I could see the male part of a flared fitting. I carefully pried the male tapered fitting out, trying not to mar the tapered part. It popped out and the check valve and spring came out right behind it. I put the male tapered flare back into the master cyl and secured it with the larger "banjo" nut and installed the line. Bled the master cylinder (it had taken a LOT of air) by filling it, and recirculating the fluid back into the reservoir until no bubbles came thru the clear line I was using. I went back and bled the calipers (the angle makes a big difference, so take of the calipers, jam a piece of wood between the pads to mimic the rotor, and bleed them while holding them at different angles until no bubbles escape. Put it all together and go for a test drive. All 4 rotors warmed to about the same temperature. I have no idea what temperature is "normal." It probably depends on how much braking has been going on. I want to drive around on a straight highway to cool the brakes, then coast to a stop and check relative temperatures before I declare this project done. I bought some rebuilt calipers to try if I determine that a caliper is dragging. Then I'll tweak front to rear bias once I have a muffler. -

Need help with dragging rear disc brakes.
RebekahsZ replied to RebekahsZ's topic in Brakes, Wheels, Suspension and Chassis
I can't remember, it has been too long, but I may have purchased this from an ebay Datsun parts seller who MAY have advertised it as a direct replacement for the stock master cylinder. So, he may have added the check valve. I am just so happy that Cannonball gave me such an easy solution - once I started into it, I was about an hour between starting the repair to being on a test drive. I'd have never known to look for a check valve without his suggestion, and I'd never have seen the check valve if he had not sent me a picture. How did we ever live before the internet? I will be doing all dry-weather racing, for sure. I will try all the tuning techniques that have been suggested. Thanks guys. -

LSx s30 Longtube group buy thread
RebekahsZ replied to 1 tuff z's topic in Gen III & IV Chevy V8Z Tech Board
Still waiting on my headers. I wonder if Blake could make this mod for the 240z orders? Have you had to make any other mods? -

Need Advice on how to test and tune brakes
RebekahsZ replied to RebekahsZ's topic in Brakes, Wheels, Suspension and Chassis
Thanks SOOO much! I will look over ALL the suggestions in depth. Mostly, I wanted to see if temperature testing played a role in diagnosing problems or tuning. Sounds like I will need to really heat up the system to see. Then when I have a muffler, I'll start going thru these recommendations and post result. Car is too loud to really get on it repeatedly. I will follow this cherished advice. I find it interesting that no one has suggested testing the fluid pressure at the calipers - I guess that was another wasted $80! Add it to the pile. -

Coilovers for 280z with 240z suspension
RebekahsZ replied to Siberian Husky's topic in Brakes, Wheels, Suspension and Chassis
So, now you've heard it from both some novices and a pro race car builder/fabricator who does this sort of thing on a daily basis. Do some more research with the "sticky-noted" part of this forum, PM ComicArtist to get advice from the low-rider set, and call tech support at a couple of strut companies. Then, buy some struts and get out the chop saw and welder. Good luck with your project-post some pics when you are done. -
I just completed a disc brake conversion on my LS2/240z. It has stock front calipers and rotors and 1984 Maxima rear calipers on either 280sx or 300zx non-vented rear rotors. Car has Porterfield R4S pads on all 4 corners. Master cylinder is 15/16" with rear drum brake check valve removed. Cockpit adjustable proportion valve is Willwood. New DOT3 fluid. Please describe the steps or exercises I need to put car thru and the tests and measurements I need to perform to validate (test and tune) that the system is working maximally with the highest reliability. My dad just had me stomp the brakes, and if the car stopped and didn't yank the steering wheel out of you hands it was good enough. I'd like to be more thorough and precise than Dad was. Right now, I have one caliper that is heating its pad more than the others (tested with a laser pyrometer-or whatever you call the $39 laser guided thermometer that looks like a little pistol). I have ordered some SSBC caliper gauges that screw into the bleeder screws, but I'm not sure how I am supposed to bleed the caliper after installing them. Once my brake sysem has been validated, I will move to other aspects of the build. Thanks for any advice you can give.
-

Need help with dragging rear disc brakes.
RebekahsZ replied to RebekahsZ's topic in Brakes, Wheels, Suspension and Chassis
Oops-double post while trying to edit. -

Need help with dragging rear disc brakes.
RebekahsZ replied to RebekahsZ's topic in Brakes, Wheels, Suspension and Chassis
Thanks to everybody! Getting the check valve out was the ticket. I wonder why my disc swap kit instructions didn't mention this little tid-bit. I've been around Z-cars for 20 years and had never heard of it, and I've read lots of threads on disc brake conversions!!! It is strange, the pedal is higher too, now that the check valve is out....I've even watched Z-car disc swaps on youtube...?! I turned my proportion valve in the direction to put minimal brake pressure to rear wheels. I drove my car around the block and hammered the brakes a few times to see that the front brakes locked first. No pulling to either side. Turned proportion valve in direction to increase pressure to rear wheels-repeated hard stop procedure and car stopped like a bandit with no pulling and no tires locking up. I will repeat this sometime when the streets are wet to really fine-tune my bias based on worst case traction scenario. I'm hoping, for the most part, to set it and leave it. Used laser pyrometer when I got back to my garage. All 4 rotors were about the same temp (160 degrees F). The hydraulic handbrake pads were the same temp as the rear rotors. However, the left footbrake pad was about 200 degrees F, while the right footbrake pad was about 160. Why would this one pad be so much higher temp? Should I worry about it? I picked up new (rebuilt) calipers today, so I can switch one if that is the problem. I'd really like to hear what some of the enduro racers do to test and tune their brake systems to ensure reliability. Any pointers appreciated-I really want reliable brakes before I start racing (hopefully in 2 months). I'll do a google search for the ATE brake fluid to find a supplier. -

Need help with dragging rear disc brakes.
RebekahsZ replied to RebekahsZ's topic in Brakes, Wheels, Suspension and Chassis
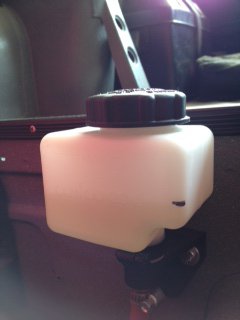
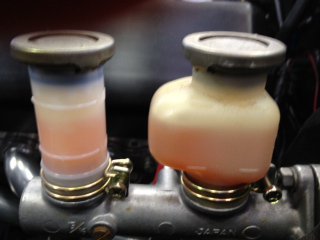
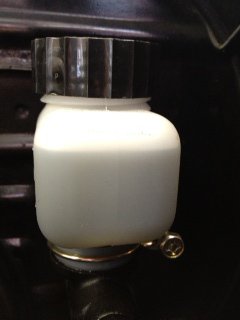
Look what I found! A check valve in my master cylinder! Cannonball89: you are 'da man!!! Going out to bleed brakes. Will report back after a test drive. Something else I found that isn't pertinent to this problem, but interesting. The brake fluid in each of my reservoirs has turned a different color. The one from the hydraulic handbrake (new Willwood MC) is still clear. The fluid in the reservoir from my old 15/16" brake MC has discolored honey-color. The fluid in my clutch master cylinder (new Tilton MC) attached to 13k-mile LS2 slave has turned almost black. The same DOT3 fluid was used to fill all three. Is this a heat thing, or is it just do to dirty fluid in the used portions of each system working its way back into the reservoir? I bled them all until clear at the bleeder screw! Any thoughts from the forum? Also, is there a safe dye that I can add to the brake fluid to make it easier to see in the reservoir when it is clean? I actually check this stuff when I open my hood and it would be easier to see that I have lost no brake fluid if I could color it (assuming this natural discoloration stops).

