-
Posts
5399 -
Joined
-
Last visited
-
Days Won
58
Content Type
Profiles
Forums
Blogs
Events
Gallery
Downloads
Store
Everything posted by RebekahsZ
-
Amazing! I wish you could rotate the valve cover so the emblem was on top-then at first glance, it would look like you had a V12! VERY cool.
-
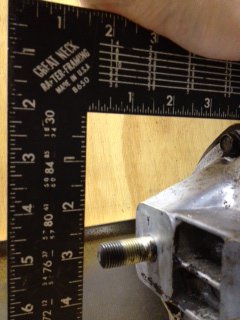
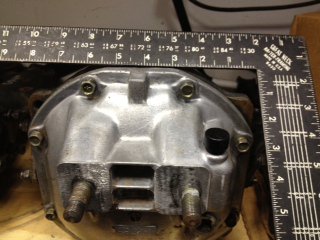
R200: 2 inches from center of bolts to top of case. The picture I attached was from an R200 on my bench. R180: I forgot that I've got my two spare R180s out on "longterm loan" so I couldn't measure for you on a bench. I got under my car, which has an R180, and best I could tell, it was the same heighth as the R200 from the bolts to the top of the case. However, I know you are trying to raise the diff 2-3 inches. From what I could see, there is only about an inch between the R180 and the boxed section "cross member" above it. Are you planning to c-notch that out to create room to move the diff up? I think you may have to. Edit note: I just looked at your post and it looks like you do plan to c-notch. I took another picture that shows the width of the diff as well so you can plan that out too. The t-square is at a little bit of an angle, so the width measurement is correct but the vertical dimensions are a little off, but it should be good enough to get you started.
-
Up early with a migraine and I'm feeling your pain. Don't try this in the rain, on a Sunday night before a final exam. There is some really good stuff on this subject on these forums, so do a lot of searching, and google too. Try terms like "280z axle stub removal, etc" and you might find more info. The biggest improvement between my last job doing this and the first was using a dremel tool with a fiberglass cut of wheel to "unstake" the flattened areas of the big nut, if you haven't done that already. Make sure your car is jacked up really high and well supported so you don't drop it on your head. If you have it high enough, you need to get as long a breaker bar as possible with a long piece of pipe (cheater bar). I've never gotten my air impact wrench strong enough to break this nut free. Get somebody to push the brake pedal for you so the wheel won't turn and don't roll car off ramps onto your head. Both sides are normal threads "leftie loosie, rightie tightie." Then gather up all your really good cuss words and you will eventually cuss it loose. Wright down the order of parts removal as you pull apart, there are lots of posts from guys (like me) who can't remember the reassembly order of the bearings, spacers, seals and washers. Re-use your same spacer tubes that go with your hub. There is some debate on whether the brass/bronze washers are really necessary, but I'd reuse them if your car has them (some do, some don't). When you get your axle stubs out, take them to a machine shop and pay like $10 to have the old bearings removed and new ones packed and pressed on - worth much more than you will pay in pain trying to do this at home with a hammer (those bearings are expensive). On a side note, next time I do this job, I'm going to skip replacing my bearings (about $100). I've always replaced them for fear of damaging them during assembly/disassembly, but I've never hurt one-they are tough. Clean up the threads you've damaged with a triangular file before reassembly so you won't cuss so much when you are back there on your back in the rain again. Use new nuts ($10-ish-I got mine and my bearings and seals from Motorsport Auto or Long Motor Company, both of which have really quick delivery)-you don't need to replace the washers that go under the nuts, so that saves you like $3 for a stupid washer. Order this year's transmission plastic shifter bushing while you are paying shipping. I borrowed a really big torque wrench from an old machinist in my neighborhood to retorque on reassembly, although I have never been able to get to 220 foot pounds-I usually run out of steam between 180 and 200 foot pounds and have never had a problem. There is only one other job on a Z-car that is more difficult than this, and that is removing and replacing rear spindle pins. For both of these jobs you really want someone at home to call 911 in case they hear a crash, then all the cussing goes silent, only to come to the garage and see your car off the jackstands with your little legs sticking out. Call me if you need support at 256-366-4685 central time and I'll cuss along with you, seriously. Sorry so manic, my migraine feels better knowing that you are dealing with such a crappy, miserable job. As someone posted above, I have had to remove the whole side of the suspension before, mount it in a vice and use a breaker bar with all my body weight plus a sledge. At least that way you are off your back.
-

78 Datsun 280z ------> 5.3 build
RebekahsZ replied to SUNNY Z's topic in Gen III & IV Chevy V8Z Tech Board
Doesn't mild steel start surface rusting really quick (no experience here)? You are one of my many mentors, by the way...I've got a killer migraine, going out to wrap some engine harness wires instead of just laying in bed unable to sleep at 6am on a Saturday... -
I will try to measure for you tonight. I have both available. I need to look at the same thing, but for a different reason. PM me to remind me.
-

78 Datsun 280z ------> 5.3 build
RebekahsZ replied to SUNNY Z's topic in Gen III & IV Chevy V8Z Tech Board
So, to summarize the v-band discussion, we should get stainess v-band kits, without o-rings and we can mig weld them to aluminized tubing or tig weld them to stainless?? (sorry I hit reply instead of edit to add the question). -

78 Datsun 280z ------> 5.3 build
RebekahsZ replied to SUNNY Z's topic in Gen III & IV Chevy V8Z Tech Board
I'm using the LS2 stock cold air intake combined with the JCI rubber and aluminum kit and it fits great. Go to my build thread "Mentor Wanted" to see pictures. I made my own flange to the radiator support, which took a LOT of trimming with a dremel tool. I really like the way the LS2 air tubing fits. I ruined one by cutting it too short, then bought another one off ebay for $20 and it fits great without modification. This is one of the sweetest parts of my build. -

LS/T56/240z Project Mentor Wanted
RebekahsZ replied to RebekahsZ's topic in S30 Series - 240z, 260z, 280z
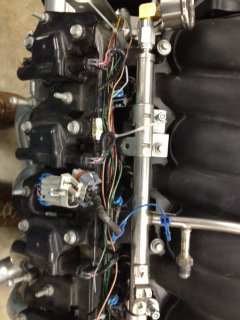
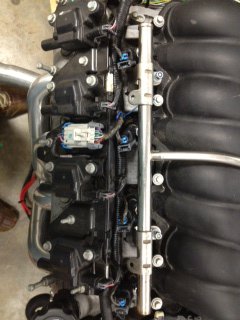
Spent the evening tidying engine wiring harness. See before and after pics of injector wiring. Have just the 1" loom to finish up - I gotta hit the sack. -

78 Datsun 280z ------> 5.3 build
RebekahsZ replied to SUNNY Z's topic in Gen III & IV Chevy V8Z Tech Board
Can you shoot me a photo of the fittings you used for the oil pressure sender? I considered this what you are suggesting, but I couldn't figure out how to de-conflict the vacuum line and the factory gauge sender (so big). It seemed like a lot of off-set fittings would be required. Send me a pic of how you did it. -

LS/T56/240z Project Mentor Wanted
RebekahsZ replied to RebekahsZ's topic in S30 Series - 240z, 260z, 280z
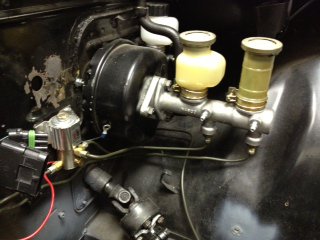
What do you guys think about me installing some flex line in the brake lines just as they exit the master cylinder? I'm thinking about this because I have had to change a vacuum booster before and I will probably have to adjust the little rod that is between the booster and the master cyl multiple times to get the length right. I am thinking about using stock 240z front wheel flex lines. Flex lines in this location should keep me from having to bleed brakes every time I remove my master cyl from the booster. -
Why would you assume that your video is boring? That video is like porno for a z-car guy! My diff has slack too. In fact, the entire drivetrain has slack at every point from the motor mounts to the tires - and every point in between. That is why manual transmissions and drag racing breaks parts. Hoping to limit carnage with a line lock and a rev limiter to take slack up before clutch dump and going to full throttle. Best option is an auto trans foot braking it.
-

78 Datsun 280z ------> 5.3 build
RebekahsZ replied to SUNNY Z's topic in Gen III & IV Chevy V8Z Tech Board
Oh snap! I have poly motor mounts and that bolt is a total PITA to remove. The oil pressure sender is really close, so it is tough to get a sledge hammer in there to pound the bolt in...for some reason the passenger side is easy-it is the driver side that is so tough. -

78 Datsun 280z ------> 5.3 build
RebekahsZ replied to SUNNY Z's topic in Gen III & IV Chevy V8Z Tech Board
Did you have to remove the steering shaft to install these headers? -

78 Datsun 280z ------> 5.3 build
RebekahsZ replied to SUNNY Z's topic in Gen III & IV Chevy V8Z Tech Board
MSD makes some LS plug wires that hold a shape after you bend them (kind of like Gumby). I think that would solve your problem with header/wire contact. Thanks for the pictures. I'm hoping to run some electric ovalized exhaust cutouts inside the front fenders to allow for side exit/dump tubes. It is going to be more tricky with these headers, but still do-able. I'm really impressed at how tight they are to the bottom of the car. I'm trying to rest at night this week and go 24-48 hours straight this weekend in order to try and crank my car this Sunday. Worst case would be the following week. I love your furniture plans-the joys of life before marraige! -

LSx s30 Longtube group buy thread
RebekahsZ replied to 1 tuff z's topic in Gen III & IV Chevy V8Z Tech Board
Do med school after college and you'll find 10 more years when you don't have time for your z-car and the other things in life that you love. I used to wonder why the old guys have all the cool cars. Now I'm an old guy. -

LSx s30 Longtube group buy thread
RebekahsZ replied to 1 tuff z's topic in Gen III & IV Chevy V8Z Tech Board
Anxious for pics that show ground clearance and how far back the collector is. Sunny, do you have a build thread out there in cyber space? -

LS/T56/240z Project Mentor Wanted
RebekahsZ replied to RebekahsZ's topic in S30 Series - 240z, 260z, 280z
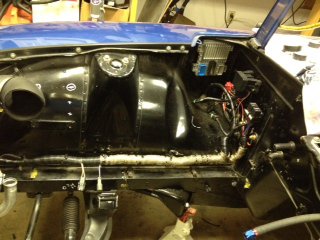
Stayed up late last night to complete engine bay wiring harness. Only wiring in engine bay is on passenger side wit all quick disconnects soldered and crimped on. Wiring is in split loom and area at risk for header burn is covered in fiberglass header wrap. My hands hurt today. -

LS/T56/240z Project Mentor Wanted
RebekahsZ replied to RebekahsZ's topic in S30 Series - 240z, 260z, 280z
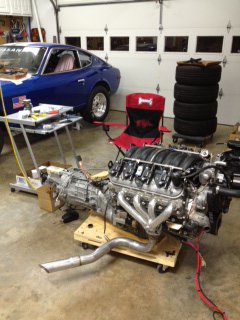
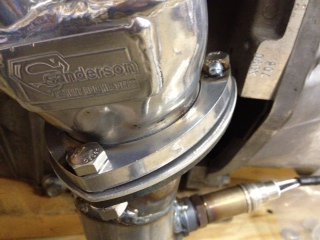
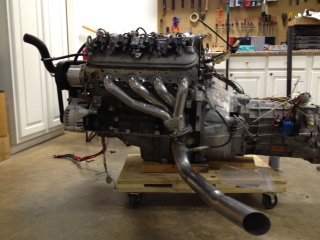
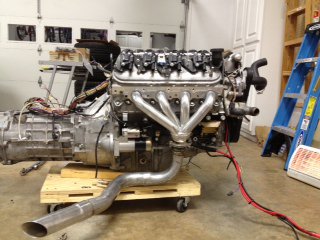
Got all the quick disconnect weatherpack connectors on the chassis and engine harnesses. Soldered the pins to make them stronger. Weatherpack connectors are really simple and cool. Am now putting looms on the chassis and engine wiring harnesses. This stuff is really tedious and time consuming. Really important to do a lot of test fitting-fan wiring once truly organized was several inches too long and I couldn't get the plub in the right place-had to redo fan wiring again. Hoping to work a little at night during this week so that I can fire motor up this weekend. I found it impossible to get a wrench on the collector bolts on the JTR Sanderson headers, so I had my bolts spot welded to the header collector to make mount pipes easier. -
Been through this myself. Didn't believe the advice of others, wasted a lot of time trying to make the GTO alternator work with JCI kit. Bottomline: you gotta get a Camaro/Firebird alternator ($60-$100). The front bracket is the same, but you gotta get a rear bracket from the dealer ($10). Don't waste another minute on your GTO alternator. You gotta also get a Camaro/Firebird alternator connector. If you really get serious about this, PM me and I'll send you pictures of the connector with the correct wiring. You might be able to save some money by getting a truck alternator which lacks the rear bracket, but I'd be willing to bet it will be alright without it, since the truck doesn't seem to need it.
-
...when you have 5 sets of wheels for one car "because it's impossible to find wheels that fit a Datsun."
-
bj- What diameter are your exhaust pipes, 2.25 or 2.5? Whose transmission crossmember did you use? Looks great with lots of clearance, I'd like to copy! Keith
-

Weber jets??All who live for their triples please read this
RebekahsZ replied to datfreak's topic in Nissan L6 Forum
Simple answer: Electronic Fuel Injection -

Question about John car kit and tranny tunnel
RebekahsZ replied to LS1240Z's topic in Miscellaneous Tech
If you have a torch and know how to weld pretty well, it wouldn't be much trouble to make a new mount that didn't require beating up the tunnel. I have been tempted to build something different, but I need to just get the car done without adding any additional tasks. I don't weld and I don't have a torch. I hope to be singing a different tune within a few years. My advice it so buy his mount and use it as a guide to build something better. The tranny mount doesn't need to be super strong, the floor you are bolting it to isn't very strong, anyway. The motor mounts handle all the torque and the tranny mount just handles a small percentage of the weight. The real problem with the JCI mount is exhaust clearance. Go thru the forums and look at pictures. My Mentor Wanted forum should have some pictures that shows what I had to do to get the crossmember to fit. -
When you want to buy every "rust-free" 240z chassis that you see listed on ebay.
-

Question about John car kit and tranny tunnel
RebekahsZ replied to LS1240Z's topic in Miscellaneous Tech
I had to beat the crap out of both sides of the bottom of the trans tunnel for the JCI transmission crossmember to fit. I did not need to hammer anywhere else. I did trim some aluminum bosses off of the T56 housing. There is lots of room left on the driver side, now, but the passenger side is very tight clearance. I don't know how you would accurately estimate where and how much to hammer away until you have the engine/trans installed and the trans crossmember in your hand.

