RebekahsZ
-
Posts
5399 -
Joined
-
Last visited
-
Days Won
58
Content Type
Profiles
Forums
Blogs
Events
Gallery
Downloads
Store
Everything posted by RebekahsZ
-

Bolt-in camber plates?
RebekahsZ replied to ComicArtist's topic in Brakes, Wheels, Suspension and Chassis
Just some pics to give substance to the discussion. I concur with all the comments made-these two plate designs do have their limits/problems, but the low cost and ease of installation were super for me. The second pic (I replaced the orginal allen head bolts with regular hex bolts) is of an EMI plate on my front suspension w/ Tokicos; it is on the max negative camber bolt holes. First pic (Allen head bolts) is of a DP plate on my rear suspension w/ Tokicos; it is on the second to highest negative camber bolt hole.
-
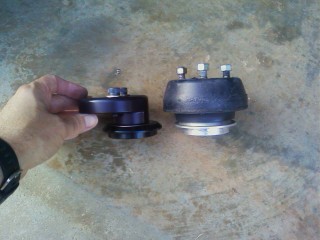
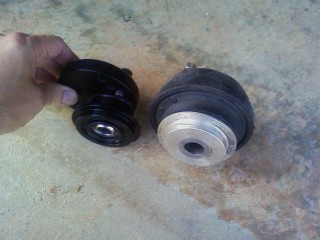
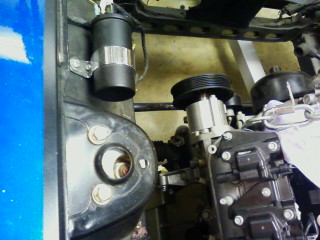
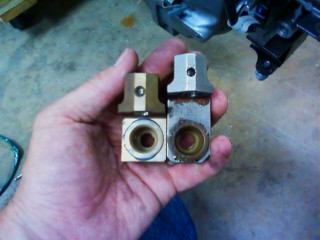
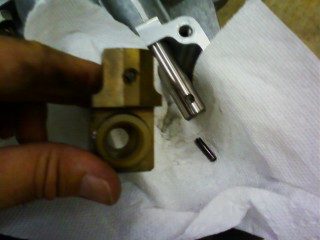
I'm considering the potential benefits of changing my motor mounts(the stock left side LS mount and the rubber JCI-provided right side engine mount) for polyurethane while I have the engine out (getting close to putting it in for the "final" time). Poly mounts for the right side are easily available in my AutoZone for $23. However, the F-body LS mount is a clam shell arrangement - I seem to be only able to find poly "guts" replacements that require me to take the "clam shell" apart and replace the guts. Summitt has a pair of Prothane LS1 mounts for $49. So my basic question is: how much do these engines move around with the stock JCI system? Would I actually gain anything in terms of reduced engine movement (which translates into exhaust system movement and banging around) by going ahead andd getting poly mounts? I'm thinking that I'd be fine with the JCI soft rubber tranny mount since it is in the center of the car(?) I'm hoping to hear from someone in the drag racing crowd with actual experience with either or both the "stock" rubber and poly setups.
-
LS/T56/240z Project Mentor Wanted
RebekahsZ replied to RebekahsZ's topic in S30 Series - 240z, 260z, 280z
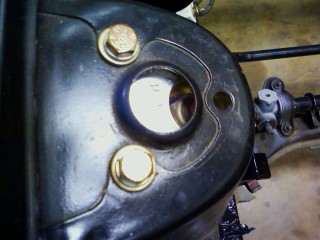
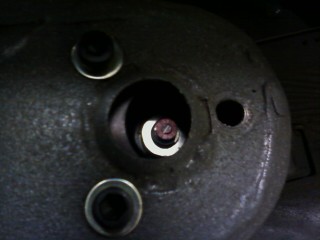
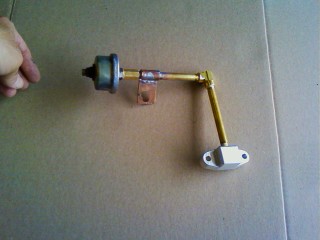
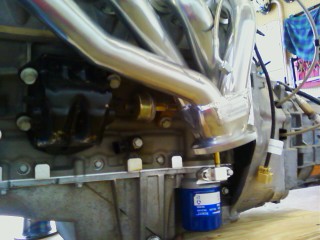
Worked on car all night this Saturday and here are the pics to prove it. I really like the way the 240z oil pressure sender relocation turned out. I think the remote clutch bleeder is going to work out as well. I got my new strut inserts in the rear along with the DP bolt-in camber plates to allow the increased tire clearance to run my Rota RB 16X8s. I installed my Technotoys adjustable LCAs and my adjustable TC rods (can't remember supplier). Removed and started painting my JCI motor mounts (I think the next time i install them will be permanent). Removed my fuel line from inside the tunnel and am in the process of making it for the second time. Hope to get fuel tank sandblasted and to paint shop.
-
Bolt-in camber plates?
RebekahsZ replied to ComicArtist's topic in Brakes, Wheels, Suspension and Chassis
True, you can't reach the adjustment screw thru the center hole anymore. But, you only need to enlarge the hole if you truly adjust your strut dampening on a routine basis. Check around and see if you are really apt to change it a lot, or if you can set it before bolting up to the top of the strut tower. Even so, it isn't that big of a deal to unbolt the strut for a minute in order to change the dampening rate, then bolt it back up. I set my illuminas to 3 in the front and 4 in the back, bolted it together without widening the center hole. If your dampeners have a big adjustment knob, you might need to open the center hole, but with illuminas it is not necessary. You might want fancier camber plates if you plan to make frequent adustments, but don't forget that every camber adjustment must be followed by a toe adjustment. -
Bolt-in camber plates?
RebekahsZ replied to ComicArtist's topic in Brakes, Wheels, Suspension and Chassis
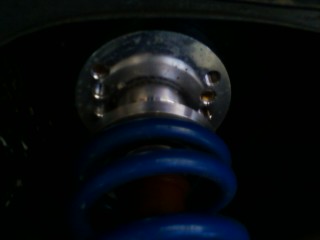
Better pictures in the daylight from under car looking up. As you can see, the spring comes off the top seat at full droop. I plan to make some droop straps before LS2 swap is done. What the heck is a pillow ball?
-
Drifting handbrake (hydraulic handbrake)
RebekahsZ replied to RebekahsZ's topic in Brakes, Wheels, Suspension and Chassis
Bracket is at machinist. I checked on it today and he has started, we verified some design issues and left him a caliper to ensure it fits. He has a long way to go, and is working this job in between better paying, more time critical jobs. I will definitely put pics up when I have the new brackets. -
Bolt-in camber plates?
RebekahsZ replied to ComicArtist's topic in Brakes, Wheels, Suspension and Chassis
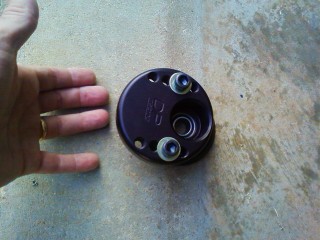
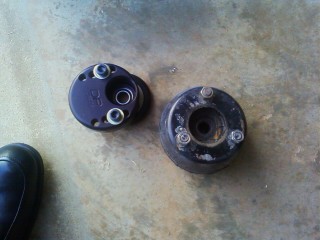
Here's the rest of my pics. Shown are the DP camber plates and also an upper 2.5" spring seat that I had machined that allowed use of the stock upper insulator and steering bearing. That spring seat worked great with my coilovers, but I ultimately had to have increased camber to stop front end from pushing. The silver color of my custom spring seat makes it look larger than the DP spring seat, but it is just an optical illusion-both seats are the same size for 2.5" springs.
-
Bolt-in camber plates?
RebekahsZ replied to ComicArtist's topic in Brakes, Wheels, Suspension and Chassis
Here are photos of my EMIs installed; you can see how the stut rod is moved inward. I've tried to take pics of my coilovers looking up into the fender, but the lighting in my garage is no good for a decent photo. I'll go shoot pics of my DPs (putting them in the rear) so you can see how spring seat looks then I'll edit the post to add them. I think about $300 for a pair, but email John at BetaMotorsports.com to order; if you have to get new strut inserts the project can get pricy. If you decide to get new stut inserts, consider Konis just to have the best and be done with it. I've had quick and slow deliveries from John, so you might want to get them ordered pronto if you decide to go this way-he doesn't keep much in stock and sometimes you may have a production delay while he gets a manufacturer tooled up.
-
Brake pads / shoes for Race
RebekahsZ replied to tjandriesen's topic in Brakes, Wheels, Suspension and Chassis
Ditto on Porterfield. Very nice to work with-call them and express your needs. John Coffey taught me a little trick as well: drill a hole thru the front face of the brake drum and manually adjust your rear brakes regularly. The e-brake handle adjuster just kind of sucks and is inadequate. I got a lot more rear brake bias after manually adjusting the rear brakes thru the little hole (1/2 inch-I drilled 2 holes 180 degrees apart (for balance?). There is already a little rubber stopper in the drum and that put the hole at just the right spot-I just drilled out the little stopper. I could even adjust the brakes with my wheels on. -
Trevor, I saw that post and that is what gave me the idea, but that little post seemed to just die out. I never tried to email the dude. I ordered a Sentra caliper and it has much bigger pads. But, I didn't know whether it would make a big difference to have two different size pads running on the same rotor (might make a weird wear pattern). Anyway, I decided to stick with 85 Maxima calipers for both sets of calipers. Will report how it works on my Hydraulic Handbrake thread. I have two different Porterfield compounds to try.
-
How much of the strut tube is filled?
RebekahsZ replied to ComicArtist's topic in Brakes, Wheels, Suspension and Chassis
Did exactly what you are doing about 10 years ago and had a top spring seat custom machined to fit into the top stock strut mount and to ride on the stock steering bearing. The aluminum seat I had made is compatable with 2-1/2 inch springs. Switched that assembly out for EMI camber plate last year because I was pushing bad on the autox. If you get the DP camber plate, a 2-1/2 spring seat (is that what you mean by a top hat?) comes on the camber plate. So, you only have to source the threaded collar and bottom spring seat. The DP includes upper seat, bearing and replaces the top insulator-all in one piece. Check it out on betamotorsport.com. If they don't list the DP, check out the EMI camber plate they are pretty much the exact same part. You just bolt the top of your strut into the camber plate assembly and you are ready to go. I'd love to sell off my little spring seats cheap (they are really sweet), but you'd be better off to get the DP plates instead so you can have that camber. EMI and DP camber plates are basically the same design, but they are by different manufacturers and are different colors. -
Bolt-in camber plates?
RebekahsZ replied to ComicArtist's topic in Brakes, Wheels, Suspension and Chassis
Talk to John Coffey at BetaMotorsports. He is on the forum and sells DP camber plates. They are basically copies of the EMI camber plate (which seems to be unavailable), which I have and am thrilled with! You gotta have a coilover system with the small diameter springs to use them, but if you have that, they are truly bolt in and gave me 3 degrees of negative camber, and I still have one bolt hole to go if I wanted even more. Took about an hour to set up both sides, then off to the alignment shop to get toe readjusted, then off to the track. You will need to tell John what kind of strut insert you are using so that the center bearing can be sized properly, and if you don't have a compatable insert, you may need to buy a Tokico or Koni insert. There is plenty of room inside the strut tower for these camber plates-3 degrees only requires the top bearing to be pushed in about 3/4 of an inch and the top plate is much smaller than the stock strut mount. I go to John for all my suspension guidance. All his products are great, and he will refer you to reliable people for the things he doesn't supply. Any part he designs is first rate. I'll have him set up my R200 LSD later this year. Good luck! With DP camber plates available, I really don't see why anyone goes to the trouble to cut up their strut towers-it seems like overkill to me. -
LS/T56/240z Project Mentor Wanted
RebekahsZ replied to RebekahsZ's topic in S30 Series - 240z, 260z, 280z
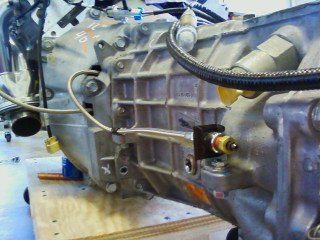
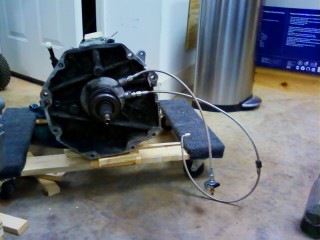
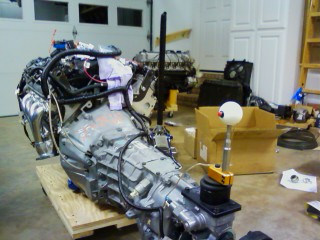
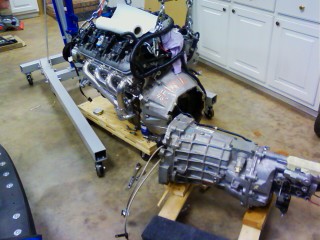
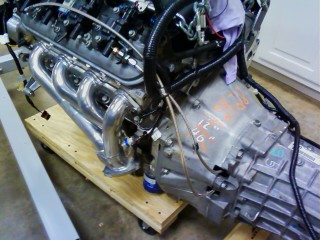
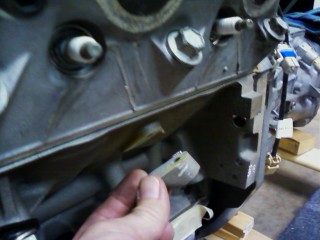
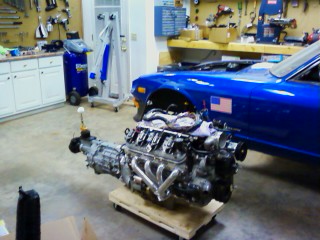
Kitchen is pretty well finished. Got some time in garage and did some transmission work. Installed 18" remote bleeder hose for throw out bearing and a 36" AN3 hose with a 90 degree bend to the clutch master cylinder. Disconnected trans from bell housing. Very easy job. Would prefer a 30" AN3 hose, but couldn't locate one wit 90 degree bend. Both lines were purchased from Speedway Motors. I hope I torqued the bleeder fitting tight enough-don't want to break it, but I don't want it to leak either. Shorter (12") remote bleeder line would have been adequate, but I couldn't figure out how to restrain the shorter line when I'm not using it. Changed T56-GTO offset lever for a T56-Camaro offset lever in the shifter mechanism: this allows me to junk the complicated GTO shifter mechanism for any F-body short shifter. Very easy job. I bought a Hurst shifter and wasn't impressed. Searched LS1tech forum and bought short shifter from MGW-love it. Topped it with a button shifter handle for use with linelock. Removed boss on driver-side of engine block that conflicts with JTR headers-didn't see any description of this in anyone else's build write-up. No pics yet, but I removed the front LCAs and TC rods; air chiseled off the TC rod bushing cups and painted all the above - to allow install of adjustable LCAs and TC rods. Mocked up rear disc brake conversion. Received engine harness back from waitformeperformance.com: was hoping for just a few wires to have to hook up. Holy crap! There are a ton of wires to wire up. Each wire is marked, but I'm gonna need a lot of help there. Got F-body alternator back from rebuilder. All for now-I'm pooped!
-
Drifting handbrake (hydraulic handbrake)
RebekahsZ replied to RebekahsZ's topic in Brakes, Wheels, Suspension and Chassis
Dual caliper bracket is designed and at machinist. Mocked up rear disc conversion from Sean (or Shawn) from New Mexico. Bolts right up! Only problem is that my passenger side disc wobbles. Has anybody out there bent a stub axle? Gonna pull it apart and see if maybe there is some crud between the rotor and the flange. I really don't want to replace a stub axle.... -
Saw a discussion on a rear disc conversion using 1987 Sentra front calipers. Anyone on this forum used those calipers on the rear of a z-car?
-
LS/T56/240z Project Mentor Wanted
RebekahsZ replied to RebekahsZ's topic in S30 Series - 240z, 260z, 280z
Got kitchen cabinets out of garage, finally. Fixed pickup truck. Wiring harness back from Hannah but still in box. Perhaps next weekend I can get a little car work done. What a hot summer! -
Drifting handbrake (hydraulic handbrake)
RebekahsZ replied to RebekahsZ's topic in Brakes, Wheels, Suspension and Chassis
Recieved Porterfield Maxima brake pads. Wow, are these pads small! Anyway, have dual caliper bracket drawn out and hope to get it to a machinist this week. Gonna try to cut off old backing plates this weekend - Any pointers? -
OMG....my LS1 sounds like my old L28ET or vice versa
RebekahsZ replied to ktm's topic in Gen III & IV Chevy V8Z Tech Board
What muffler is that on the LS1? -
LSx s30 Longtube group buy thread
RebekahsZ replied to 1 tuff z's topic in Gen III & IV Chevy V8Z Tech Board
1tuffz- That plan sounds great. I have $1000 set aside in an envelope either way. I may get my car running on the JTR headers I already have before this project is completed, but I'm still totally in for a set. The dyno results would let me know whether I want to install them on my own car or sell them off to someone who hasn't bought anything else. The only mod I ever plan to do on my LS2 beyond the headers is cam shaft/lifters. I think I'm going to have enough power to fully challenge my drivetrain, chassis and driving skills without going any further. -
LSx s30 Longtube group buy thread
RebekahsZ replied to 1 tuff z's topic in Gen III & IV Chevy V8Z Tech Board
When your prototype is built, can you try to get SUNNYZ to do a dyno day to see what these headers are worth (in TQ/HP)compared to the JTR headers? If needed, perhaps those of us who are invested on the list could chip in for the cost???? -
Would you consider doing a thread on the sump pump set up you did (with pictures and everything)? Modifying my 240z for fuel injection has been a major headache.
-
Auto-X tuning ideas, want feedback
RebekahsZ replied to wheelman's topic in Brakes, Wheels, Suspension and Chassis
John C- (not arguing here, just curious) what does it matter whether you use camber plate or adjustable LCAs in order to get the camber? -
relocate electric fuel pump from stock location?
RebekahsZ replied to virginz2's topic in Gen I & II Chevy V8 Tech Board
I think it is great that you are thinking ahead of problems. If you are worried about it, make the changes. I have seen a few Z-cars with metal hoops around the half-shafts, kind of like a mini driveshaft loop. It bolts down to the lower control arm using the extra sway bar holes. Just a thought about broken half-shaft restraint. If you don't address your fears, you will be restrained with the go pedal, and that really puts a damper on your fun factor. -
Drifting handbrake (hydraulic handbrake)
RebekahsZ replied to RebekahsZ's topic in Brakes, Wheels, Suspension and Chassis
Just ordered 85 Maxima pads from Porterfield. My street pad will be R4-S on both my 72 240z stock front caliper and my primary maxima rear caliper. I'll be trying the R4-1 on the drifting rear Maxima caliper that activates with the hand brake. Next step is to make (or have made) new caliper brackets that allow mounting of dual Maxima calipers on each rear wheel. -
Well why didn't you say so before! Help a brother out for cryin' out loud! By the way, thanks for allowing you car to be test car for headers. I wonder who will be the first to do dyno before and after runs(?)