
qwik240z
-
Posts
825 -
Joined
-
Last visited
-
Days Won
1
Content Type
Profiles
Forums
Blogs
Events
Gallery
Downloads
Store
Everything posted by qwik240z
-

looking for 84-85 non turbo wheels
qwik240z replied to spacecase70's topic in Brakes, Wheels, Suspension and Chassis
Here you go: http://cgi.ebay.com/ebaymotors/Nissan-Datsun-300Z-Alloy-Rims-NEW-Tires-NR_W0QQcmdZViewItemQQcategoryZ66481QQihZ010QQitemZ200168550322QQrdZ1QQsspagenameZWDVW -
They look like the seats from the 80's VW's and the Bimmers. The ones in the pics look to have been reupholstered. At least the center sections. I have a set like them in my garage. I have not decided which of my cars they will go it. I bought them for the Z but I just got new Recaros for the 240Z so they may go into one of my 510's or I may decide to sell them.
-
Yes. If you can post pics that would be great. I may want to do that to mine.
-
Yes. They were having problems with other people offering to sell items to the listed bidders outside of eBay. Like they weren't making enough money.
-
There was another set on eBay a week ago. It was blue cloth and kind of worn. They went pretty cheap. Keep your eyes open. I found mine on the local Craigslist. I searched for Recaro. Good Luck
-
Thanks Clive. Yes. I think I need to change the interior color too. The red just doesn't go with the new seats. I am undecided on what to do. I can track down a set of black door panels (I have the rest of the interior parts in black except for the headliner) but after seeing Dave's (1tuffz) car at the convention, I like the way he had the rear plastic parts covered in fabric. To me, the stock plastic parts have always seemed cheap looking. Not ot mention that they offer little in the way of oise reduction. I may look into having it all done by a shop to make it match the seats. With the price of NOS door panesl these days, I doubt that it will cost too much more to have it redone. I plan to do the drivers side this weekend if it stops raining. I can't wait to try them out.
-
Do they have a website?
-
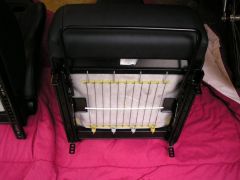
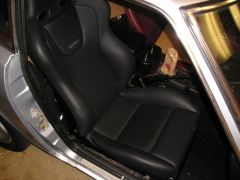
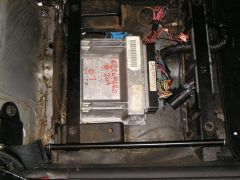
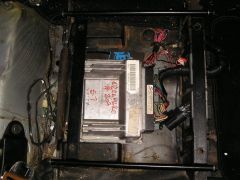
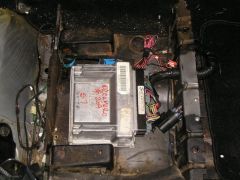
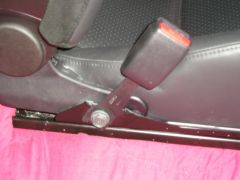
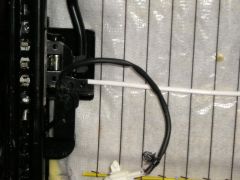
Evo Seats - They are Black but look gray in the picture. Well I finally got one of the seats installed. I decided to do the passenger seat first so I would still be able to drive the car if I didn't get the install finished right away. Here is what I had to do to install it. I was planning to use the sliders that came on the seats. They were a flat bottom slider but after an initial test fit I found that there wasn't an easy way to make them work. I would have to build a frame to mount them to and then bolt up that frame to the stock seat mounts. I would also have to really cut up the stock seat mounting rail up front. Way more work then I wanted to do and I don't own a welder so I decided to go a different route Last year I had purchased a set of Recaro SRD seats and Wedge Engineering seat brackets made to install them into a 240Z. The SRD seats didn't fit well so I sold them on eBay and kept the seat brackets. Wedge Engineering Bracket The Wedge Engineering brackets are made to accept what are known as Tab Sliders. Tab sliders allow the seat to be raised or lowered to 3 preset positions front and rear. Recaro Tab Sliders I ordered a set of Recaro Tab Sliders from Speedware, a vendor I found doing a google search. They arrived this week so I started to take apart the Evo sliders. First I removed the stock set belt receiver from the seat. A 17mm wrench is all it takes. Seat Belt receiver Bottom of the seat before removing sliders. Then I unbolted the sliders from the seat frame. They use a Star type bolt head and I didn't have that type of tool so I grabbed a torx bit that fit close. I removed the 4 bolts holding the sliders to the seat frame. I was not able to remove the slider adjusting lever. It is hard to see in the picture but when you unbolt the stock sliders there is a welded pivot tab on each side of the seat frame where the slider release lever goes. Seat Lever Pivot There is a small C clip that holds the release lever on. Once you pull the C clips, the lever can be removed. After I removed the lever, I test fit the new slider. I noticed that the pivot would interfere with the new release lever so I broke out the grinder and removed the pivot bracket. Took all of about 30 seconds to remove them from both sides. Next, I lined up the holes on the new sliders to the seat and found that the distance between the mounting holes on the seat and the sliders didn't line up. Seems that the distance of the mounting holes on the seats is 12" on center and the holes on the brackets are about 11 3/4" on center. I decided to widen the hole on the back of the slider. This would push the slider more towards the front and allow the seat to slide back even more. I clamped the slider into my vise and used a round file to open the hole up towards the rear. A few minutes with the file and the holes lined up properly. I mounted the sliders to the seat using the bolts provided with the slider. Tab sliders mounted to the seat Finally it was time to move to the car and install the Wedge Engineering Bracket. Stock 240 Seat Mounting Points Wedge Engineering Bracket test fit. As you can see in the picture, I have my ECU mounted under the passenger seat. The ECU was in the way of the bracket so I unbolted it and moved it forward for more clearance. Once the ECU was out of the way, I found one more area where the stock mounting area was interfering with the Wedge Engineering bracket from sitting flat. Interference area. I marked the area to be removed with a sharpie. A minute with the grinder and the problem was gone. Area removed with grinder. Bracket sits flat now. The rest of the install was easy. I ran up to the hardware store and bought some 3/8" x 1 1/2" Grade 8 bolts nuts washers and lock washers. I bolted the Wedge Engineering Brackets to the stock mounting holes and then bolted the seat sliders to the bracket. The moment of truth. How will they fit? Will they be comfy? Will they slide back and forth? Will there be any interference? I sat in the seat and wow. If sure is comfortable and supportive. The seat slides forward and back just fine. Good visibility out of the windows. It is well centered in the area and there is plenty of leg room up front. Even for a really tall person. It is a good fit. It doesn't rub anywhere but I did notice when I shut the door that the wing part of the seat does rest against the door panel. It does not even compress the seat foam at all. they just barely touch. I think if I use the file, I can open up the stock mounting holes about 1/8" towards the center of the car and they would not touch anymore. It does sit a little higher then the stock seat but I have never sat in any aftermarket seat that was as low a stock seat. I think I could flip the Wedge Engineering bracket upside down and this would lower the seat about 1/2". If I find I need it lower, I may do that in the future. I would need to grind a few areas on the stock seat mounting areas to clear the bracket if I flip it but I think it will be fine the way it is. One other issue I found. If the seat is slid far back, it is hard to adjust the recliner knob. There isn't much room for your hand in there in the rearward postion. Not a big deal. I usually get my seat adjusted and leave it in that position but if I need to adjust the backrest, I will slide the seat forward a bit, adjust it and then slide it back. Overall I am very happy with this seat so far. I will install the drivers seat soon. I am sure that it will go much faster and easier now that I know what to modify. Total cost sums up like this: $700 Evo Seats $215 Recaro Sliders $175 Wedge Engineering Brackets $ 10 Grade 8 Hardware ___________________ $1100 total $550 per seat. Not too bad for Like New Recaro Leather seats.
-
-
-
-

-
-
-
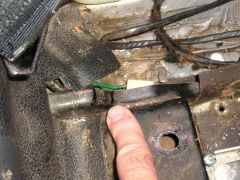
I used my grinder to remove a small area for clearance for the bracket
qwik240z posted a gallery image in Members Albums
-
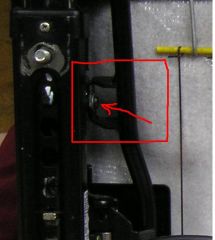
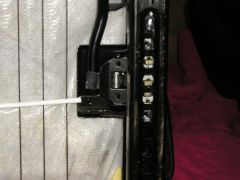
Bracket Interferes with stock mounting area where shown
qwik240z posted a gallery image in Members Albums
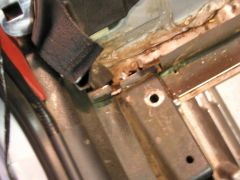
 The Bracket can't sit flat as the stock mounting area needs to be trimmed
 -
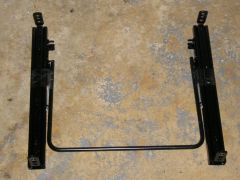
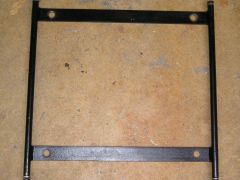
Wedge Engineering bracket in place on stock mounting area
qwik240z posted a gallery image in Members Albums
-
-
-
-
-
-
-
Man that is a great shot of Glen and Eiji. Steve did a great job with the pics. My car looks good too.
-
David, Your car looks great. They did a nice job on the studio shots. I sent an email to Steve at Highland Design yesterday but have not heard back from him yet. I want to order some pics of my car.