heavy85
-
Posts
1227 -
Joined
-
Last visited
-
Days Won
2
Content Type
Profiles
Forums
Blogs
Events
Gallery
Downloads
Store
Everything posted by heavy85
-
Rear Wheel Stub Axle Play - Help Needed
heavy85 replied to Wheeler's topic in Brakes, Wheels, Suspension and Chassis
The spacers are clearly hardened. Unless you have the ones you are having made hardened I strongly dont think they will hold up. How are you planning on hardening them? If the inner and outer races are in line then there is excessive play. You need to either space the inner race out or in to take up play in the bearings. I've played with this so know this from first hand experience not just theory. I would space the inner race to be closer together than the outer race to take out the play. Bearings have an effecive center that's not neccessarily through the middle of the race. You draw a line from where the ball touches the outer race through the center of the ball through where the ball touches the inner race to the center of the shaft. By having the inner race closer than the outer, the balls touch the outer race towards the inside and the outer race towards the outside. This effectively makes the bearing spacing wider which reduces the load on the bearing. I still cant find any markings. Anyone have 'B' spacers that are in specs willing to sell? -
Rear Wheel Stub Axle Play - Help Needed
heavy85 replied to Wheeler's topic in Brakes, Wheels, Suspension and Chassis
Thread revival That's helpful but I still cant find any marks on the casting. I've looked inside and out in the are marked in the FSM but I cant find anything. The spacers clearly have 'B's stamped on them but nothing I can find on the upright casting. The shim idea I mentioned above is not a long term solution as the shims keep squashing out. Anyone have more details on where to find the mark on the upright? Both of my 'B' spacers measure way under the spec listed in the FSM which is probably to real root cause. Any ideas where to get replacements? -
You mean like this? I was wrong they actually touch with zero clearance. Im just saying they work.
-
It prevents what you are feeling. Seriously been there done that. Like you I thought with poly bushings etc its not needed. Yep sure is. From memory I think it prevents the rack from rotating fore/aft.
-
Make sure the little rubber bumper is in place on the steering rack reaction arm. Mine accidentally didnt get put back in and it felt horrible like you describe without it.
-
I go back to the stock LS1 wires just work - no need for blingy wires ...
-
Die grinder with a long bit. Welds are hard and flap wheels arent going to take much off. They are ok once you are very close but if you can still see the weld you need a die grinder with a metal bit IME.
-
Are you using the coated version of the headers? If not that's your solution. I run coated headers with the stock ls1 wires and have had zero issues over 5 years and 40+ track (road course) days. A couple of the wires are just barely clear of the headers - like a mm or two, and the one that actually touches the header I wrapped in very thin insulated foil (also from the Camaro parts car). These wires are the original wires with the metal boot that came with the '02 Camaro parts car that had 40k miles when I got it and I'm still using the same 11 year old oem wires and they still look new. Cameron
-
Ha - If you are referencing my avatar pic ... thats many years ago when I first brought it home. Can independently adjust camber. Been this way with both Rivals and RS-3s at various camber settings. I'm still leaning towards too much caster. Its also off throttle. Maybe need to play with shocks which I tend to ignore.
-
Really? What happened?
-
Sideways - could be (most likely) an influence but there's something in the set-up thats off and exagerating it. For years I struggled with the front end pushing on slow turns like I described (most certainly over drive was a contributor) but now Its moved to almost uncontrollable tail happiness. I agree that driver is a huge contributor but I've been doing this long enough in this car to want to keep optimizing the set-up in addition to keep learning the nut behind the wheel. More I think about it, first I remember this was after I added that last degree of caster. Forgot about that. Maybe I need to take some caster back out.
-
Ran an autox today with the droop limiters and new rear control arms. Nothing fell off so thats good. Seemed very smooth to apply power so definitely liked that. I drove like ass so its hard to say much else. I continue to struggle with the back end wanting to lead between turn in and mid corner going into slower corners. There are no corners like that a Dragon so its not an issue there but most tracks have a turn or two like that and Autox have plenty. No rear swaybar and plenty of rear toe in so not sure whats causing it.
-
So I think the cabin is influencing the numbers. When I checked above and below the pic right behind the Z emblem I should be at 1.5" lift. When measured both together its only ~0.7-0.8". Moved and tested delta pressure right behind the vent in the pic above and got only <0.1" lift. Still unfortunately havent measured any downforce When I stopped to make the last change a cop pulled up and checked my license. Guy I shouldnt have stopped near a railroad track at night but that put an end to my testing for the night. Was hoping to check the splitter but oh well. Jon - I tried 280Z vents, then just open hole, , then open hole with trip strip at leading edge, and now these louvers and to be honest seat of the pants didnt change although I never measured it precisely with the pressure gauges.
-
rsicard - many years ago I used to travel to Tucson about once a month. Now maybe once every other year. Unfortunately it's a long ways from Illinois. This may get addictive. So sealed up the gaps to the hood and retested. Went from +0.75 down to +0.5 " so it was a contributor but not the main one. Then I moved it here and got +0.8" so confirmed its coming from the engine bay. Move the top side to here and got +0.5" (note I later rotated it 90 deg so it wasnt into the airflow but didnt take another pic - either way the result didnt change) Then finally here and got +0.5" as well Interesting that 0.5" seems to be the popular choice. I'm holding the gauge on the steering wheel so this is all referenced to the center of the steering wheel with the windows down. Not sure what all this means yet. There's a thousand areas to test it's going to be hard to focus with limited time.
-
We have these nice ducts built into the front frame horns, the ones that feed the fresh air vents by your feet. Seems like if one were clever enough you could find an aero purpose for those. Im not clever enough - any ideas how we can use those to an advantage? Cameron
-
I only had time for a quick test but plan is to eventually measure all over. The pressure could be from the engine bay or possibly from the small gap between the hood and the front vertical filler plate? There is no seal as its just a close fit to the hood so mayby squeezing through there? Will tape it up tight and try again. The neg pressure above the hood is quite interesting I think - hood vent in front of the rad support anyone?
-
The upper bolt goes through a doubler plate welded to the inside of the tower used for the welded strut tower braces. It aint goin anywhere.
-
Test results at ~60 mph: I was a bit shocked at +0.75 " water I was equally shocked at -1" water Net 1.75" water of lift
-

-
Jon - I may be dense but dont understand what you are trying to do. Isnt the fill through the cap? As stated you want to fill at the high point and the pressure relief needs to be before the rad. Think about it - the pressure is from both expansion AND restriction through the radiaor. The inlet to the water pump will therefore be at a lower pressure and the cap wont work as intended. Plus the mess issues already discussed if it does open. Why not just keep it like normal with a remote, higher fill/cap and put a splice in the upper hose where you can both connect the steam vent and have a bleeder valve? Thats what most including myself seem to do I dont see why lowering the radiator would make a difference? Some engines are a bitch but I've never had any issues at all the air pockets when filling the LS. Just fill and go with no drama.
-
My take on modified stock control arms. Got some 500 lb springs for the front and going to move the 425's to the rear. Front droop limiters installed. I'm debating splurging on some new A6's It's going to be a long offseason ....
-
Front Control Arm Design
heavy85 replied to Mike Mileski's topic in Brakes, Wheels, Suspension and Chassis
Does anyone have experience using that Moog steering tie rod as TC pivot? I remember there was someone who sold TC rods that used them but dont know how they hold up. Seems like a good idea. -
G-Machine tension rod pivot Kit... Is this safe?
heavy85 replied to SDgoods's topic in Brakes, Wheels, Suspension and Chassis
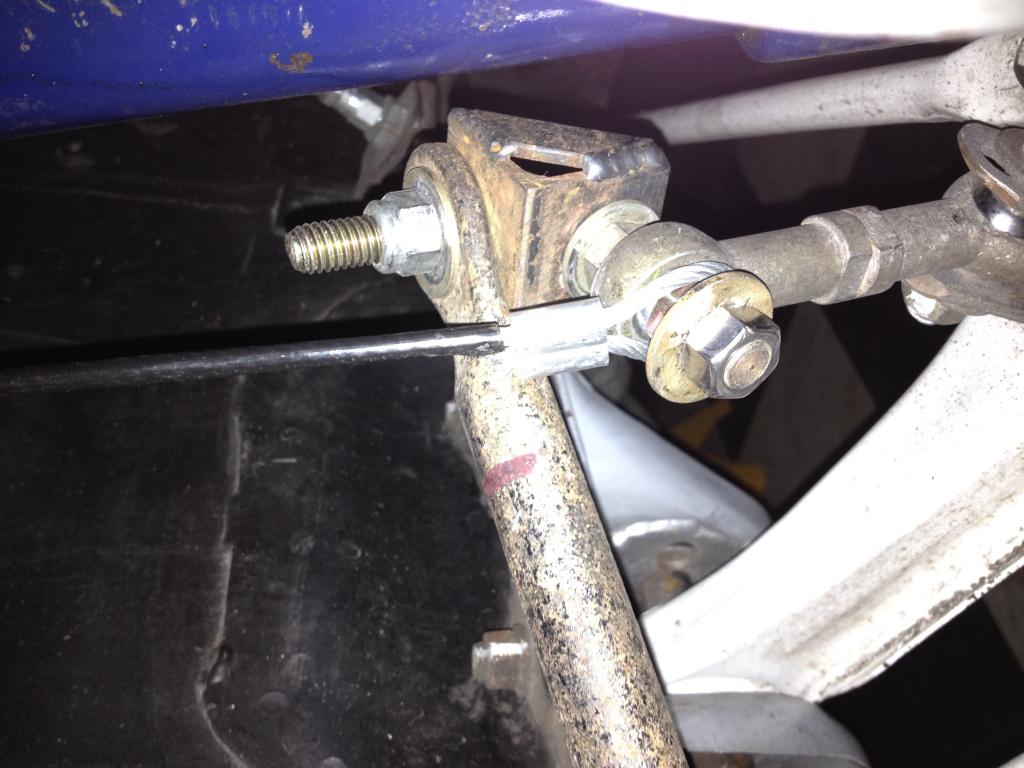
You have the big washer on backwards. Both nuts fit as you would expect if assembled correctly. -
What is the "best" T56 shifter dust boot?
heavy85 replied to RebekahsZ's topic in Gen III & IV Chevy V8Z Tech Board
I used the '02 Camaro boot from the donor just bent it to fit the tunnel and secured with self tapping sheetmetal screws. -
So control arms are almost done. Plan is to: - Lower the splitter as its effective at higher speeds but is just too high. - Finish modified stock arms w/ toe link and heims - Swap from 3.7 to 3.56 diff as Im on the limiter at the finish and should be able to eliminate at least one 3-4 shift - Install droop limiters on the front - MAYBE up spring rates Need to figure out tires in case I cant find 275/35-15 A6's. Next round of questions. The first Dragon next year is in March. This means much cooler temps maybe in the 40s or 50's. Other than trying to preserve tire temps any other considerations? Also when I swap gears I'll have the diff out. Should I keep the OBX gear type or go back to the Nissan clutch type? I've been happy with the OBX but I havent played with R-comps ... ever before these last couple events.