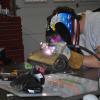
240hoke Posted January 29, 2005 Share Posted January 29, 2005 Well I wasnt sure what section to put this in, but I choose here since it had to do with stregthening the chassis. Anyway a couple months ago i posted about figureing out how to fix my rust problems lol. Well after alot more work then i thought im nearing getting done with it. Ive learned a good bit about welding amoung other things as this has been my first attempts at welding. Anyway here aresome pictures, thought yall might enjoy. rust before after: floor boards: frame rail (this pic was taken before i was completely finsihed welding) for more pics and info on my car you can visit: http://www.geocities.com/projectzt Quote Link to comment Share on other sites More sharing options...
Tim240z Posted January 29, 2005 Share Posted January 29, 2005 WOW I would have junked that heap long ago!! Well done...looks great now!! Lots of work, but now you know its all good!! Kudos man!!! Tim Quote Link to comment Share on other sites More sharing options...
Z-TARD Posted January 29, 2005 Share Posted January 29, 2005 First attempt at welding? Jesus.... That year and a half I spent learning how to weld in the Navy now seems like wasted time Seriously, that looks awesome! I hope my rust repair looks half that good when its done. Looks like yet another car that will be finished before mine Mike Quote Link to comment Share on other sites More sharing options...
DaleMX Posted January 29, 2005 Share Posted January 29, 2005 Nice detail on the web site. I'm very impressed by your work. I wish I was half as talented as you are. Those wheels look nice with the 225's. I'm gonna get the pans or the rewinds too. Quote Link to comment Share on other sites More sharing options...
slownrusty Posted January 29, 2005 Share Posted January 29, 2005 Austin - Looks great buddy, glad to see you back on here. I still cringe after thinking about your 260ZT...and its sad demise...glad the powe plant will live on in your new project. You are doing some wonderful work...congrats.... Yasin Quote Link to comment Share on other sites More sharing options...
240hoke Posted January 29, 2005 Author Share Posted January 29, 2005 Hey guys, thanks for the positive remarks. haha I too would have not bought this car or attempted work on it if I would have know it was so bad. The people who had "fixed" the rust before jsut put aluminum flashing over the bottom and frame rails and undercoated it. I bought the car without ever opening the hood or looking inside. I jsut saw it out in a parking lot and called the guy. Once I found out how bad the rust was, I couldnt really cut my losses because I would have lost too much to get another car so I plugged away at it. Still alot of work, but getting there. I am the second owner so I do feel like im saving something here. -Austin Quote Link to comment Share on other sites More sharing options...
280Zone Posted January 29, 2005 Share Posted January 29, 2005 Yep that is a very impressive "first attempt" hell that is impressive at any rate. Quote Link to comment Share on other sites More sharing options...
Guest cowboy6280 Posted January 29, 2005 Share Posted January 29, 2005 WOW! looks great, keep up the good work. I have planned to do the very same with my Z, although my rust isnt any wheres near as bad. I want to go ahead anyway just to help stiffin things up a bit and have new metal in the floors. My biggest slow down now is "time". If we lived closer I would try and talk you into doing the same with my car... Again, looks like you have a done a great job, keep it going! Quote Link to comment Share on other sites More sharing options...
Sparky Posted January 29, 2005 Share Posted January 29, 2005 I too would have junked that car long ago, almost makes me regret having to cut up that early 70's chassis........well.......nahhhhh it doesn't your doing excellent work and its most impressive for some first time welding. kudos to you Austin, hope to see your project on the road very soon...... Quote Link to comment Share on other sites More sharing options...
buZy Posted January 29, 2005 Share Posted January 29, 2005 Good Job! You are well on you way! Great MIG welding! Keep it up and post more progress as you continue! Quote Link to comment Share on other sites More sharing options...
Dat260 Posted January 29, 2005 Share Posted January 29, 2005 Nice work 240hoke. What was your approach when it came time for positioning the T/C cup, crossmember attatchment point and the swaybar? Cheers, Ari Quote Link to comment Share on other sites More sharing options...
Wagz Posted January 30, 2005 Share Posted January 30, 2005 Wow, fantastic job! It all looks familiar. Although, your '71 had a bit more rust than mine. I learned to weld on the exact same projects (battery tray area, firewall, pans, sf connectores) and can really appreciate how much work goes into what you've done. It's looking great. Quote Link to comment Share on other sites More sharing options...
5foot2 Posted January 30, 2005 Share Posted January 30, 2005 Nice work 240hoke. What was your approach when it came time for positioning the T/C cup' date=' crossmember attatchment point and the swaybar?Cheers, Ari[/quote'] Yeah, I'd love to read the notes and measurements you took while doing this. Quote Link to comment Share on other sites More sharing options...
Drax240z Posted January 30, 2005 Share Posted January 30, 2005 You guys that are saying you would have junked that car don't know how lucky you are living in Texas or California and having rust free cars available! As for the quality of work, you are putting a LOT of professionals to shame. Quote Link to comment Share on other sites More sharing options...
240hoke Posted January 30, 2005 Author Share Posted January 30, 2005 Hey guys, thanks once again for all the positive comments. ON the t/c mount and the sway bar mount. I have a little write up about what i did on the site that explains the sway bar mounts. I went up to 3/8" bolts and welded nuts onto the original spacer plate and then welded the plate to the frame rail -- might sound confusing but i've got pictures on the site that should clarify it. About those t/c mounts..... wellllll..... I took a few measurements before i cut everythign out and then got them welded back on as best i could. To be honest im fairly confident they will be off a little bit lol. But Hopefully not anything more then i can fix with some shims or, if i have to, adjustable pieces which i want anyway xmem was the same way, I did this one side at a time, and took measurementrs, I made exactly sure that the xmem was right, this wasnt a hard task as it is pretty easy to measure out. -Austin Quote Link to comment Share on other sites More sharing options...
Poundz9oh9 Posted January 31, 2005 Share Posted January 31, 2005 Don't suppose you'd consider giving the same floor treatment to a fellow HybridZ'er??? Quote Link to comment Share on other sites More sharing options...
240hoke Posted January 31, 2005 Author Share Posted January 31, 2005 haha i might. BUt not till my project is finished. Or at least on the road and driving lol. -Austin Quote Link to comment Share on other sites More sharing options...
MTenneZ Posted January 31, 2005 Share Posted January 31, 2005 Did you have any trouble with the sheet metal warping under the welding heat? Either way what, brandkind of MIG welder were you using because those welds look great? Quote Link to comment Share on other sites More sharing options...
Poundz9oh9 Posted February 1, 2005 Share Posted February 1, 2005 So, what's the projected finish date ?? Quote Link to comment Share on other sites More sharing options...
240hoke Posted February 1, 2005 Author Share Posted February 1, 2005 im useing a hobart 220v 180w with gas. And yes i did have some trouble with the warping on the flat pieces between the tunnel and the s/f connectors. I am going to blame it more on my skils then the welder though. Like i said this is really my first go aroudn at everything. IT really isnt too bad defintly not notciable with carpet and honestly prolly not notciable to any degree jsut painted homefully. Perhaps a better nchoise would be to stich weld it and then seal it im not sure, I thought welding everything would make it the most stiff. But maybe somebody with more expirience could chime in on this Im hoping to finish the project at the begining of summer. BUt we will see how everyhting goes lol. More like when i run out of money. Im in HS now so im not currently working, trying to get through with the insurance money i got. But i think thats gonna have ot change if i wanna finish and follow through with my goals. -Austin Quote Link to comment Share on other sites More sharing options...
Recommended Posts
Join the conversation
You can post now and register later. If you have an account, sign in now to post with your account.