-
Member Statistics
33298
Total Members5167
Most Online
All Activity
- Yesterday
-
Damian_GTX joined the community
-

Fast Floridian's 240Z Track Build
FastFloridian replied to FastFloridian's topic in S30 Series - 240z, 260z, 280z
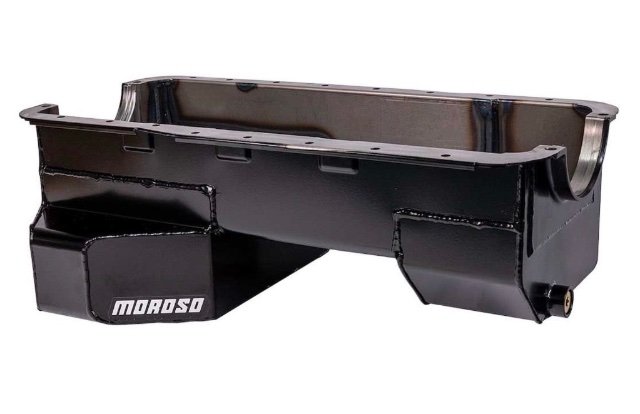
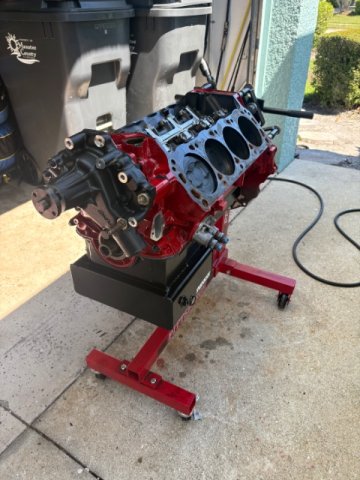
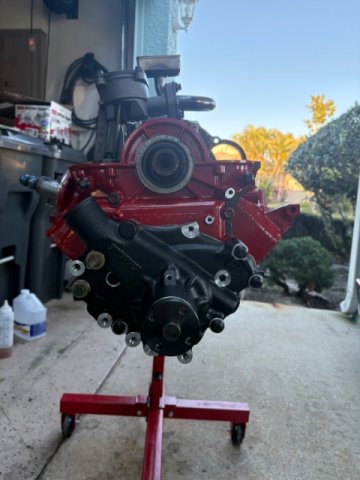
You caught my screw up. Unfortunately that oil pan doesn’t work, gonna have to replace it 😤. I ordered, basically the same thing, but a rear sump. Hopefully I’ll get it on this weekend. I went with a moroso baffled oil pan. I should be able to make this one clear the subframe.
-

Fast Floridian's 240Z Track Build
74_5.0L_Z replied to FastFloridian's topic in S30 Series - 240z, 260z, 280z
What oil pan are you using? You'll have to set the motor back really far to get a front sump pan behind the front crossmember. I'm using an Aviaid Mangusta pan on mine and I needed a custom crossmember to get the front sump to clear. - Last week
-

A 2026 SEMA SHOW 260Z Build all the way from Great Britain
toolman replied to toolman's topic in Body Kits & Paint
PART 9- ROLL BAR WELDED IN AND FABRICATING SQUARE TUBING INTERMEDIATE FRAME Thing are really moving along now. The Roll BAR is welded in and a frame connecting the existing front and rear frame rails is being fabricated. Excellent metal fabrication is demonstrated. i can for see that the original Transmission Tunnel will have to be removed to provide clearance for the Mercedes transmission. e Firewall probably have to be widen also. -
My efforts to get this other Z back running have expanded quite a bit beyond the rebuild of the 3.0 stroker motor. At the moment, I am working on repairing some rust in the floor panels. I have been watching a number of "Make It Kustom" videos on Youtube by Carl Fisher. In one of them, he creates some forms out of 3/8" plate to create a "hammer formed" part. Additionally, he uses a hydraulic press to "stamp" a recess into the battery tray he is making in the video. The rust in my floors on this car is not extensive. It is generally in the area of the large oval depression in the floor panel (on both sides of the car). Yesterday, I spent a few hours cutting out and grinding/filing on part of the form I plan to use to replicate the depression. On the right side floor, I only need a small portion of it. On the left side, I will attempt to make a full piece to replace the depression. I've never done anything with forms likes this, so we'll see how it goes. I will be using my 12 ton press because it is what I have to attempt to make the replacement part. But, I have been watching facebook for a suitable upgrade, perhaps a 30 to 45 ton press.
-
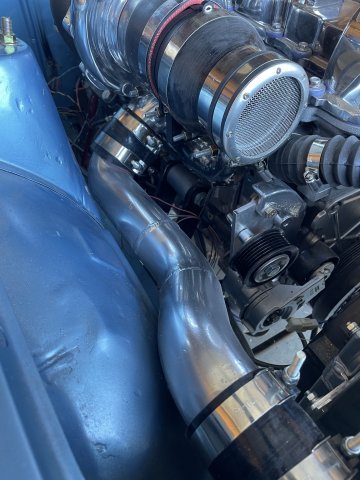
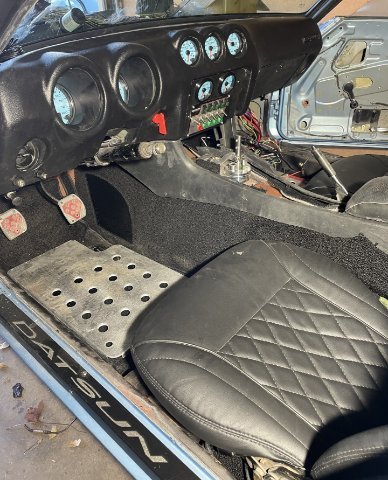
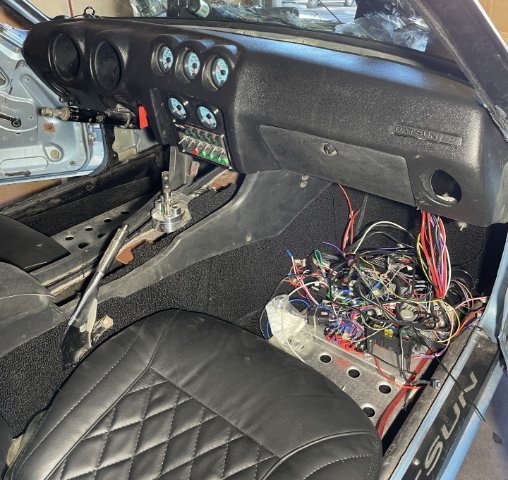
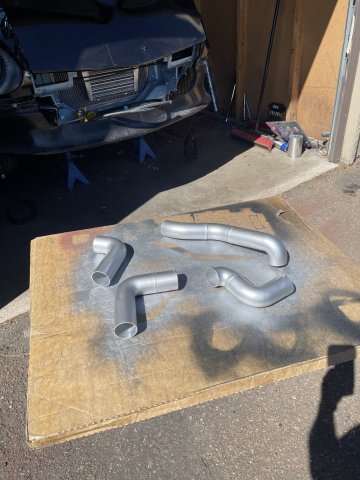
03-21-2026 ATLAS Z UPDATE: After painting the intercooler piping silver yesterday, I didn't think it had enough "pop" to it, so today I I put a couple of coats of chrome spray over the top....I like it much better. I was able to get all the intercooling pipes installed. Then I went ahead and vacuumed out the car, and installed the carpets from Newark Auto I got on eBay. some carpeted pieces I am not installing, as I will leave the vinyl 260Z pieces that the car has from the factory. I dropped in my heel plates from Skillard and then mounted my dashboard and then set the console in to see what modifications would be necessary. The pics of the shift knob on the steel show that I am ready to hold it to the shifter, mark it and then cut out a shifter so that the shift knob is right where I want it. PICS!
-
Fast Floridian's 240Z Track Build
FastFloridian replied to FastFloridian's topic in S30 Series - 240z, 260z, 280z
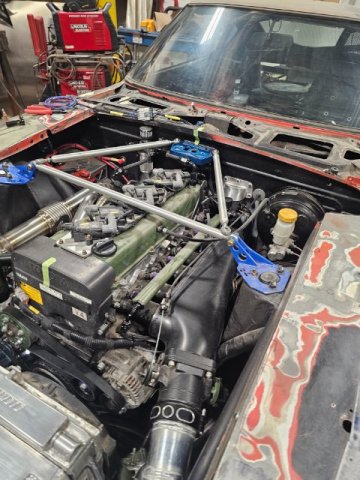
Windage tray and oil pan on. I had to take the oil pick up off to slide in the windage tray.
-
02-20-2026 ATLAS Z UPDATE: Today I got my intercooled pipes back from being welded up, and I decided to see how they would look painted. I used the Duplicolor silver engine block paint. I also was able to finally get the right length of hose for the lower radiator hookup. When time comes, I will tighten it up and assemble the intercooler piping! PICS.
-

Progress on my insane VQ35HR 240Z project
calZ replied to markrolston@mac.com's topic in Nissan V6 Forum
One of the best builds ever on the site. I'll be sad if this is the final update, but I have a feeling it won't be. There's always something to fix or change! -
It's been one of the busiest years of my life but the turbo build continues in the background. Since the last update, the circuitry has been mapped out so I visited the chassis to start installing the mil-spec bulkhead and radlok connectors. Generally, the plan is to run Haltech for ignition control, knock detection, etc. and ditch all piggyback systems which I'll probably recycle on another ongoing turbo project. Only the best for the Z 😉. The resto shop is doing a fantastic job with great attention to the details. They've installed the sweet Capital Metal Works full length framerails and started massaging bent OEM sheetmetal back into shape, along with continuing to metalwork other detailed aspects of the chassis.
-

Progress on my insane VQ35HR 240Z project
Zetsaz replied to markrolston@mac.com's topic in Nissan V6 Forum
Always an inspiration Mark! A lot of what you do is well out of my abilities, but seeing your project still being refined after so many years keeps me motivated on mine. -
 churchData2015 changed their profile photo
 -
So I had moved and left my car behind, but now that I'm back I did some more testing. I was unsure how accurate the knock sensors were as I was seing knock retard even when the motor was not in boost. Turns out they are 100% accurate. I put in some 104 octane and gave the car a spin. 99% of knock retard was gone. It is now quite obvious why people blow these motors so easily. I was getting knock retard throughout the 7psi (absolute PSI so 7 away from being "in boost") band from around the 3.6K+ RPM when using just 93 octane. I was getting up to 13 degrees timing pulled at higher boost. With the high octane it was only pulling timing at 14PSI boost, with a resulting spark advance of 20degrees. It will spin tires in 1-4th gear easily.
-
Fast Floridian's 240Z Track Build
FastFloridian replied to FastFloridian's topic in S30 Series - 240z, 260z, 280z
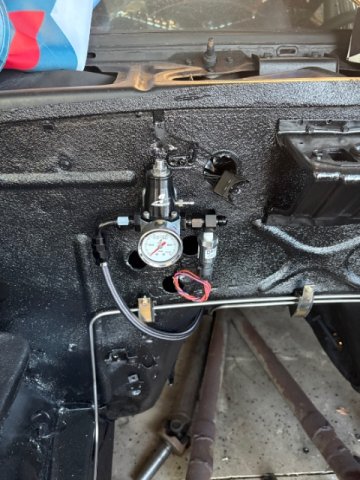
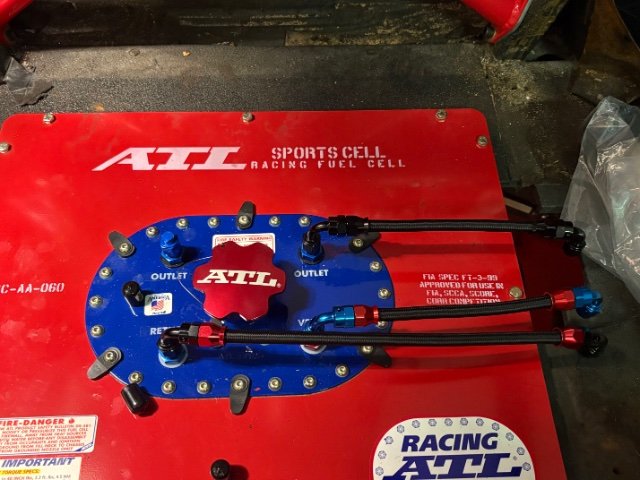
Thanks guys. I got the timing cover and water pump on, ordered a windage tray then I can get the oil pan on and start working on the top. Mounted the fuel regulator started making some fuel lines. Need to figure out filter placement then I can cut and finish the rest of the lines. I’m using black for fuel, red for return and blue for vent.
-
280z 1jz track build from a pile of parts
FastFloridian replied to flatout's topic in S30 Series - 240z, 260z, 280z
Nice, you’ll be good. Yep, I went with same gearing, but I got a 3.3 in the rear. -

280z 1jz track build from a pile of parts
flatout replied to flatout's topic in S30 Series - 240z, 260z, 280z
I plan on boxing it all to the grill opening as well as venting the hood just behind the radiator. direct air in and give it a place to go. I have 2.87 first and .81 5th. I have this gearing in a 2jz 240sx with a 3.73 rear and pretty happy with the ratios. so i'll see how 4.08 rear gear works with it on the local tracks. -
280z 1jz track build from a pile of parts
FastFloridian replied to flatout's topic in S30 Series - 240z, 260z, 280z
Looks good, what gearing did you go with the on the TKX, I got same bell housing too. I would definitely do some ducting to help get all the air you can through all of that. I have a TT 370Z I track occasionally, oil cooler/intercooler/radiator all stacked similar to you, after about 5 laps or so I need to do a cool down lap to get temps back in range. Adding some ducting is on my to do list on that car. -

Progress on my insane VQ35HR 240Z project
Jboogsthethug replied to markrolston@mac.com's topic in Nissan V6 Forum
Interesting! I have never heard of keeping it all together like that, you'll have to update as time goes with how it holds up! I'm sure with the outer layer being glassed it will be fine though -
280z 1jz track build from a pile of parts
flatout replied to flatout's topic in S30 Series - 240z, 260z, 280z
Cage is done. Driveshaft arrived. its comically short. i dont know if i even mentioned it in this thread. I bought the engine with a 350z six speed and tried to fit it and didn't like it so i switched to a tremec TKX 5 speed with a scatter shield. lighter, smaller, better gearing, serviceable. shifter position is great, and not 20+ years old. Mounted a 240z ebrake handle in place to help connect to the 300zx rear cables. Started getting the dash sorted. FIA bars are certainly making it extra challenging to do a clean install. Pedal box is in and throttle pedal is fitted. I don't know what the pedal is even out of but it was sitting in a box that came with the car so I made it work. feels good on the foot. Mounted the heater box to the tunnel. designed and 3d printed some ducts that go to the factory defrost ducts. i also added a small foot diverter for the wifes feet as shes always cold. Mounted the oil cooler. went thru a few ideas between laying it flat and ducting it, stacking it. putting one in the wheel well. etc. Although a 3 stack is not ideal i decided to try it. Can always move it around if its impeding flow to the coolers behind it to much. probably do some sort of screen infront of everything when its on track to keep debris from damaging it. Got my front valance quickly mocked up. I forgot the headlight buckets were a bit beat up so added that to the list of things to fix. drivetrain is basically all set so I am pretty close to pulling everything out and starting bodywork.
-

Progress on my insane VQ35HR 240Z project
markrolston@mac.com replied to markrolston@mac.com's topic in Nissan V6 Forum
Not a mold. I just left the original 3D part sandwiched between the outer layer of fiberglass, bondo, and paint used for fit-and-finish, and the inner layer of carbon fiber used to ensure the whole part is stiff enough to last. -
-
Heavy Duty frame rails and connectors
toolman replied to toolman's topic in Gen III & IV Chevy V8Z Tech Board
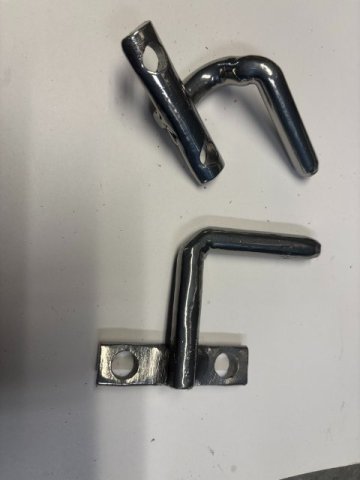
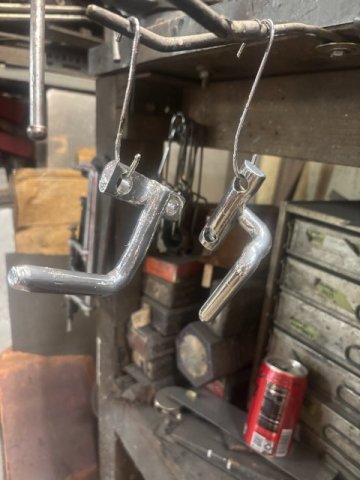
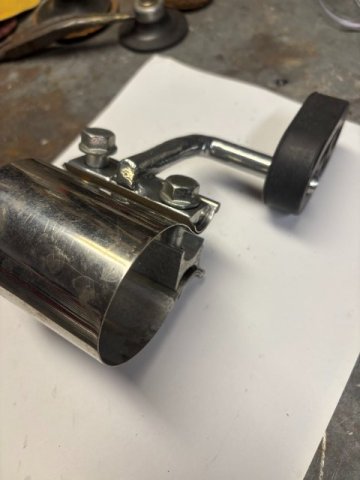
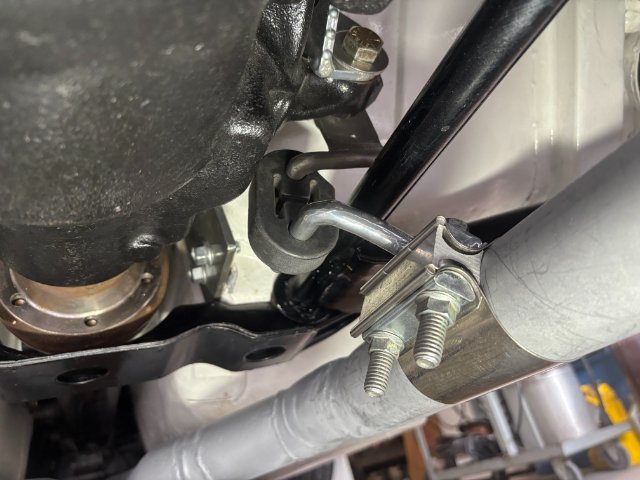
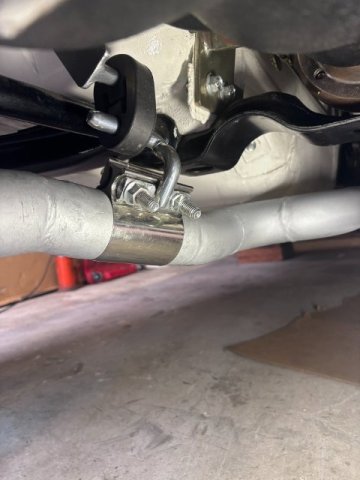
EXHAUST SYSTEM REPAIRS- My 240Z Exhaust Pipes were damaged from scrapping them on Speed Bumps. I found a cracked at one welded joint and a few exhaust leaks. Since repair required their removal, I decided to raise the pipes higher as the same time. I designed this exhaust system so that whole system consists of three major sections. First -Front Section goes from Hooker Exhaust Manifold to the X-Crossover pipe. Second Section runs from X-Pipe to the Rear Right Angle Exhaust Pipes. The Last Section finishes at the Two Turbo Mufflers. So this repair and raising the pipes only required the Intermediate Pipe. Also, since I used Evil Energy V-Band Clamps to connect the pipes, it was a simple job. The Intermediate Pipe Mount consist of 1/2" Steel Rods bent at 90 degrees and bolted to the Differential Housing. To Raise the exhaust pipes, only the Mating 1/2" Mounting 90 degree Rods had to be shorten. Pic of Mounting Rods cut off and rewelded Pic of Mounts Powder Coated and out of Oven Pic of Fully Assembled Exhaust Mount Evil Energy 2 1/4" Lap Joint Clamps( Amazon $20 a pair) Rubber Exhaust Pipe Hangers(Amazon-$6 a pair) and 1/2" Steel Rod-Bent to (90 Degrees-Home Depot) Right Side Pipe Mount Left Side Pipe Mount The Exhaust Pipes were raised about 1 1/2". The job can be accomplished in one days if materials were at hand.
-
Fast Floridian's 240Z Track Build
flatout replied to FastFloridian's topic in S30 Series - 240z, 260z, 280z
bummer about the bolt. pretty common SBF flaw. Engine looks good. TKX will be great addition. They fit the tunnel pretty well. I have one behind my 1jz -

240z Barn Find Registration help
jhm replied to Btz white z's topic in S30 Series - 240z, 260z, 280z
Sorry, I misunderstood the question. It's a much easier proposition if you're just looking to flip it, IMHO....particularly if you can attract out-of-state buyers. Every state has their own unique requirements for titling and registration, and prospective buyers will (should) know that going into the deal. You will typically have to sell it "below" market value without a title, so be sure to factor that into your decision on how to proceed. -

240z Barn Find Registration help
Btz white z replied to Btz white z's topic in S30 Series - 240z, 260z, 280z
Just looking to sell it, can I sell it without the title in place for someone's project car or do I need to obtain title for a transfer (is the main question). Thanks! -
Fast Floridian's 240Z Track Build
jhm replied to FastFloridian's topic in S30 Series - 240z, 260z, 280z
Ugh...broken bolts in the block. What a pain. At least the motor was already out of the car! 👍 Making great progress -- keep the updates coming!! - Earlier
-
A 2026 SEMA SHOW 260Z Build all the way from Great Britain
toolman replied to toolman's topic in Body Kits & Paint
Part 8-The Roll Cage is now installed so the Roof Area is being prepared for the Gull Wing Door Build. A Major Obstacle that I foresee the Transmission Tunnel and Firewall may have to cut open because of the Huge Mercedes Motor and Transmission. But if they are willing to Eliminating the Tunnel and Widening the Firewall Opening, they should not be a Big Problem.


-
Who's Online 1 Member, 0 Anonymous, 803 Guests (See full list)