m1ghtymaxXx
-
Posts
743 -
Joined
-
Last visited
-
Days Won
1
Content Type
Profiles
Forums
Blogs
Events
Gallery
Downloads
Store
Everything posted by m1ghtymaxXx
-

Rota Shakotans.... anyone running them?
m1ghtymaxXx replied to ComicArtist's topic in Brakes, Wheels, Suspension and Chassis
No camber plates required at a reasonable ride height, and I would recommend going with 225/50's which will have a bit of stretch. 205's will be very stretched. -
Suggestions on under coating/rust preventative
m1ghtymaxXx replied to Hypertek's topic in Body Kits & Paint
I would also recommend POR15 and other epoxy coatings if you don't mind putting the time into doing it. Personally I wouldn't recommend the rubberized/asphalt undercoatings as I blame them for killing my 83. They might be fine for a few years, but eventually they can lose their bond and trap water, all the while hiding the damage it's doing. If you want to add some sound deadening, I would recommend applying whatever product (spray on or adhesive) to the interior side of the floors. Only downside is it won't cut the noise of stones and debris hitting the floor and inner fenders, but in my opinion that's a small price to pay for preserving your car. -
Just food for thought, 240SX manual transmissions accept an L series bell housing, what about looking at 240SX automatic? No clue if it works, but perhaps worth looking into.
-
15x9 without flares?
m1ghtymaxXx replied to GarageRatt13's topic in Brakes, Wheels, Suspension and Chassis
15x9, 0 offset, 225/50R14, stock diameter springs. 3/8" spacer required for the front to clear the spring, rear has about 1/2" clearance to the spring. I rolled the front fenders before the wheels arrived, though it wasn't necessary. It hasn't ever rubbed with this setup/ride height. The wheels poke about 15-20mm from the fenders, therefore I wouldn't recommend getting negative offsets for any reason other than to clear the front spring. I wouldn't recommend 205 width tires either, 225 is plenty stretched as you can see. I have 220/45 Rivals arriving this week to replace the 225/50 Falkens in the picture. -
Jay Leno garage on 63 Corvette
m1ghtymaxXx replied to djwarner's topic in Windtunnel Test Results and Analysis
Missing video link? Of course 280Z's had hood vents, I'd be surprised if they were for anything other than styling though. -
Alternator upgrade does'nt charge battery
m1ghtymaxXx replied to s30kid's topic in S30 Series - 240z, 260z, 280z
I had lower voltage at the battery than alternator on my 83 ZX. The culprit was rusty battery and alternator grounds. The same grounding issue also caused my fusible link box to catch fire, created severely RPM dependant voltage (low charge at idle, over charge at high RPM), and caused the demise of several alternators and batteries. -
Many of are running smaller than stock wheels. Sure it will slightly increase steering effort when parking, but well worth it to get the bus sized wheel out of your lap.
-
Neat looking custom dash partly visible too.
-
So I just stumbled across this in a google image search. Never heard of it before and I couldn't find any more info: http://www.chromjuwelen.com/de/network/237/180391-240z-with-a-turbo-v6-in-the-trunk.html The fabrication work looks well executed from what I can see, does anyone have more pics or info of this car? Seems like a strange thing to do to a car that will easily tuck a V6 well behind the front axle under the hood, but I'm dying to see more!
-
You won't fit anywhere near 10" of wheel under the fenders. Many of us (myself included) are running 15x9's with stock fenders. at 0 offset, that's 4.5" backspace, and a spacer was required to clear the stock front suspension (5mm spacer was enough to provide roughly 1mm clearance, so I stepped up to a 3/8" (9.5mm) spacer for comfort. Going by memory, I think there was about a 1/2" of clearance on the rear so you might be able to get away with 5" of backspace (stock suspension). The bottom line is you won't be covering your tires without flares, you'll have about 1-2" poking out of the wheel wells so rolling won't do you any good. The only way to go without fender modification will be keep your ride height high enough to allow them to poke without bottoming out like below. It might take some air dam trimming to allow the wheels to turn lock to lock also.
-
Rear Control Arm Bolt - Size and Source?
m1ghtymaxXx replied to m1ghtymaxXx's topic in Brakes, Wheels, Suspension and Chassis
Considering all that bolt seems to do is retain the bushing, I don't imagine the thrust load is remotely enough to stress a bolt that size, I would think the 1.5x or even 1x thread rule isn't necessary in this situation. You're drain plug suggestion may have merit. Anyways I managed to 'borrow' a bolt from a rusty 240Z stored a few blocks away. Big thanks to Whitehead performance for sending me a replacement, and to z240 who offered one up as well. -
Rear Control Arm Bolt - Size and Source?
m1ghtymaxXx replied to m1ghtymaxXx's topic in Brakes, Wheels, Suspension and Chassis
I managed to gather up all the parts I need in a day despite living on an island with 3-4 other running S30s. For whatever it's worth, that bolt is a m22x1.5, 30mm length, but it doesn't matter as it seems pretty much impossible you'll find one unless it's off another car. -
Rear Control Arm Bolt - Size and Source?
m1ghtymaxXx replied to m1ghtymaxXx's topic in Brakes, Wheels, Suspension and Chassis
Thanks Jim, you have mail! -
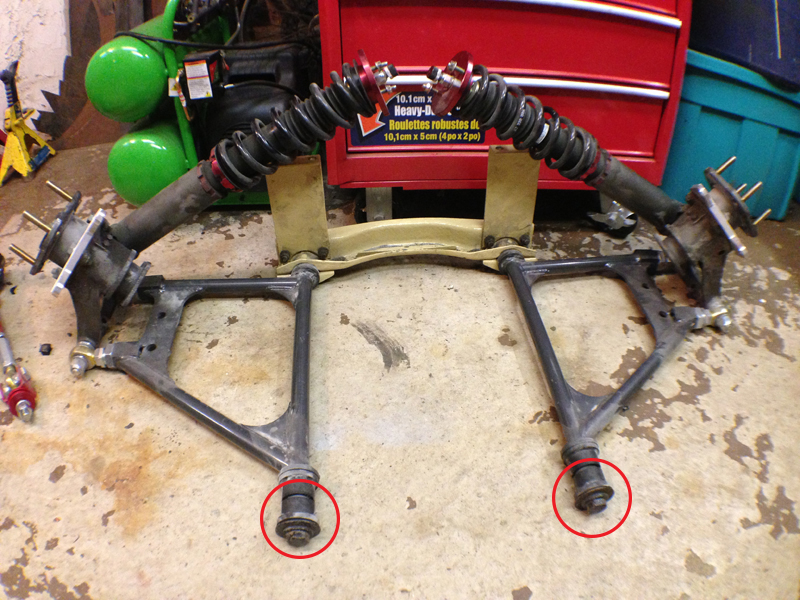
This weekend I had a bit of scare, while braking down from highways speed onto a turnoff, my 77 280Z violently lurched to the left and then wandered back and forth while under braking. I pulled over at the next opportunity and after a few minutes of poking around, found the left drop link was only held to the chassis by only 1 of the 2 bolts, with the second bolt partly backed out. Thinking I had located the issue, I limped the car to a friend of a friend's garage in a neaby town, grabbed some replacement 10x1.25 bolts from a local hardware store (though I was bracing to have to drill and tap the chassis to a larger thread as the remaining bolt was completely stripped). Just when I thought I could carry on my coastal cruise, I found the main issue was that the inner front bushing of the right rear control arm was missing, along with the large bolt that retains it. This meant that the front control arm pivot is free to bounce around in it's pocket, allowing the wheel to move back and forth almost an inch. Under normal driving/accel, the wheel would have been pushed forward into toe-in position, but the moment the car begins to deccel/brake, the wheel would instantly pull back and toe out, veering the car to the left. Anyways, I'm now trying to source the missing parts ASAP as I have autocross this coming Saturday. It seems I can probably get a replacement bushing set quickly either through Energy Suspension or a Whiteline kit through Whitehead performance. The bolt however looks harder to find. I measured the thread pitch at 1.5, but I'm not sure on the diameter and lenght, but I'd estimate it at 20mm diameter, 25mm length. Could anyone confirm the bolt size, and can anyone point me towards a source for a replacement, or would anyone have a spare then could send me? I looked on Mcmaster and Carr's website, but it seems all their 20mm diameter bolts are 2.5mm pitch, though M&C doesn't make private sales to Canada anyways. The offending bolt/bushing is circled in the attached image. Thanks in advance!

-
Love this build! I look forward to a final weight. The F20C seems like the ultimate out-of-box n/a 4 banger. There was an MKI Ford Escort competing in Targa Newfoundland last year powered by an F20C running through a Qauife sequential gearbox. Unfortunately I had to help the driver out after he rolled it into a telephone poll on a practice stage, but he had it back up and running for competition stages. I would have done horrible things to have that drivetrain setup.
-
Are these seats original? ?
m1ghtymaxXx replied to 88dangerdan's topic in S30 Series - 240z, 260z, 280z
They do look an awful lot like S30 seats but with cloth covers. Custom upholstery job perhaps? -
DIY front end alignment- what's your method?
m1ghtymaxXx replied to madkaw's topic in Brakes, Wheels, Suspension and Chassis
Figured I may as well post up string method for those unaware: http://www.negative-camber.org/jam149/technical/alignment.html Cliffs: - Research front and rear track widths of vehicle - Lay out string parallel to to both sides of the car on jackstands. Make sure front wheels are visually straight, set elevation of string at center of wheel. Space string out 100mm from front center cap. Account for any diference in track width at rear. Example; if rear track is 20mm wider, string should be 90mm from rear centercap. - Position steering wheel and secure it in place. Get creative or find a very patient volunteer to hold it. I've put a long 2x4 across both windowsills and securely zip tied it to the wheel with several heavy duty zip ties. Keep an eye on the wheel during alignment to avoid it shifting. Adjusts your front and rear toe as necessary. When done properly you must have equal measurements side to side at the front and rear lips of the wheel to the string. Again make sure the steering wheel doesn't slip. - Use an angle finder or the the triangulation technique shown for camber. -
Roll bar main hoop conflicts with quarter glass screws
m1ghtymaxXx replied to RebekahsZ's topic in Fabrication / Welding
http://www.canadiantire.ca/en/pdp/mastercraft-29-pc-screwdriver-set-0588626p.html#.U4N2ZvldXAQ This little tool kit is a staple of Mastercraft socket sets from Canadian Tire up here. There must be something similar available stateside, seems like the ticket for the task you're describing. -
gland nut welded to strut tube
m1ghtymaxXx replied to grillhands's topic in Brakes, Wheels, Suspension and Chassis
Just a thought, you could still use those strut housings to build coilovers with Bilstein dampers using the method shown in this thread: http://forums.hybridz.org/topic/98897-step-by-step-coilover-conversion/ -
There is no way of adjusting bump steer (which is engineered for the safety of unskilled drivers) without adjustable tie rod ends, slotting/redrilling of the control arm mounts, or moving the steering rack. Without serious modification, there's no way to make bumpsteer better or worse so there's nothing to worry about in that regard.
-
I think your best bet is to exchange the wheels for something with less offset if possible. Myself and many others are running 9" wide, 0 offset wheels under stock sheet metal without issue, with your widened quarters I can't see there being any issue. Can't wait to see it painted though!
-
1.30 Minutes? 17:41 myself today.
-
Looks good, what are the camber plates you had in the first post, and why the switch to weld-in?
-
77 280z master cylinder check valve
m1ghtymaxXx replied to voltron_boi's topic in Brakes, Wheels, Suspension and Chassis
The stock 280Z pushrod works. Getting the measurement may take some creativity without the right tools (shown in the sticky: http://forums.hybridz.org/topic/102754-a-one-inch-diameter-brake-master-cylinder-for-the-s30-z-cars/). Find yourself a machinist's straightedge, a fine ruler, and Vernier calipers and you'll be golden. Mine measured pretty close, but not within the 0.3mm recommended. I tried to adjust the rod but it was complete seized. I figured I'd try to bolt it up anyways it performs flawlessly. The pedal is rather firm and threshold braking can be tricky without locking up the wheels, but I attribute that to the oversized m/c with stock disk and drums brakes (and high friction Hawk HP+ pads) -
The rockers can be removed by simply prying them down on the spring with a large flathead screwdriver or small prybar, then the lifters thread out easily. I took apart, and reassembled my lifters full of oil on my L28ET that I have yet to install. One of the 12 collapsed on install so I'll have to revisit it. This thread has all the information you should need: http://forums.hybridz.org/topic/50067-p90a-head-ticking-what-to-do/?hl=cleaning%20hydraulic%20lifters