
Derek
-
Posts
1317 -
Joined
-
Last visited
-
Days Won
40
Content Type
Profiles
Forums
Blogs
Events
Gallery
Downloads
Store
Posts posted by Derek
-
-
-
I ran into the same direction problems with my cast ITB manifold. First I used a Haltech sensor with a D shaft that went all the way through the switch. It was a total piece of crap. It wouldn't return to "0" consistently. Then I bought one from a Chrysler but I don't think the resoloution is fine enough for Megasquirt. Please post how you make out with this as I'm going to have to make a change at some point.
Thanks
Derek
-
looks pretty good for the amount of milling your going to be doing. The 2400 rpm spindle speed will make it tough to get a good finish on aluminum but it's workable. An old mill is a tricky buy. sometimes problems don't show up until you start working the machine. But then it's too late you already own it.
Derek
-
Depends on what I'm driving. F250 4WD diesel with lift gate on back, You betcha. Driving the Z, no way. Now keep in mind there's brake checking and there's brake checking. My idea of a brake check is a light tap just to get their attention not a rapid decel on the verge of locking them up. Now adays though I mostly pull over and let them by. It just isn't worth the hassle.
Derek
-
I think the earlier 260's had more in common with the 240's, and the later 260's had some parts simular to the 280's. Read that somewhere, not too sure what it applies to.
I am willing to pay for another sensor mount if it is possible to mount it on the drivers side. My car is not at my place, so I can't easily do the mock up right now. Anyone have a 280 ?? Is it possible to mount the sensor on the drivers side and still retain A/C??
I plan to do some more work this summer prototyping the car with Autodesk Inventor, I am getting sufficent with the package now.
Hi clint
I'm confused as to why you need to mount it on the drivers side. Is there a clearance problem?
Derek
-
I originally had the same 280Z damper from a 1975 280Z and while it is very similar to Derek's set up (that he based his design on) it will not work with his 36-1 wheel. The diameter of 36-1 wheel is about 1mm larger and it won't go into the damper center hole.
I went to the local yard and ran into a 1974 260Z, it had the timing marks on the drivers side just like Derek's and the damper also had a 1mm larger center diameter. I tried on the Derek's wheel and voila, perfect fit.
I finally got a new battery for my cam so I will post pictures and measurements comparing the two dampers in the next day or so.
Did the 74 260 have A/C?
-
I'm thinking if I make the hubs to fit the 75-78. Which is the one rossman sent me then it will also fit the dampers like mine. This will become the standard adapter that will fit early (73-74??) and 75-78 2 groove dampers.
Derek
-
I think they all interchange, Derek's is the first I have seen with opposite clocking. Is it possible to flip the mount to A/C compressor side ?? I haven't fully layed out that option, I was going to do all my machining myself before. Just a minor speed bump along the way.
The hole pattern on the timing cover is different from the passengers side so the sensor mount has to be mounted there. Mounting it on the drivers side would take a different mount bracket.
If you guy's would just go out and buy 73 model year cars this wouldn't be a problem.
C'mon work with me here
-
I have a 75 280z damper, does anyone know if it will fit the zx motor. I am not using the a/c, or power steering, only the alternator. if it fits then I could use the parts correct ?
From what I understand the answer is yes. The hub is the same and as long as it's from a 6 cyl and not a 4 cyl the harmonics should be the same.
Derek
-
Ok
Here's the deal.
In my infinite wisdom I made my system fit a 1973 damper with an airpump.
This fits a damper that has two pullies, the outer one being narrower than the inner and no protruding ears on the inside bore of the damper.
I recon this fits about 4 cars in the US, including mine 5.
Rossman sent me his setup from a later model 280Z with the A/C mounted on the drivers side. This damper has two pulleys that are the same size and a smooth bore on the inside of the damper. I'm machining a new adapter for his damper and based upon my initial measurements I don't see any problems. So that will damper style #2
highly sent me an IGES file on his adapter that fits the MSA performance single pully damper. I'll be making an adapter ring like the one in the photo of his post.
As far as the ZX Turbo goes I'm not sure whay's going to fit that. I kind of have my hands full right now getting everyone that's purchased hooked up with the right parts. I think this is a pic of the Turbo damper

This was Rossmans original damper.
If anyone that bought one of my hub adapters that hasn't installed it yet please check it out and make sure it fit's. If you have a problem PM me and I'll get it straightened out.
Derek
-
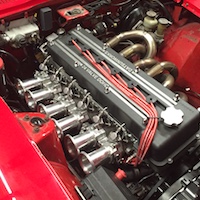
Man that header would look awful purdy under my manifold!
Derek
-
From one fool to another
Happy birthday Phil
Derek
-
Mmmmm... That sure is a purdy 3D file.
PM sent.
-
What a bunch of whiners! You actually want things to fit?
After perusing the pictures I know what the problem is. The outer pully on my damper is to drive a air pump and is a narrower groove. This means the distance from the base of the damper where the crank bolt goes to the shoulder of the pulley is longer. That's why there is an air gap between the hub adapter and the damper.
There are a few way's we can go.
1) I can leave the country and you'll never hear from me again.
2) I can machine a spacer to go between the damper and the hub adapter to space it out. This would require some good measuring. but is doable.
3) Someone (rossman I'm talkin to you man
) can send me their damper, sensor, and all the parts back and I'll machine everything to fit.At that point we will probably have a baseline to work from. This is my preferred solution.
I take a lot of pride in my work and it bugs me that this stuff isn't working out for you guys.
Let me know.
Derek
-
Though, to play the Devil, no 'works rally car' would EVER have an IAC...it would have a fabricated zinc-coated bracket and a pneumatic pull-off!
muahahahaha!
Or Air conditioning, power windows, central locking, cruise control or an on-board computer.
It's called "artistic license"
The IAC symbolizes modern mans desire for convenience yet struggling with the dichotomy of the myth of simpler times.
Or something like that.
You low down dirty thread stealer!!!Not to steal the Thread, but hopefully to help!This may interest some in the future! Derek you may want to look at Extrudabody Electronic's as well in the future! There's no Vacum Log, vacuum sampling is done on the last runner of a 4 or 6 cylinder, uses a TMAP sensor mounted directly in #4 Runner. This engine only has a 60-2 Crank Trigger, no CAM SENSOR!
Wideband self tune control is working excellent on the itb's, as is the 4th runner MAP sampling – shows idle MAP as 30 kPa, exactly the same as with a manifold! Also, it’s synchronizing with the engine for sequential injection, and – SEQUENTIAL IGNITION (we made a small box that splits the signals, and as long as the dwell doesn’t exceed 50%, it can double the number of outputs, and fire 4 or 6 coils sequentially)! With ITBs, the VE is a little different though, at the medium loads - probably from the runner length changes, and the hack-job adapter that we made for the ITB's.
You couldn't have come out with this a few months ago?
Derek
How'd the goop work out for ya?
-
Derek,
What code are you using that has 16x16 cells ?
Nigel
Hi Nigel
I'm running MS2/Extra. I'm running the 2.1 beta. It's almost ready for lockdown so it's stable. I upgraded mainly for the IAC control but it seems to run better as well. Only the VE table is 16x16.
Derek
-
I will be utilizing this damper setup and am wondering if it would work with this. The damper is from zraceproducts.com.
I'm not sure. If it's the same bolt pattern as softopz's damper then What I plan on making for him should work for you.
Nice package. I wish it would have been available when I was doing my install. Is there a reason you chose to locate the VR sensor on the right (passenger side) of the motor and not on the left (driver's side) of the motor?My AC compressor is on the drivers side. I had more room on the passengers side as the v angle on the alternator belt is wider.
Derek
-
I think it's hanging out too far!
Here's the deal. Get me a measurement from the face of the damper to the face of the flat sensor bracket that mounts to the case. I also need the spacing on the two bolts on the damper. I'll cut you a spacer plate to replace the hub that will bolt on the way you have it and bring the wheel in closer. I'll set it up for one of my laser cut wheels.
This method of mounting will work but it's dependent on the holes in the damper being concentric to the bore. Otherwise it will have runout. It will be better than what you have though.
I'll exchange the whole rig all you have to do is pay shipping. These EDIS wheels have been a pain anyway and I'd like to see this done right.
How's that for a deal.
Derek
-
I know this is a little off from our current topic in this thread, though it's still the right thread...
But... Derek, what do you think of making instead of triplets, or dual horns, just making single horns that have mounting holes predrilled, or dempled for different intake bolt patterns. this way you could sell, 4 for 4 cyl, 6 for 6 cyl, or 12 if someone has an old jag engine. hmm I guess dual horns work just as well, but singularly they have a better chance of fitting multiple engines, or at least being made to fit... linkages may be difficult though, unless you can come up with n easy standard configuration for them.
You just keep thinkin' Butch (Phar). That's what you're good at.
I did give that some thought but hadn't gone any further. The tricky part would be the angles (and probably a host of other things I haven't thought of)
I periodically pull the air cleaners and check things out. Everything looks AOK. The goo still looks exactly the same. I put the screws in with red loc tight so they shouldn't be a problem. I really thought I was going to have to tear it apart so I didn't stake the screws. I'm at mile 750 or so. I'll probably pull them around 1500 -2000 and check everything out. If all is well I'll stake the screws and call it a day.Separately, have you looks down inside to see how the plates and that goo stuff are holding up? all the screws staying tight?Interresting lessons learned on this about the MS tuning.. Keeping the Map away from the IAC, you wouldn't think was a big deal, but apparently there's enough vaccuum variance at that point to really make a difference.
Phar
I was really surprised about the MAP as well. That's why it took me so long to move it over to the manifold. I just didn't think it would matter.WRONG.
Man the learning curve for me was steep. At the suggestion of Daniel (Zmanco) I switched over to the latest beta extra code. I'm glad I did. My IAC is finally working as it should. I'm actuall tuning the closed loop idle settings today. The 16x16 table helps the tune as well.Glad to hear you got that worked out. Good stuff to know since I'm trying to MS my own car. Can't get the dang thing to register on the computer though. Can't wait for better videos.The funny thing is though, the car has driven better than the SUs regardless of what tune I had! I still can't believe how drivable these things are. I was lugging through my neighborhood in third gear last night and it just was smooth as silk! No bucking, farting or sneezing.
The car ran pretty good too.
Derek
-
I moved the map sensor over to one of the runners. Underneath of course. WOW! Now we're getting somewhere. Not only does my IAC operate as it should but the MAP signal is a lot steadier. It's also operating in a wider range of the table. Now yet another re-tune.
I ordered a decent microphone from amazon so I should have some in-car video's to post soon. I shot a few already but the built in microphone just doesn't cut it.
Derek
-
Here's what I have.
1/2" hose running from the balance tube to the vacuum log. I have a T fitting in the 1/2" line with the master vac hose and the MAP hose attached.
when the IAC is closed all is well with the world. But when the valve opens it reduces the vacuum at the MAP sensor and makes the car run way richer.
I need to pull the map signal from another spot. Or I need to start investigating Alpha N.
Any ideas on this.
Thanks
Derek
-
Derek, are you using that cruise control made by audiovox?
No I'm using a Rostra unit.
http://forums.hybridz.org/showthread.php?p=1004361#post1004361
Derek
-
Well I got my cruise installed. I ended up ordering the magnet sensor kit. I tried to make the speedo cable sensor work but it was too much of a pain. I started out with one magnet but had bad surging. I ended up going with 4 magnets and had to set the pulse count to 18000 before it was drivable. I just did a 2 hour trip and it worked like a champ.
Derek
-
Usually the pulsation damper is closer to the source of the pulsation, and then put the orifice on the outlet to the MS like KTM mentioned. A welding tip will work, that's a good one. Beats using number drills on 1/4" brass rods chucked in a lathe...
Alright then.
I'll move the filter closer to the source and I certainly have plenty of mig tips around as a reducer so I'll give it a try.
We are working on this as well with the NEW Electronics! We are working on "Window" Based Vacuum Sampling, Basically sampling only 1 runner with a TMAP at only a small portion of the 720 degree engine Cycle. TMAP is totally ignored except for this Window in time. Not sure if the Mega Squirt offers this or if some of you could write the Code to make it work! May be a solution for you, the jury is still out on our testing at the moment!That sounds pretty cool. I don't think there will be any code written by me though.
Well, pour a second set of castings, and lop off the #1 and #6 cylinders and find out! might need 1+2 and 5+6, but it's just aluminum...Well at some point that may happen!
Well I just got back from a 2 hour round trip to Tampa and back and the car never missed a beat. Averaged about 75mph the whole time. My new cruise control worked like a champ. I didn't check the mileage but judging by the usage on the gas gauge I got a lot better MPG. The only problem I'm having is with the IAC. It seems to get confused as to which direction it needs to go when I fire it up. I've been dealing with it since the beginning and I guess it's about time I got it figured out.
Derek


Carfax misses damage
in Non Tech Board
Posted
My truck was hit in the 1/4 panel pretty good and went through insurance. I ran a carfax on it and it didn't show up.
Derek