
Derek
-
Posts
1337 -
Joined
-
Last visited
-
Days Won
48
Content Type
Profiles
Forums
Blogs
Events
Gallery
Downloads
Store
Posts posted by Derek
-
-
Be careful Chuck or you'll end up like me!
-
I would think a combination of a compression spring on the throttle cable, maybe a torsional on each butterfly or a tenstion spring on each 'triplet' along with a suitable reduction in mass of the linkage bellcranks to eliminate braking induced throttle movement, and all will be well.
Yeah, braking induced movement---the linkage will be moving fore-aft in operation, and I have seen cars with heavy shift knobs come out of gear because of inertia under hard braking...
I left the throttle shafts long so I can add torsion spring on the bottom.
Braking induced movement (news to me but makes sense) works to my advantage.
Sick as a dog right now but managed to get the parting lines cleaned up on the rear manifold. I shipped it back over to the foundry for shot finishing.
I'm heading down to another foundry on Friday to cast the vacuum log.
MUST FINISH MANIFOLD (In my best William Shatner impersonation)
Derek
-
Hehe, There's a lot worse things they could call you than "That Horney Z Guy" Sorry about that.
Anyway, that box is going to look pretty cool, it always amazes me when you get something milled out like that. it's almost like you dream it up and poof (okay it's a multi-hour expensive poof) and there it is all created and ready to be cast.
if anything I think your biggest problem will be high idle, tho that's as you know proportionate to the amt of air leakage. oh, where are you mounting the spring to snap these throttles shut? I assume you're using the stock throttle cable to pull them open.
Phar
Springs......We don't need no stinking springs!!!
Unsure how the throttle is going to work. Originally I hoped to make the stock bell crank work but I won't really know until it's on the car. That's the only thing I'm leaving till the end. Besides I don't need an accelerator pedal to start it!
I see a few over night deliveries in my future.
Derek
-
It's big, it's heavy, it's wood.
Ok it's Corian and it's not really heavy.
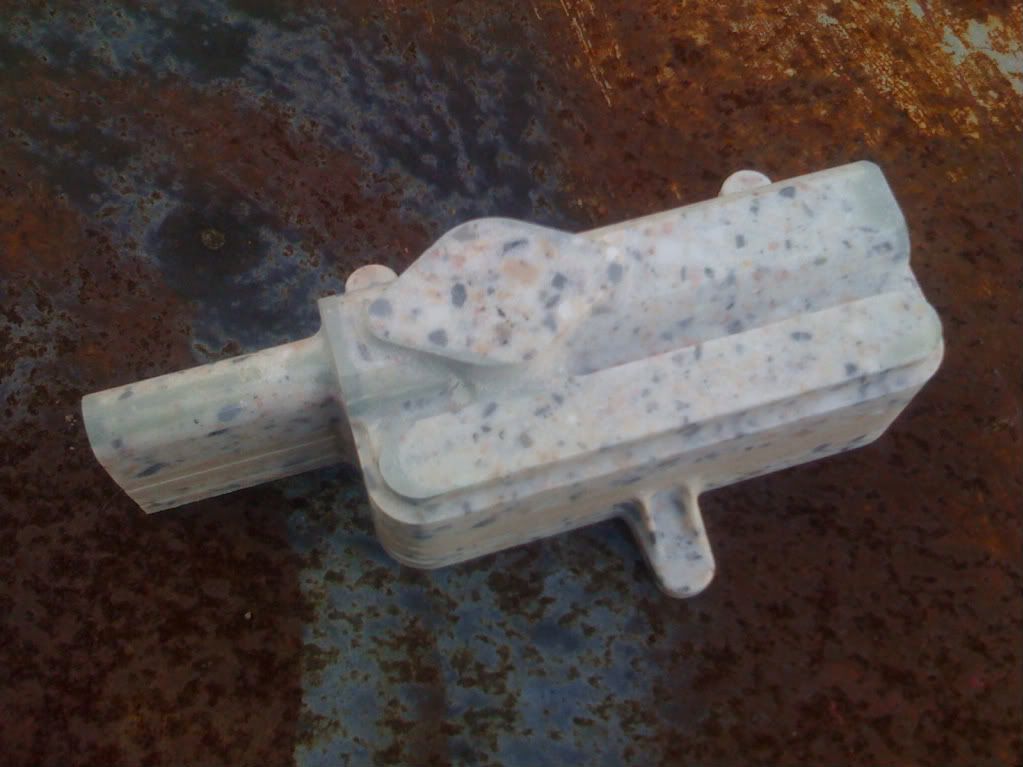
Got the pattern done for the log today and I'm about halfway through with the core mold.
The X axis motor on my router decided to take a crap on me and proceeded to start to chew up the pattern. Nothing that a little duraglass couldn't fix.

The protrusion to the left is the core print and won't be part of the casting.
Derek
-
Unlikely. EFI is an amazing equaliser. With your manifold block setup for the idle circuit, I lay money you will idle like a stocker.
In CCC (and UK Magazine) there were guys running Fords using injector bungs made of plastic and epoxied into the hollowed out bodies of old cast-off Solexes....
I think you will be suprized as hell how well they do run once it's all fired up and ready to go.
And the 'raw' casting does have merit. I for one would not use the head-mounted injector bosses. They would be trumpet mounted, and by not boring the bases, it always leaves open the ability of some retard like me using them for Mechanical FI running 100% methanol on some salt flat somewhere (and thereby preserving my strange, but hood-clearanced Eggers & Vickers manifold...) sometime in the future.
Hell, if I can get our L28 to idle at 400 rpms with the cam that Bonneville Car has and with EFI...I think these will work admirably!
Thanks for the vote of confidence Tony. I feel like I've addressed most of the problems with my design. But the devils in the details.
I'll make castings available on a case by case basis. I'm worried about someone having problems with the machining and then creating a bad name for the product.
Made the big order with Mcmaster Carr today. Brass sheet for the butterflies (easier to machine than stainless) Stainless steel seamless tube for the injection lines, fittings and a really cool knurled screw for my main idle air bleed. I also ordered up all the stuff for from UNI Filter for my air filters.
Time for the big push. I'm carving the vacuum log pattern and core box tomorrow. Then I'm getting started on the rest of the handwork on the manifolds. I'm having trouble coming up with the DAG 213 for the bores. The guy on ebay is out and he should have it in a couple of weeks. I found it from a distributor but I have to make a $500.00 purchase!!!
At this point I'm feeling pretty good about where I'm at with everything. I'm really hoping to have this on the car the beginning of January.
I mean really hoping!
Derek
Oh and thanks a lot I see I'm now "That Horny Z Guy" But of course I'm from Ocala where the men are men and the sheep are nervous!
-
2 sets of mikuni 44's in the classifieds now for $650 and $1000.
Derek I think you might find it a better plan if you can offer up the raw castings for a fair price and let people do their own machining/design/fitiment. A lot less work on your part too. That's assuming you have any interets in doing all that extra work!
Well in my mind Mikunis are worth more than that:-|
Originally I was going to sell the raw castings but these are only as good as the machine work. I see lots of potential for problems if they're not done properly.
We're really getting ahead of ourselves here. These things may run like crap and not idle at all.
Here's all I'll say about pricing until they're running on my car.
They won't be cheep!
No more talk of pricing as it will suck all of the fun out! And there's a long way to go before they're running!
Derek
-
Man alive...that is one hell of a ITB setup! Incredible work, Derek! PLEASE arrange a HybridZ group buy if you plan a production run and prices end up in the 3 digit range (one can hope). This is worth going EFI for!
Thanks
Well considering a used set of Mikunis goes for $1300 -1500 I don't think your going to see a three figure price!
There's a lot of work in these things and realistically there's a very small market for this stuff. I'm not ready to throw any prices out yet but I can guarantee you they will be more expensive than a used set of Mikunis!
A lot more.
Thanks
Derek
-
You might want to check on Milspec Hard Anonidizing after fittment of the plates (and subsequent re-disassembly) to give the aluminum some durability beyond as-cast. It is especially resistant to abrasion. With aluminum plates, and Anonodized bodies, the plates would be the wear item, and easily replaceable if need be.
Though, personally, my first choice would be brass...
Well I just priced some brass sheet .063 thick. 12" x 12" $40.00 Yikes.
I may have some .080 brass but that's getting a little thick.
I have a bunch of 316 16 gauge stainless that I'm going to try first.
The bores have a stainless liner so wear won't be an issue.
derek
-
Stainless or Brass (even mild steel) is the standard. Brass is usually the choice.
Aluminium may expand equally with the bores, and cause a sticking problem on slam-close throttle conditions once the bores get slightly fouled with fine dust that passes the filters.
The brass and steel throttle plates normally used expand slightly less with the heat than the mazak and aluminum bodies do, letting them fit progressively 'looser' in the bore as they all heat up. This keeps them from sticking, and is one of hte reasons for that 'sealing paint' mentioned earlier in the thread...it does a nice job of keeping any actual gaps from opening up when the bodies are at operating temperature.
I don't know of any commercial applications where aluminum is used on a butterfly. Even in slides or bike carbs they are usually hard-anonidized to keep any galling/metal transfer from occurring---which I've experienced in compressor butterfly throttles where it's Aluminum to Aluminum contact. You have a SS bore in that area as I recall? Probably best to be brass on SS or brass on AL in that case. Easier to machine brass...
Which you might want to consider on those bodies once they are all machined, either alodine or anonidize the aluminum parts to keep the 'white fuzz' from growing on them. The alodine will give them a nice, OEM look of slightly bronzish tint, and it's easy enough to apply with a swab/brush while the bodies are warmed (to let it get into the metal pores nicely). Aircraft Spruce and Caswell Plating are online sources for that kind of stuff.
Hi Tony
I originally chose the aluminum for the butterflies because I saw that Kinsler used 2024 for theirs. Of course this was for a race application not street. What started me thinking on this was since there are no throttle stops it's just the butterflies slamming shut each throttle closing. I could see the aluminum deforming over time. I think I'll go with stainless first and if it becomes a pain to work with I'll switch to brass.
The alodine is a good idea. I've used it before on other applications but always under paint. One method I've used on sculptural applications is to heat the aluminum and then brush on butchers wax. you then give it a good wiping down. This keeps it an aluminum color. I'll order up some alodine and do some tests with both and see which one I like best.
-
Words fail!
Well when words fail cash can usually get the message across!
Words like YOU SUCK keep crossing my mind.....Beautiful work!!!!
Yes it's going to be pretty tough around here if this thing actually runs!
I ordered up the bore polishers from MSC so I can get the insides finished off. Then I can finalize the butterflies. I'm starting to lean towards stainless steel for the butterflies as opposed to aluminum. That way all of the components will be stainless.
Derek
-
That is looking absolutely awesome.
Thanks!
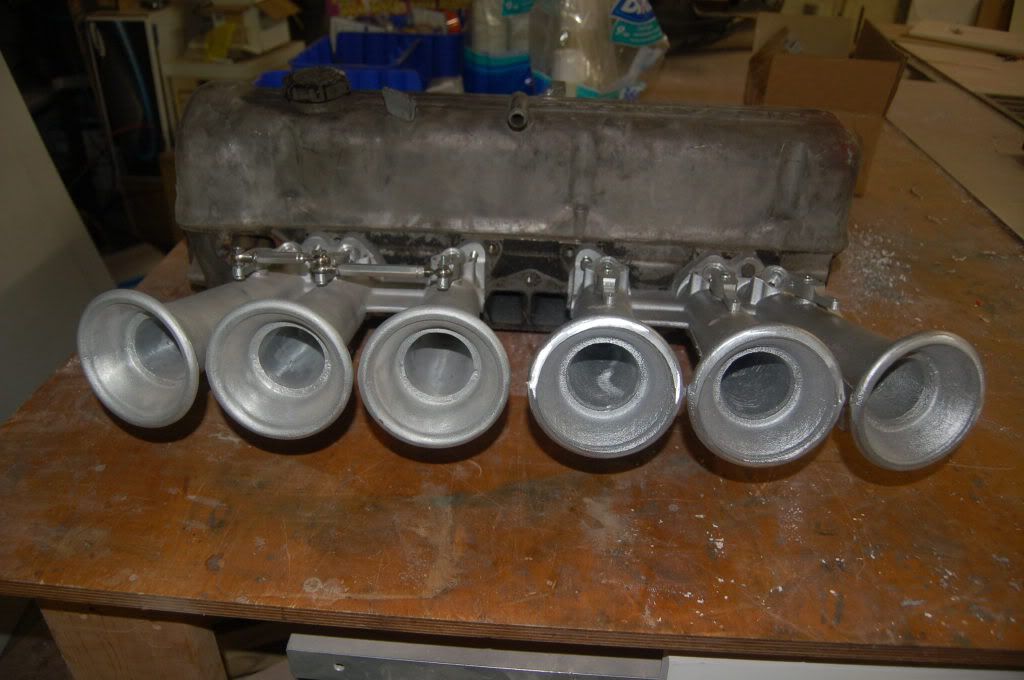
Those stacks will clear the brake master vac and master cylinder, right...No problem. The end of the bells are where the face of the SUs are so they don't come very far out. The rear bell might be a tad close to the accelerator
mount coming off of the fire wall but that won't pose a problem.
Derek
-
Well truth be told I couldn't wait either!
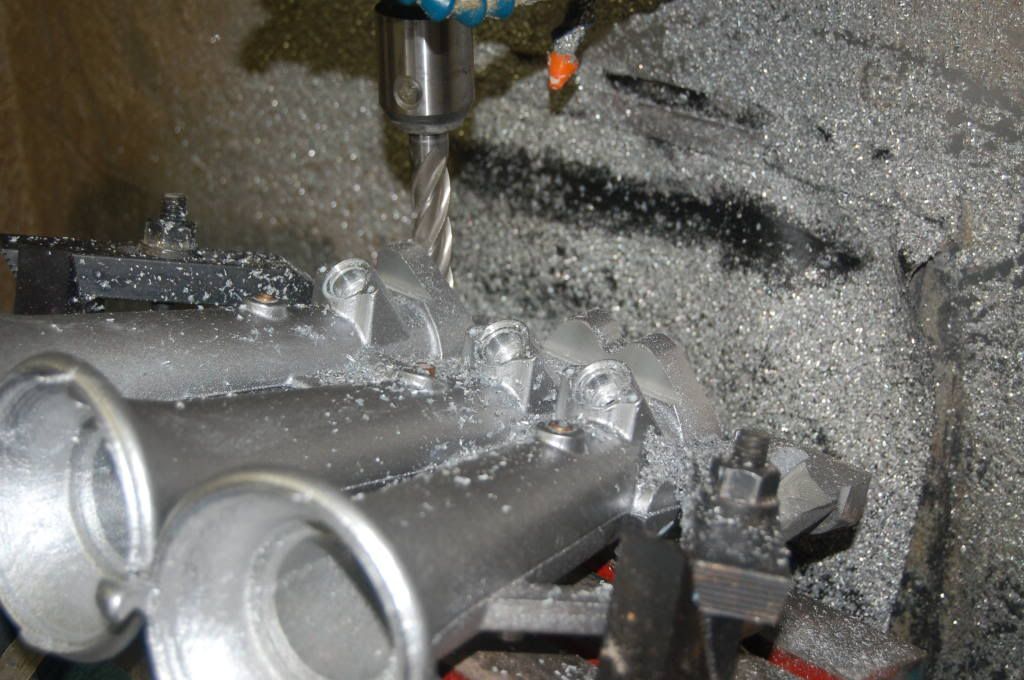
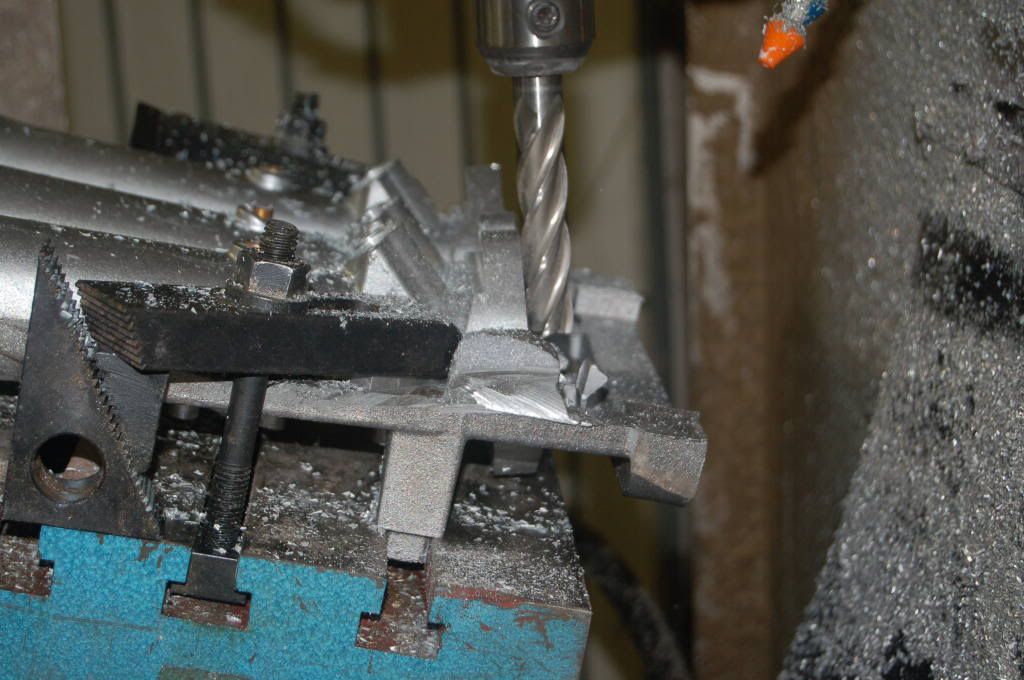
Making chips
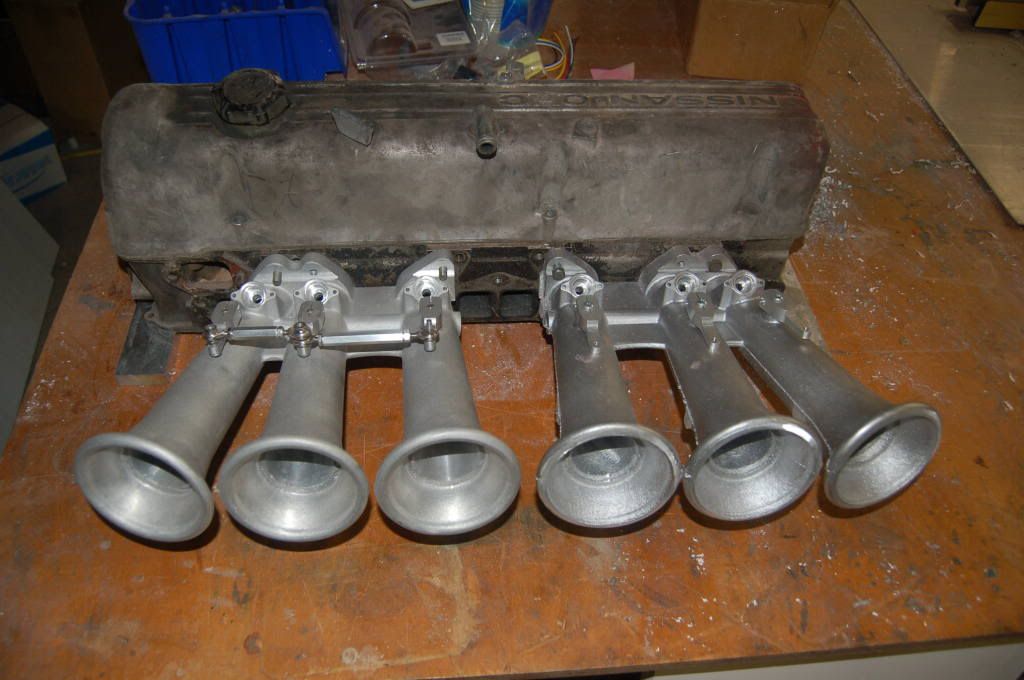
The new clamping arrangement worked out perfectly.
Now I really have to go back to work. I have the head setup in a prominent place so I'll keep motivated.
So far it's looking exactly like I wanted. I'm really happy.
Thanks
Derek
-
I agree with tony, those are impressive raw castings, for a couple of guys who go about short sleeved and glove free
and for my part, I will say: SCREW the machine work, I want to see these puppies bolted to a mock-up longblock (preferably in an S30 engine bay, but I'm not picky!) PRONTO!!!
Seriously though, much respect! cannot WAIT to see you finish!
Thanks guys
You don't know how bad I want to see it happen as well!
I'm going to try to knock out the machine work on Friday. I'll be able to bolt it up to my mockup head but that's the best I can do. Like Phar said. I'm in no hurry to take down my daily driver. I'm having too much fun, and tooling around in the F250 diesel just isn't the same.
I still have a ton to do.
Pattern and core box for vacuum log
Machine rear manifold
clean up the bores
make jig for machining butterflies
machine butterflies
finish linkage
make air cleaners
make injector hold downs
fabricate fuel lines
machine fuel distribution block
make surge tank
YIKES!!
I probably shouldn't have done that. That's a mighty big list.
So are you just going to use a standard intake gasket and cut out the parts in between for it?
Phar
The flanges are identical to the stock manifolds so they will use the stock gasket.
Derek
-
Awesome work derek. Now get that job done then start machining!!!! I wanna see your car run on these by at least July!!!! lol
Hey Jeff how you been?
I know, can you believe how long this is taking? When I showed you the first pattern at the Daytona convention I had no idea it would be this involved.
Derek
-
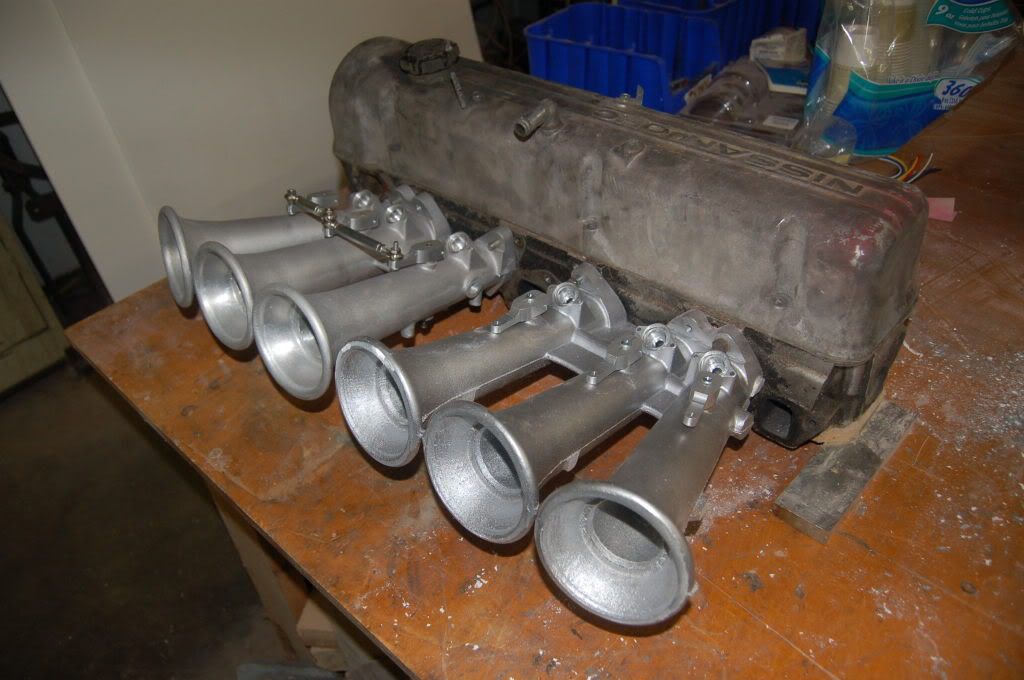
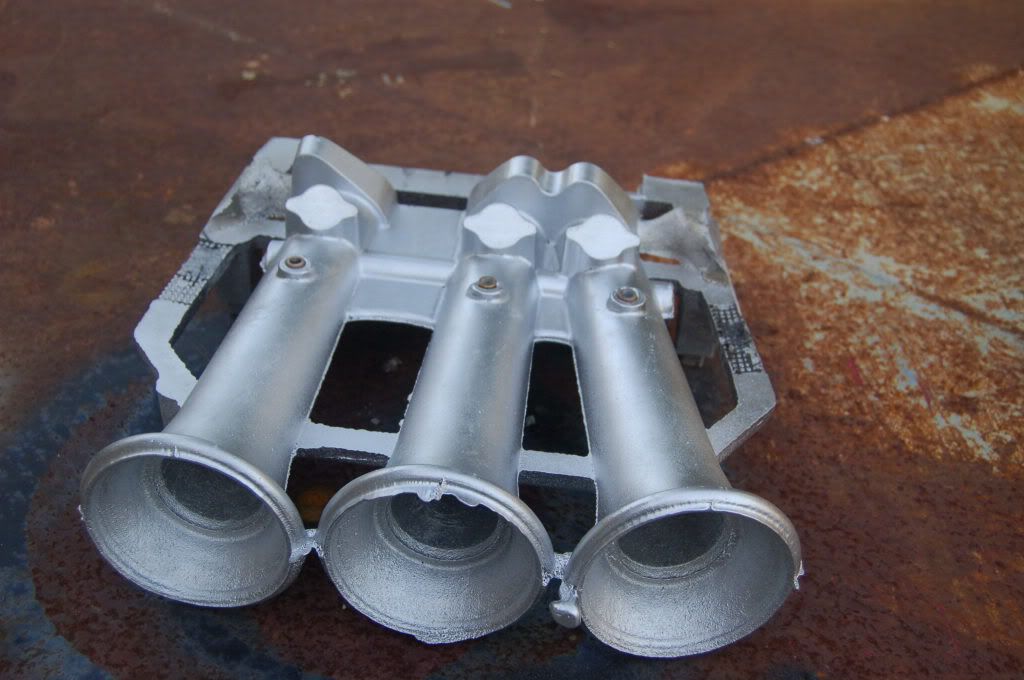
Well the pour went really well except for the bosses on the top for the throttle shaft bushings short ran. No big deal as I'll tig weld them up and they'll be just fine.
The inside came out much better than the first one. The stainless tubes match the aluminum really well.
I won't be doing any machining for a few day's as I have a pattern that I need to get done.
Derek
-
I just read through this entire thread, and all I have to say is holy horsepower batman. No but seriously, this is amazing, where did you learn how to do stuff like this, I would kill for even a tenth of the knowledge you must have regarding engines in order to do something like this.
If you're ever in the mood to take on an apprentice, let me know.......
Thanks!
Actually if you go back to the original design thread http://forums.hybridz.org/showthread.php?t=121021
You'll see that I really don't know too much about manifold design. I did some searching and got some input from other hybrid members.
At this point if it runs better than my 25 year old SUs then I'll be happy!
Very nice Derek, as you know I too have been watching your project from the start, though I didn't realize it had actually been two years since you started it. The New blanks look awesome. I love all the new bosses. oh, and good thinking on the angle table squares, I had wondered how you got the correct angle on the first manifold for fit to the head. Not to mention those would give you a nice handle to drag them around with.What is the Gel coating supposed to do for your mould? Better surface? looks like it takes the "woodgrain" out.
So here's a question, I didnt think of till just now, but that you could probably fix in the MS setup. A lot of cars have a cold start injector, I'm not sure how you would put one on an ITB setup, or if you'd even need one. (I know you said this car is basically going to be a garage queen.) The Thermotime is in the head too I think, though I don't think MS would use that. I keep thinking "what could he have missed?" and nope, I think you've got it all covered.
The manifold looks amazing. oh and I'm sure you've got a line out the door for appentices huh?
Phar
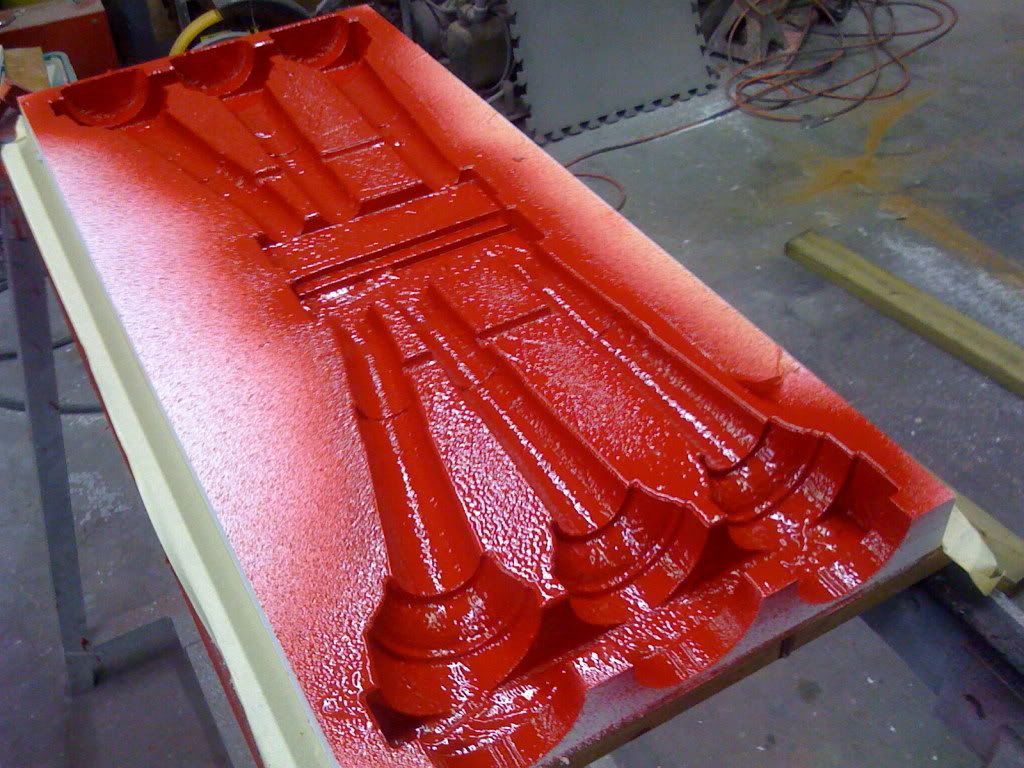
Hi Phar
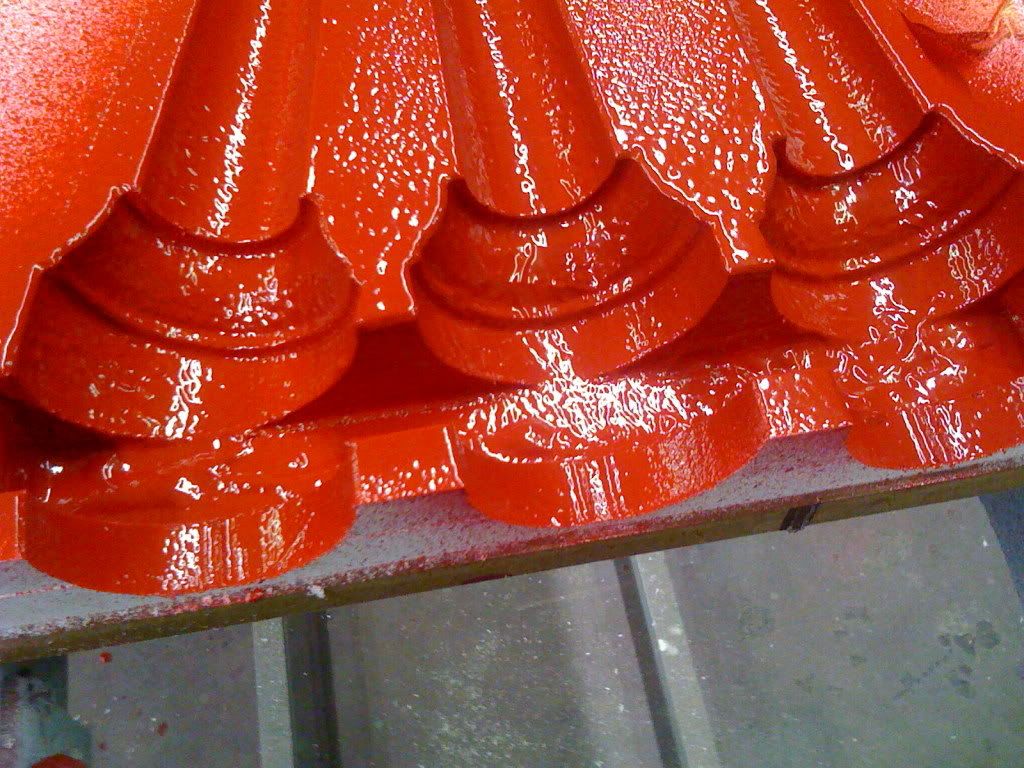
The PVC sheet that I use as the base is great except it's a lot like wood in that in order to get a good finish it needs to be painted and sanded. If I use the gel coat I can eliminate that step.
I ended up painting and sanding the manifold anyway. I wasn't very happy with the finish.
I'm not sure where garage queen came from as this is my daily driver! And I hope to keep it that way.
I rescheduled the pour for next week as I have some machine maintenance to do.
Thanks for the support.
Derek
-
ok that's the good news. Unfortunately I won't be able to do any machining this week as I'm heading over to the foundry to cast my rear manifold tomorrow. The castings look great.
I'll be doing the machining the first part of next week.
Derek
-
Well if the foundry gets a decent core today I'll be heading over there tomorrow to pour the rear manifold.
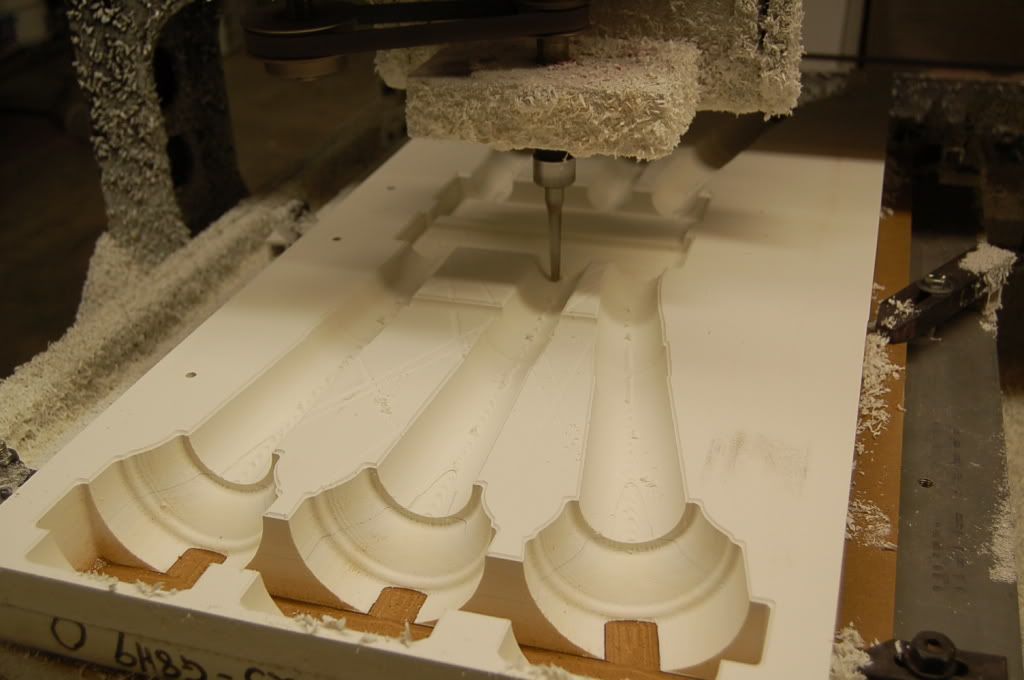
Here's a shot of where I'm at now.
I still need a little touch up an I need to get it mounted to the board.
WAHOO!!!
Derek
-
-
Thanks for the update. Are the hubs made from a casting or plate aluminum? What is the alloy? Just curious.
The hubs are going to made from Almag 535 which is an aluminum magnesium alloy. It has a very high tensile strength. It machines really well. It's used a lot in the aircraft and medical industry. I do a lot of patterns for a helicopter company and they have everything done in Almag. The nice thing about it is it's right at a T6 hardness with out heat treating. Using castings is going to save a ton of machine time. I'll still machine all surfaces but it will all be finish passes.
I had about a whole day of hogging on the first one I made.
Derek
-
I would like to know prices too, defiently want some parts if you still have/making them!
No problem.
I'm waiting for the hub blanks to get back from the foundry. I'll do the machine work on them right away and then we'll have the prices. Shouldn't be too long now.
Derek
-
I don't like it.
cause it's not on my car, when it should be...
It's a good thing I don't do this for a living!....Oh wait...I do do this for a living.
I went back and checked. April 2009 will be 2 years since I started the design. I better get this thing done!
As I was finishing up the Hemi manifold I was struck how much more involved an ITB setup is. I feel I'm on a roll now though. I'm heading into my slower season (although I'm still slammed) I think I have the majority of the issues solved. I'm sure when I see that second manifold machined and mounted on the mockup head it will be full speed ahead.
Thanks again for all the support and encouragement.
Derek
-
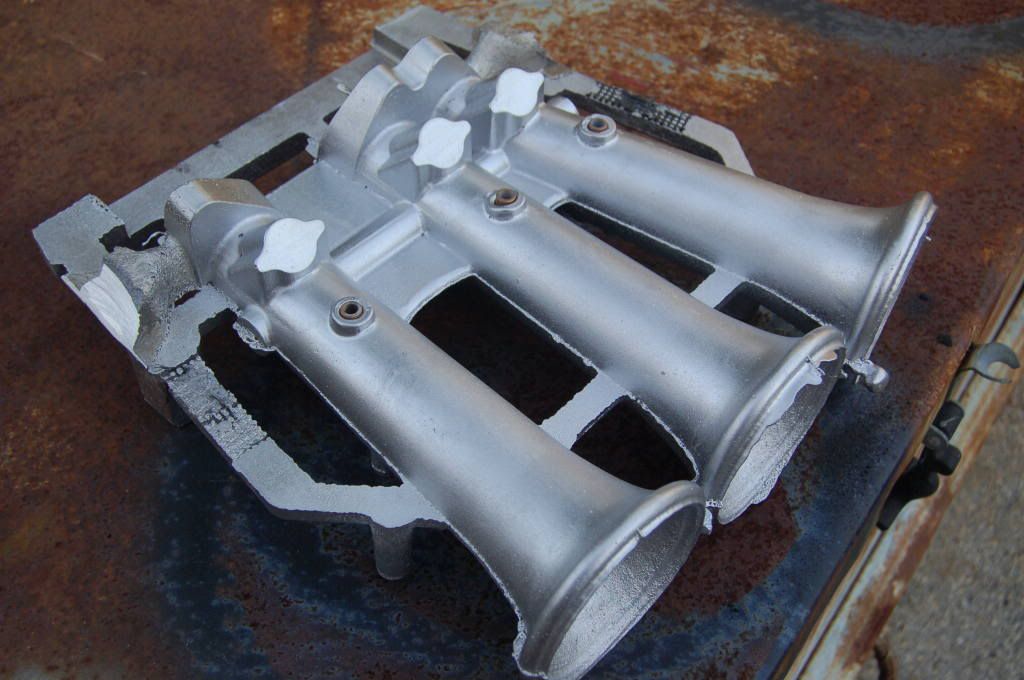
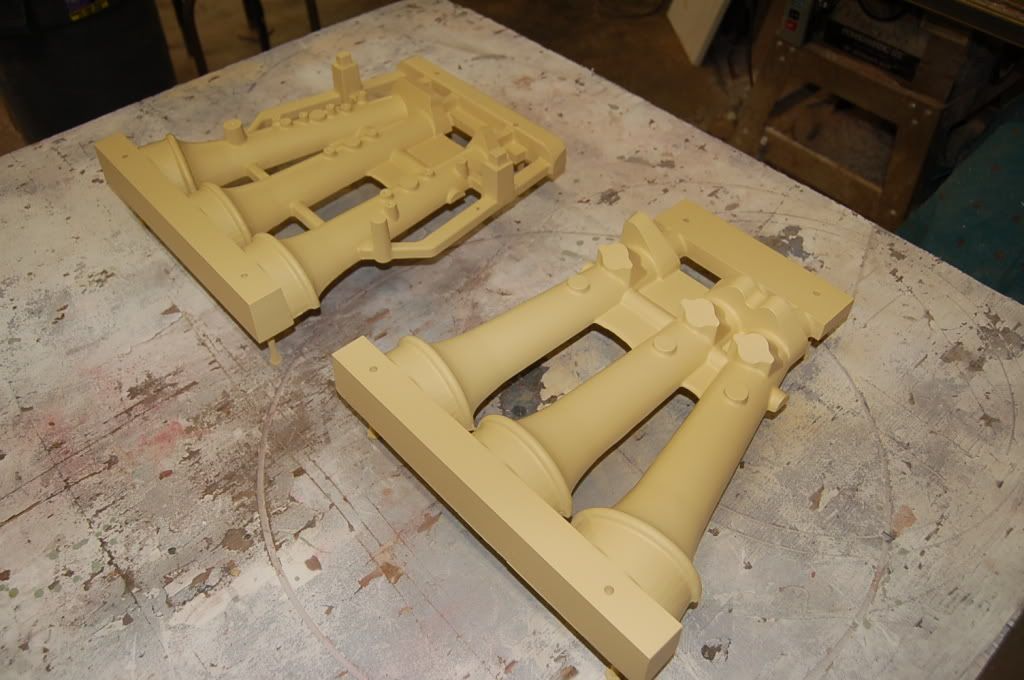
I'm using a new procedure on a lot of my patterns and core boxes. I carve the piece out of sheet PVC. I make it about .015" undersized and then spray a few coats of tooling gel coat on it. I then put it back in the machine and do a final finish carving of the gel coat.
Here is the carved core blank with the gel coat sprayed on
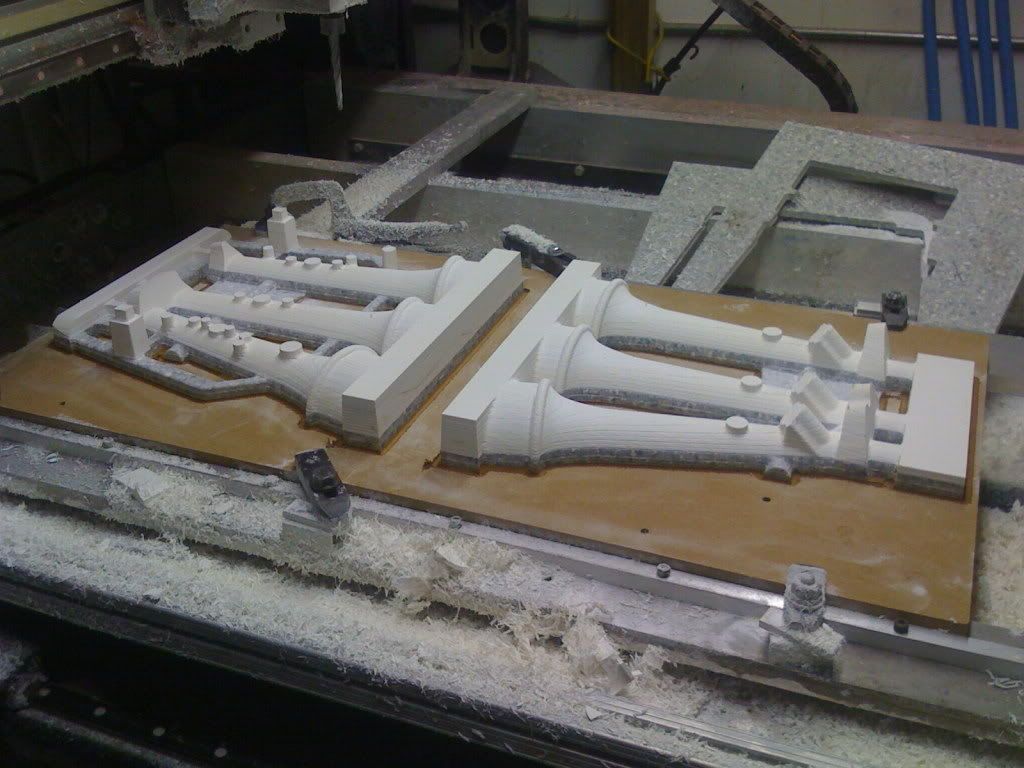
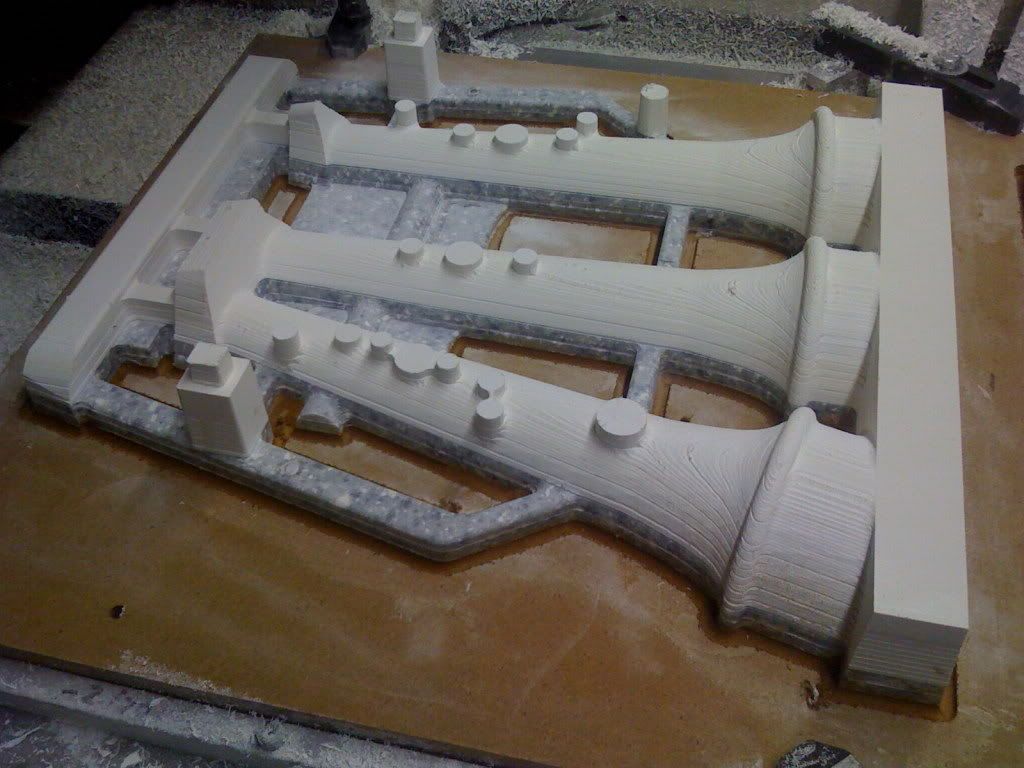
Here are the blanks for the rear manifold.
We're talking boss heaven! I'll be able to bolt everything on here but the kitchen sink!
The square towers with the small squares on them are something I've added. These locate the manifold on the angle table for machining. this should make the setup a lot easier if I go into production. I'll then remove them with the gating.
Derek
-
I just got started on the rear manifold on Friday. I'm roughing out the core box and then I'm on to the manifold pattern.
I'm hoping to head over to the foundry right after Thanksgiving to do the castings.
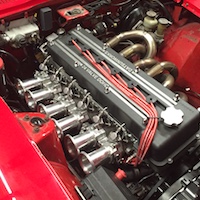
There is no fuel rail. I'll be using individual lines to each injector. I'm trying to get a mechanical injection look with the individual lines.
Derek


Gauging interest in EDIS mounting parts
in MegaSquirt
Posted
Well the news is not good. I'm sick as a dog right now. I've been afraid to work on them because I can't concentrate and I don't want to make a pile of scrap!
Went to the doc today and got some meds so I should be back on track next week.
Sorry again for the delay.
Derek