
Derek
-
Posts
1317 -
Joined
-
Last visited
-
Days Won
40
Content Type
Profiles
Forums
Blogs
Events
Gallery
Downloads
Store
Posts posted by Derek
-
-
Independent CNC patternmaker for the foundry industry.
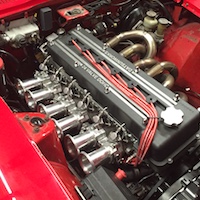
This is a pattern for a Desoto Hemi I'm just finishing up
Derek

-
Hi Josh
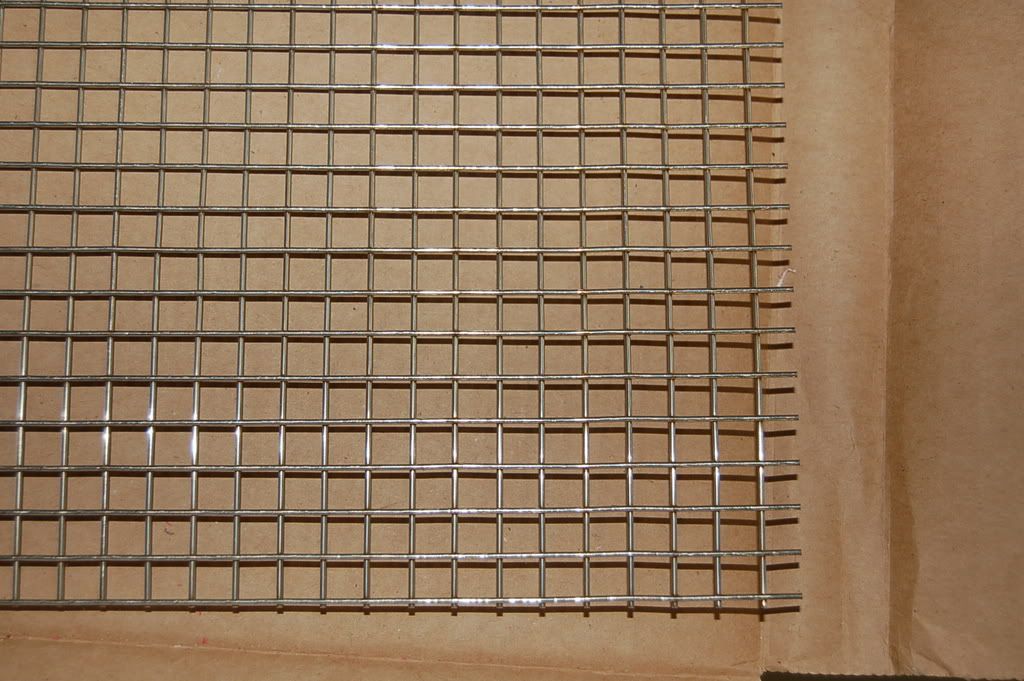
The air filters will be a round disk of perforated metal that sits on a ledge inside the bell, then a chunk of air filter foam that is held in with a domed shaped piece of stainless steel wire cloth like this:
The holes are .295 or so. I'm making a set of simple dies to press the screens. Not sure how well this will work but that's where I'm at filter wise for now.
Derek
-
This looks like a winner
http://www.eautoworks.com/product-Thermo-Tec-259081.htm
Attach this to the bottom of the stainless plate and I'd be good to go.
There's enough to do a couple of shields.
Derek
-
I'm basically with Tony on this. I'll make it out of what ever is on the shelf. From a corrosion stand point mirror stainless corrodes less than mill finish. There is less tooth on the mirror for the salts to hang on to.
In my thinking mirror is a little to much bling for this application. I think a mill finish would probably be more like what a works team would use. And that's the look I'm going for. One thing I'm going to do is to keyhole the mounting holes so it will be easy to remove.
I'm almost done with the Hemi manifold so hopefully I can get something done on the next set of patterns. I finished my CNC conversion of my lathe so I can make my dies for pressing the air cleaner screens.
So Much to do!
Derek
-
Beautiful. cant wait to see these done and on the car. This would be an awesome alternative to triple webers. Any thoughts to produce and sell these? I'm sure someone has asked but there are too many post for me to read through.
Keep up the work.
Kyle
Thanks Kyle.
C'mon it's only 7 pages!
If the manifold performs well as in "runs and idles" Then I'll offer them up for sale.
The original mantra for this project was:
#1 Look Cool
#2 Look Really Cool
#3 Actually Run
So far I think I have 1 and 2 nailed I just need #3 to happen!
When I get ready to install them I hope to do a before and after on a Dyno.
I will say they won't be cheap though. There's a lot of hand work that goes into these things.
Derek
-
A metal backed, ceramic mat covered shield will work well. That's what's on the bottom of the 73/74 Carbs as heat shielding, and on the original SU heat shields as well. Though that was blown-on asbestos, or woven asbestos, the ability to stop heat transfer is what you want. A nice mirror polished piece of stainless steel (not aluminim!) is what you want. Mirror finish faces the heat source, with the blanket over it (covering it up, alas...) That will be about the best you will do with common materials. Attach with some monel or stainless safety wire through the shield holding the blanket in place like a quilt.
You don't want aluminum as it absorbs heat. Stainless is much better at preventing heat transfer, doesn't corrode as much, either...
Well I Think I have enough 16GA mirror stainless to make up a heat shield. I's a little harder to work with than aluminum. Does the mirror act as a reflector? Also I really want to do a sandwich of some sort as I don't want to have the insulation visible. Remember "Function follows form" on this project!
-
I Have some ceramic blanket that I use for the linings in my kilns but it's 2" thick.
Mcmaster Carr has this in 1/4" thick:
Flexible Silica Insulation
- Temperature Range: 0° to 2000° F
- Heat Flow Rate: 0.78 Btu/hr. x in./sq. ft. @ 800° F
- Density: 10 lbs./cu. ft.
- Color: White
I really don't know how to calculate the amount of heat soak but it's only $13.00 for a 12 x 36" piece so I'll probably give it a try.
Derek
- Temperature Range: 0° to 2000° F
-
Hi Tony
I also heard about a Chrysler TPS with an arm on it for attaching to the throttle linkage directly. At this point Ill leave the bosses in place. This will give me plenty of options.
Derek
-
Great news on getting your car back!
It would be nice if they had a security forum that we could post to anonymously. Then Info could be shared without any one knowing the geographic location of the poster. Realistically the internet is full of great ideas for security measures. All I'll say about mine is I don't have an ignition lock cylinder in my car at all and I sleep very well at night. I have multiple systems that can be engaged depending on the location and level of security I want. Of course a flatbed or a gun changes all of that! If someone really wants your car their going to get it.
Derek
YAY! Dude, I'm so glad you got your Z back. It really sucks to lose a baby even just for a few days. I hope the police catch the bad guys! Did they Dust for prints? (Not that that helps if a window was down...)So how'd they Get her started? Flatblade screwdriver and a hammer? It's ridiculus how easy it is to get into these cars, and get them going. I wonder if anyone's looked into ignition swaps, or for those mega-squirters, if there's some way to prevent ignition... I bet if any of you still have the ignition interlock still wired under the seat, that you could put a switch in there then it wouldn't start w/o the switch turned on, but not all S30's had that.
1 Vote for a Vehicle Security thread/sticky et al.
Phar
-
Thanks Phar
I have bosses (the gray ones)on the bottom of the manifolds for mounting a heat shield. I'm thinking along the lines of a sandwich of aluminum and ceramic insulation. Maybe a ceramic coated piece of aluminum would be enough.
Derek
Nope, No problems here. Thanks for letting us help! I don't think the plug on the TPS will be a big deal in anycase since it'll be on the back end tward the firewall right? That TPS looks like an excellent choice, turns the correct direction, and it's small. GM IAC is a good one. When I did the EFI swap on my 87 jeep, I used a lot of 4.0 parts.Well maybe there might be one issue I can think of that might be a problem there. Heat... The underside of the intake is just above the exhaust. I don't know how much heat the plastic of the TPS could take. You might need to include some heat shield between the exhaust and the intake. It may or may not be needed, but you might consider that...
It's always awesome to see the CAD files, then to see the actual pour. I'm still in awe over the work you've done so far.
Phar
-
Kevin from Extrudabody was kind enough to send me a 3D file of their TPS switch. I have it mounted on the bottom of #6 tube. The only thing you can see from the top is the plug so It won't be too bad.
Thanks for the reminder on this Phar. I totaly would have forgotten to put the bosses in place.
I'm pretty sure I'm going to cast a vacuum log as well. This will be machined to accept a Jeep 4.0 IAC and a bleeder arrangement for the main idle setting. It will have a small air cleaner for the intake air. This will mount on the firewall near the booster. This way I can have a single hose leading over to the manifold and it keeps the clutter kind of hidden.
Anyone see any problems with this?
Thanks
Derek
-
Thanks!
You can see a ridge just at the inner end of the bell. A mesh screen will sit on the ledge. Then a piece of foam air cleaner will go in the end of the bell with a domed mesh screen on the outside holding it in.
Derek
what kind of filter are you going to be using? if any.after about a hour of sitting here reading. very good read!
and great job. looks really nice.
-
Hi Phar
I plan on using one from extrudabody
http://www.extrudabody.biz/servlet/the-126/TPS-dsh-1008/Detail
It will mount under one of the throttle shafts, Probably the rear one.
Thanks for the reminder I needed to order one so I can put the bosses on the pattern.
Derek
Okay, so vaccuum and MAP shouldn't be a problem. So back to Throttle Position Sensor (TPS) What are you thinking for that? is there a specific type/maker that you'll be looking to use? Does MegaSquirt require a TPS?Phar
-
Hey Derek-
Sorry I missed it, I have been bouncing back and forth reading this at work and didn't see where you had already said that. What you are doing looks awesome, I have never seen casting before and now have a clear picture of the process. You are investing a ton of time and work into this.
Great Job-
Scott
Thanks Scott
Also I wasn't trying to shut you down. If you have Ideas throw them out there. That's what this things all about.
Derek
-
Now PalmettoZ if you had carefully read all 6 pages of this thread you would have read the post where I proposed this very thing!
Thanks for the suggestion and offer. That's exactly how I'm going to do it. I'm going to cut the blanks out on the mill and then true them up on the lathe.
Derek
Hey Derek-Could you not make a quick fixture to hold the butterfly at the angle you need ( I assume just a couple of degrees ) and then turn this down on a lathe to the correct diameter ? This would give you the relief on the sides as required.
I can try to draw something up and show you what I am thinking about.
-
Hi
basically if the manifolds perform well and are drivable then I will offer them for sale. But there's a lot that has to happen before I get to that point!
Derek
I would like to get a set of these if you are going to be selling some. Any info on that ? Thanks- -
Well that's good to hear. Having never designed a manifold before I'm really guessing on a lot of this stuff.
Now you guys have me chomping at the bit again for this thing. Hopefully I'll be able to squeeze it in after the Hemi manifold. There's still so much to do after the castings are complete that at times it's a little daunting. I'm in the process of hanging a couple of servo motors on my lathe so I'll be able to automate some of the turning ops as well. It won't be a speed demon but it's better than me sitting there throwing levers!
Derek
1/2" for the balance tube / plenum log should be more than adequate.Our Bonneville car has like 75KPA vacuum at idle, and a 1/2" pipe manifold with 1/8" taps to each runner gives more than enough vacuum for the brake function as well as a nice smooth MAP signal for the ECU.
TEC2 system recomended 1/2" log, and that's what we ended up with. For older manifolds without such a plenum for the MAP and Vacuum Accessory taps, a piece of Fuel Rail Stock gives a nice compliment and can be piggybacked next to your fuel rail as a visually pleasing addition when you make the conversion to EFI (or to simply get someplace to take a vacuum reading that doesn't bang your gauge to death!)
I previously ran my 240ZT with some 1/8" npt nipple barbs in each runner, to 1/4 tubing, which had 3/8"x1/4"x3/8" "T" fittings to manifold it all together and even that worked as a balance tube quite well with Mikuinis. The engine really smoothed out when it was put on compared to it's actions under boost before the balance tube was in place. I guess that would be equivalent to a 3/8" log, huh?
-
I imaging the Balance tube would actually be a really good place to put the MAP sensor since it would then read BOTH the manifolds. A larger diameter tube would probably read best. I'm not super familar with the Mega squirt setups, but I'm pretty good at ODB1&II GM fuel injection. From What I've read it's pretty similar. I don't know if Megasquirt would also require a MAT sensor, but I'm pretty sure you'll need a TPS, (throttle position sensor) so I was thinking maybe you could extend one of your throttle shafts out the bottom and key it for a TPS. Though I'm uncertain the directonality. You might look at that before you pour your 2nd Manifold.
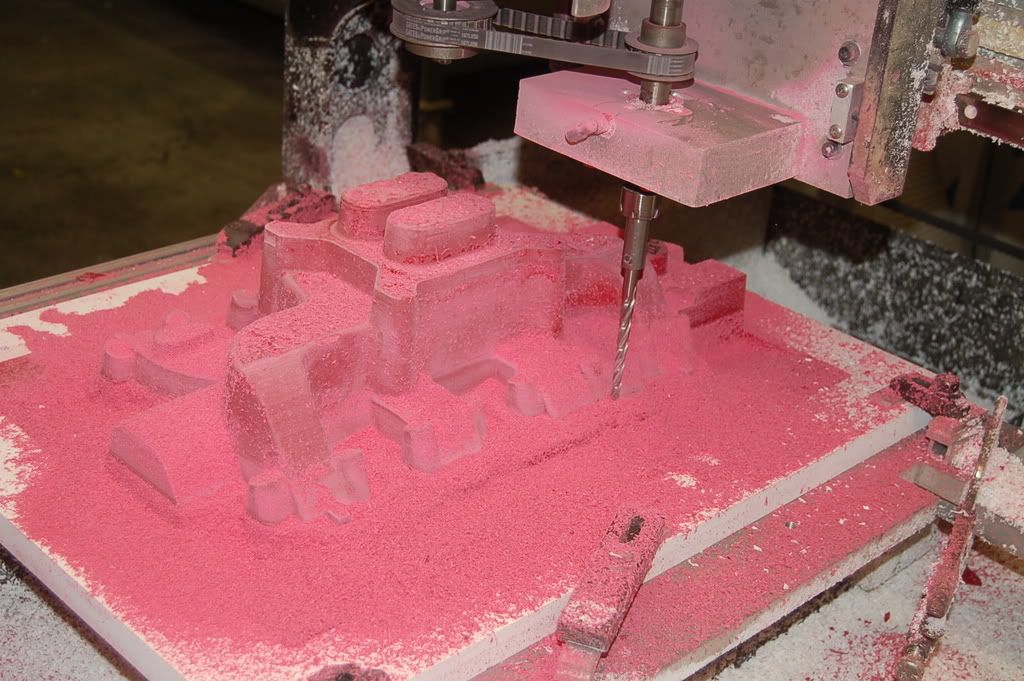
Wow, that's some pretty expensive castings. $10K each! I wouldn't be able to afford it, until you got it into production, but they do really look awesome. This Milling Machine you've been using looks really cool too. What is it that you mill? is it some type of plastic? I hope you're getting a good discount on the pours?.
I hope you can get back to your own project again soon. I'm still really excited to see it and hear it run. You'll truely have a 1 or a kind...
Phar
Hi Phar
The balance tube is 1/2" ID so I hope it's enough volume for everything. I'm hoping the first manifold works right the first time but in all reality will probably need some mods. What ever I do to my manifold will be reflected in the patterns if and when I go into production.
On the Hemi manifold that's $10,000 just for the patterns. That doesn't include the first actual casting or machine work! The person I'm doing the pattern for feels that there's enough of a market for him to recoup his money and then some.
Pattern making is very laborious even with the CNC machines.
I use a variety of plastics in my patterns depending on the usage. Some epoxies some PCV.
Derek
-
So what does making a casting like that cost. (hemi manifold)
Your looking at $10,000 for the tooling which includes the top and bottom (cope and drag) patterns and three core boxes. The customer supplied the 3D model. Otherwise it would have been about $2500.00 more. There's a ton of work involved in making tooling. On a project like this you have to figure it's not going to work the first time and require some modifications. I'm not sure what the foundry is charging for the castings.
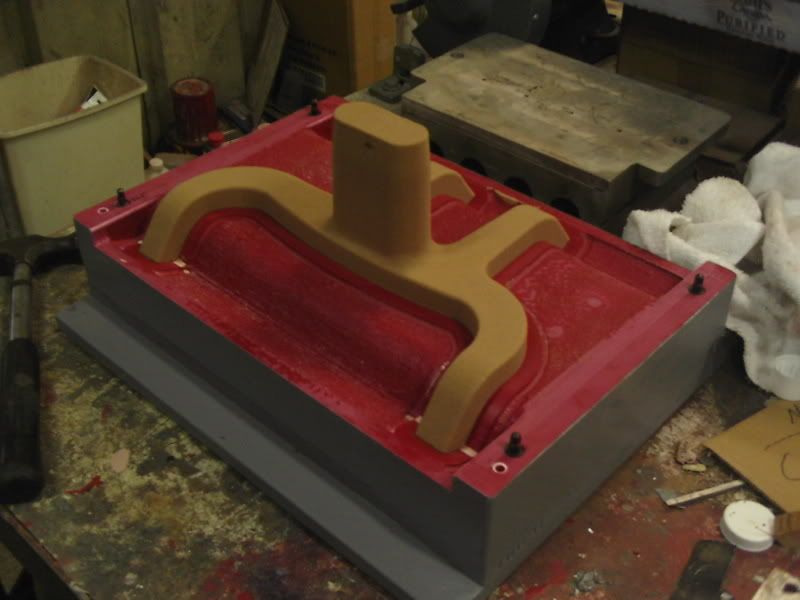
Here's a shot of the one of the core box halves with a core that has been "blown".
This sand is what will make the casting hollow.
Derek
-
so hey any news on this, I know it's a project, but it's been a While, I hope you haven't dropped it. it's pretty awesome!
So how were you going to measure airflow, obviously not by AFM, really MAP is the only way, but where will you sample from? I didn't see a boss for a nipple anywhere. I imagine You'll have a balancing port between the manifolds.
Phar
Hi Phar
Well I've been working on a manifold just not mine!
It's a paying job for an old hemi.
Hopefully as soon as I'm done carving this I'll be getting back to my manifold. The CAD and Cam work is all done I just need to get enough free time to run it.
There is a internal balance tube that runs through the manifold and has a boss on the rear manifold. I'll probably run a vacuum log for the booster and IAC. Not sure exactly where the MAP will pull from at this point. There's plenty of wall thickness to drill and tap anywhere on the manifolds.
All of the bosses are going to be on the bottom of the manifolds.
Derek
-
For me that is.
I've been battling with this problem for years. In Florida I mainly run with the windows up and the air on so it hasn't been too much of a problem. But with the windows down and during down shifts it was getting pretty bad. I had made all the usual repairs. New weatherstripping, sealed the tail ights, checked for holes with a flashlight, etcetera etcetera. All to no avail. I then came across this post by
Zs-ondabrain over on Classic Z
“Here is one thing you can do. Get a smoke machine, a shop vacuum and some cardboard.
Cut the card board to fit in the window opening with the window 1/4 of the way down. Cut a hole the size of the vacuum hose into the card board and slide the card board into the felt groove in the upper part of the window frame. Then tape the lower part of the cardboard to the upper part of the open window.
Turn on the vacuum. Start the smoke machine and blow the smoke to the suspected areas and there ya go. Or have someone on the inside watching for the exact spot that the smoke comes in, while you're out side with the machine.â€
The only thing I changed was I was on the inside of the car and my buddy was on the outside working the smoke machine.
As I laid in the back of of the car my thoughts quickly switched from wondering if I wasted $45.00 on the smoke machine to “ I hope I can get out of here alive†as I was immediately engulfed by smoke. Okay I know the smokes non toxic but it was a bit freaky! We aired out the car and decided to go for a more measured approach. This time I was able to spot the areas where the smoke was coming in. In my case it was the body seams between the rear body panel and the inner floor that were leaking.
I had put a new rear body panel on the car years ago and didn't do a good enough job of sealing the seams. The biggest culprit was the very bottom seam. This is the one you see if you look under the car and follow the inside of the panel upward. This is also where the bumper brackets mount. Although this channel doesn't directly lead into the cabin, the ends are open and spill into the ¼ panels under the tail lights.
It then became a game of sealing leaks and the re smoking the car. All told I found 3 minor and 1 major leaks that I probably never would have located without the smoke machine. Now's the time to buy one because of Halloween. The party stores all stock these things.
This really works!
Derek
-
This may sound lame but check the battery terminals. With all the rain we were getting you may have developed some corrosion between the post and the clamp.
Derek
-
Wow Jeff that came out very nice.
I really hope to see it before you split.
Derek
-


Making my own EFI intake... The First Casting
in Nissan L6 Forum
Posted
I just finished the Hemi Manifold that was consuming most of my time. I'm hoping to start carving the core molds next week and hopefully the patterns right after that.
Scrap is ok if your making mail box parts but anything that requires machining has to be poured from ingot. The amount of inclusions you get in the casting goes way up when your pouring metal with a high scrap content.
Tea strainers would work but I'm afraid they would be kind of restrictive. The only thing (in my mind) that the screens are there for is to hold the foam elements in place so I want as much open area as I can get. If I go into production I'll get a price on laser cutting some custom blanks out of stainless.