
74_5.0L_Z
-
Posts
1194 -
Joined
-
Last visited
-
Days Won
30
Content Type
Profiles
Forums
Blogs
Events
Gallery
Downloads
Store
Everything posted by 74_5.0L_Z
-

First impression of Formula Atlantic slicks
74_5.0L_Z replied to 74_5.0L_Z's topic in Brakes, Wheels, Suspension and Chassis
I'll try to get some pictures of the car with the new wheels and tires and post them tomorrow. Drax the answer to your question is yes. They are less responsive and more forgiving, and I believe the overall grip was better. We'll have to see how they wear. Cary, by the end of the day I was driving as you stated, I had to "increase my steering input velocity." I really like the way they drove after I figured that out. BRAAP, the tires you had on the back of that car were just obscene:mrgreen:. -
For a while now Tube80Z (Cary) has been suggesting that I try out some FA slicks for autocross use. With my bodywork (SubtleZ kit), the only ones that would fit are the 23.0 x 9.5 x 15 slick which are designed for use on a 15x10 wheel. So, I finally got some wheels (15x10 Spinwerkes series 82 with 5.25" backspace) and some used FA slicks off the internet (R25B compound). The tires weigh 16 lbs each and are 22.9" tall. The Spinwerkes wheels weigh 15.8 lbs each. My old wheels and tires weighed 39.5 lbs and stood 24.7" tall. Putting the new wheels and tires on the car lowered the car 0.9", and increased the track by 2". The new tires really fill up the SubtleZ body work. I used the new tires at the autocross yesterday for the first time, and all I can say is that they rock. Absolute grip was slightly better than with the A6 tires, but the feel was completely different. With the A6, the maximum grip occurred at a lower slip angle. The A6 responded quickly to inputs but would loose traction if the driver pushed the tire past its ideal slip ratio. The FA slicks are different. They respond to inputs more slowly and require more slip to get maximum grip. If I needed to turn in deeper, I just had to turn the wheel. The front never seemed to wash out on me as it would have with the A6's under the same conditions. The set the air pressure at 25 psi at all four corners and left the camber where I had it last year (-2.1 rear and -2.5 front). These tires heat up very quickly in 95* F conditions. I made seven runs and had the best performance when the tires were cool on the starting line.
-
Chassis Setup (corner weights)
74_5.0L_Z replied to 74_5.0L_Z's topic in Brakes, Wheels, Suspension and Chassis
I've made some significant changes to the car, so it was time to rescale everything. First the engine changes: I Replaced stock 5.0L bottom end with a 5.4L stroker. The new bottom end has a 3.25" stroke and 5.4 inch rods as opposed to 3" stroke and 5.090" rods. Also the new bottom end has a main stud girdle and an aluminum flywheel. I replaced the Cobra intake with a Performer RPM intake. I replaced the stock rear sump pan with a custom Kevko racing front sump pan (this required modification to the crossmember to fit). Second, the wheel and tire changes: Last year I was using 16x8 centerline wheel and Hoosier 245/45/16 A6 autocross tires. This year I have replaced them with 15x10 spinwerkes series 82 wheels and FA slicks (23.0x9.5x15). Last year's tire/wheel combination weighed 39.5 lbs each, and the new tire/wheel combination weighs 32.0 lbs each. (I save 7.5 pounds of unsprung rotating weight at each corner . I put the car on the scales Friday night and here is what I got with me (185 lbs) and about 12 gallons of fuel in the car: LF = 648 Lb RF = 610 Lb LR = 692 Lb RR = 653 Lb. Total = 2603 Lb These were my percentages: (LF + RF)/ Total = (648 + 610)/2603 X 100%= 48.3 percent on the front 51.7 % on the rear. (LF + LR)/ Total = (648 + 692)/2603 X 100% = 51.5 % on left and 48.5% on right. my diagonals : (LF + RR) = (648 + 653)= 1301 (RF + LR) = (610 +692) = 1302. The car has lost 53 lbs since last it was scaled. 30 lbs of the lost weight came from the new wheels and tires. The rest came from changes to the engine (intake and flywheel mostly). The car has significantly less unsprung and rotating weight, and a measurably improved rear weight distribution. -
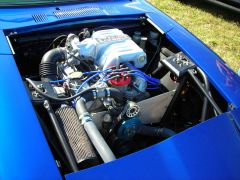
For a carbureted engine, the answer is pretty much all of it. The wiring in the engine compartment is mostly for the headlights and turn signals with just a few wires going to the engine. The wires that went to the starter on the straight 6 will now go to the starter on the V8. The wire that went to the coil on the 6 will now go to the coil on the V8. Some combination of the alternator wires will be reused depending on the alternator and voltage regulator that you end up using (I bought a Power Master 1 wire alternator with internal voltage regulator and made it simple). If you run mechanical water temeperature and oil pressure gages then you can delete those two wires. Another thing that you can stand to loose is all of the inter-lock relay crap.
-
Go to this link and scroll down: http://www.kevko.net/ford.htm They make about any pan you like. I had them make a custom 6.5" deep front sump road race pan for my car.
-
The weight transfer worksheet is an implementation of the Total Lateral Load Transfer Distribution (TLLTD) material presented in Race Car Vehicle Dynamics (RCVD) by Milliken. In the text (chapters 16 and 18) Milliken states the basic relationships between spring rates, motion ratios, static weight distribution, track width, and other vehicle variables to the TLLTD in a steady state corner. Within the text, are some suggested starting points for setting up a car that will be driven on a road course type circuit. On page 605, the following recommendations were given: (begin quote) Ride Frequencies: Non-Aero Sedan________________1.6 to 2.0 Hz (with front higher) Aero Cars _____________________3.0 to 5.0 Hz (with front higher) Roll Gains: Sedans________________________1.0 - 1.8 deg / g Aero Cars______________________0.25-0.5 deg / g TLLTD's To insure initial understeer, calculate the TLLTD to be 5% more than the weight distribution at the front. (end quote) What this is telling you is that if you have 50% of your weight on the front tires, then the front suspension should supply ~55% of the total roll stiffness. Remember, these are only suggested starting points for road racing cars. Cars intended for other purposes (like autocross) will use slightly different values (My car is set up with 2.5Hz frequencies, and Cary and others are exceeding 3 Hz frequencies). There are a couple of weight transfer worksheets available. The one that we keep referring to is marketed by Smithees out of Australia. As far as I can tell, this worksheet directly implements the gospel according the Milliken. The WTW provides a very user friendly worksheet to input the vehicle parameters. The worksheet then provides a "magic number", which is the difference between the static front weight percentage and the percentage of the roll resistance provided by the front suspension. If the number is greater than 5%, the prediction is that the car will tend more toward understeer, and if the number is less than 5% then the car will tend more toward oversteer. Although this tool isn't exact (because of inaccuracies in user measurements), it is a great tool for visualizing the effect of suspension changes like spring rates and roll centers.
-
enclosing front tube chassis
74_5.0L_Z replied to ZT-R's topic in Brakes, Wheels, Suspension and Chassis
Black plastic. It comes in 24" wide rolls. I got mine from Coleman Racing. -
enclosing front tube chassis
74_5.0L_Z replied to ZT-R's topic in Brakes, Wheels, Suspension and Chassis
Thanks, The car cools very well. It never gets hotter than 190 F. When I dynoed the car a few months back, the car was on the dyno for two hours and never got hot. Here is a link to the bodywork construction thread: http://forums.hybridz.org/showthread.php?t=121617&highlight=emulates&page=3 -
enclosing front tube chassis
74_5.0L_Z replied to ZT-R's topic in Brakes, Wheels, Suspension and Chassis
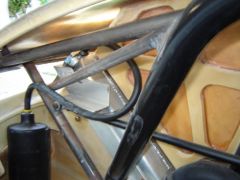
As promised, here are some photos showing the fender installation: The first picture shows the car as it is today (with the hood removed). In the picture, you can see the 1 x 0.058" tube that connect the two fenders. The brackets on the end of the tube are constructed of 1/8" plate welded to 1.125 x 0.058" tubing that slide over the transverse tube. The next four picture show the hinges and front structure during the construction phase two years ago. In this picture, you can see the hinges of course. The hinges were made by slipping two pieces of the 1.125 x 0.058' tubing over the transverse tube and welding two lengths of 1 x 0.035" tubing. Each piece of the 1 x 0.035" tubing has two dzus bracket welded to retain the hood. The small diameter black tube with the rod ends has since been deleted (it was only there for alignment during welding). In these pictures, yo can also see where I had to massage the inner mounting flange of the fenders to clear the strut tower structure. I only removed enough material to clear. When I was making the front fender supports, I was trying to come up with a structure that could be used to pull the car off the track if required, but that would also give in that event of an accident without affecting the suspension attach points. I apologize for the size of the pictures, but it is easier to see the detail in the bigger pictures. -
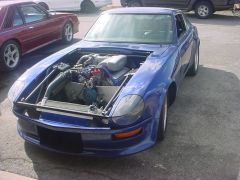
-
-
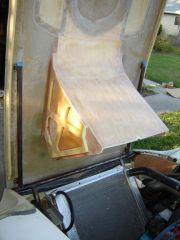
-
 The small tubing supports another tube that runs between the front corners of the fender extensions.
 -
enclosing front tube chassis
74_5.0L_Z replied to ZT-R's topic in Brakes, Wheels, Suspension and Chassis
When I finished mine, I added some lightweight tubes (1 x 0.058") that have mounting tabs at the front of the headlight buckets. When I get home tonight, I'll see if I have any pictures. Basically, the rear of the front fenders mount to the stock locations at the cowl and rocker panel, the front of the fender is attached by some light weight tubing, and the middle of the fender lip rests on the structure of the strut tower (with a piece of rubber sandwiched between). -
The machinist did not make any comment with regards to the harmonic balancer. He balanced the rotating assembly by taking some weight out of the center counterweights and a little weight out of the flywheel (I didn't notice the flywheel until I got home). The balancer runs true, and suprisingly the "0" mark was perfectly aligned with the pointer at TDC (I checked the alignment using a piston stop). This is actually the second Romac balancer that I have had. The first was an 0241SA/50 which has a 50 in-oz imbalance to match the stock 5.0L engine. It was on the stock bottom end for about the last 2500 miles or so and was a huge improvement over the stock balancer. When I built the new bottom end, I required a balancer with 28 in-oz of imbalance to match the new rotating assembly. So, being happy with the Romac on the old engine, I purchased one for the new engine (P/N 0241SA/28). If anyone is interested, I have the old Romac (P/N 0241SA/50) for sale for $200.00 + shipping. These are $350.00 new from DSS.
-
If I remember correctly, the koni 8610's are self limiting in droop. I don't think any shock is designed to bottom out in bump.
-
To some degree yes. In my front setup, the koni 8610-1437 struts are all the way in the bottom of the strut housing, and the strut housing has been sectioned to fit. Now, with car sitting on the ground at nominal ride height, this places the strut at about mid-stroke (~3" exposed). With my 450 #/inch springs, they will be compressed about 1.5" while sitting there. So, when I jack up the font of the car, the strut will extend 1.5" before the spring comes off its seat, and then another 1.5" before the strut limits travel. If I had softer springs, lets say 225#/inch, then the spring would compress about 3 inches under the weight of the car, and the spring would not come loose when the car is jacked up. For my application, I want the 450 lb/inch springs, and I want to have 3 inches available for bump travel (even though I will only use about 2"). So in order to keep the springs from coming loose when I jack up the car, I have straps on my front suspension that limit the droop travel such that the springs remain lightly loaded at full droop. On the rear of the car, the struts were sectioned a little more than they should have been. The result is that I lost about an inch of droop travel. So at nominal ride height, about 4 inches of the strut shaft is exposed. I have more weight on the rear and 425# springs. The result is that the rear springs are lightly loaded at full droop, so I do not need a rear limit strap. If I were to up the spring rates, or lower the nominal ride height, I would need rear limit straps. There are other ways that I could have accomplished this. Namely, I could use a light weight tender spring.
-
240Z Doors - Weight reduction mod's
74_5.0L_Z replied to S15 200sx owner's topic in Body Kits & Paint
For the sake of comparison, I weighed the doors from my 260Z while they were off. Complete with glass, regulator and inner door panel they weighed 68 pounds. I just cant bring myself to gut my 260Z doors because they are in perfect condition, and I also like being able to wash the car without washing the interior at the same time. I have often pondered finding some early 240Z doors and putting them on my 260Z. Just switching to the early doors would save 40 pounds off the car. -
The rod you are referring to is called a turnbuckle, and it is composed of several parts: 1. The ends are called spherical rod ends. For a turnbuckle, you need two. One has right hand threads, and the other has left hand threads. 2. The central tube is threaded. One end is threaded for right hand threads, and the other for left hand threads. 3. Two lock nuts, one with left hand threads and one with right hand threads. These keep the turnbuckle from rotating after you get it adjusted. Typically, the only places to get this stuff is through racing and aircraft supply businesses. I typically order my rod ends through Aircraft spruce, the Chassis Shop, or Coleman Machine Racing. Each of these companies can supply all of the parts you need to make your tensioner. Once you buy anything from these companies, you will start getting their paper catalogs in the mail. Their catalogs are just filled with parts that will let you do just about anything that you can dream up (and afford). It is apparent to me from your posts that you are fairly new to the fabricating parts and/or playing with cars. Do yourself a favor and read some of the following: Design to Win (Carroll Smith) Tune to Win (Carroll Smith) Bolts, Fasteners, and Plumbing Handbook (Carroll Smith) The last book is especially useful for showing you the proper way to bolt things together (and have them not self destruct).
-
There are several problems that you run into when trying to mix and match pulleys and water pumps from the older 302 and the newer 5.0L. First, the older 302 used a different bolt pattern for the crank pulley. The 1968 through some time in the 1980's used a 3 bolt pattern, and the 1982 -1995 5.0L used a 4 bolt pulley. Unfortunately, you can't just get a harmonic damper from an old 302 and put it on a 5.0L because the two motors are balanced differently (the 302 had 28 in-oz imbalance, and the 5.0L has 50 in-oz imbalance). There are aftermarket harmonic balancers available that let you use three bolt pulleys and are balanced for the later 5.0L. Second, the older 302 has a different timing chain cover. This you can get and put on the newer engines. You would then also get the matching water pump. Actually, there are a myriad of water pumps of different lengths and varying inlet positions to choose from. This sounds like a good thing, but it just complicates matters. The trick is to find pulleys that will bolt up to your water pump, harmonic damper, and alternator, and bracketry that will put everything in proper alignment. This can be a real pain. Here is the point: Buy a complete pre-engineered set-up. You can go junk yard shopping if you want. You might get lucky and find a late model (~1988 I think) Crown Victoria that had a forward rotation water pump, the correct pulleys, and bracketry (good luck). If you find a car that has the set-up that you want, make sure that you get everything (all pulleys and all brackets) Or, you could call a company like March Performance and buy a complete set of pulleys and brackets that will align everything properly and look good. Unfortunately, their stuff isn't cheap (but sure is pretty). You asked the following regarding the valve covers, "also would drilling a hole in the stock valve and putting a breather work?" The problem with just drilling a hole is that there will not be a baffle between the breather and the rocker arms. The baffle acts as an oil/air seperator. Without the baffle, you will have an oily mess.
-
When you are done you really want to end up with one of the two types of set-ups: 1. PCV in one valve cover, and breather on the other. or, 2. Breathers in both valve covers. Since you are in California, I am guessing that you need to opt for the first option. As far as a tensioner for the belt, you can get away with making your own. I did just that with my set-up, and it works great.
-
The EFI 302 has the PCV valve at the back of the intake, and the breather plumbed from the passenger side valve cover to the throttle body. The older carbureted 302 engines had the PVC valve at the rear of the passenger side valve cover and a vented oil filler cap on the driver side valve cover. In both cases, vacuum from the intake pulls vapors from the crank case while fresh air is drawn in through the breather. This is a good thing for emissions and for the longevity of the engine. There are a variety of valve covers available. Try and find a set that has a PCV provision on one side and a breather provision on the other. Also, a quality set will have baffles below the holes for the pcv and breather. The baffles reduce the amount of oil that get into the intake through the PCV valve prevents the breather from getting saturated by oil thrown off of the rocker arms. I am kind of fond of these: http://www.fordracingparts.com/parts/part_details.asp?PartKeyField=6147 Also, if you read this thread: http://forums.hybridz.org/showthread.php?t=139751 we discussed water pumps and belts.
-
It is just a plain old Ford EEC-IV (A9P) processor with all of the factory sensors. The only changes are that I am using a C&L Mass Air Meter with a calibration tube that matches the 30# injectors, and an adjustable fuel pressure regulator.
-
One of these days, I hope to find out how this engine responds to more cam and some better heads. First however, I want to back up the current dyno numbers with a trip to the quarter mile. Dyno numbers are just numbers until you see a matching mph in the quarter.
-
Here are the specs on the cam that is installed: http://www.crower.com/misc/cam_spec/cam_finder.php?part_num=15511 The specs listed are for 1.60 rocker arms, but I am running 1.72:1. Therefore, my lift is 0.522/0.503, and my duration is a little increased. This cam is on the small side for my engine, and, I would like to replace it one day. If I stick with a hydraulic roller set-up, I was thinking of using one of these: http://www.crower.com/misc/cam_spec/cam_finder.php?part_num=15512 http://www.crower.com/misc/cam_spec/cam_finder.php?part_num=15513 Even better, I would like to ditch the hydraulic roller and switch to a mechanical roller set-up. Unfortunately, that gets into a lot more money.