Blown77Z
-
Posts
405 -
Joined
-
Last visited
Content Type
Profiles
Forums
Blogs
Events
Gallery
Downloads
Store
Everything posted by Blown77Z
-
Thanks for the input guys ! I think that is what happened now I think about it. I can run my fingers over the little bumps and they fall off the paint Now, how do I get rid of the little bumpy things? Wet sand until they disappear or wetsand the paint down and re-apply the base? Other than my hiccup, how does the rest of the paint job look?
-
There is no clear coat on it yet. I'm following my painter's advice on how to apply the paint/clear coat he sold me. The paint spray pattern is set at about 80-85% of max width on my gun. I've been holding the gun 12-18 inches away when spraying and I've been using a 50% or so spray overlap when coating. How does the paint look in terms of a good coating pattern? I don't really know how it's suppose to look before the clear coat since this is my first time painting Any advice is greatly appreciated !
-
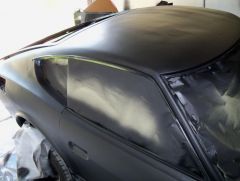
UPDATE: We have COLOR ! This past weekend I was able to spray the color on the front end. The paint code is KY0 for those interested. Basically the entire front end (AKA the jigsaw puzzle) was sprayed first and were used as my test pieces, including the hood, bumper, fenders, headlight buckets, inspection lids and cowl. 2 coats of base (color) were used, the clear coat will be added after the pieces have been washed using water w/ liquid dawn detergent and applied with a super fine scotch pad. Now on to pic of one of my pieces that worries me. Here you see some fuzzy paint crap that appeared on/in the paint as I sprayed the piece It looks like some paint didn't atomize in time before it hit the surface? There are other smaller spots on other pieces with the same crap. The pieces were wiped down with a wax/grease remover and tack cloth prior to spraying, so the piece was NOT dirty. Anyone got a clue what it is and if I can remove it with 1500+ sandpaper?????? That really put a damper on my day
-
Tis why I made my comment: "Those actually look kind of functional and maybe a way to get ram air to the LSX" LOL
-
I know very little about carb setups, but I've heard around 9 psi FP is average?!? Here are some links to help out: Carb jets Fuel level Trouble shooting Doug, we still need to meet up so I can check your car out My car is almost painted, so I can drive my Z to see yours !
-
Those actually look kind of functional and maybe a way to get ram air to the LSX
-

Front brake rotor install problem
Blown77Z replied to ttodhunter's topic in S30 Series - 240z, 260z, 280z
Pictures would help a ton with your issue... Are the rotors the same size as your stock ones? -
Yep ! Thanks. Now, on with the prototypes !
-
Call me dumb, but what exactly is a "headpipe" ?
-
Count me in for a set if all goes well !
-
I'm not sure why the bumper is like that. Maybe the suspension sits higher on the driver's side? IDK ! I'll be tackling the issue soon though
-
The last pieces have been primered, woot ! I have my base coat (color) and clear now. The paint will be Chrome Silver (paint code KY0) from the 03-09 Nissan 350z. Should look GOOD Can't wait !
-
On my 77 280z the door release rod that attaches the handle to the door locking mechanism has a threaded end to it with a nut. If you see a nut on yours, turn it DOWN so it makes contact with the release mechanism........ I hope that made sense, I'm extremely tired, bah.
-
UPDATE: Body work 2.0 complete. Wow, I'm REALLY tired of doing bodywork
-
I love DIY jobs ! Came out looking good. How did you attach the front bumper exactly?
-
What he said. I used a 60 grit flapper disk with my angle grinder to get mine down to bare metal, or you could do a chemical strip...(paint remover). You would be shocked to see how much rust (if any) is hidden under your paint................
-
I'm still a ways off from getting to the bumper. I'm still in the process of primering/MORE body work, BAH. More pictures today maybe if I can get around to it.
-
UPDATE: Primered the remaining pieces to the front end the other day. The cowl hood, inspection lids, headlight buckets and gas cap lid are all done now. I also received my high build primer to help cover up the body work areas under the sealer.
-
GL with the repairs/rebuild ! BTW, what hood is that? I like it !
-
But will the 240z strut fit the 280z hatch?
-
Hatch Strut These are for a 240z, however, I don't see why they would be different for a 280z. Maybe slightly different mounting holes? Hell, if they don't work, take them back..........
-
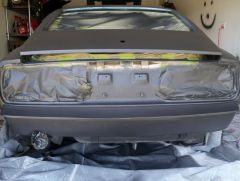
I like the way it looks with it on To me it looks like a mini bumper/wing
-
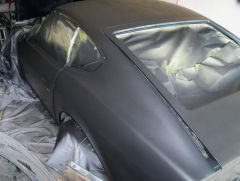
UPDATE ! I was able to put my primer/sealer on the rest of the car last night. I had previously primered my hood and fenders a few days earlier to test my new equipment. I noticed today I still have a few problem areas to deal with, mainly the areas that have the body work. You can still see the body work under the primer. I'm going to spray 3-4 coats of primer over the body work again to see if I can hide it that way. If the primer method doesn't work I will get some high build primer and use that.
-
From the album: 77 280z
-
-