-
Posts
317 -
Joined
-
Last visited
-
Days Won
3
Content Type
Profiles
Forums
Blogs
Events
Gallery
Downloads
Store
Everything posted by T-Bone028
-
Weber DCOE's installed | Initial impressions
T-Bone028 replied to T-Bone028's topic in Nissan L6 Forum
Last thought, aside from progression holes.... If you do take off the carbs, try the paper gasket instead of the anti-vibe mounts....some experiences I've read pointed to improper seating w the o-rings causing vacuum leaks. Just a shot in the dark. -

Weber DCOE's installed | Initial impressions
T-Bone028 replied to T-Bone028's topic in Nissan L6 Forum
What series of 40 DCOE's are you using? With soaking the whole carb in parts cleaner, it *could* contribute to the throttle shaft binding or perhaps when you swapped throttle levers right to left, maybe it was too tight? Before switching sides for the levers, the car ran/idled, correct? Do you have the same idle speed after the switch?...when the car is off, do the throttle plates come completely back to the the throttle stop? Is it a firm snap back to the throttle stop? When the car is on, if you were to turn the idle speed screw in a quarter turn, will your RPM's increase? How positive are you that the dampner hasnt slipped giving you a false reading for your timing mark? Any pinging if you were to rev to 3500-4500? Advancing your timing should increase RPM's, but I cant imagine it would contribute that much to give a 2500 RPM idle. Unfortunately, I'm just not intelligent enough to point to why your idle is that high. Only thing I can think of is your idle speed screws are too far in and is uncovering a progression hole. You should be able to see by removing the progression hole cover and shinning a flashlight while moving the throttle lever. Any readings with a sychrometer? -

Hit the dyno yesterday.....
T-Bone028 replied to SUNNY Z's topic in Gen III & IV Chevy V8Z Tech Board
I dont frequent the V8 sub-forum too often...but GOOD GOD....I feel like my Z is a little intimidating with its 3.1L...I cant imagine how often I would have to change my underwear with ~450 HP!!!! You V8 guys are crazy...in a perfectly reasonable way! -
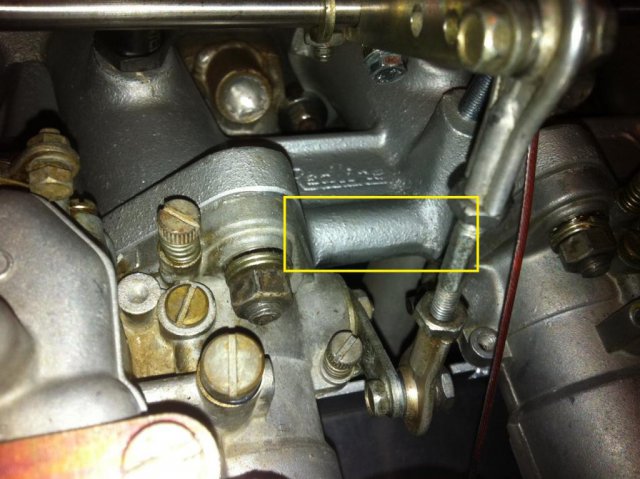
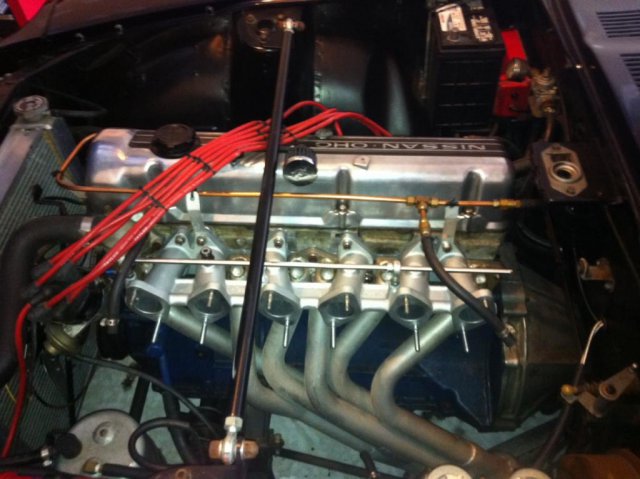
Here's a picture of what I'm talking about in regards to the runners being "connected" via a 1/4" hole/balance tube between runners 1 & 2. The balance tube is highlighted in yellow, and runs across the entire manifold. Only runners 1 & 2 are connected via the hole drilled through the balance tube, runners 2, 3 - 6 are not drilled/connected. And here's a picture of the entire manifold Also, I noticed you listed a "zero" bleed for the pump jet exhaust valve...what was the biggest change you noticed with going to a zero vs something like a 50 or 55 (or whatever is normally fitted)? I've been trying to read up on side draft central...so much info to absorb! Lastly, I dont know what I would do if I had TWO Z's at the same time...one Z already consumes all of my available time! Keep us posted on your L28 build!
-

Weber DCOE's installed | Initial impressions
T-Bone028 replied to T-Bone028's topic in Nissan L6 Forum
Nice work Steve! Those are massive air horns! when you set the idle speed screws 1/8 past contact, do you recall where the throttle plate was in relation to the first progression hole? At 1/8, I doubt a hole is uncovered...Linkage completely un-hooked, what do you idle at? Just trying to think out loud about why your idle is that high -
Thank you Leon, follow on question: on my redline manifold, there is "webbing" if you will connecting all the runners for support/strength. On runner 1 and 2, the runners are connected via a 1/4" hole drilled through this support, essentially allowing runner 1&2 to balance each other on the front carb. The reason I assume this was done was because of the port drilled into the manifold of runner 2 for the brake booster. Now for the question, I noticed during measurement w the synchrometer that the front carb flowed higher than the center and rear carb (front carb: 7, center: 6, rear: 5.5). Could the larger discrepancy be part of the "cross-talk" you mentioned above because cylinder 1&2 are drawing from each other, causing a slightly larger vacuum on the gauge? And would it make sense to take that into consideration when balancing? I had to turn the mixture screws for barrels 1&2 in quite a bit to bring it down to the lowest flowing carb.
-

Weber DCOE's installed | Initial impressions
T-Bone028 replied to T-Bone028's topic in Nissan L6 Forum
Steve are you using slip in style air horns? they should help in both aligning the aux venturi correctly in the throttle bore, as well as seating the aux and main Venturi once tightened down with the retaining tabs for the air horns and filter back plate. -

Weber DCOE's installed | Initial impressions
T-Bone028 replied to T-Bone028's topic in Nissan L6 Forum
Steve, I'm guessing I got pretty lucky with my intake manifold then, aside from all 3 linkage rod ends being centered correctly on the manifold, I did not have to do any grinding on the outside flange to match up with my header. That would be something that would drive me absolutely nuts upon fitting it on the head. I did however have to knock down some of the casting ridges/marks within the intake runners, and smoothed some of the rough texture inside the runner. I still left a bit of "roughness" if you will based on some reading I did regarding wet/dry intake manifolds as it relates to polishing. As far as carb to intake manifold alignment, they were pretty darn close so I did not take the chance on mucking it up trying to gasket match. Regarding the throttle levers, I ended up leaving the front and center carb as a right-hand throttle lever, and made the rear carb (closest to the firewall) a left-hand throttle lever. Depending on the throttle actuation arm type (ball stud versus bolt) I could see that being a pretty tight clearance. It's a tight fit for me between the center and rear carb throttle levers/arms...they dont touch though so it worked out. If you check one of my photos earlier in this thread, you may be able to see it. Lastly, I did end up putting on slightly longer manifold/carb studs. 1 3/4" stud length for the top 6, 2.225" for the bottom 6. I think the one's usually included are a 1 1/4". Should be 5/16-18 studs...purchased from Summit for like $10 (I believe brand was Summit and Mr. Gasket or Doorman). Gives you a little extra room/thread to install the anti-vibe mounts with the studs fully seated (with loctite of course) into the intake manifold. Too bad those stupid anti-vibe mounts made it impossible for me to fit my air cleaners on! I've heard that the "Borg-Warner" style anti-vibe mounts are slightly thinner. I believe its the one that PierceManifolds says is their "preferred" type. But with the regular anti-vibe mounts with the plastic spacer being a 1/4" thick, I'm not sure how much thinner the borg-warner style is. What kind of ignition are you using and whats your timing? Ignition timing was the biggest difference for me as far as power... -

Weber DCOE's installed | Initial impressions
T-Bone028 replied to T-Bone028's topic in Nissan L6 Forum
Nice Steve! Hope some of my posts gave you some ideas. When I selected 33 chokes, I looked at every single graph/table I could find and read countless posts. For my first iteration, I too was worried about selecting something too big and being disappointed with low-end grunt. So I looked at some reviews of people running L28's with 32's and some people with 34's. I would say some folks pointed to the smaller side for the street. That's when I said eff the graphs amd split the difference between 32 and 34 to come to 33 for my starting point. Extremely scientific. As I continue to drive and tune, I'm going to keep my eye out for used jets/parts. Good luck Steve, hope to read something from you soon! -
Leon, are you switching to the 151's because of the air-bleed screws? And I think the other change on the 151's was the aux venturi's moving to a set-screw instead of friction spring, correct? Just curious as to the change...and is the TWM manifold shorter than the cannon? What kind of gain can be had with a shorter manifold, high-rpm flow increase? More room for longer air horns? How many questions can I fit in one post?
-

Weber DCOE's installed | Initial impressions
T-Bone028 replied to T-Bone028's topic in Nissan L6 Forum
For those following this thread (and I hope my experience thus far is interesting to you), I was able to do some tuning today. But first...Ram, I agree, I could be leaving power on the table...but I also left some money in my pocket! My primary cost on these specific 40 DCOE's, are the 33mm venturis, air horns, and filters. Everything else, like Gollum mentioned previously, would have had to be purchased regardless (assuming I purchased used 45's). Rebuild kits, additional linkage/throttle cable pieces, heat shield, manifold gasket, fuel hose/fittings, supplies, etc would still have been needed. And different main venturis could be a cost if the set of 45's I hypothetically were to purchase werent already ideally sized. However, what I really gained out of this project (aside from a LOT of fun) is experience. I now have a far better understanding of the disassembly/assembly, various circuits, and tuning of a DCOE carb then I ever had reading the Weber carb books I've been casually scanning through for the past 3 years. And as you mentioned...the beauty of these DCOE's are their design. I can always bump of the choke size with almost minimal work. Lastly, regarding CFM's...what I posted was for all intents and purposes...100% arbitrary. Numbers picked from obscurity over multiple years, unknown flow benches, and a whole lot of other variables. But in the end, I now have 6 carbs with 33 mm venturis, instead of 2 carbs with 32 mm venturis. On to my tuning experience this afternoon...I removed the air horns to make room for my sychrometer and measured their flow, and I changed my idle jet from 50F9 to 55F9. They are now all about as close as I could get them without being drastically different from the number of turns out on the idle mixture screws. I bench-set the idle speed screws prior to installing and dont plan on changing their position. Idle speed now hovers between 1000-1100 RPM, and AFR at idle is 12.5 to 13. Under load, AFR's up to about 2000-2500 RPM are in the 11's...however, I did not get the chance to get up to a real cruising speed (just running around at 30 mph on a short road less than a 1/4 mile from my home). Hopefully, this weekend I can take her on the highway to get a better idea of AFR's at steady state cruising. The real effect I noticed from the change of 50F9's to 55F9's, was the dreaded "bog" other people have experienced with triples. When flooring the throttle with the 50F9's from about 10 mph, I would get a slight half-second bog before getting planted in my seat. Now, with the change to 55F9's...the bog/hole/hesitation/what-ever-you-want-to-call-it, is effectively gone. I'm sure if I were strapped to a dyno with every single measurement device known to man hooked up, there would be data that shows there is a bog. But from a "seat of the pants" feel, there wasnt anything I could perceive...and somehow a grin ear-to-ear is permanently on my face. Finally, I was able to look at my AFR's at full throttle at 6500-6700 RPM. They climbed up to about an AFR of 13.8 at WOT. I may change my air correction jets from 180 to 170 to see if I can richen it up on top. From 2500-6000ish, AFR's are in the 12's at WOT...so according to the gauge, I probably dont need to change anything with the mains. Will I change my mains to experiment? In the words of Sarah Palin, you betcha! For those debating the move to triples, do it! So far, they have been completely drivable on the street, 100% fun, and noticeably faster in comparison to my SU's (SU's were rebuilt by Ztherapy in 2002). Hope to give some more updates as I progress through this project/exercise. -

Finishing Touches on my 1973 240Z
T-Bone028 replied to Onion's topic in S30 Series - 240z, 260z, 280z
Hey onion, are those fiberglass front bumpers? Did you put them on or did you receive the car that way? If they are fiberglass and you purchased them...how was the fit/finish as received? I've been thinking about fiberglass or carbon fiber bumpers, but worry about the quality and warpage. -

Weber DCOE's installed | Initial impressions
T-Bone028 replied to T-Bone028's topic in Nissan L6 Forum
Hey duragg...good feedback. I've heard mixed reviews on the anti-vibe mounts and o-rings. Some say they're necessary, others say that they get vacuum leaks with them. If I notice heat-soak or noticeably inconsistent AFR's, I may switch out the paper gaskets to the anti-vibe mounts and get lower profile air cleaners. Right now, my filter height is 3 1/2 inch...with a lower profile air cleaner, I would only have 3/4" space between the air horns and filter lids using a 2 1/2 inch height cleaner...that and they are around $45 a piece! Has anyone had any direct experience between using stack filters and a regular oval airfilter? I've read the stack filters reduce the effectiveness of the lip/radius in the air horns and I worry about their filtration...they look pretty wicked though. Regarding foam/ITG's...just dont love them, and I've read some experiences of their durability after a few years. -

Weber DCOE's installed | Initial impressions
T-Bone028 replied to T-Bone028's topic in Nissan L6 Forum
Oops, double post. -

Weber DCOE's installed | Initial impressions
T-Bone028 replied to T-Bone028's topic in Nissan L6 Forum
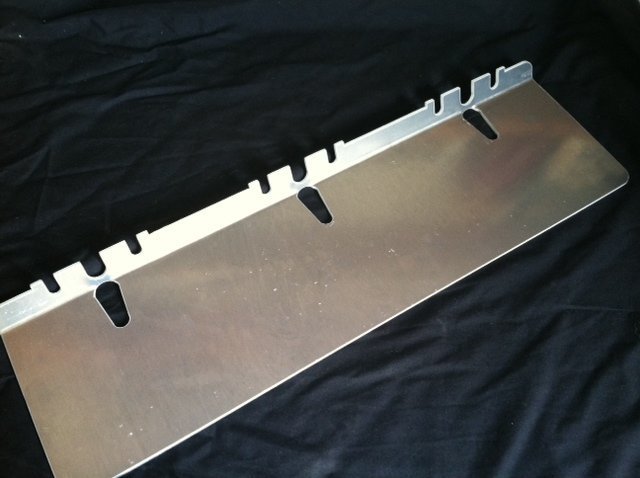
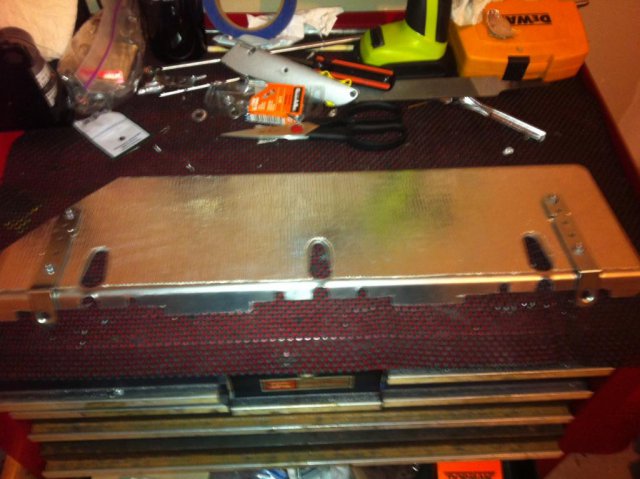
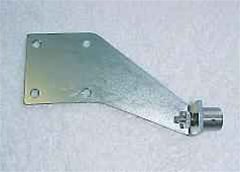
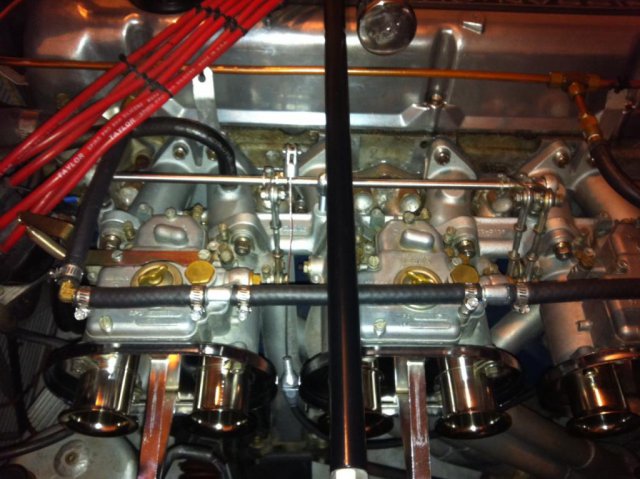
Hey Heroez, I'm addressing you directly (again)...thanks for your opinion. I'll make sure to run everything I do by you first, I'm just not good at planning things. Wait...did I just make a plan?!? Awesome!!!! Moving on...I finished up my heatshield and put it on this morning. I purchased the heat shield from ZCCJDM.com...its a nice piece, but being universal, it had to be modified to fit. It took some time to trim the heatshield to fit my engine bay and I ended up having to use brackets to mount it to the intake manifold studs. There just wasnt any way to get it securely in place with the existing mounting slots. If I were better at planning, I probably could have just made the shield myself... but I'm relatively pleased with how it turned out. Here's a pic from ZCCJDM's website...when I received it in the mail it looked nothing like the picture from zccjdm's website, it had a lot of additional material on top of the mounting holes and it would not fit as received due to clearance issues with the carburetor bodies. Aside from trimming the excess material above the mounting slots, and adding brackets, I also had to trim part of the shield to clear my brake booster vacuum reservoir. Here's a picture of the shield trimmed to fit, thermo-tec heat adhesive backed heat barrier applied (about $18 from summitracing), and brackets added. And lastly, as mounted in the engine bay. Weather still wont cooperate and its forecasted to rain the next 5 days...so once I get permission from Heroez and the weather clears up, I'll be able to road tune and try out different jets. Moderators, please feel free to move this thread to the members project sub-forum if it makes more sense. Heroez, that okay with you? -

Never2BeFinished's 280z Build Thread
T-Bone028 replied to Never2BeFinished's topic in S30 Series - 240z, 260z, 280z
That's a bummer regarding your old motor. I think cheapest thing to do would be L28 to replace your blown motor....with limited funds, that's what I would consider first if that's your only mode of transportation. You can always build out/plan a motor swap afterwards. -

Weber DCOE's installed | Initial impressions
T-Bone028 replied to T-Bone028's topic in Nissan L6 Forum
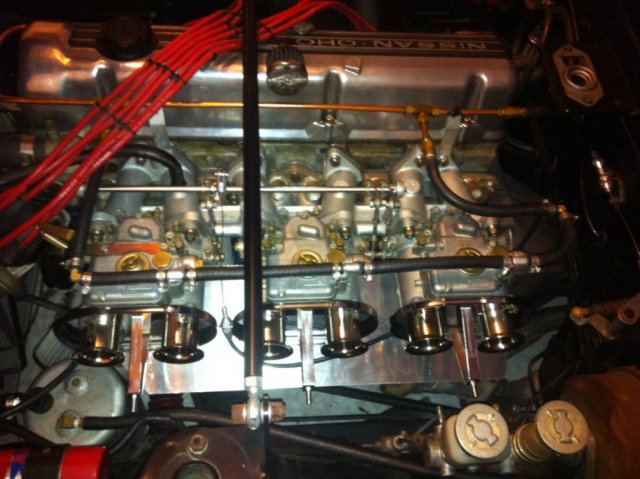
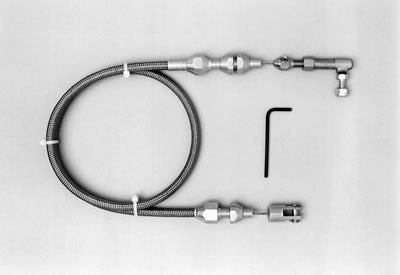
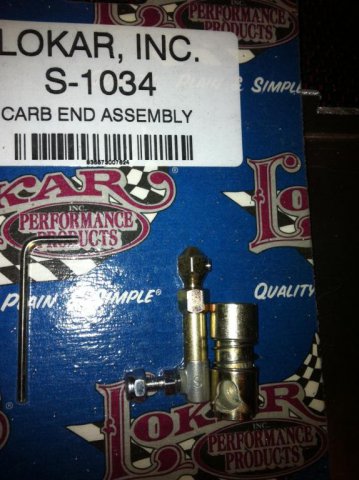
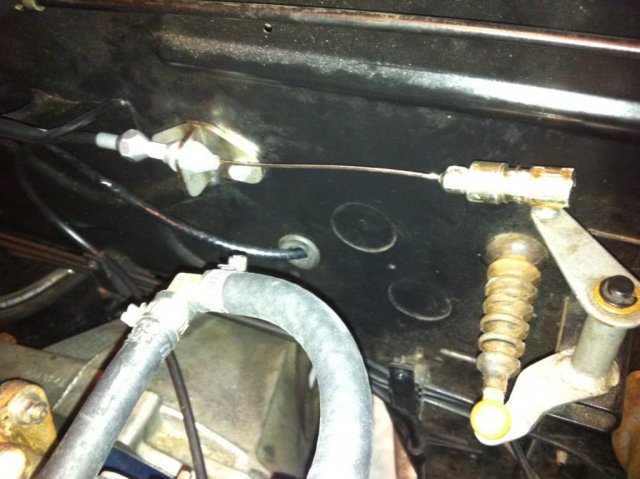
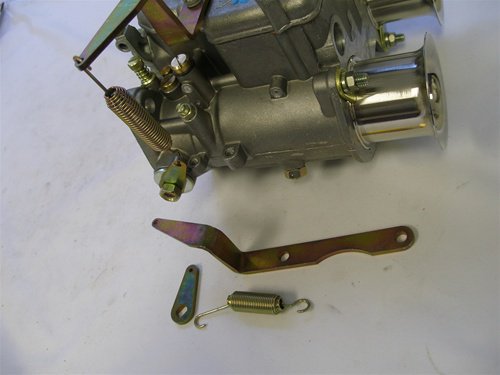
Anywho, figured I show some pics of how I ran my throttle cable. I wanted the least amount of permanent modification as possible, and I think I was able to accomplish it with a great pedal feel and smooth action/return without any binding. Parts list: - Lokar 36in throttle cable, I used p/n: LOK-TC-1000U36 ($48 from Summitracing) - Quick Disconnect Ball Joint Assembly 5/16-24 ($15 for 2 from Amazon.com) - 5/16 (8mm) rod arm p/n: 99006.251 ($8 from pierce manifolds) - DCOE bottom mount cable bracket, p/n: 40930 ($33 from Pierce Manifolds) - DCOE external spring kit, p/n: LT5000 ($32 from Pierce Manifolds) - 16" stainless steel linkage rod p/n: 36016 ($13 from piercemanifolds) - 2 5/16 shaft collars p/n: 99024.350 ($13 from piercemanifolds) - Last piece was the firewall bracket that replaced the bell crank. I received it from HybridZ member Savage42 for $25. This could probably be made for you DIY'ers. Total cost: ~$187 I'm sure some of you more creative/thrifty folks have done something similar for a whole lot cheaper...but this was all readily available, off-the-shelf products delivered to my door. The Lokar throttle cable has one end with a ball and cup (1/4") that can be disconnected. Unfortunately the cup is too small to fit over the datsun pivot ball. So, I took the 5/16 quick disconnect ball joint and slid it over the lokar cable end, and bonded the two permanently in place with JB Weld. I like the quick-disconnect because it takes me all of 30 seconds to completely disconnect my throttle cable to make adjustments. Plus, I didnt have to crawl under the dash and modify the gas pedal at all. The only other "modification" I had to do was trim the cable sheath 3" to give me more cable wire. Here's a pic of the cable (that shows both ends of the cable) and the quick disconnect ball joint before being JB welded together.. And here's a pic of it in place along with the firewall bracket from Savage42: To connect the throttle cable to the carb/linkage, I used the DCOE bottom mount cable bracket from PierceManifolds, and a small L shaped bracket I had leftover from a universal choke cable to attach the other end of the lokar cable to the rod arm on the main linkage rod. Here's a pic of the bottom mount from Pierce Mainfolds, and it attached to the center carb. Lastly, the return spring is fitted to my 1st carb closest to the radiator...its the only return spring I'm running and with all the rods/arms attached to the carb/main linkage rod, all carbs return fully to the throttle stops. Based on some other posts, seems like I'm of the lucky few that is able to run all three rod ends on my intake manifold (brand is Redline). With my throttle cable rod arm mounted closely to the center rod end, I have good mechanical advantage and solid support to avoid bending the linkage rod. I've read some other experiences of folks only being able to run two rod ends due to uneven spacing and in some cases, the linkage rod flexing/being bent. I believe a fix for some folks has been re-drilling the manifold to accept 3/8 rod ends and a beefy 3/8" rod. Or JB welding the center rod end mount, and re-drilling to be centered correctly. Hope this helps someone, it probably took me a solid few days of thinking about and finding all the parts online I would need to make everything work as I envisioned. Now if only this weather would cooperate so I can continue tuning my rookie-mistake carbs! -

Weber DCOE's installed | Initial impressions
T-Bone028 replied to T-Bone028's topic in Nissan L6 Forum
Hey Heroez, thanks for the insight. Complete rookie mistake on my part using the 40s. 45 DCOE's would have been the way to go...no maybe I should have gone EFI ITB's, or better yet forced induction for the most power out of the L6. Actually now that I think about it, I should have just done a motor swap (all of the members on this forum that stayed with the L6 are clearly rookies and its sad/funny to read their experiences)...Clearly the best choice would have been V8 or even better yet a V10 with twin turbo's and nitrous with a rocket strapped to the roof. Wait, I take that back...I just had a moment of clarity. Every member on this forum that enjoy's the Z is a rookie. So many better/faster cars out there. Maybe I should just sell the Z...dont want to be a rookie. Thanks again Heroez, you just saved me a lot of wasted time. -
If your door striker is adjusted all the way, then by new weatherstripping. Mcmaster Carr has a type that will fit...p/n is somewhere in the forum. I had good success with it
-

Weber DCOE's installed | Initial impressions
T-Bone028 replied to T-Bone028's topic in Nissan L6 Forum
So finally got some time to play with the Z a little bit. So you know how everyone says "Webers like a lot of initial advance"? Well guess what, webers like a lot of initial advance! I received the timing light I ordered and checked my timing this afternoon. At idle, my timing was currently set at about -6 degrees without vacuum advance, which makes sense (I disconnected vacuum advance when I installed the triples). I advanced the timing to about 13 degrees and watched the RPM increase from 900 to 1500. From what I understand, this should put me at about 31-32 degrees total advance (really wish I shelled out the extra $25 to get a timing light with an ignition advance dial!). I gave it a couple of revs to see if I heard anything odd....my "spitting" that I was observing from the front carb on the 2nd barrel disappeared. Decided to take her out for a spin and....dear god, I thank the italians for my webers! I run 245/50/15's in the rear and from about 15 MPH, I was losing traction when I stomped the throttle, and getting a little loose going into second! I have a wideband installed, and I didnt even have the time to look at it through the rev range because I was too busy making sure I didnt crash the car or miss a shift. The car was screaming through the rev range as soon as quickly as I was shifting gears! I was running out of time and have not had a chance to start really tuning and sychronizing the carbs. Next step will be to try to lower my idle to 1000 RPM. Currently I have 50F9's in the 40 DCOE's at 1 full turn out from fully seated. I think I'm going to need to try out my 55F9's (Thank you LeonV) and start tuning the idle from there. Ram75280Z, let me say this in advance: I do not disagree with you. I think 45 DCOE's would be a better choice over the 40 DCOE's. I have a P90 head with unknown head work...from some searching, a number popped up that said the P90 head flows about 172 CFM intake per cylinder - stock (I assume this was 172 CFM per cylinder...the post did not specify). Is this true? I dont know, but its all I've been able to find. As far as CFM's, I will share some numbers that I found during a search regarding CFM's for various induction methods posted by TonyD on Zcar.com back in early 2000's. CFM's: Stock early round top SU's (46mm plate with 32mm venturi X 2) 217 cfm (this was what I had on my stroker prior to the Weber install) Stock late flat top SU's (46mm plate with 34mm venturi X 2) 254 cfm DCOE/DHLA/PHH Triples with 32mm Main Venturis (x6) 650 cfm DCOE/DHLA/PHH Triples with 34mm Main Venturis (x6) 761 cfm Stock EFI 50mm Throttlebody (50mm x 1) 323 cfm EFI 60mm Throttlebody (60mm x 1) 490 cfm EFI 65mm Throttlebody (65mm x 1) 583 cfm TWM / SK / Weber Triple 40mm EFI Throttlebody (40mm x 6) 1140 cfm TWM / SK / Weber Triple 45mm EFI Throttlebody (45mm x 6) 1512 cfm So I would Imagine with DCOE 40's and 33 chokes, I'm able to flow somewhere in-between 650-750 CFM's. Does this mean that the P90 head is out breathing the carbs? Probably. P90 head: 172 CFM x 6 = 1032 CFM's So yes, I may be out-breathing my 40 DCOE's with 33 mm chokes. But is it an improvement over the SU's at 217 CFM? I would say yes! The reason for me installing the DCOE 40's was because I had them already available to me, sitting in a box in my garage. If I had more disposable income for my Z, I would have gone with ITB's via Extrudabody. However, this was just a "why the heck not" spring project that I'm having a great time with. Maybe in a couple of years I will go down the path of EFI ITB's, but for now, the 40 DCOE's are just what I needed. Hopefully tomorrow I can synchronize the carbs, finish up my heat shield, and refine my cable linkage set-up/geometry. I'll be sure to post my cable linkage set-up...seems to be a topic of interest for the triple folks. -
Maybe it's out of your Budget, but why sell the Z? If I had to, I would buy a "beater" used sentra/Hyundai/civic/versa/sub-compact car etc. While I'm sure you have your reasons to sell, you'll never get it back once it's gone. A $150 car payment for a 6-7k car w AC and solid MPG would be worth it to me. Change the insurance on the Z to classic car insurance and your annual cost to own becomes minuscule. FWIW, my "daily" is an Xterra (which I love) and I'm thinking about getting a beater to add to the fleet to save on gas!
-
Although forums and Internet searches will give you a lot of good info on the swap, buy the V8 swap book from JTR. It will consolidate a lot of info into one quick reference book, and was written for exactly what you are thinking about. And do the 350...think about how much the aftermarket supports and tech articles were written about for the 350.
-
+1 to the datsun spirit wires...helps clean up the look of the engine bay
-
+1 to the CF clamshell with integrated single gauge pod...it might make sense to make it slightly larger on the underside of the clamshell...with all the wiring in the column, and relay mods to save the headlight switch, my clamshell doesnt close completely. Also, I would hope that you could use the same size screw...I believe the stock version used 3 different sizes! Additional thoughts would be the panel where the map light, AC/heater control knobs go...As my car is fair weather only (and I'm sure a lot of other members are too), I dont use HVAC and wouldnt mind seeing something else as an option...I think modular would be the way to go...i.e. blanking panel within the CF panel that would be removable for those that wanted to put in 3 gauge cluster or something. Just a couple of thoughts based on things that I've been thinking about but dont have the skills...lastly, I know budget is always on my mind...so if it were me, I would consider fiberglass options as well.
-

Weber DCOE's installed | Initial impressions
T-Bone028 replied to T-Bone028's topic in Nissan L6 Forum
Hey Josh, nice paint color! Regarding Vacuum advance, I do not believe it applies at WOT, and is generally a fuel economy thing. Currently, I have the block breather vented to atmosphere with a filter because I havent decided on location for a catch-can yet (so no PCV), and my brake booster is attached to a port on runner #2 (still need to replace hose and check for vacuum leaks because the same carb barrel is sneezing/spitting/coughing/ruining my life). Vacuum advance is unplugged and the nylon hose is just hanging in the engine bay because I havent found a plug to fit on to the distributor I want to use yet. I've been searching all day on setting timing, so just waiting on my timing light I order today so I can get started. So basically, the only thing I'm happy about is that I got the car running and it sounds/looks cool. Still need to make the heat shield I bought from ZCCJDM fit (it doesnt, at all, in any way, requires modification) and then start throwing different jets at it to see if anything makes it happier.

