HuD 91gt
-
Posts
347 -
Joined
-
Last visited
-
Days Won
4
Content Type
Profiles
Forums
Blogs
Events
Gallery
Downloads
Store
Everything posted by HuD 91gt
-
No, I think you have a bigger flatter torque curve! Lol but saying that, to make me feel better if I break it down in my head, 6psi is artificially 40% larger in displacement. Meaning my N/A 2.8 is making 160whp as it sits with very very conservative timing and 8.5:1 compression. Seems bleak, but at least it’s higher then stock! Lol. a 3.2L on the other hand is 13% larger in displacement. Bring that down to 2.8L levels and were at 196whp. What are 2 points of compression worth? all this doesn’t really make sense as head flow is headflow, but the math may work for peak torque values? Who knows. Makes me feel better though 😛
-
Haltech Platinum Sport 2000. The closest available ECU would be the Haltech Elite 2000. Very capable unit.
-
Just working out all the bugs. Plan was to turn it up on the dyno but ran into ignition troubles. I’ll be back.
-
Manifold progress stopped when I had to reorganize the shop to fit in a lathe. Then decided it’s probably just smarter to make a whole new manifold. So I stuck the old one back on and the car is on the road for summer. Hit the dyno for the first time yesterday, had some ignition issues at 6500rpm so pulled it off the rollers to diagnose. Got in almost a full baseline run Funny torque curve.

-
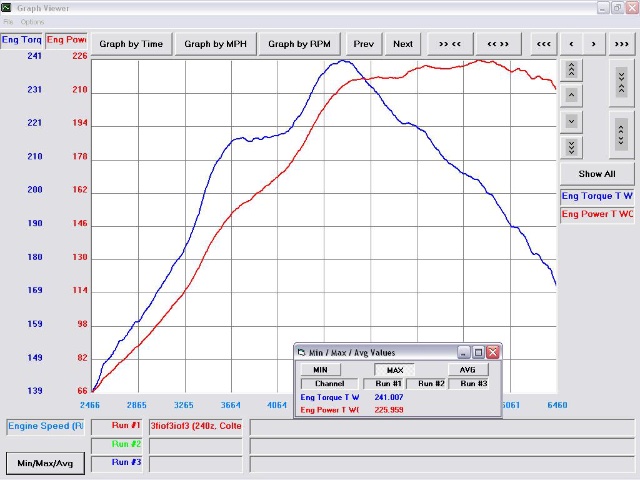
I finally get to contribute in this thread. Only got a baseline in before my ignition was cutting out at high RPM so we pulled it off the rollers. 5 years of EFI fun to get to this point, relieved I could drive home. (Swear I was more nervous then when I proposed to my wife). Ported P90 with 510 lift, 280 duration cam. ~8.5:1 Cast pistons +0.040. 440cc injectors Platinum Sport ECU HX35 w/12cm housing 6-6.5psi 3” Exhaust/DP w/hi flow cat LS coils Sadly this chart doesn’t show boost, but my datalogs leading up to this point show 3rd gear pulls hitting 6psi by 3500RPM. Chickenman safe tune for the street. I find the torque curve and associated drop off really peculiar. Anyhow, enjoy!
-
No. As the post above explained, I’m using a single wastegate. Stock 240z manifold is divided. My adaptor continues that right to the turbo, and eventually to the valve face of the single 44mm wastegate.
-
In progress... the secret experiment! I needed to pull my manifold to change wastegate springs. I hate buying new gaskets (cheap ass), and a manifold idea had always been in my head. Sooooo..... True twin scroll manifold using an adaptor from an original 240z manifold. Cylinder firing order is perfect for an easy adaptor. I am fearful of the manifold cracking, but the adaptor is designed in a way I can chop off a portion and easily adapt it to a completely new manifold. I didn’t go that route as I can’t get my hands on a flange for a decent price, then this idea popped into my head. The original 240z exhaust manifold actually flows really well. The adaptor is going to use a single 44mm wastegate completely divided right up the the WG valve. Picture time!
-
I should state, I’ve never heard of this happening to anyone else before. Put even just the time it took to get a proper working diff, wasn’t worth the few hundred bucks difference. If i were to do it again I’d probably go the M-tech route. Or even smarter. The super 8.8 kit that the member here sells. Especially if your going to purchase brakes and CV’s at some point.
-
I did the washer upgrade through who ever sells that kit as well. The issue I had was when checking the backlash. At one point I had proper backlash, then you rotated ring gear 180 degrees and I had basically zero backlash. Being the first diff I had ever taken apart I wasn’t sure if I just screwed up but luckily have a machinist friend. He measured it out and the surface which the ring gear mounted to was completely warped. So he tossed it on the lathe. I reassembled and had even backlash all around.
-
Thanks! The goal is a bit of a wolf in sheep’s clothing. I’ve got another exciting engineering project on the bench right now. Pumped.
-
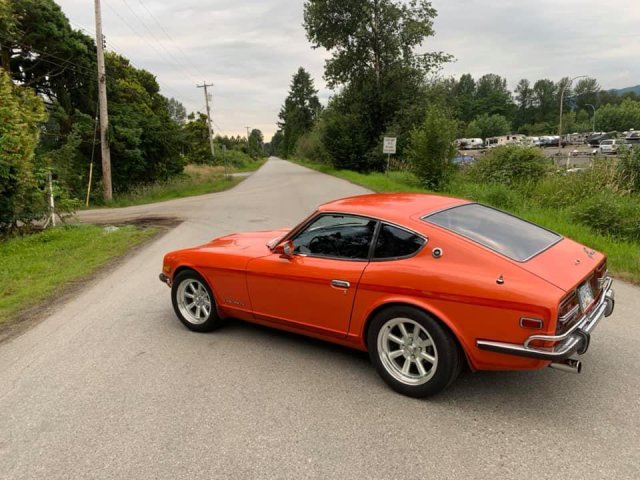
Always wanted to do a fall shoot with this car. Hadn’t touched my real camera in... years? These turned out well despite missing the sun by about 10 minutes. Damn time change throwing me off. Ha.
-
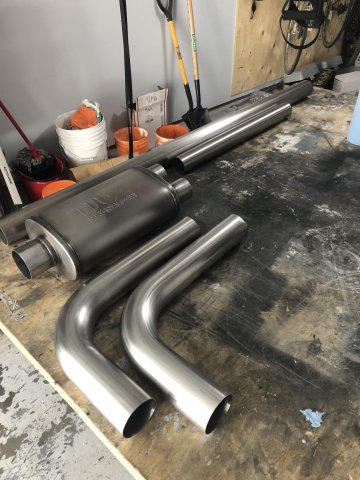
Tips complete.
-
So what I thought was going to take me a couple days took me 5 or 6. Lol. My welding has not improved by not using it it. Amazing. Lol. Here is me using my back purging cap (made of a slice of the muffler outlet which slides over actual pipe nicely, then capped with sheet metal and a fitting threaded in) and welding a few pieces to the old flex pipe. It was 3” as I always planned on upgrading. All welded up and hit with scotchbrite. The thing that took me the longest, was how to hang the system. I went through many types of hangers and spent the most time doing this. I have the pipe with such tight tolerances to surrounding pieces I needed the whole system to be very secure. I started by hanging the whole system with New car OEM style hangers. They work great but you really need to stretch them horizontally to make your system secure. By doing this it’s also hard to line everything up exactly where you want. So the rear muffler hangs off these. This worked for the rear, but wasn’t working with the pipe going through the front differential/control arm mount. So I used these cheap J hook style ones and made a bracket to the crossmember. Have no clue what those threaded holes were for in the bottom but I guess I’m not going back now. Lol. The thing is rock solid now. So now my welds just need to hold up. As you can see they aren’t that pretty. Lol. working on the tips tomorrow. They are going to be a little complex. Hopefully it all works out as planned.
-
Decided to build a new exhaust. Old setup was a 2.5” “Premium Exhaust” from MSA, modified with a vibrant ultra quiet resonator and a magnaflow muffler. Since I’m now turbocharged, 3.0” was in the plans. I also wanted to add a catalytic converter as I’m tired of smelling like fuel every time I drive the car. So the cat will replace the vibrant resonator. So I spent an hour or two rubbing all pipes and muffler with SOS and WD40, followed by Acetone. Proceeded to spend the next 6 hours today making hanger brackets, and getting the muffler in the exact right spot. No pictures of that yet, but I do have the pipes! There will be a lot of pie cutting as well to get the perfect fit. I plan on taking my time on this one but should be done by next week.
-
I don’t know which one it was, but an EGR version of the 280z intake.
-
Well I had some slight differences in my plugs, so I just moved mine from 4 to 3.7. I’ll let ya know if it changes.
-
Since Hybridz is a bit more of an engineering site vs a photo gallery, I made this alignment system after installing the coil overs. string alignment, and I used a cube inclinometer for camber. (iPhone actually works pretty good too). The first time I did a string alignment I used jackstands to mount the string. Everytime You jacked the car up to make an adjustment you had to realign the strings and ensure it was square. With the mounting points of the string attached to the car, you can can make multiple adjustments without worrying. Was a fun project.
-
Photos hide many of the imperfections, but it’s certainly has many many battle scars. One day a full tear down will happen. But one must have everything setup before they make it all very pretty.
-
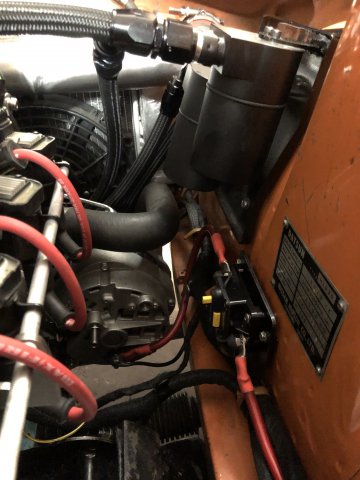
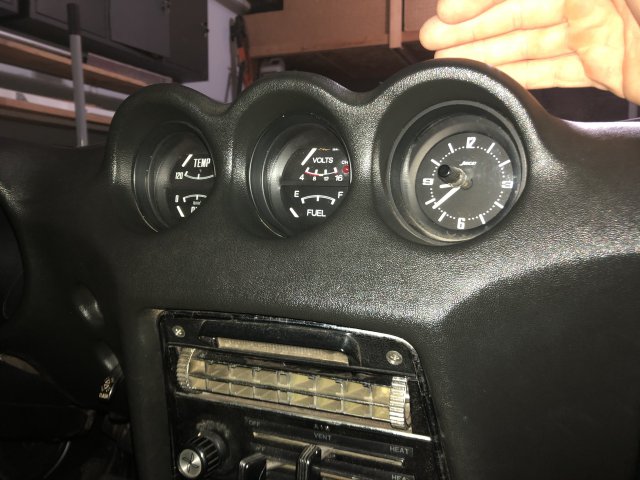
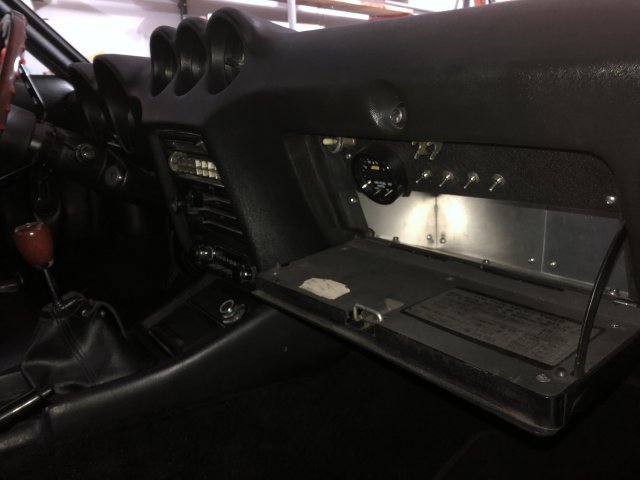
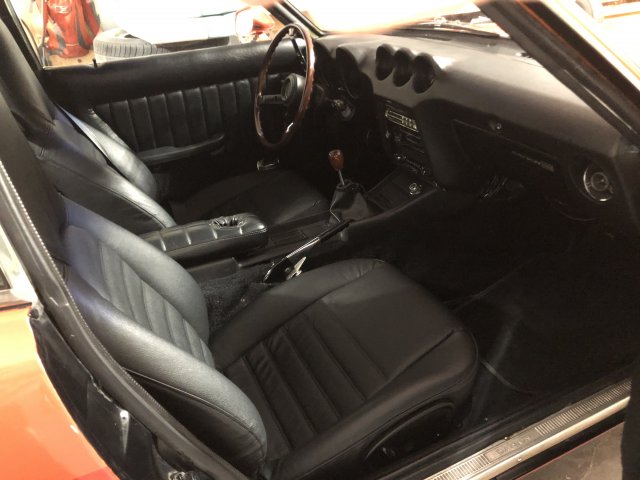
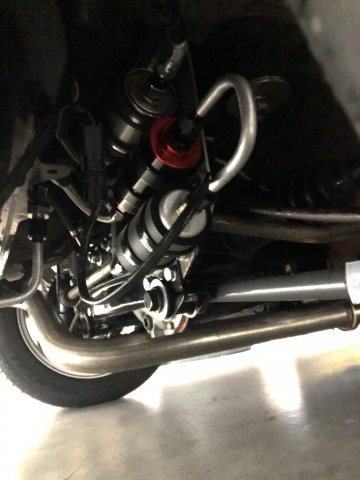
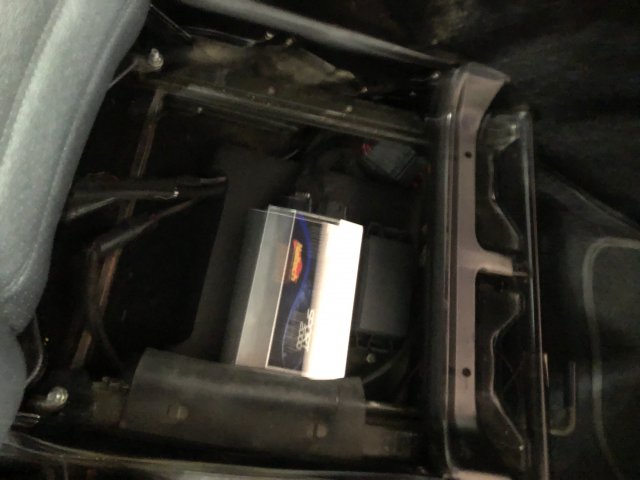
I just ran down and took a few more shots. Most recently I discovered the 10g WR wire which runs through the car was fried and cracked in many places. Due to age and definitely helped out by my 140amp CSS alternator. I ran new wiring where required, worked out a couple bugs and ran a 4g wire through a 100amp breaker to the starter. My hope is this take the load off the original 10g wire that runs through the cabin. I also got a hold of a stock 280z voltmeter and replaced my original ammeter. Photos attached. Also attached photo of my interior complete with Porsche Boxster seats reupholstered in black leather (they were $200 torn up beige specials). I redid them with a more classic 240z/911 style. I never ended up adding the heated seats but they are power. You can also see my ECU/Fuse assembly under the passenger side. Aluminum glovebox. Holds my AFR gauge when tuning, and switches for manual operation of fans, pumps, antennae etc. also included photo of my fuel system at the rear. The whole assembly comes out with 1 (or is it 2?) bolts. All fixed to a fixture using rubber radiator mounts.
-
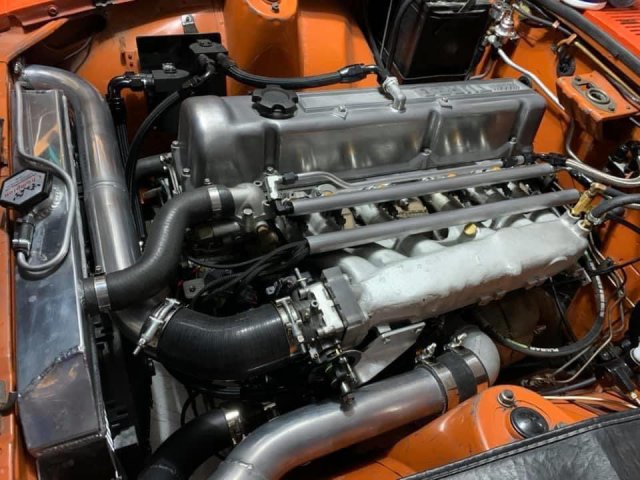
I’ve almost started a thread on here so many times, and it’s unfortunate I haven’t as the car has been through so many iterations. But better late then never! The Car. 1971 240z L28 w/ 0.040 overbore flattop pistons ARP Hardware throughout Fully Balanced P90 Head port and polished by Whitehead Performance Colt Cams c.542s cam (.491L 280D) Kameari adjustable cam gear OEM Valves 60-2 crank trigger (VR) LS2 Ignition Coils Jeep CAS for sequential 240sx Throttle Body Pallnet fuel rail 440cc Injectors Ported Intake (hacked open and rewelded) Ported turbo manifold HX35w turbo w/12cm housing Tial MV-R 44mm wastegate 3” DP 2.5” Exhaust, vibrant super quiet resonator and magnaflow muffler 2.5” Intercooler piper w/ EBay Intercooler VW recirculating valve Bosch 2-wire idle valve dual catch can setup using OEM PCV Haltech Platinum Sport 2000 ECU Driveline R200 w/ OBX LSD (Required lots of machine work) Techno RT diff mount Suspension T3 rear control arms Silvermine aluminum front control arms Ground Control Coilover sleeves Tokico Illumina struts Too much poly larger sway bars Konig Rewind 16x7 Continental Extreme somethings 225/50r16 Stock Brakes w/Portafield pads/shoes Tacoma Booster/Master cylinder Hybridz has been an invaluable learning hub over the years. Just hoping this thread can perhaps sway some traffic to come back over. I’m still playing with wastegate springs, but have seen 10psi with very conservative tuning. I won’t be increasing over that until I source some larger injectors. 10psi, 80duty cycle and only 5200 RPM (this cam likes to go to 7k). Chickenman gave me a beautiful base tune and has been working his magic, with the help of me fiddling and screwing things up in between. Once I get proper wastegate springs in, I will be headed to the dyno for some high power tuning. The car is running like a champ other then some heat soak issues. It’s been many years. Engine wise the car has been through a few versions. L24 w/e31 head and SUs L28 w/ N47 head and SUs L28 w/P90 and SUs Then introduced MS2 and LS2 ignition coils Then eventually EFI Then finally over to the Haltech and added Turbocharger Ill try and keep this thread updated with changes. Next up is most likely strut bar fabrication, and possible reworking of intercooler piping. Possible manifold fabrication. For now I just want to drive it. It’s been 6 years and now it’s reliable and time to enjoy.
-
Very interesting about the dwell. What made you come up with that idea?
-
[Help] New to me 240z + L28 won't idle
HuD 91gt replied to awk34's topic in S30 Series - 240z, 260z, 280z
From the look at those photos, Id be getting a timing light pretty quick! Your right in regards to that being 180 degrees out. I can’t remember if that piece is reversible on the distributor itself or not? Perhaps the plug wires are not in the correct position and they did that to try and correct it? -
[Help] New to me 240z + L28 won't idle
HuD 91gt replied to awk34's topic in S30 Series - 240z, 260z, 280z
Can you get someone to check the timing quickly while it’s running? -
Awesome! Are you able to fill us in what rubber bushing was used in replacement?
-
My wife bought me a retro sound radio a few years ago. Requires trimming your own faceplate but it’s as correct as one could ever ask for. bluetooth, MP3 whatever. Honestly it never get turned on, but looks great. Light green writing really sets it apart.