langfordchuck
-
Posts
63 -
Joined
-
Last visited
Content Type
Profiles
Forums
Blogs
Events
Gallery
Downloads
Store
Everything posted by langfordchuck
-
am installing mine in the next couple of weeks, will post with pics. am doing sound insulation as well, and closed cell foam.
-
Welcome to hybridz. i take it that you are now the proud owner of a 260 2/2? Since you are in canada, I assume it is a 74? I have the same, a 74 260 2+2. And, am also in canada, on the west coast. Pics of the new car?
-
Removing Gas Tank Filler Hose
langfordchuck replied to UofA_ZCar's topic in S30 Series - 240z, 260z, 280z
yes, the heat trick is important, or at least very helpful.... -
Of course, it goes without saying that for us 2/2 owners none of this applies, we are stuck with the limited number of parts and wrecked z's that are 2/2... I suppose that this just gives us more incentive to repair and resurrect our cars. having said that i am sure the internal parts and strikers etc interchange, so all is not lost.
-
While you are diggin around in there you might find that the rubber tube that channels the water flow from the cowl area out through the fender well is cracked or rotten. Since it passes through the passenger compartment (thanks for that engineering brilliance datsun) if it it broken it leaks inside. It is a bit of a PITA to remove: access to it is tight, but worth it. If this is the case, repair it of course, but some folks (myself included) have taken steps to ensure it drains ELSEWHERE than inside the 1/4 panel, where it likes to deposit debris and encourage rot. Also, there is a metal box (at least on my 74 260) that is part of the heating cooling system that opens up to the cowl area. sometimes the seal between the box and the cowl area rots, or it rusts and water leaks in. Protecting the wiper motor with a bag or plastic box is simple enough: it is barely visible and so it doesn't need to be precise and original. but i suspect that this is not the source of any leaks. I would look at the areas i have suggested. BTW I have not seen replacements for this rubber tube, but a little work and some parts sourcing will identify a replacement. I ended using heater hose: it was a bit of a chore to get it to fit through the opening at one end and on the drainage tube at the other, but it is much thicker than the original, and so will not rot for some time, and since it is not under pressure a good friction fit is all that is required. Making it drain water and dead leaves and debris outside of the fender well is more work but worth it to remedy a design flaw in our old cars. I mean, what were they thinking? no wonder the lower part of the 1/4 panels are rotten in most old zeds..... good luck: there is nothing worse than a leaky cabin.
-
Post your favorite Z other than your own.
langfordchuck replied to dailydrifter's topic in S30 Series - 240z, 260z, 280z
Sorry about the quote and the extra pictures for other users but it was a few posts back... nice final job. Your licence plate light is exactly what i was looking for: where did you get it? And, I also like the hood. -
Post your favorite Z other than your own.
langfordchuck replied to dailydrifter's topic in S30 Series - 240z, 260z, 280z
This is my personal favourite, although I realize it is photochopped, I still love the Aston look of the side vents, the clean C pillar. And I love the silver: real clean look. It is my desktop.
-
Nice looking seat install. I have to check out the colour schemes for those seats, as my interior is brown, and the black seats would look out of place. Will have to start checking out S2K seat colours.....
-
I am not at my garage ritht now so can't confirm the products I used. But what I do recall is that I used a plastic paint prep material to ensure good adhesion to both the plastic Datsun used in the interior, and the vinyl trim. the plastic paint prep worked well, except I should note that on two of the plastic panels i had real trouble getting a good bond: the actual paint stayed wet for a long time. I am not sure what i did wrong, and am still looking into it. IIRC i used a Krylor paint, not a duplicolour. But even with that flaw, the results were good. I did a fair amount to clean the material (tsp, thinner, etc). The outcome was good, outside of the adheion/drying issue I encountered. Well worth it. I also takk the time to repair some of the broken plastic backing on the trim (lots of two part epoxy and some fibreglass) , and re-work the fasteners to ensure a reasonable fit,with fewer vibrations and less noise transmission. good luck with this, and post pics of the result....
-
Niiice.... Any idea what make those rims are?
-
rough estimate for ground up restoration
langfordchuck replied to powershotnt's topic in S130 Series - 280ZX
yes, I have seen FricFrac's car and it is nice. A big factor is how much time you have to spend on it: lots of cash outlay can be shaved off with hard work and long hours. But in my case, this would be penny wise and dollar foolish: it is more profitable for me to go to work and pay someone else to do some things. I do the work because I like to do the work, but the business case would tell me to sell my tools and just buy a nicer car someone else has fixed up. having said that, if you can't build a decent (ie, reasonable, not perfect and not super fast or absolutely reliable but still good) zed for $10K then something is wrong. -
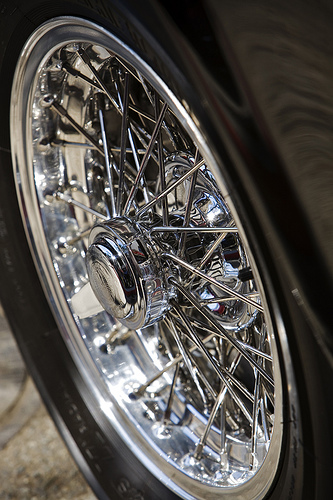
Good question Logan1! I have been on a bit of a search for exactly this: some cool wire wheels. As I noted in a post in the 'show your wheels thread' on this site, I am looking for an older european/aston martin look, complete with wire wheels. I hear you MONGO510, they are a real pain to keep clean: recall how many MGB's came with them, and how many still look good. More importantly, if they are older (used) wheels they also need maintenance to avoid run out (i.e., tighten spokes if they are real old, etc) .However, I am still willing to do it as i think the look could really rock if done right. new ones from Dayton and from Dunlop have that OEM look but without the issues associated with older wire wheels. Classic MotorSports from july 2003 has a good article on them, aimed at brit car owners but useful for the rest of us. One key variable in wire wheels is the centre caps: on Borani's like the ones you find on older masers and Ferraris the centre knock offs are quite large. I am not sure that exact look work so well for the 260z, so I am hoping for something with a more discrete (non-knock-off) cap. the other variable is the number of spokes and their location in relation to the outer edge of the rim. a 72 spoke wheel looks good IMO, but there is the issue of cleaning all those spokes, and with that many there is not much room for hands tools and clothes. But I find the 48 spoke look too spare. I personally like the spokes close to the outer edge: I think this is a more classic look. The pic of the red zed below is what got me started: i pm'd the person who supplied the pic but didn't hear back. I was hoping to get the maker and specs for the wheels but no go so far. But I just loooove the look.
-
nice work Fric Frac! Likely to go teh direction of a star ground system myself, although i did buy a copper bus bar for marine applications that i might end up using instead: it gives me six ground attachments, and well, it is copper. I like the look of the fuse box: what make is it?
-
My flooring is as follows: 1) RaaMat BXT sound insulation (cheaper than Dynomat and Rick is good to deal with): this is self-adhering material 2) ensolite closed cell foam: glued down with spray on elmers glue to the RAAMat 3) extra automotive carpet underlay in the front cabin area: have not decided if I need to glue this to the ensolite or just lay it down 3) carpet from Stock interiors http://www.stockinteriors.com which has underlay bonded to it. 4) floor mats: cheapo ones for now better ones later: will likely look to a mechanical fastener (snaps) to keep this from moving around when I heel and toe will post pics when i get to this stage.
-
Glue not necessary unless you use underlay, in which case the two layers can bunch up. that is why when you buy from MSA, or others, the carpet and the underlay are bonded together. You can mechanically fasten them, ie with some form of a snap fastener that joins the two either together and/or joins the two to the floor, or with spray on glue between the layers, especially if you are using closed cell foam like I am.
-
i have a hook ended small tool i use just for that purpose, curved like a 'J', but lacking that a relatively stiff piece of wire (paperclip or otherwise) will do. I find it is not that hard to get the clip out, but make sure not to spring it into the bush next to the door like I did... putting the small clip back on is a PITA. you can buy a door handle clip tool for about $5-6, but i find it easier to do as DCZ says, except i don't put it on all the way, as it will interfere with the serrated stub. I just put it on part way, (sometimes with a tiny bit of tape if it is fighting me and desiring to spring into the bush next to my door) then slide the handle on gently, then reach in with a tool and push in the last 1/8 inch. Kinda hard to explain, but obvious when you do it.
-
My fuel pump died, should I go electric or mechanical?
langfordchuck replied to FiveSeventyZee's topic in Fuel Delivery
As other posters on this site have noted, a cheap electrical pump will be noisier, with a noticeable ticking noise. If you don't care about noise, no problem, if you want the quiet than worth buying a better pump. -
The Ultimate HID Headlight Upgrade the easy way!
langfordchuck replied to FricFrac's topic in Miscellaneous Tech
Thanks for the info! Good to see another victoria person on this site Good write up, even though i already bought Dave's headlight harness upgrade and new bulbs, so too late to change my alleged mind. will look out for your 240 in town: will recognize you by the bright headlights..... -
Yes, spray on adhesive is the best bet here. note it comes in different strengths, since the goal is just to stop it sliding some medium strength 3M or Elmers will do.
-
Dyno Tuning: This is why you do it (56k beware)
langfordchuck replied to Drax240z's topic in Fuel Delivery
very informative thread, esp. since I live in victoria, bc. I pm'd Dragx240z, does anyone know if he is still in business in victoria? And i echo an earlier question above: is dyno-tuning a worthwhile investment if you are running a relatively stock n/a 260? -
Yes, I am looking for the same thing, as i have moved my fuel and brake lines around a bit, and in addition, my old clips were shot. A quick junkyard search did not produce anything usable, 'tho i could probably look harder. I was thinking of fabricating something, using aluminum and rubber. the aluminum clip part should be simple enough, and for the rubber part that surrounds the lines, i was thinking of just getting a block of hard rubber, drilling the appropriate size holes, and then cutting it in half length-ways. But I haven't got there yet. Let me know if you find something, or how you resolve the issue.
-
Wheel Show! Post your pics of you wheels
langfordchuck replied to k3werra's topic in Brakes, Wheels, Suspension and Chassis
yes, very nice rims Corpcrim, the closest so far i have seen that gives it that euro spoked wheel look, but more modern. nice. -
Whats your Favorite color for the S30?
langfordchuck replied to 19762802+2's topic in S30 Series - 240z, 260z, 280z
For a bunch of reasons, not all of them aesthetic, I am firmly marching down the road to a dark brown for my 260 2/2. I am going for a real euro (early jag, not Ferrari 250 GTO) look, complete with spoke wheels. the 2/2 of course is different enough from the regular early zed shape that the colour choices don't automatically transfer from one to the other. Having said that, I would love it if any zed owners who have gone dark brown would post so i can see if my path is a good one, or if I should change my (alleged) mind while I still have a choice. I have seen a nice semi-metallic brown in a Lexus, don't recall the paint code, but I am not sure a semi-metallic would work. If you think about the older euro sports car look, metallic was rare or non-existent, so while i like it at some level, it is not right for the look and feel I am after. So, long story short, I am hoping to see something that would work for me. folks with brown cars, PLEASE POST! take care -
bumper confusion ... please help
langfordchuck replied to rskdsk's topic in S30 Series - 240z, 260z, 280z
When I get around to posting my bumper rebuild thread I will try to remember to measure the lengths of the shock mounts and include the info for my 260 brothers and sisters -
bumper confusion ... please help
langfordchuck replied to rskdsk's topic in S30 Series - 240z, 260z, 280z
I think that either bumper on a 260 would be seen as authentic (or 'correct' if you prefer that word). The nice thing about the zed community is that they (we?) are not fanatic about those details: the fact that the 260 came with the earlier bumpers would be good enough and most if not all of us would consider the car 'stock' with those bumpers, regardless of which bumpers it actually carried from the factory. Mine is an early 260 (1/74) and (thankfully) it has the earlier smaller bumpers. I am in the midst of rebuilding them, as they were a bit beat up, and will post a thread about my rebuild in the appropriate section once I have made more progress. Here is a pic of the 'before', on the car. Not a great picture but hopefully the ones to follow will be more helpful.