
Warren
-
Posts
619 -
Joined
-
Last visited
-
Days Won
2
Content Type
Profiles
Forums
Blogs
Events
Gallery
Downloads
Store
Everything posted by Warren
-
Whew, I'm not alone after all. I thought only "I" had that kind of luck. I'm still fighting with making rear crossmember mounts on mine. Hopefully, I have enough time between work & family stuff to get the interior out, weld in the brackets and put it all back together. Oh, did I mention that I still haven't built the transmission? You're not the only one short on time.. Welcome to the club...my membership number is 130013. Good luck with it. Warren
-
Talk to Pallnet...he's done it. Warren
-
Glad it worked for ya. Hope to see you at SEZ #8 on the 25th, click the banner above for info. Warren
-
Perhaps you could search on the Innovate Motorsports Forum Site. Pretty sure the answer is on there. If you can't find it there, ask Klaus. If he can't answer your question, it doesn't have an answer. (edit)...found this answer in less than 30 seconds doing a search there myself. Click Hope it helps, Warren
-
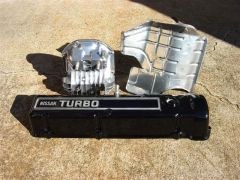
More Bling...all powdercoated. The hood prop rod is holding the heat shield up. It was done too.
-
 Just a few more
 -
280ZX weatherstripping...anyone actually sell any?
Warren replied to 80LS1T's topic in Body Kits & Paint
Looks like a great price, but that's not right...here are the seals in question> http://www.zcarsource.com/content/p/9/catid/7240_7266/DOOR_GLASS_WEATHERSTRIPS_FOR_79_83_ZX $562.05 each side. Still WAY too expensive (for me anyway). Warren -
280ZX weatherstripping...anyone actually sell any?
Warren replied to 80LS1T's topic in Body Kits & Paint
Cody, Those parts are NLA Worldwide...don't ask me how I know. Advice on re-using the ones you have, if you still have them or can get a used set: Once you remove them from the car (4 phillips screws that are probably rusted away), clean them thoroughly, removing the "stainless" strip (emphasized intentionally, read on) from the rubber coated bracket that they're attached to (they're glued on). Wire wheel brush, bead blast, scrape, curse Nissan for designing such a sh!tty part, and remove ALL of the old rubber that the bracket is covered with. Be certain to remove any and all rust on these parts as well. Once cleaned, spray paint these parts black with a rust preventative paint, like Rustoleum, or other "grill paint" and let them dry. At this point, you may consider drilling out the 2 rivets that hold the bracket to the strip. You'll see what I'm talking about once you complete the step above. Clean the parts well and set them aside. Polish out the stainless cap strips that you've removed. Don't worry about using a polishing wheel on a bench grinder...it works VERY well for this. Use plenty of rouge or polishing compound on these parts and they'll look brand new again pretty quickly. Now, use the 3M windshield sealant I mentioned above to replace all the rubber coating of the bracket itself (the part with the 4 screws going through it). Lay it on wax paper, do one side, let it cure out, do the other side. You want this coating to be approximately 1/16-1/8" thick. Smooth it out with a wet finger or spatula when you apply it. If you don't put this coating back on these parts, they won't fit the body right when you go to reinstall them. At this point, you'll want to reinstall the riveted brackets you removed earlier. Use 1/8" rivets and make sure they're tight. Use the 3M adhesive on between the stainless cap and the bracket itself to reassemble the 4 parts of these 2 pieces (2 stainless caps and 2 brackets). You can use some masking tape to hold them together while the adhesive cures (24 hours). Now, since the little rim of the original rubber, (seen between the stainless cap and the body before removal) will be gone, there will be a gap which will hold water. When you reinstall these to the body, lay a small (approximately 1/8") bead of the 3M Adhesive along the edge of the body where the stainless cap will be (only at the top if the screws are to be reused, cover the entire contact area if the screws aren't going to be reused.) You'll want to seal up the rusted screw holes in the body after you clean them out. The 3M adhesive works well for this. It is best to lay masking tape along the length of the opening (front to back) to avoid getting the adhesive where you don't want it. Wipe off any excess adhesive and shape it to fill the gap with a wet finger or spatula. Acetone or Laquer Thinner can be used on a cloth rag should you get too much on a painted surface or the stainless trim itself. Just be careful not to damage your paint. (If you laid down the masking tape as listed above, this shouldn't be much of a problem). Now, when you install the brackets (with stainless trim already attached) to the body, you'll want to use the install the T-Tops back in the opening to align and hold these parts in place until the adhesive cures out. You can use a strip of masking tape to hold the stainless parts to the T-Top itself. This will ensure a good tight fit. If you take your time and be carefully artistic about using the black 3M adhesive, you will come out with what appears to be a "factory" installed part on each side and they won't leak again either. BTW, I had tried using at "Dip It" coating on these parts before resorting to using the 3M adhesive. It didn't work well, and was a pain to get an even coating. It peeled off very easily once it cured and the 3M stuff worked MUCH better in the long run. Just be sure to keep a rag and some laquer thinner around when playing with this stuff. Once it cures, you cannot remove it from your skin. It has to WEAR off, unless you like playing with VERY harsh chemicals on your skin. Latex gloves don't help much because the adhesive sticks so well to them that you'll go through a whole box in less than 2 hours playing with this stuff. This is just one of those "dirty" jobs that you'll thank yourself for going through when you're finished. I know I did. I hope all of that made sense. It worked for me on my car and I have NO leaks, no more rust, and nobody can tell the difference. Warren -
280ZX weatherstripping...anyone actually sell any?
Warren replied to 80LS1T's topic in Body Kits & Paint
And to think that I've removed 3 sets, WITHOUT damage by simply spraying brake parts cleaner between the seal and the body. It melts the adhesive, without hurting the seal, cleans the seal itself (after wiping the gook off with a towel) and makes them plyable again. It dries almost instantly, so you may go through a whole can per side, but it does work well. Use a DULL putty knife to slip under the seal once you start lifting up on the seal and keep spraying the brake parts cleaner. This is for removing them from a car that you don't care much about the paint on as the putty knife may leave some scratches in the painted surface, but it does work well. Just be careful not to pull too hard on the seals themselves while removing them as once they're stretched out of shape (takes alot to stretch the thick parts, but the thin parts will stretch relatively easily) they may not go back to their original shape. If for some reason, you happen to break the seal itself (meaning a clean tear without a bunch of rubber missing), you can use 3M Windshield adhesive (available at automotive paint stores, comes in a white tube for use in a regular caulk gun) to repair the split, break or tear. Lay the seal on some wax paper, use a dab of the adhesive in the split. Use a WET (with water) finger or small spatula to form the sealant into the split, break or tear. Form it back into it's original shape (meaning basically wipe the majority of it away, leaving the adhesive only where you want it when you're done). Be sure to smooth it to the shape you want to be in, not leaving any gobs of it and let it cure 24 hours. After the 24 hour period, it will be cured and you can simply peel it from the wax paper (that's why you use wax paper, so the seal itself doesn't get glued down to the surface you're doing the repair on). The split, tear or break will now be virtually invisible and it will still be plyable. You can also use this sealant to form missing small parts of the rubber seal should it happen to get gouged somehow. It will replace the rubber, remain plyable and depending on your skills, be virtually invisible once you reinstall the seals on the car. BTW, this is the same sealant you should be using to adhere the windshield and rear side windows to the body. I'll edit this later today to provide you with the 3M product name and number. Hope that helps somebody. Warren -
UPDATE: Parts arrived safely. Thank You Chris! Warren
-
Wait, almost 3800 transactions, 96% positive feedback, and that's not good? What are you a perfectionist? That just proves that you can't please everybody....some people just can't be pleased, no matter how hard you try.
-
There are really too many things it could be, without knowing exactly which SDS system you are running...there are some minor differences between them.
-
Been almost 4 years since I got it (March 03), but It's been on the road, to Baton Rouge & back, made 2 SEZ's and is about to make some serious runs at the SEZ next month (provided I can get it all back together with the new tranny in it). Keep at it, you'll get there.
-
EEEEWWWWW, the memories...that's almost as bad as mine WAS when I got it.
-
RPM Errors are usually caused by hall sensor vibrations. Check to make sure it's still rigidly mounted and not loose. You should be able to lift the motor by it if it's installed securely enough. It'll cause all kinds of wierd stuff to happen if it's loose or vibrating at all. Hope it helps, Warren
-
Congrats Thumper. Just make sure you have all the mods done by SEZS #9 in March of 08 and you'll be fine. It'd be good to see you again. Don't forget to bring your own drag radials, cuz mine won't fit that one...hehehe Warren
-
Chris, Thanks for explaining the circumstances. A PM has been sent to you. Warren
-
Here are the details, so there will be NO more confusion. Fact, I called Chris on 1-29-07, Chris was in some sort of meeting. (Hey, it happens, I don't mind waiting another day.) Fact, I tried to place the order on 1-30-07, Chris was too busy to take it and asked me to call the next day. (No problem, I understand sometimes people are busy, but how about just taking an order...) Fact, I finally got through to Chris himself, the parts were ordered on 1-31-07, via telephone call with Chris, who stated that the parts I ordered were "in stock and ready to go". Fact, the parts were paid for on 1-31-07, via Paypal, as Chris requested. Fact, Chris was called on 2-7-07 to find out what happened to the order. He was too busy so his wife (ashamed that the order was messed up) took the call and tried to help. Chris admitted (yelling from across the shop) that the order was fudged and he'd get it out right away. However, one of the parts listed as belonging to a 2004R is incorrectly listed on their website and not necessary, it actually belongs to a TH400 and the website is wrong, according to Chris himself. UPS ground only takes 2 days from New York to Atlanta. (I order stuff from New York once a week for my business.) Fact, the billing info went to UPS on 2-7-07, a week after the original order was placed. Fact, the order wasn't picked up for shipping by UPS until 2-16-07, 11 days after the billing info was recieved. Funny how it took 11 days for UPS to pick up an order that was "in stock and ready to go"...That's NOT what I would call "GOOD customer Service". Fact, UPS tracking shows the package in Baltimore MD as of today, the 18th. At least it's on it's way. Now I can understand that some "Custom" or "one off" parts may take a while, that's normal, but when a man says the parts are "in stock and ready to go", there's NO good reason for it to take 11 days to get a package to UPS, especially in New York City, where UPS picks up daily. According to UPS, they've had no delays due to weather for packages coming from the New York area and it's funny how my other weekly orders from New York showed up, as scheduled, without delay. Moral of the story, live and learn, and I've learned the hard way. Now let's just put the whole thing to rest and chalk it up as experience and I'll be an "eventually" satisfied customer. Nuff Sed! Warren
-
[Rant ON] Well, another week has passed and still no part from CK Performance. Makes me wonder if this Chris guy really wants to sell parts or just run a tranny rebuild shop. As you can tall, I'm NOT too happy with his customer service. So much for getting a part in a timely manner. BS...BOO...HISS... NOT the way to win customers and influence people. [Rant OFF]
-
OOPS, all this for nothing... I just did a little more research and checked with Summit regarding the TCI Pro kit that I have. It doesn't come with Kolene steels...only the "Ultimate" kit comes with Kolene steels, so I guess all this "Kolene Talk" is out of place. My apologies. I misunderstood what was included in the "Pro" kits. Looks like I've got regular steels after all. Sorry about that, but I DID learn something...Thanks! I have ordered a few parts from Chris, just last week, and they screwed up the order so bad, it's still not here. Should be only 2 days from New York to Atlanta, just like all of my keys that I order from New York (I'm an automotive locksmith, but don't tell anyone). I called them on Friday to enquire it's whereabouts, (ordered last Tuesday) and found out that the order hadn't even been filled or shipped. They apologized, but that's not getting my tranny put back together. They seem like they're always in such a hurry and don't want to talk on the phone. Wish my business was that busy...hehe
-
At $419 for a billet forward drum, I think I'll give the $200 hardened one that I already have a try first. As far as the deep pan and sump feeder is concerned, I'm using a B&M super-cooler equipped with a themostatically controlled fan on it, and I'm not sure about the clearance requirements and whatnot at this point, perhaps later.) Don't get me wrong here, I'm definitely NOT arguing or being contrary. I'm still learning all this, and appreciate the input. Warren
-
It's getting the full treatment. TCI Pro Super kit with Alto Red Eagle Clutches, New steels, Wide Alto Red Eagle band, New Heat Treated Direct drum & Sun shell, Torringtons, New Waves in the Low/Reverse, 7 & 7 in the new hardened Direct & shaft, 3 & 3 in the CK Performance Overrun, all new backing plates in all, new bushings, washers & gaskets. Has a GN Governor, Art Carr Manual Valve Body (I still have and will probably keep the BRF valve body), hardened stator support, 13 vane pump with teflon seals, 9.5" 3000 stall converter, 700R4 bottom feeding filter, GN Servo modified per Art Carr's recommendations for manual valve body. (I might have missed a thing or two in the list, but not inside the case). Never heard of damming the cutout, but have been advised to run 1/2-1 qt over on fluid to avoid/prevent cavitation and G-force induced starvation. I'll be putting less than 400 hp & tq through it, but wanted to overbuild it anyway. It "should" hold up to that, at least. Thanks for the tip on the cutout. Warren
-
Stripper? At my age? Heck, he'd be able to drive the car away SLOWLY, once they load me in the ambulance to take me to the hospital after having a coronary. hehehe
-
Nope, I said I slept in the van, with the car on the trailer. Don't go getting all perverted now. You're making me want to drive AROUND TX instead of through it.
-
Strippers in Dairy Queen? Where? They must have some pretty fancy Dairy Queens in New Mexico. Maybe I need to make that trip out west sooner than I thought.