Fridge Gnome
-
Posts
37 -
Joined
-
Last visited
-
Days Won
5
Content Type
Profiles
Forums
Blogs
Events
Gallery
Downloads
Store
Everything posted by Fridge Gnome
-
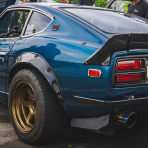
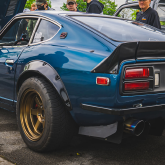
280Z GenV L83 Swap
Fridge Gnome replied to Fridge Gnome's topic in Gen III & IV Chevy V8Z Tech Board
AutoX.mp4 I'm not particularly good at autox as you can see here, but it made for a fun video. -
280Z GenV L83 Swap
Fridge Gnome replied to Fridge Gnome's topic in Gen III & IV Chevy V8Z Tech Board
Good new and bad news! Good news I am still here and happy to answer questions. Bad news there was only one car I liked better than the 280Z and well... It was cheap and I could resist, but only one project car at a time is in the budget, so the Z is off somewhere in Texas now. The skyline is currently getting an LS swapped into it, so if you were wondering which way I'd go if I did it again that answers that, but the LT is still good and its much more unique than an LS. As far as engine mounts, I'm not sure whats available now. It would certainly be cleaner to fab a custom upper mount to use with the DD lower mount. The mount is already poly. That being said, you probably wouldn't want it any lower than this, since the holley oil pan was already flush with the bottom of the front crossmember. You can see the oil pan on the left here, its already pretty low. Doing it again I would move the engine further back. If you make a custom upper motor mount you can avoid the interference with the LT vacuum pump boss, which should allow for the engine to be moved further back. I think I blamed the high pressure fuel pump as a reason to not do it, but I was just lazy. The only difference between auto and manual would be preference and the engine and ecu are already design for an automatic transmission. So a few tuning things will probably go easier with an auto and you wouldn't need a bellhousing spacer. This was my first(ish) engine swap, and as long as you keep it simple (no A/C, power steering, "while I'm at its", etc) the Z is really a pretty easy car to swap these engines into. LS vs LT is a hard one for me to answer for you. I picked an LT because the LS swap is quite common on the Z and I wanted something different. LT has complications the LS doesn't have, and fewer online resources and aftermarket parts. It's not a huge difference though. The pedal I used is an LS corvette pedal (19417903), they are compatible with the gen V ecu. HPtuner and probably any other tuning tool has an option to quickly calibrate the throw of the pedal.
-
There's more clearance under the hood than you might think. Unless you have the truck intake or something there's plenty of room for an LS in these cars without any ground clearance issues. I have a goofy throttle body setup on mine that sticks way up, but it still clears the stock hood.
-
So this isn't entirely helpful, but here's some pics of my LT which is approximately the same dimensions as an LS. Done correctly, I believe there is room to get the damper behind the steering rack. The LT didn't have full adjustability on the dirty dingo mounts I'm using, so I would have needed to modify them to move the engine back. Depending on oilpan you may not want to go too low though. Mine is flush in height with the front crossmember.
-
Chassis mounting wing
Fridge Gnome replied to JMortensen's topic in Windtunnel Test Results and Analysis
Perfect, thanks! Also, it sounds like you already have the aluminum, but I pulled the trigger on these uprights from sendcutsend yesterday and it was still only $100 for the two in 1/4" 6061. I thought it was worth it to not have to gum my way through the aluminum and its about the same price as the plate.
-
Chassis mounting wing
Fridge Gnome replied to JMortensen's topic in Windtunnel Test Results and Analysis
Any chance you could measure the chord on the 9 lives second element? I'm now working on a carbon/foam core wing for autox mainly and layup went poorly on the second element so I'm thinking I may just give in and buy that part if its around the right size. Looking forward to seeing your mounting, I've yet to mock anything up there. -
I like that hatch, the recesses for the hood latches is a nice touch. Any chance you'd be willing to share that 3d scan file? I've been trying to find one for a while.
-
ls1 1975 280Z LS1 Swap
Fridge Gnome replied to Nimbus_280Z's topic in Gen III & IV Chevy V8Z Tech Board
The TR6060 uses a different tailhousing than the T56, so the mounting points will be different, but I'd imagine it would be fairly easy to adapt a T56 mount. brackets like this are available: https://animalsspeedshop.com/products/gm-tr6060-transmission-mount-conversion-bracket not sure if they actually match the T56 mount location, but should make it even easier. -
Chassis mounting wing
Fridge Gnome replied to JMortensen's topic in Windtunnel Test Results and Analysis
I think he's referring to the arch over the leading edge of the wing, most of them are just flush with the upper surface. -
Chassis mounting wing
Fridge Gnome replied to JMortensen's topic in Windtunnel Test Results and Analysis
Definitely interested in what you come up with. I've been thinking about going for this project as well. Just spitballing, but the frame edge around the hatch has never struck me as a particularly weak location, I would think it could handle the ~250lbs each without the 1/8 aluminum? -
280Z GenV L83 Swap
Fridge Gnome replied to Fridge Gnome's topic in Gen III & IV Chevy V8Z Tech Board
I'm using an LS7 clutch, I think most LS clutches are compatible, the important part is the flywheel is 8 bolt, so you need to use a flywheel for the LSx or CTS-V, not 6 bolt like most LS flywheels. I used a Mcleod 1302 for the hydraulics, but if you have a T56 Magnum this is the wrong part, I had to file a ring off the base of the cylinder to get it to mount properly to the magnum and for a while the clutch felt like a compound bow with the give point right at the clutch engagement point which made it very hard to shift smoothly, its broken in or something now and feels much better. That being said, no spacer is needed for the slave cylinder, just get one with the correct throw dimensions, the 1302 has a range of 2.31"-2.5" for reference. -
280Z GenV L83 Swap
Fridge Gnome replied to Fridge Gnome's topic in Gen III & IV Chevy V8Z Tech Board
Cool to see someone also doing this swap. That makes 3 I've seen total so far including this one. Glad to see the manifold info helped, yours looks much cleaner than mine. The holley extension should help a bunch too. I cheaped out and didn't redo the pulleys, so I couldn't install the throttle body that way. I used two silicone 90s and an aluminum tube for the lower radiator hose. I used MIO-MMCP-1590BK for the lower and VPE-2749 for the upper half along with a 1.5" aluminum pipe. As for what I would look out for, it would definitely be the software and electrical side of things. I'm not sure if it has gotten any better yet, but deciphering what pin of the ecu does what is a mess since it varies between cars and years quite a bit. Tuning is still a running issue I am having. I tried to tune the car myself and having never tuned before it was way over my head with its torque based tables and driver demand. It still is way over my head. I had local shop dyno tune it and the power is better, but the throttle is still weird in its response sometimes and I occasionally have rev hang issues. Along with it cutting power when I try to accelerate up hills. The car is fun and totally driveable, but it can be annoying when I try to blip the engine and only get a little response. I'm considering going for the holley ecu since it now supports DI, just to get away from the complexity of the stock ecu. Heres the dyno, stock L83 with camaro headers and intake.
-
280Z GenV L83 Swap
Fridge Gnome replied to Fridge Gnome's topic in Gen III & IV Chevy V8Z Tech Board
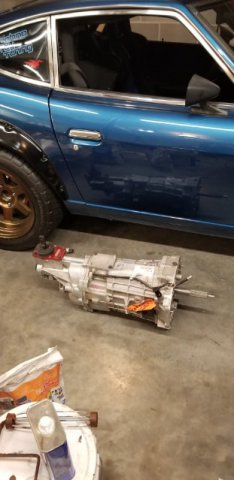
Maybe its time for an update. Car is doing well, mostly working on less noticeable things. The transmission I had was completely shot. Most gears anywhere near the synchros were pretty worn. With the price of replacement parts for the T56 lately I decided I might as well just buy a new magnum for slightly more. With the engine still mounted forward from other LS swaps, the F-body shifter was a bit too far forward compared to the GTO shifter. The GTO shifter was also just slightly too far back in its original location where 4th gear would hit the console trim. It looks a little sketchy, but I was able to drill new holes and flatten out some features in the GTO shifter to match the magnum shift cup and seal correctly. Original holes were plugged. I also welded on the bad dog frame rails over my existing rails. The rails weren't terrible, but had a couple bad spots that I wasn't totally comfortable with. I installed the 240z e-brake cable in as well. Welding on some washers to work with the larger 280z mounting points. To match the new engine, I installed some 300zxt cv axles that I found for cheap a few years ago. Since mtnickles adapter plates that don't add any extra hub thickness are no longer available I had some machined using a similar design. Also replaced the wheel bearings while I had things taken apart. The silvermine rear brake calipers are a fairly tight fit around the cv axles. I had to bend the e brake mounting point to avoid the flange. The sway bar was also a tight fit. I had originally purchased the T3 rear sway bar but it had no chance of fitting with this setup. The ST suspension rear mount sway bar fits with the spacer on the end link shortened. Swapped in some GTR AP3 side mirrors while I was waiting for the CV adapters to be machined. The ones on the car when I purchased it were some cheap plastic and tended to fall over if I looked at them. Back to some genV related stuff. I didn't have a clutch sensor wired in and apparently the ECU needs to see it. Helps to avoid the ecu getting confused when the load suddenly disappears. GenV engines seem to use a position sensor rather than a switch, not sure why. Engine is running fairly well now on a 2017 Camaro OS. Still have some rev hang issues and needs general tuning, but totally driveable. A lastly I made an airbox for my intake as I try to get things ready for some dyno tuning. First time making a fairly complicated shape from a cardboard template cutout, fairly pleased with the results.
-
Electric power steering, use complete donor column?
Fridge Gnome replied to 280Z-LS3's topic in S30 Series - 240z, 260z, 280z
I also used the vue setup with the bruno box, and my dad uses one of the toyota ones in failsafe mode. We both used bits of the original column though. Both seem to work fine, with the toyota one just not being adjustable, but the failsafe assist seems to be about right anyway. The vue seems to be a little biased to make turning right easier than left, but there is trims on the control box to fix it if it ever was enough to bother. The lack of self centering has never really bothered me either. -
280Z GenV L83 Swap
Fridge Gnome replied to Fridge Gnome's topic in Gen III & IV Chevy V8Z Tech Board
One last thing, the hood just barely fits, but probably wouldn't without modifying the engine mount to let it sit lower. Maybe if the engine was further back it might be ok, but that would still require modifying the vacuum pump flange or the engine mounts to allow the engine to move back further on the mounts. The aluminum foil on top of the throttle body is the room I had left. You can see the foil in a couple other spots was pretty close as well. I had to rotate one of the intake pipe hose clamps as it was just barely touching the hood.
-
Bad Dog frame rail install question
Fridge Gnome replied to 280Z-LS3's topic in Fabrication / Welding
I haven't done it, but I haven't heard of anyone putting extra reinforcement on the car while installing them. If you're rails aren't gone already and the roof is in good shape I would think it would be fine. I mostly have read that people find their chassis is crooked already and have to force things to line up for the new rails. If you are concerned you could always temporarily weld some steel tubing across the door frames and between them as well to be sure. I've done that on a convertible MG. -
Wiring hell--a question
Fridge Gnome replied to wingwalker's topic in Gen I & II Chevy V8 Tech Board
I used an 140A alternator from a cadillac deville. Needed a little modification of the alternator mounting points, but not too bad. Holes are in the same spots, but the mount is too thick iirc. Autoparts stores sometimes have them in stock too. edit sorry, I'm thinking l28 alternator mounting points, not sure if they are the same. -
280Z GenV L83 Swap
Fridge Gnome replied to Fridge Gnome's topic in Gen III & IV Chevy V8Z Tech Board
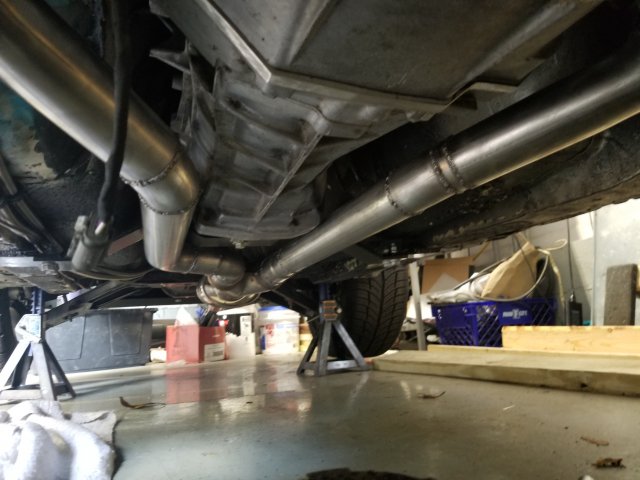
Ok, so things went much easier than I feared. I only had one small issues in my wiring harness. I had wired in one wrong O2 sensor. I've updated the doc I posted. Exhaust went in without issue. That was my first time back-purging and welding stainless. It doesn't look great, but its leak free and shouldn't rust. E Everything else went in fairly straightforward on the hardware side. I had a driveshaft made, dropped it in and was able to get the car moving. All in all, not much different from any other LS swap. On the ecu side I had a little more trouble. When I bought the engine it was out of a 2017 Silverado, but the ecu ended up being out of a 2019 cadillac escalade. Since the cadillac was never offered in manual the engine would run, but it was always expecting feedback from the tcm and even changing settings to a manual transmission didn't help. I had to buy more hp tuner credits, but I eventually got a 2017 camaro OS installed and things worked much better. I also needed to hook up the VSS as several of the ecu tables relied on vehicle speed. The only remaining issue now is that my transmission seems to be pretty worn out. Grinding in all but 5th and 6th gear. So it will need to come out and be repaired. Then I can get back on the road and tuning things up. I also haven't put the hood back on yet, so that remains a potential issue, but I'm crossing my fingers I've got the engine low enough.
-
Could Bobby or Edna be from the transmission mount bushings? I would guess its from something else or not original, I don't think any original parts had finish like that.
-
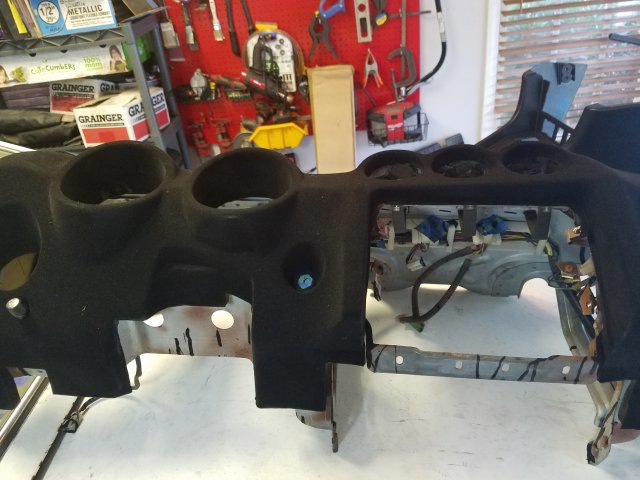
I like it, it was a nice way to paint the dash with something that had texture after I did crack repairs on it. Its different than most dashes that have caps on them or spray-painted which I wasn't a fan of at all. It's super easy to put on, takes way more of the flock than I expected though. I had to scoop the leftovers up off the plastic I had laid out to finish the whole dash. I think I ordered two packs of it, I'd recommend three. It does show lint and stuff, but not bad and you can vacuum it with the little brush attachment. Durability wise its not bad, I've scraped it getting it in and out of my car a couple times and one spot did get the fuzz knocked off. I'd suspect you could do a spot repair though.
-
With no stitching I would guess flocked too. I used it on my dash, much cheaper and easier.
-
280Z GenV L83 Swap
Fridge Gnome replied to Fridge Gnome's topic in Gen III & IV Chevy V8Z Tech Board
Exhaust manifolds are in! Modified camaro headers did the trick. Unfortunately this also means I have to show everyone my ugly welds. Regardless, no major issues in getting them made up. I also installed a catch can. Due to the direct injection on these engines they are prone to having gunk build up on the valves since there is no fuel constantly washing them off. Going to get started on making the rest of the exhaust tomorrow.
-
280Z GenV L83 Swap
Fridge Gnome replied to Fridge Gnome's topic in Gen III & IV Chevy V8Z Tech Board
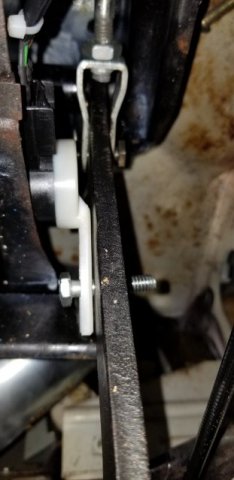
Quick trip home, got a little work done. Clutch master cylinder went in with no issue. Nothing too exciting there. Swapped the push rod for the 280z original one and went in fine. Corvette accelerator pedal is in too. Made an adapter to use the original pedals mounting points on an aluminum plate. The plate is fairly thick, so it doesn't flex. I had to space the pedal forward about 0.4" as it doesn't stick out as much as the original one. On the more interesting side, I bought some 2016 camaro headers to see if they would work on the Z. Passenger side needed some work, but I think it is manageable. I made two cuts along the inside of the header to let me bend the header in slightly to get it to fit inside the frame rails. I will have them welded back up. Also removed the flange. It comes out directly above the tension rod mount, but I think I will be able to cut it a little shorter and have enough room to turn the pipe and get around it. I also had to remove the plastic connection cap on the starter solenoid. to make a little extra room. Drivers side fits pretty nicely except for the same issue of the tension rod mount. Again I think I have enough room to route around it. -
280Z GenV L83 Swap
Fridge Gnome replied to Fridge Gnome's topic in Gen III & IV Chevy V8Z Tech Board
Small update, wiring harness is in. I modified the original harness based on the attached document. Grey lines are the connections I used. Not sure if it's right, but I'll try to remember to edit it if it's wrong. I actually made the harness at school, while the harness was in the original state I marked the location of connectors on a cardboard box and used that as a template to modify the harness to place the ecu inside the cabin and use a new fusebox. 2018 Gen V l83 Pins.docx -
I used TTTs weld on setup and it was fairly easy to do. The strut tube is decently easy to weld to. Perches weren't that hard to cut off with an angle grinder. Getting the tubes off the car to work on is probably the worst of it. I can't really comment on what is comfortable though, I went with a fairly stiff setup.


.JPG.7cf467f856509934f9170b46ec6efc0b.JPG)
.JPG.41687be3e770f2798c5792ed6280f507.JPG)