phantaz
-
Posts
361 -
Joined
-
Last visited
-
Days Won
1
Content Type
Profiles
Forums
Blogs
Events
Gallery
Downloads
Store
Everything posted by phantaz
-
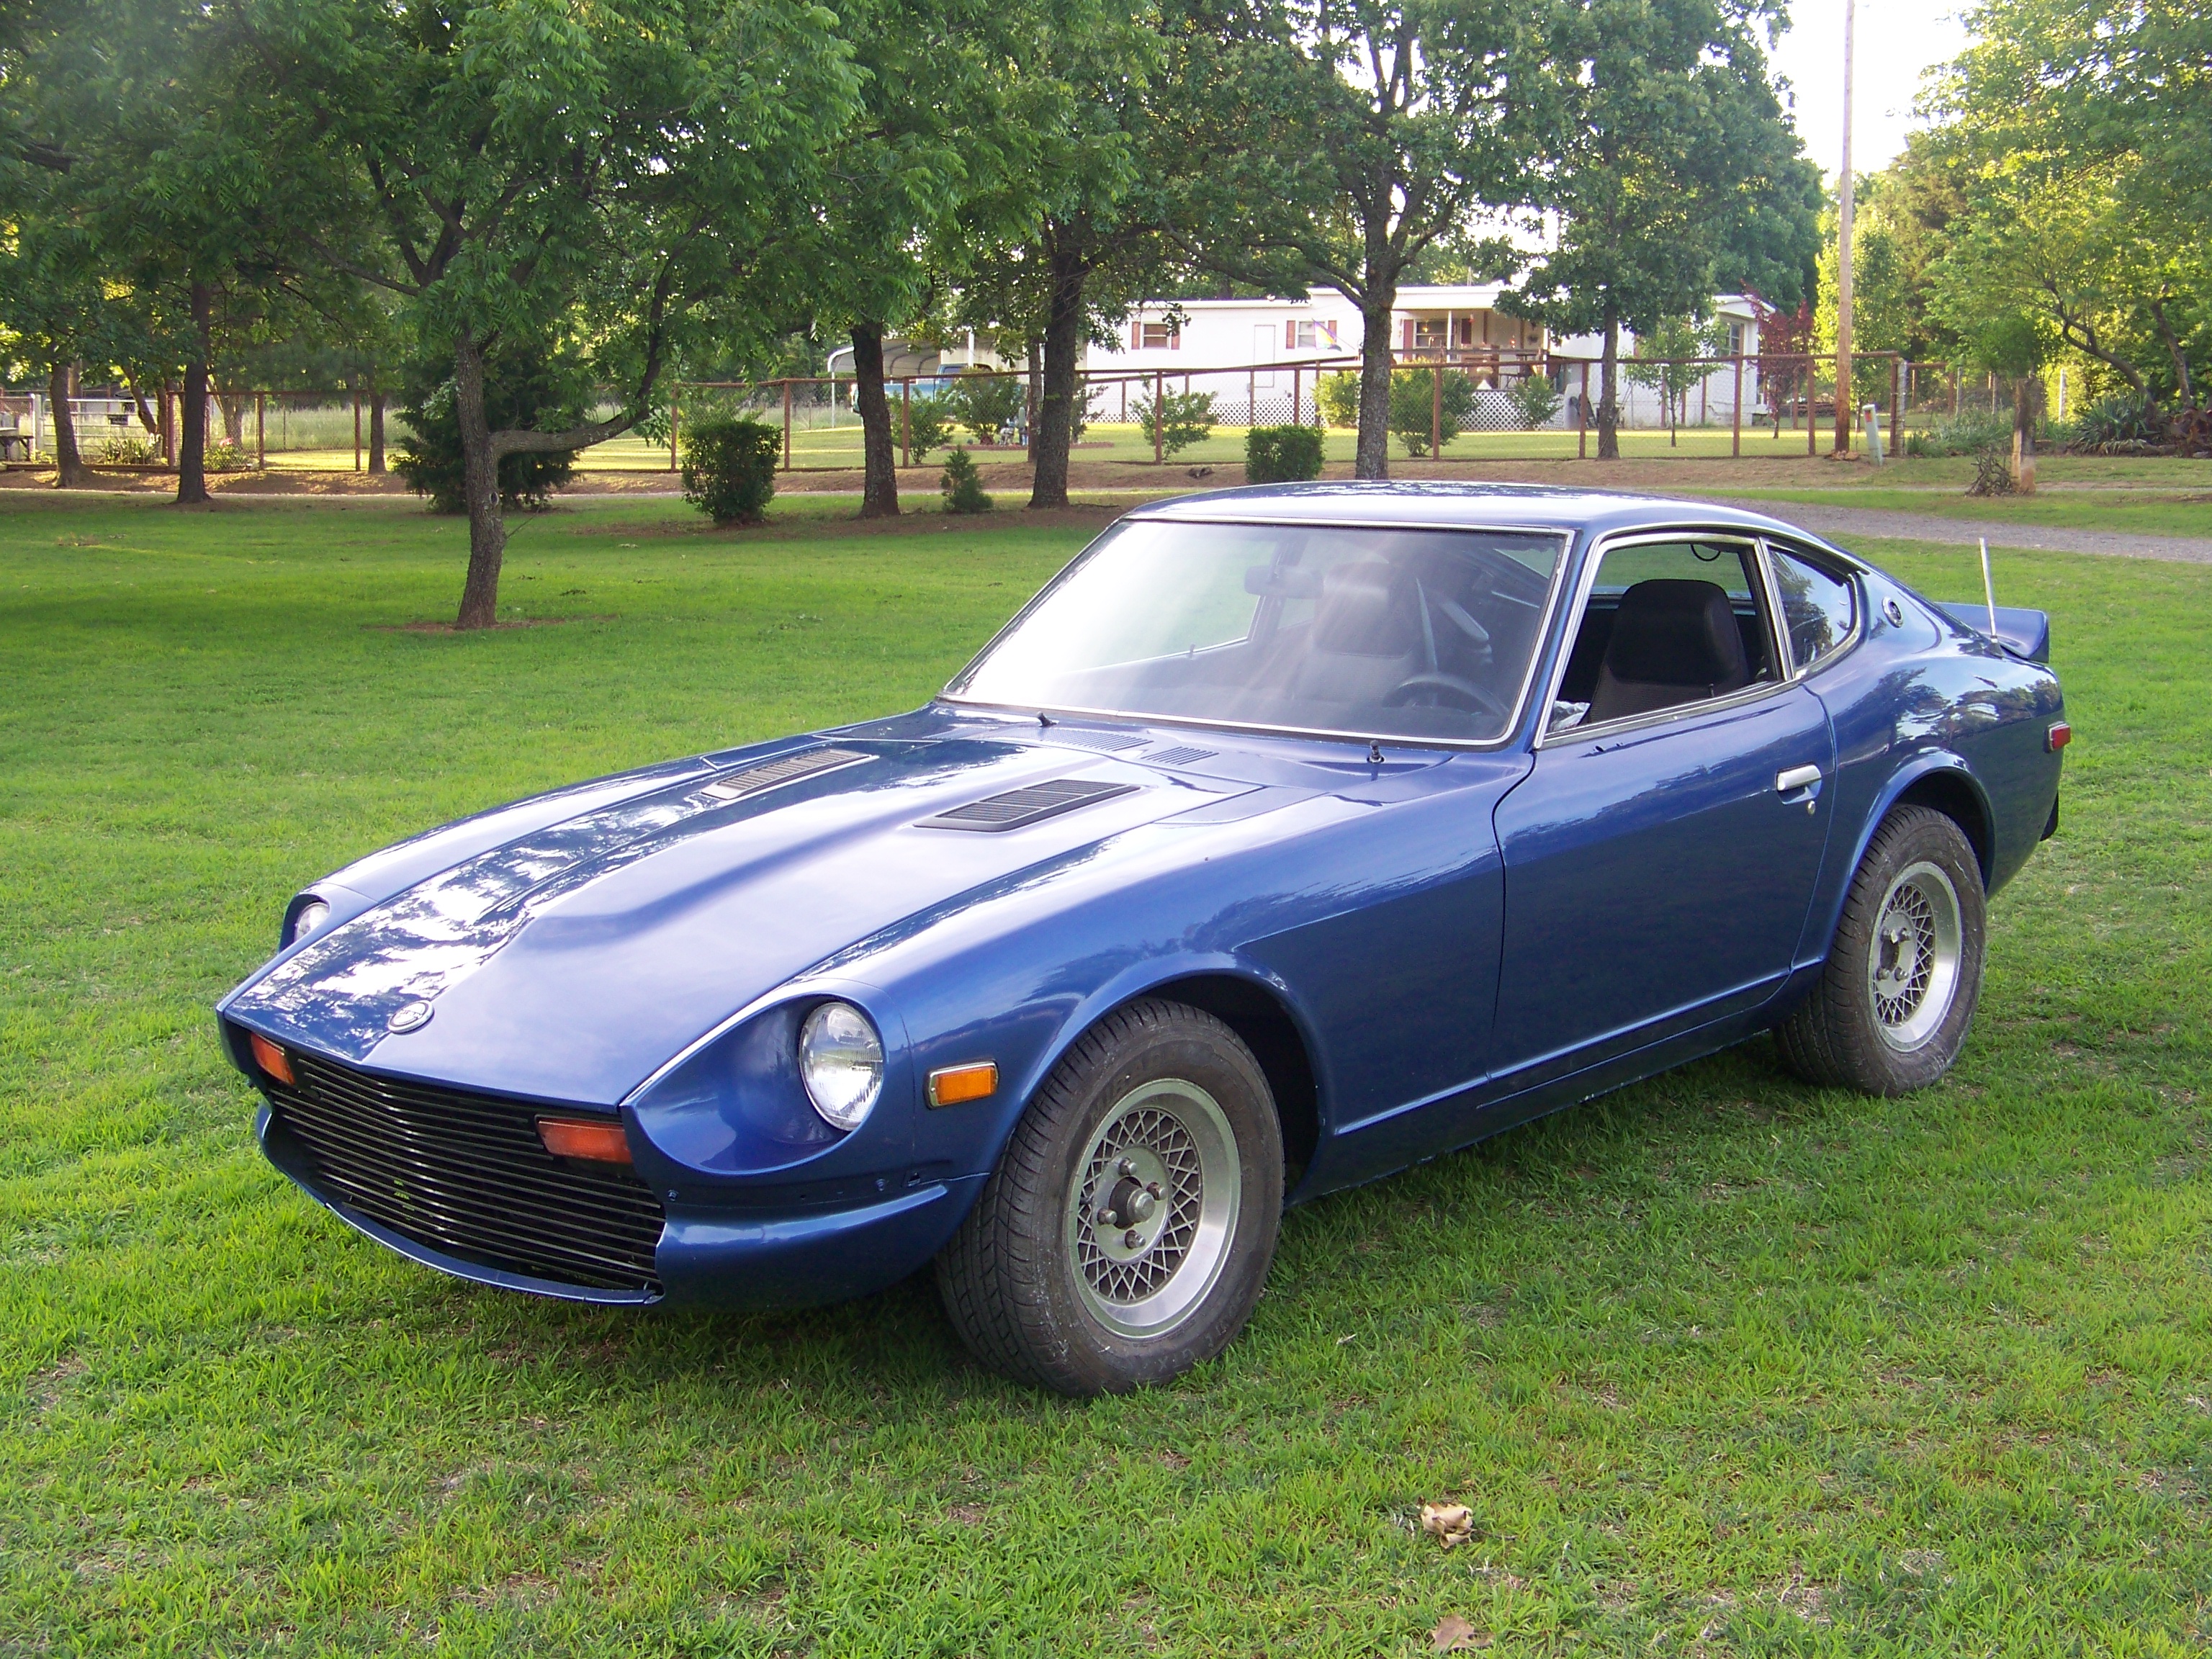
Hey guys, been a long time since ive posted here but i have moved, changed jobs and family issues has kept me pretty much wrapped up since last summer. I last posted about finally getting ready to paint my 77 z. long story short is the paint company we bought the paint from and went back to TWICE sold us the wrong paint.. gave us single stage paint when i was trying to do a 2 stage and we just couldnt figure out why the clear kept cracking... well the fumes from the premixed clear/hardener was doing the deed.. we repaint my poor hood 3 times trying to figure it out.. talk about frustrating. That went through up until the fall and it got to cold to prectice painting anymore. I had decided on the 2 stage using a newer BMW blue metallic that we had not painted with before. so we thought we were doing something wrong. This spring we finally went to a diff store when we found out the other one had went out of business after 20 years of service. amazing it lasted that long. and when we showed up carrying the paint in he was dumbfounded that they sold us that paint TWICE. He was the owner of the other one and had sold it about 8 years ago. anyways, i have all the pics on my face book but here are a few of the final product. Its amazing how many dents show up after you put on a good paint job.. sigh. First shot was driving up to park i, and a decent one with sun going down and the roof show showing cloud reflections. Pretty proud of roof.. it had some serious dents in it. Last shot shows more of the color while sun was still mostly up. ill get around to the requisite "at speed" shots and down in the industrial area shots later =). You can really see the difference with my original Sig pics below.. yep same car =0) any questions or comments are more than welcome =) glad to be back !

-
agrees with ZR8ED.. i removed my bumpers from my 77 and had to grind off that "fin" mine was riveted to the body.. i think ihave pics on my profile somewhere of what it looks like now with home made bumper. i moved it in real snug to the body like the 240z bumper and that fin was just in the way.
-
LOOking good.. need to see some rear view pics though =0)
-
looks great and sounds great... but did those 5 slot mag rims look a little bit larger than 14's to anyone else???
-
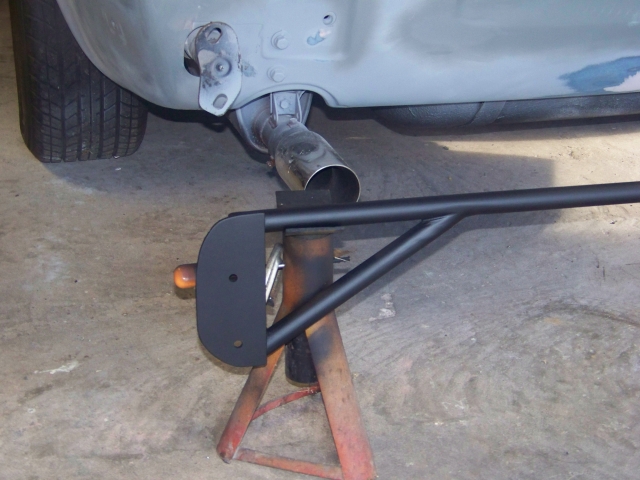
FInally finished mocking up and mounted on my Dad'z car... next one will go on mine... have some better thoughts on how to keep the metal sealed without warping so it should be a little better but here ya go... final positioning and after painting and bolting up..
-
=).... no worries.. ive had more responses to that bumper than just about anything else... bro hates it, sis in law loves it,,, mom hates it, dad luvs it, neighbor luvs it, mailman hates it.. lol aw well.. i like it for the 20 pounds of weight i lost removing that horrid thing that was on before !
-
Few pics of the round tail lights we are attempting to set up... and a view of that rear bumper actually attached.. =) lights are from Tractor Supply for $8.95 each.. comes with rubber grommet accent. kinda cheap but this is a first attempt to see what to do later and while i had my rear assembly apart, my Dad went to town with his idea for his Z. So mine turned into the practice car.. =) We found some rubber "v" trim that will slip on tightly to the sheetmetal so it cleans up the outer edges really well. more pictures once we get all the lights in.
-
Finally figured out what i was going to do with the rear..... liked the cleaner look with out the 75 pound monster bumper but wanted something back there so heres what we came up with.. originally just had the plates attached to the old bumper brackets with a single bar across it... then added the angled pieces and that just really set it off..
-
Im with him.... that had to have been a LOT of work... kinda like the guy who cut a ford taurus front end in half..sected out a few inches the middle and stuck it on a 280 i think.. lots and lots of work for something diff... course it is a cavelier.. hope he didnt put in the plastic radiator.
-
looks great!!! almost a match for my paint scheme.. reversed though with BMW Mid blue and silver on top... getting excited after seeing yours!!!!
-

First local Z meet in 4+ years, I got good reception!
phantaz replied to BillZ260's topic in Non Tech Board
argh.... no invite??? whats up with that??? jk.. what meet was this?? -
Happy Birthday Hybridz!!!
-
might be real... hoods on the ZX and the vents are a bit larger than the Z.
-
i used some vinyl spray to match my exterior but instead of painting whole areas i went for the small touches to personalize it.. all i did was follow the natural lines in the door panel. And like previously suggested, im covered the other panels in material instead of painting. just my .02 cents.
-
New Photo of the Z car doing a Wheelie
phantaz replied to jnjdragracing's topic in Gen I & II Chevy V8 Tech Board
screech!!!!.....where did the track go......thump oh there it is.. 0.o -
L28S - Supercharged 78 280Z: engine build pics
phantaz replied to boardkid280z's topic in Turbo / Supercharger
Hows the clearance looking between the TBI and the inner fenderwells?? looks really really tight from that front view? -
beautimous!!!
-
Thnx monster... like that yellow and black look.. =) very nice.. is that the type 3 airdam? did you have mounting problems with fitment that everyone else seems to have had?
-
Some updated picks of the grill area... filled the empty center section that the bumper used to cover with the grill from a 71 240 Dad had laying around.. trimmed the edges to match the contour of the opening.. it was really close to begin with.. used little tabs we attached to the back of the grill peice and screwed them into existing holes on the turn signal bracket.. kinda handy. had to bend it a little to git it to line up but thought it came out great. this is just a mock up with everything in place.. not painted. There are actually 3 sections.. they are all staggered if you look at them from above. .. we tried to line up the top to the bottom but because of the angle the center section was almost straight up and down compared to the lean angle of th e top and bottom peices so we leaned it at the same angle instead.. sounds strange until you see it but it works. Tools of the trade.... Dad snapping pictures of me fighting the sanding block.. you ever have that one folding piece of sand papaer that just does NOT wont to go... sigh.
-
Cant fall off that way =0)
-
hey guys... thanks for the comments and keep em coming.. welding... yep.. pretty much figured it was a bad ground since i had to hold it in place by hand until i got the first spot on it. fly by trail here since ive never had an welding experience.. as for the back of that panell. we did clean it up and use por-15 on it. the FIller plate i used for the hole in the back panel was also cleaned up and used por-15 on it also =0). just didnt do it all that first week. after getting the stuff smoothed out we went back to everything we could find and did the back side.. the rivit holes though..some of those we cant get to with out taking the fenders off so.. going to hope that my welds dont have little holes and cracks to let moisture in. once again thnx for any thoughts... welding boogers.. i like that LOL
-
Hood actually went really quick.. i thought getting all the clearcoat remains was going to be a nitemare and all the little pits... thick sandable primer IS YOUR FRIEND!!! hit it with some 200 grit and wet sanded it with 400 and shazam... sometimes i like bodywork.
-
Here are some better shots of the body molding repair that we did. the patch job on the big rust spot is not quite done... has a small indentation left but is braced well from behind so i think its not going to fall out when i hit my first pothole LOL This is the driver side front.. only big rust spot and wouldnt you know it, the rubber flap that is in the finderwell is gone so it was packed with nice wet debris for who knows how long. still have some work to do and the ofcourse the other side.. no rust on that side so it should go quick.
-
Almost done with the back... little bit of finishing up with glazing compound and the rear panal should be done.... welding in that patch panal was a nitemare... im not a welder and i couldnt clamp it. gettign it to arc and try to get a nice bead was impossible for me. all i could do was tap it and get little weld spots. i think im throwing in the towel as a welder =0). It worked though.. i could tap it from behind and front with a dolly and it never broke. i pushed it in from the back to reduce the amount of bondo used and drilled a few holes so it had something to adhere to. start of the day.. And the mostly finished rear. instead of trying to fill in the indentation in the middle of the rear area.. i molded/sanded the bondo into a simliar shape as the opposite side and im going to glue my datsun symbol that came off my hatch into it. looked good when we taped it to see how it looked.