JMortensen
-
Posts
13742 -
Joined
-
Last visited
-
Days Won
67
Content Type
Profiles
Forums
Blogs
Events
Gallery
Downloads
Store
Everything posted by JMortensen
-
I just went out and swapped it from one side of the center bar in the dash to the other and did some checking. It looks like its just about exactly as far from the steering wheel as the A pillar bar is on the other side, so I think I'll leave it. If I have problems there I'm pretty screwed, because I can't really move the A pillar bar. I suppose I could move the steering wheel closer. I did read the manufacturer's info on the cg of the helmet, and I think the top strap in the net is right there. In deference to your warning I'll just hold off on cutting the straps until I can get in the seat and check it. I don't want to take the seat back out to do that and although I used to climb into the seat while it was on the rotisserie, I don't think I can safely do that with the door bars in there, so it will have to come off the spit before I can check it out.
-
Just for the sake of posting the resolution, I moved the seat forward and the tension on the net barely changed at all. One click on the ratchet and it was tight again, so I'm leaving it where it is and cutting the straps to fit.
-
Not worried about aesthetics. Just need a panel to hold the gauges.
-
Aluminum seems easier to work with than CF, even if it is heavier. I'd love to see as many pictures as I can before I dive in.
-
Was just turned onto this, looks like a much easier solution: http://www.hrpworld.com/index.cfm?form_prod_id=764&action=product
-
I looked a bit at custom dashes and gauge panels, and also roll bar clamps for Autometer gauges. Both were pretty expensive and I think the thing to do is make my own dash panel. If I missed a cheap solution, please let me know. Not looking forward to this project. If not, the tentative plan is to copy a guy I saw on another site where a guy had used U bolts to bolt a flat aluminum sheet to the dash bar, and that seems like a really easy and inexpensive way to go for mounting a plate. First question is how thick should the aluminum be? It will be supporting probably 5 gauges, a couple switches, a push button to start the car and a bias knob for the brakes. It has to be strong enough to use the U bolts without bending for starters. I'm thinking that if it's flimsy I can support to the top with some left over 1/2" aluminum fuel line, just pinch down the ends, drill holes and screw it to the dash holes in the front and the plate for reinforcement. I should have enough for two supports if needed. As far as cutting the holes goes, is there an easy way to do that or am I going to have to fight with a jigsaw and die grinder? I don't have good luck with hole saws on sheet metal, so i'm reluctant to try that method again. Anyone want to share their experiences?
-
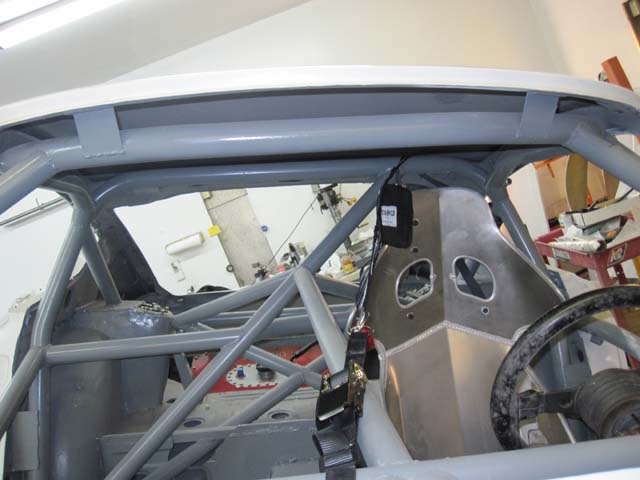
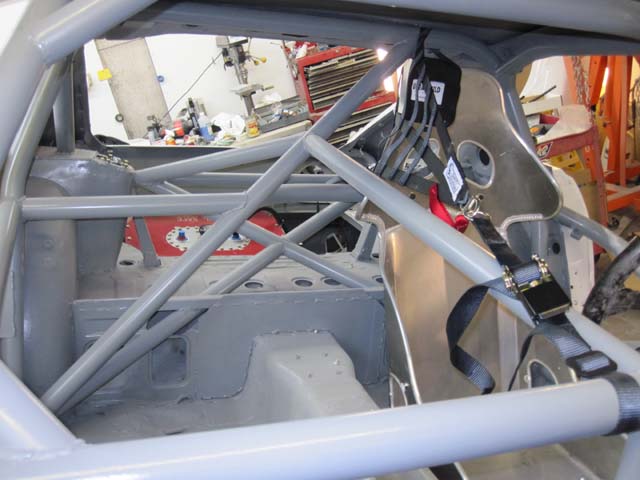
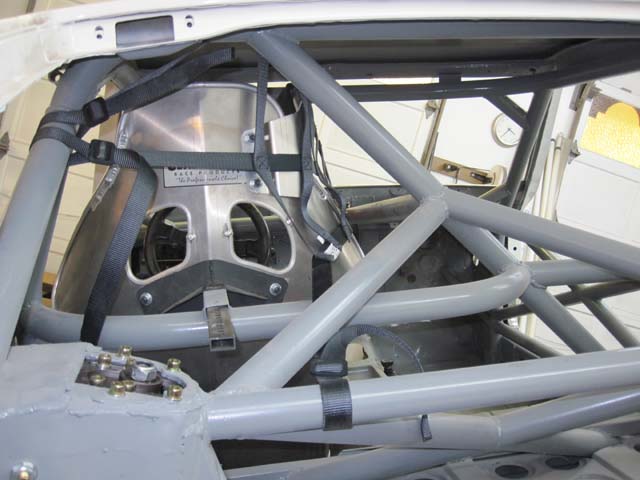
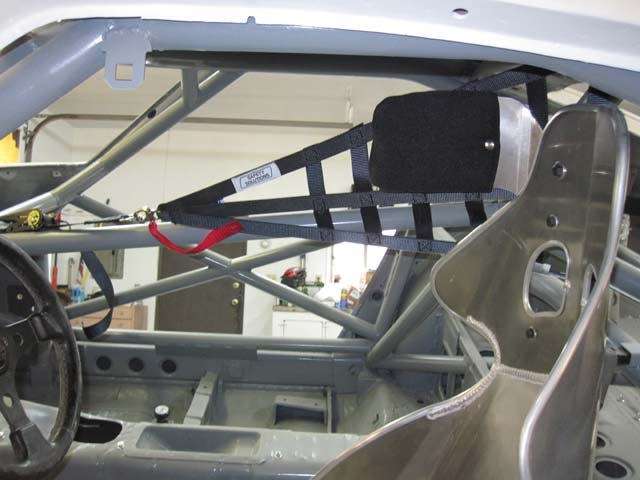
There is a window net as well although it's not installed right now. The right side net keeps your head/torso from moving towards the center of the car in an accident. Becoming a requirement in more and more racing sanctions, and I wanted one due to that big bar right down the center of my cage.
-

my alignmnet numbers
JMortensen replied to thewaiverproject's topic in Brakes, Wheels, Suspension and Chassis
I'd bet you that you had some retarded monkey working on your car who couldn't figure out that one side of the rack has left hand threads, so they were tightening the living crap out of it trying to break it loose. This happened to a friend of mine, he called from the shop telling me that he needed a new rack, I talked to the service manager, figured it out and had him leave without them doing any more "work". They stripped the nut on the LH side pretty bad but my friend was able to get it loose with some heat and vice grips and was able to set the toe with a tape measure after that. Hopefully yours isn't that bad. What is a custom camber kit? Pictures? The only stock adjustment on the Z is front toe. The front can be thrown off by bad ball joints and tie rods (usually outer tie rod ends are bad, sometimes inners). The rear is usually bad bushings. They are a ***** to replace, search "spindle pin" and you'll see what I mean. If you have all stock original suspension I would suggest replacing the ball joints and tie rod ends and then going to a different shop where they can figure out how to work the tie rods. Have them set the toe and maybe shim the right side caster up a bit, and see if they can loosen the uprights and the rear link between the two rear control arms and straighten up the toe. If you want to make the suspension adjustable, then you have options like camber bushings, adjustable TC rods in front, etc. Do some searching and you'll find more options for adjustable suspension. -
I bought a right side net from a circle track safety manufacturer and it didn't fit my Z at all. So I went back and asked some racers and was turned onto the Safety Solutions net. I bought it a few months back along with a head restraint for the seat (just to keep the net off the helmet. I went to install the net today and I like it, but it specifically warns about the net sloping in towards the driver's head. I wrapped the net over the top of the cage to try and keep that to a minimum, and I think it's OK now, just looking for someone to give me a thumbs up on this. Also, I had to put the front part of the mount over on the passenger side of the dash bar because it looked like it was really close to the steering wheel. This makes the whole net kinda slope away from the driver's seat when viewed from the rear. Is that OK? Was thinking a possible solution there would be to bolt a bracket to the original dash mounting holes and then hook the strap way up front there, this would keep the ratchet farther away from the steering wheel. I think the problem that I would have now is that if my wife wanted to drive the car there isn't enough adjustment in the ratchet strap to allow it. The first net I tried was way too short. This one is bordering on too long for me, probably is too long to scoot the seat up for my wife. Feedback (good or bad) appreciated as always.

-
New Car! new member kinda!?! Break master?
JMortensen replied to RedFoxSi's topic in S30 Series - 240z, 260z, 280z
There is no reason to go to a bigger master with stock brakes. Stock brake masters work fine and the pedal effort is high enough already with the early master due to the smaller booster. Going to the bigger master gives the pedal a harder feel and lowers pressure to the calipers and slave cylinders for the same pedal pressure. -
New Car! new member kinda!?! Break master?
JMortensen replied to RedFoxSi's topic in S30 Series - 240z, 260z, 280z
Grasshopper, you must break master to become master. If you want a brake master though, you should be aware that there are at least two different early Z masters, and the difference is the hookup to the brake pedal and the bolt size there if I recall correctly. -
Here's what I came up with from the cell to the engine compartment. Will need to get the engine installed before I go any further. Hose along trans tunnel, crosses over to right side to come up on the correct side of the engine compartment. Ended up needing the soft line in the back, wasn't enough room to route the hard line without removing all the suspension and I didn't want to do that. Hard line crosses over the brake line. Every place where this happens I have zip ties around both lines that are hooked together. This holds them together without letting the lines touch or rub. Here is the cell to the first filter, to the pump, to the second filter in front of the cell. Someday I might incorporate a diffuser into the back, so I tilted the cell 7 degrees and installed it backwards so that the pickup is at the front corner instead of the back corner.
-
brakes get progressively worse
JMortensen replied to crazyoctopus's topic in Brakes, Wheels, Suspension and Chassis
Weak pedal meaning soft? If so, that sounds like reaction disk. You might have a couple things going on here... -
brakes get progressively worse
JMortensen replied to crazyoctopus's topic in Brakes, Wheels, Suspension and Chassis
Oops. Didn't see myself quoted there... I would adjust the push rod on the pedal and see if that helps, if not then pull the master off and adjust the other one between the booster and the master. -
Weber jets??All who live for their triples please read this
JMortensen replied to datfreak's topic in Nissan L6 Forum
Not too familiar with Webers, but on Mikunis you have mains which is what the car runs on when you are at WOT above say 3000 rpm, and then it has pilots, which are what it runs on when idling, and pumps which kind of bridge the gap. That's oversimplifying a bit and the pilots will actually affect things well into the mains, but whatever the idle circuit is controlled by, I'd go bigger on that. My reasoning was that the fuel was better atomized out of that jet than it is out of the pump, which in the Mikunis really puts a thick stream of gas straight into the engine. I'll be interested to see what happens with your suspension changes. -
Weber jets??All who live for their triples please read this
JMortensen replied to datfreak's topic in Nissan L6 Forum
Hey Mark, on my car with Mikunis I found that running a larger pilot jet was better than running larger pump nozzles. Don't know how that works on Webers, but my thought was always the same as yours, that velocity drops to 0 right at the same time you get a big stream of fuel from the acc pump. My attempts to cure a similar stumble had me going to surprisingly large pilots and I hadn't yet gotten to going to smaller pump nozzles. At some point I would suggest you live with it, because cutting down the venturi sizes is going to limit top end power. Another thought would be to put a cam in the throttle linkage so they open more progressively. Might also help traction coming out of corners. I seem to remember you having issues there, although if I recall correctly they were more related to suspension bottoming out. -
Drivetrain Clunking...I'm going to need some help.
JMortensen replied to jacob80's topic in Drivetrain
Probably not backlash. Everyone posts that they think the problem is backlash, I have yet to see a single person fix their clunk by adjusting backlash in a Z car. I'd go after the U-joints or maybe loose driveshaft bolts. If the bolts aren't loose, pull the driveshaft and feel the U-joints by hand. -
I sent you a link to a thread that described this in detail a couple weeks ago. Check your old PMs.
-
Opinion wanted For strut bar mounts
JMortensen replied to 280zjoel's topic in Brakes, Wheels, Suspension and Chassis
The early cars like mine only have the brace you show on the passenger side. I took the advice of a guy who knew Z's without pulling the cowl panel off to check and welded the bracket where the brace should have been and it wasn't there. My car was pretty rusty where the bottom of the cowl box is spot welded to the firewall and this area was separating pretty badly under the force of the strut bar. I don't think my car was unique in this respect. Put it there if you want, but I think bjhines' solution is a LOT better. -
There are longnose R200's and shortnose R200's and the gears don't interchange. I believe new gears are NLA from Nissan. Installing gears in a housing is the difficult way to get a different ratio. A much easier way is to find a diff with the gears you want and swap the LSD into that diff. I did a write up on this and it is posted in the FAQ section. I bought a 200SXT diff with 4.11's and swapped the LSD into that. You can get 3.90's from a 280ZX pretty easily as well. The earlier diffs come with 10mm ring gear bolts, so you just use a bushing to make up the difference. If you search you'll find a part number from McMaster Carr for the bushing.
-
Clicking from rear when backing up - R200LSD or U-joint?
JMortensen replied to jgkurz's topic in Drivetrain
The LSD does absolutely nothing unless you're turning. -
Opinion wanted For strut bar mounts
JMortensen replied to 280zjoel's topic in Brakes, Wheels, Suspension and Chassis
This has been discussed before several times, a search would probably have negated the need for this thread entirely, but I'll make the argument against Dave's argument again. I had bars tied to the firewall and only after I was taking them off did I realize how flimsy the area of the firewall was that I had attached to. The firewall itself was separating from the cowl on my car, so I really think the firewall did next to nothing on my install. Still, adding strut tower bars (with pivots) made a HUGE difference in my car. The pivot thing is a red herring. Yes, it means that the struts can move up and down or back and forth relative to each other and the strut bar does nothing to try and resist that motion, but the fact is that the strut bar is a pretty crappy device to use for preventing that motion. I believe I previously used the analogy of holding on to the base of a diving board trying to prevent motion at the other end. The strut tower bar should keep the space between the top of the struts equidistant. If you want to prevent fore/aft motion or twisting, you need something else in addition to the STB. Tying to the firewall is pretty useless IMO unless you beef up the firewall (see bjhines's STB). Another idea is tying to the frame rail where the sway bar attaches. This has the dual benefit of strengthening the frame there and should provide some resistance to fore/aft movement. For the OP, I would suggest a welded in mount in double shear and a taller boxed mount with a straight bar. In order to clear the L6 valve cover the mounts have to be fairly tall and long, so you need to do a good job of making them stiff to really get the most out of it. STBs bent to clear the valve cover are inherently much weaker, and single shear mounts or mounts bolted to one hole are also bad designs. -
12 gal, but it's nosed down 7 degrees, so it probably holds about 8 gal in this config.
-
Good bye Mazda 3, you were a good little car
JMortensen replied to auxilary's topic in Non Tech Board
Whoa. Flashback to 1985... "I'm paralyzed now, but they propped me up on this motorcycle so I could tell you that Larry Parker got me 2.1 million. Somebody come get me off of this thing now." -
Went back out and started messing around with that big ass filter again, that sucker just doesn't fit anywhere. SO SCREW IT. Bought another small filter, will mount in front of cell. The pump and pre-filter will be on the side of the cell. Hard line will attach from the 2nd filter and run up to the firewall. Not worth taking a chance on a fuel leak to get a 10 micron filter in there instead of a 40 micron. Anyone want to buy an unused HPG-1 filter???