JMortensen
-
Posts
13742 -
Joined
-
Last visited
-
Days Won
68
Content Type
Profiles
Forums
Blogs
Events
Gallery
Downloads
Store
Everything posted by JMortensen
-
 Here's something that really surprised me when I read it: diffusers actually work best when the air starts to separate: https://www.racetechmag.com/2017/08/willem-toet-explains-motorsport-diffusers/
 -
Here's the video with the CFD on the splitter diffusers:
-
4. This doesn't seem counter-intuitive, as more lift on the front end will tend to make the car understeer, and that's the more inherently stable tendency. 5. I'm sure I read in a book somewhere that lift or drag translates directly to work. If the airflow is doing work it will show up as force on the car. So as calz says, if you clean up the airflow under the car so that it isn't turbulent, you can reduce drag and lift, as it has to do less work to get under the car - acting less like a parachute. If you have a lot of lift, that's a sign the the air is doing more work. Closing the huge hole in the front and ducting to the radiator prevents all that air from packing into the front and pushing up on the hood. This will reduce lift and drag. A spoiler on a Z reduces lift and drag as well (to a point, after which it will reduce lift and increase drag). 7. The further away from the axle the more leverage you have too. So a rear wing can be mounted lower and further back and make more downforce than the same wing mounted in cleaner air and higher in some circumstances. Thinking back to what might be the same video about splitters, I think his view on the shape of a proper splitter is a little simplistic. Most of the time on a race car you're rule limited, or you have practical constraints that limit the shape, but in the more unlimited classes you see the upturned nose of a splitter or a raised tunnel entrance in the front. There are also interesting front wings on open wheel cars that we can learn a little bit from where they have unusual profiles: relatively high in front, flat and close to the ground for a bit, then sloping up at the back. Not unlike McBeath's drawings of what an undertray should look like, but with a more wing-y looking top side. Most low level race cars use flat splitters, but diffuser on the splitter kind of aim for the same sort of shape in the back as the wing. If you're going to design a splitter I'd suggest a close look at what AJ Hartman is doing. He's working with high level aerodynamicists, does lots of CFD and wind tunnel testing, and makes good stuff. Then he makes youtube videos telling you how to DIY it. Pretty amazing, really. Note the front lip shape. Sharp on top, rounded on bottom.
-
I've watched a bunch of his videos on youtube and ended up buying a bunch of pressure pucks and five 1" manometers to do some track testing. Of course I bought all that shit and then put the car down and spent the next year doing other stuff. Still need to make a temporary dashboard to hold the gauges. The one thing that he really bugged me with was his refrain that "you can't just slap a splitter, diffuser, and a wing on and make downforce" which he said quite a bit IIRC. I ended up linking in the youtube comments to AJ Hartmann's company, because that's exactly what he sells, and it obviously works. I haven't watched anything in a few months, but I did finally find one where he added I think it was a splitter and wing and was like: "HEY! That really worked!" As you mentioned though, he has a ton of good info and practical techniques in his videos, I can imagine the book will be better. Did a lot of coast downs for drag measurement too as I recall. Anyway, thanks for the heads up. Will purchase.
-
240z SCCA vintage race car, restoration
JMortensen replied to AydinZ71's topic in S30 Series - 240z, 260z, 280z
Read your previous post, if it's plugged at the wheel cyl probably just need to rebuild/replace. -
240z SCCA vintage race car, restoration
JMortensen replied to AydinZ71's topic in S30 Series - 240z, 260z, 280z
What worked for me with an entirely new brake system was pushing fluid backwards. Open the bleeder, use a tube feeding syringe to force fluid to the master. I tried everything; pump/hold/open bleeder, gravity bleed, repeated pumps with hose submerged, vacuum bleed, couldn't get a pedal until I reverse bled. Good luck. It was frustrating as hell for me. https://www.amazon.com/Syringe-Adapter-Feeding-Refilling-Drawing/dp/B07SQC95DT/ -
This doesn't look like the more aggressive NISMO one, looks like a Z31T LSD. That's probably a good thing. They're plenty aggressive as it is. You might open it up and see if it has the big washers on the sides. If so, that's a pretty big weakness. You can get some clutches from Gary Savage if he's still making them: https://www.facebook.com/garysavage42 or pull the clutches and have 4 more of the ones with the tabs on the inside laser or water cut. Here is a write up on installing it.
-
You can mod the shifter if you get the shorter trans, may require some surgery on the center console if you're running with an interior. Sounds more race car based build though. With regards to weight distribution I can tell you I went from the L6 and 49.5F/50.5R to the LS 52/48 and having changed the spring rates and alignment, etc that the "nose heavy" LS version turns in WAY harder than the L6 version ever did. I moved the engine to the right 1.5" and have the right head about 3/4" from the firewall, had to cut part of the trans tunnel to fit the bell housing. Spring rates are 600/700, no rear bar anymore. The point is you can work around the weight distribution issues. In a more extreme example, I used to autocross against the Mustang guys at Maximum Motorsports. Fox body Mustangs have a ridiculously bad distro of something like 60/40, and MM made those pigs fast. EDIT--will be harder to avoid understeer with staggered tire setup.
-
Pull it off, check the end of the crank and the slot for the woodruff key. Pretty common for the slot to break. Happened to me.
-
Datsun R30 240z Chassis Dimensions w/ Imperial conversions
JMortensen commented on santanawhite's gallery image in Members Albums
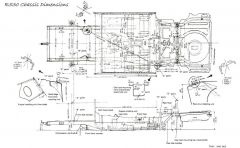 This is pulled the FSM, just in case he doesn't respond.
 -
IMSA GTU vintage racer build
JMortensen replied to clarkspeed's topic in S30 Series - 240z, 260z, 280z
All that electrical makes me feel functionally retarded. Nice job. -
Chassis mounting wing
JMortensen replied to JMortensen's topic in Windtunnel Test Results and Analysis
I think the reason the whale tail works is that it lengthens the car and the flow tries to stay attached longer, and this reduces some of the ill effects of air from underneath losing contact and becoming turbulent, and also redirects the air coming off of the top, which would otherwise be traveling down and creating lift. I think this is why the drag racing spoilers work too. I've wanted to see wind tunnel/CFD data on this forever. The one think that I think might be an issue is that if the tail is TOO long it might insulate the wing's upwash from the bottom of the car. I think you want the wing to pull air out from underneath, especially if you have undercar aero, but since we both have (or will have) wings hanging off the back a ways, makes sense that the spoiler can be a little longer. Spoiler angle and length with wing is definitely something worth testing. -
240z SCCA vintage race car, restoration
JMortensen replied to AydinZ71's topic in S30 Series - 240z, 260z, 280z
It's not multiple disk. Looks like your typical CF pressure plate with a standard disk rather than their dual friction disk which has pucks on one side. I remember you talking about double or triple disk button clutches, but FWIW, I've seen quite a few Center Force pressure plate failures online where the weights fail, and had a friend with the dual friction that chewed into the flywheel and tore up the thrust bearings in his CA18DET engine. Avoid. -
240z SCCA vintage race car, restoration
JMortensen replied to AydinZ71's topic in S30 Series - 240z, 260z, 280z
We've all felt that feeling. -
Chassis mounting wing
JMortensen replied to JMortensen's topic in Windtunnel Test Results and Analysis
Very interesting Ben. Would have been nice to see before I bought the aluminum for the uprights. Oh well. Mine won't be SCCA legal either. Figure if that becomes an issue I can make another set of uprights. Just finished my tube frames to transfer load to the floor. Yours is no doubt stronger. The advantage to mine is that I'll be able to drill several sets of holes in the uprights and raise and lower the wing. Been doing a little research and the trend seems to be to want to get the elements down to roof level to reduce drag even in time attack cars that generally don't care about drag. I'll experiment a bit I guess. The other thing I'm curious about is the spoiler. Leave it 10" and lay it way down, or make one that is closer to 4" and keep it relatively upright? Thinking I might get more diffuser action if I lay it flat. Of course, would help to have a diffuser. Haven't made any progress on that one... typical.
-
Chassis mounting wing
JMortensen replied to JMortensen's topic in Windtunnel Test Results and Analysis
Wow, that would have been a good option. -
Chassis mounting wing
JMortensen replied to JMortensen's topic in Windtunnel Test Results and Analysis
Just FYI it was about $90 to ship, so factor that in when you're looking at the price online. I ship doggy doors for sliding glass doors that are long like this, they're not gouging. UPS and FedEx just bend you over when you ship such a long box. Plus there is a second package with the end plates. -
Chassis mounting wing
JMortensen replied to JMortensen's topic in Windtunnel Test Results and Analysis
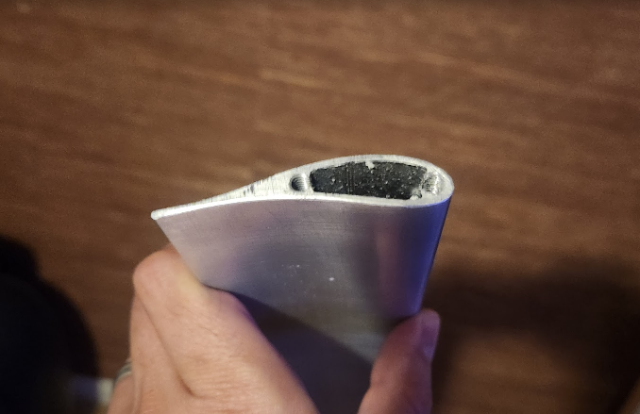
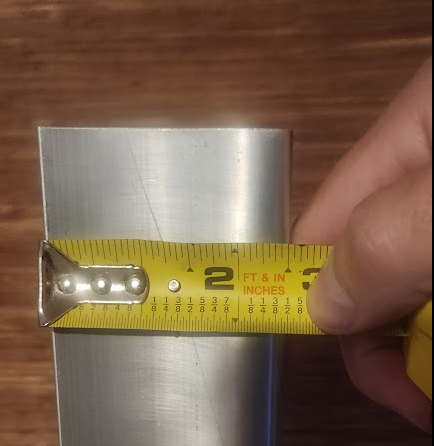
2.5" and got one of the profile too:
-
Chassis mounting wing
JMortensen replied to JMortensen's topic in Windtunnel Test Results and Analysis
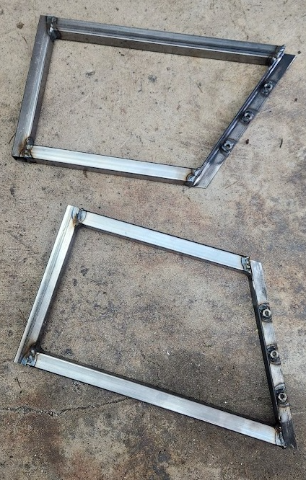
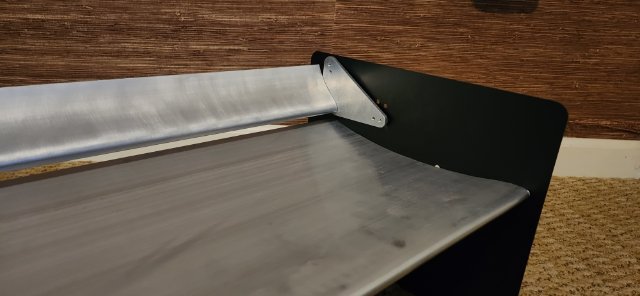
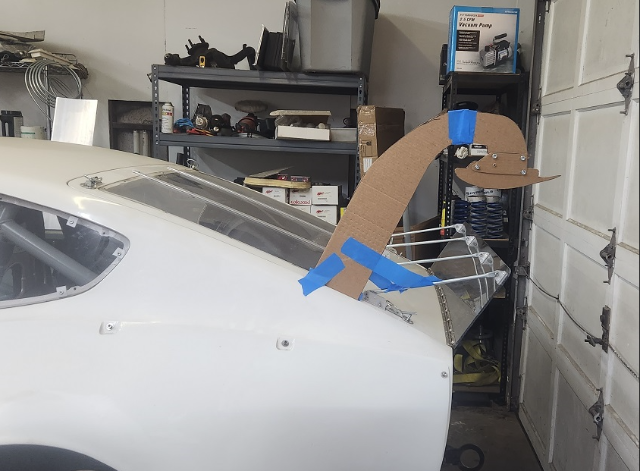
I was sick, then out of town, then sick again, then out of town again, then sick again, but I'm finally back on the wing. Decided to save myself some pain and bought the 9 lives second element rather than making one. Was hoping that the end plates would have holes that lined up in the right spot. It did. One hole was correct. Verified the overlap and gap per guidelines in Competition Car Aerodynamics, and drilled the rest of the holes. Here's what it looks like on the floor. I need to get the holes cut in the body and the mounting brackets built. I think I'm going to make the uprights from wood before I cut the aluminum. I have it all traced out, but it's expensive, so want to be sure before I do the final version. This is the flap in its steepest AoA. It's pretty steep. Thinking separation might be an issue. I do have some angle to make a gurney if I need it, and there are 3 other (slightly) less aggressive settings. Thinking for autox just go for broke.
-
Chassis mounting wing
JMortensen replied to JMortensen's topic in Windtunnel Test Results and Analysis
I mocked it up, and it raised the wing element about 1" was really surprised that it was only worth 1". Going to try again with the slot in the back instead of the front, see if it changes things. -
That is interesting info. And you're V8 swapped too, which is one of the reasons I really felt I needed it. Might be a bunch of wasted effort here. Wouldn't be the first time. LOL.
-
Chassis mounting wing
JMortensen replied to JMortensen's topic in Windtunnel Test Results and Analysis
Yep. That must be it. Thanks. -
Chassis mounting wing
JMortensen replied to JMortensen's topic in Windtunnel Test Results and Analysis
I figured I wanted to straighten the airflow under the wing, but the higher it is the more pressure there will be closer to the bottom of the wing. I think there is a happy spot in there for spoiler height, but I'm doubting that it's 10". Maybe if it were laid out almost flat. Would be interesting to see what effect that would have on a diffuser, but I think to start I'll make a shorter one. This one won't lay all the way down, since the hatch has a little convex curve. Would have to slot the outer holes in the lexan. Looked for a front mounted swan and can't find it. the F1 cars look like they're mounted to the top front part of the wing. -
Chassis mounting wing
JMortensen replied to JMortensen's topic in Windtunnel Test Results and Analysis
Here's the de-gurney'd wing:
-
Chassis mounting wing
JMortensen replied to JMortensen's topic in Windtunnel Test Results and Analysis
2 options, swan and under mount. They're both less than 6" above the roofline. Swan is a lot more complicated, obviously. I think I can get the second element under 6" above roofline with the swan, would have to lower it with the standard pedestal. Will remove the 10" autox spoiler and probably install a similar spoiler that is 3 or 4" tall. The wing element is behind the roof in the swan, so less frontal area, although I think a second element would be almost entirely above the roof as viewed from front.